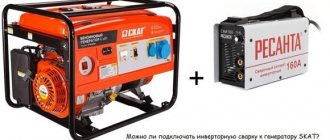
To make a cheap welding generator with your own hands, you can use a small gasoline engine. A motor from a lawn mower or moped is suitable here.
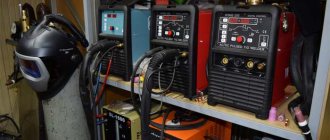
The welding generator has impressive dimensions and is quite expensive.
It is best to use a generator from a tractor as a source of electricity. It produces 24 V (volts) and 150 A (amps), just what you need for high-quality and reliable welding.
How to make a welding generator from a car generator
A welding generator is a useful unit in everyday life, since you can connect not only welding equipment to it, but also other tools that run on electricity.
In the absence of a power grid, it will be a reliable power point solution for any electrical equipment. For example, in a summer cottage or outside the city, where there are interruptions in the power supply or there is no power at all.
However, what to do if there is neither an electrical network nor a welded generator?
Then a generator built into a car can be useful in welding. All modern and some older models are equipped with this part. And a self-generator can really be used instead of a welding one.
This article will tell you how to carry out the welding process when powered by a generator, and whether it is possible to reassemble the car version of the machine into a welding one.
- general information
- Is it possible to reassemble a self-generator into a welding unit?
- Steps to connect to the inverter
- Conclusion
How to choose a welding generator
When choosing between a diesel welding electric generator and a gasoline one, you should take into account the main characteristics of the equipment.
It is impossible to use a diesel electric welding generator for operation without additional equipment that converts the generated voltage. Diesel generators can be used for welding under certain conditions.
- If it is necessary to simultaneously connect several automatic welding machines to one point.
- If you need to save fuel: important if welding makes up a large part of the total work.
- To ensure long-term and continuous operation of the welding machine.
It should be borne in mind that prices for gasoline welding generators are lower, and during operation such equipment makes less noise. In addition, gas generators are easier to transport due to their lighter weight.
Before considering options for homemade welders, let’s look at the principle of their operation.
The operation of any unit is based on Ohm's law. At constant power, there is an inverse relationship between current and voltage. For normal operation, a current of 60–150 A is required. Only in this case will the metal in the welding zone melt. Let's imagine a welding machine that operates directly with a voltage of 220 volts. To achieve the required current, a power of 15–30 kW will be required. Firstly, for this it will be necessary to lay a separate power supply line: most inputs into residential premises are limited by technical conditions at the level of 5–10 kW. In addition, such a current will require wiring with a cross-section of at least 30 mm². You will have to cook in compliance with protective measures when working in electrical installations up to 1000 volts: rubber boots, gloves, work area fencing, etc.
Of course, it is impossible to ensure such conditions in reality.
Therefore, any welding machine converts the voltage (downward): at the output we obtain the desired current while maintaining reasonable power.
The optimal voltage value is 60 volts. With a welding current of 100 A, this is a completely acceptable 6 kW of power. How to convert voltage?
Steps to connect to the inverter
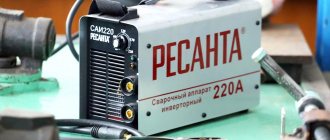
Since converting a car model into a welded equipment is not the best idea, it is worth figuring out how, if necessary, to connect a real welding unit to it.
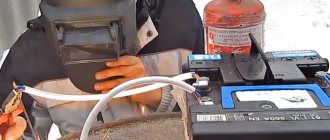
To begin with, the relay-regulator is removed from the autogenerator. The circuit between the relay regulator and the brushes is broken. After this, power must be supplied to the brushes.
For this, a voltage of 12V is used, which is supplied from the battery. Now the device is in working condition, which means you can disconnect the wire connecting it to the battery.
After this, the engine starts. It should run at 3000 rpm. In a self-generator, this number will increase to nine thousand, and it will be able to generate voltage power up to 80V.
This occurs due to the removal of the relay regulator, which in the mechanism is responsible for limiting the current strength.
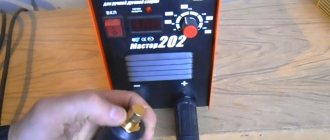
Eighty volts is enough to power a low-power inverter up to a power of 100 A. This will allow welding work. However, the duration of the work process with such power supply must be limited.
This mode of operation greatly wears out both the inverter and the apparatus powering it.
DIY welding equipment. Devices for welding profile pipes
Experienced craftsmen and ordinary people who perform welding work know that the preparatory stage does not take more time than the welding process itself.
A significant part of the time is wasted on assembling the welding structure and installing all the elements in the desired location.
Knowing how important tools are for welding profile pipes and knowing how to use them correctly, the welder can complete the tasks assigned to him quickly and efficiently.
In everyday life, a large number of mechanisms and structures are used for welding pipes. These auxiliary devices are most often manual and universal.
They help to quickly assemble a structure with securely fastened parts, and also allow you to do the work with virtually no deformation.
Prefabricated welding devices for profile pipes and their types
They are divided into the following types:
- Fasteners.
- Installation.
Installation mechanisms
These devices allow you to install profile pipes in the required position.
Exactly how they will be located in the end. According to their functional and design solutions they are divided into:
- Stops.
- Squares.
- Templates.
- Prisms.
Persistent. They fix the workpieces on the main surface, and can be used constantly, removed, and there are also folding ones (used for retraction and rotation).
Permanent fixtures are plates that are welded to the base.
And removable devices are used in situations where a permanently installed device cannot be used.
Angular. With their help, profile pipes are installed at a given angle.
Prisms. They fix cylindrical profile blanks in the required position. This device uses very simple designs that are made from corners.
This mechanism helps to install profile pipes in the required position in relation to existing parts of the future structure.
Fastening accessories
Such devices for installing profile pipes for welding allow you to firmly fix the part and protect it from accidental displacement after cooling. These include:
- Clamps.
- Clamps.
- Clamping.
- Ties.
- Spacers.
Clamp. It is a universal device that can be used for all types of work with metal products.
Masters call them the most important in importance, and say that it is almost impossible to do without them.
The clamp can be of different shapes and sizes. The mouth of the device can be of a stable volume, and can be adjusted.
Particularly convenient are quick-clamping devices in which the clamping function is performed by a cam mechanism.
ADVICE! Professional craftsmen recommend purchasing a set of various clamps. For welding activities, you may need several options of different sizes.
Clamps. If we compare these mechanisms with clamps, they are more convenient and more suitable for this type of work. The required size of the pharynx is set by using a screw in the clamping handle and moving the pin.
Clamps. Is the most common. They are: wedge, screw, spring, lever.
The simplest type of such a device is a very ordinary bolt and nut that fastens two plates that clamp the workpiece.
Ties. They are used to bring together elements that have overall dimensions. The length and method of such a structure depends on the tasks that it must perform.
Spacer This mechanism makes it possible to align the edges of assembled workpieces, give them the desired shape and correct minor defects.
Installation and fastening accessories
The most convenient to use designs that perform several functions. When working, you only need to insert the parts and tighten the eccentrics and screws. All parts fall into place without additional effort.
Most of us have to do work such as welding profile pipes very often. Therefore, a large number of different devices have been developed for this process.
Centralizers. Thanks to them, the alignment of the welded parts is maintained, and the edges at the ends are also aligned. They are divided into internal and external.
There are four main types of welding machines
- Transformer. The device operates on alternating current. The main unit is no different from a conventional power supply: the input is 220 volts, the output is the required 60 volts. Due to the possibility of mechanical movement of the secondary winding along the core, the value of the operating current changes.
Advantages: simplicity and low cost of design, maintainability. Disadvantages: large size and weight, alternating current leads to unstable formation of the weld, highly qualified specialist is required for work.
Rectifier. Essentially, this is the same transformer, only with a diode (thyristor) rectifier in the secondary winding circuit.
After converting the voltage through a transformer (with a traditional mechanical current regulator), the secondary AC voltage is rectified in one of the following ways. In primitive (inexpensive) designs, a diode bridge is used. More advanced circuits operate on a thyristor circuit, with the ability to adjust parameters. Advantages: stable welding parameters, the ability to work with various metals, no highly qualified craftsman required. Disadvantages: higher cost, difficulty in repair and maintenance. Some craftsmen convert a simple transformer welder into DC apparatus. To do this, you just need to assemble a powerful rectifier and connect it to the output of the secondary winding. This will require powerful diodes (assembling a bridge) and radiators to dissipate heat.
Welding generator: device diagram
Welding generator circuits differ in their external characteristics. According to this principle, devices are divided into:
- universal generators;
- with a falling external characteristic.
The latter are the most popular and come in two types.
- With independent excitation. The winding is powered by an external DC source. The demagnetizing winding is connected in series, and the current is regulated by a rheostat. As the welding current increases during operation, it increases proportionally. The falling external characteristic is created by a decreasing voltage at the terminals of the device.
- Self-excited generator: direct current to the magnetizable winding comes from the generator armature. Such devices are most often used to work with piece electrodes. A stable current value is maintained by voltage fluctuations.
You can learn more about the self-excited generator circuit by watching the video:
Is it possible to reassemble a self-generator into a welding unit?
Homemade welding machine from a car generator
It is possible to reassemble a car generator into a welding unit. However, it's not worth it. A more reasonable use would be to power the inverter in case of unavailability of a stable electrical network or absence of a welding generator.
This method of powering welding equipment, of course, is also not the best solution. However, in the case when welding work needs to be carried out, but there are no alternative power points, the autogenerator becomes a lifesaver.
In new car models they are capable of powering the inverter to output up to 100A. The indicator is quite low, but welding metals with such power is quite possible.
This is especially suitable for those types of devices that are low-power in themselves. Inverters with high power are, of course, better powered from machines designed for welding. Such units run on gasoline or diesel.
Is it possible to make a welding machine from a generator?
Let’s answer right away: it’s possible, but it’s not worth it. It is better to use a car generator as a power source in the field, and in places where you simply do not have a stable voltage in the network. Of course, this is a radical and controversial method of powering the device, but sometimes welding needs to be done right here and now. In this case, the use of a self-generator is very helpful.
But keep in mind that generators in modern cars can power the device so that it produces no more than 100 Amperes. However, even such welding from a generator is possible. And if you have a weak inverter, then it will definitely work from an autogenerator. With more powerful devices, it is better not to take risks and power them from a special welding generator running on gasoline or diesel fuel.
Transformers (with or without rectifier)
The heart of a transformer is the core. It is assembled from transformer steel plates, which are quite problematic to make by hand. By hook or by crook, the source material is extracted at factories, construction teams, and scrap metal collection points. The resulting structure (usually in the form of a rectangle) must have a cross-section of no less than 55 cm². This is a rather heavy structure, especially after laying the windings.
During assembly, it is imperative to provide an adjusting screw, with which you can move the secondary winding relative to the stationary primary.
In order not to go into the complexity of calculating the cross-section of wires, we will take typical parameters:
- secondary current 100–150 A;
- open circuit voltage 60–65 volts;
- operating voltage when welding 18–25 volts;
- current on the primary winding is up to 25 A.
Based on this, the cross-section of the primary wire should be at least 5 mm²; if you do it with a margin, you can take a wire of 6–7 mm². The insulation must be heat-resistant and made from a material that does not support combustion.
The secondary winding is made of wire (or better yet, a copper busbar) with a cross-section of 30 mm². The insulation is rag. Don't let the thickness scare you, the number of turns on the secondary is small.
The number of turns of the primary winding is determined by a coefficient of 0.9–1 turns per volt (for our parameters).
W(number of turns) = U(voltage) / coefficient.
That is, with a network voltage of 200–210 volts, it will be about 230–250 turns.
Accordingly, if the secondary voltage is 60–65 volts, the number of its turns will be 67–70.
From a technical point of view, the transformer is ready. For ease of use, it is recommended to make a small margin on the secondary winding, with several branches (at 65, 70, 80 turns). This will allow you to work confidently in places with low network voltage.
Hiding the unit in the housing or leaving it open is a matter of safety of use. A typical DIY welding transformer looks like this:
The optimal material for the case is 10–15 mm textolite.
Adding a rectifier
A homemade powerful welding transformer from a circuit design point of view is a regular power supply. Accordingly, the rectifier is designed as simply as in a network charger for a mobile phone. Only the element base will look several orders of magnitude more massive.
As a rule, a pair of capacitors are added to a simple diode bridge circuit to dampen rectified current pulses.
You can assemble a rectifier without them, but the smoother the current, the better the quality of the weld. To assemble the bridge itself, powerful diodes of the D161–250(320) type are used. Since a lot of heat is generated on the elements when loaded, it must be dissipated using radiators. The diodes are attached to them using a bolt connection and thermal paste.
Of course, the radiator fins must either be blown by a fan or protrude above the case. Otherwise, instead of cooling, they will heat the transformer.
Mini welding transformer
If you do not need to weld rails or channels from 4–5 mm steel, you can assemble a compact welder for soldering steel wire (making frames for homemade products) or welding thin sheet metal. To do this, you can take a ready-made transformer from a powerful household appliance (the ideal option is a microwave) and rewind the secondary winding. Wire cross-section 15–20 mm², power consumption no more than 2–3 kW.
DIY pulse welding. How to assemble pulse welding yourself - diagram and instructions
First, let's figure out what it is. If, when using electric arc welding, we also turn on short electric pulse signals, then we will get pulsed welding.
In this case, the main thing is not to draw a parallel of this type with spot welding.
Pulse spot welding and pulsed arc welding are completely different methods of welding metal parts.
Let's analyze the pulse welding collection algorithm
Converter
To begin with, it is necessary to consider the process of assembling a pulse converter. It is accordingly designated as the power element of the welding unit.
The diagram shows the transducer assembly model.
In technical literature and reference books you can find information on the components that are included with the converter.
Control mechanism
In this figure you can see a clear and understandable control diagram, as well as elements of the diagram, which shows the process of starting the electric unit.
Adapter
A descriptive representation of the pulse adapter is shown in the accompanying diagram.
“Soft Launch” is located here.
Assembled device
Just look at the figure below to have a simple idea of the appearance of this type of welding.
The body is also attached to a frame with airflow, a control adapter (it is an integral part of the body), and a plug for welding current.
The electrical fuse and power adapter must also be located on the housing.
Practice of use
Devices assembled as stated in the instructions work for a long time. Welding joints are quite strong.
A homemade pulse welder is only suitable for household use, but it is not suitable for professional work. The costly part of assembling such a welder will not leave any owner indifferent.
The voltage required for the operation of such a device should be within 220 V. But sometimes there may be voltage failures, especially if the work is carried out in a country house.
Despite this, the arc has stable and easy ignition. The most suitable type of electrodes for a homemade welding device are electrodes that melt.
This type of welding is quite strong and has a completely stable arc ignition.
In order to assemble a homemade pulse welding machine, you only need to allocate a little free time. And the result will not remain unjustified.
This will be the most economical option, based on the need to perform welding work. And this does not in any way affect the quality of the work performed.
Priorities of a welding machine manufactured in-house
The pulse welder differs from factory models in many characteristics. A serious advantage is low energy consumption.
The energy costs for performing a minor weld using a factory machine will be high. And of course, not all electrical wiring can withstand such power.
Regarding the weight of the homemade device, we can say that it is small. And its dimensions can be several times smaller than the factory ones. It is very difficult to move a factory apparatus without much effort.
To avoid moving it from place to place, you can use special electrical extension cords. But their cost is very high.
Therefore, a homemade welding machine would be a suitable option for use at home. And its weight will not exceed 10 kg.
The production resource of production welding devices has a limitation. And often it may not exceed 50-80%.
Therefore, the totality of all available technical capabilities cannot always be revealed. Based on this, the duration of welding work will be insignificant, within 3 minutes without a break.
A homemade welding machine does not lead to loss of electrical energy because there are no reactive currents. Non-critical power allows you to use the outlet even in the house, without worrying that the network may not be able to withstand it.
The power of such a pulse welder is exactly the same as in household appliances.
The duration of operation of a homemade pulse apparatus can be more than 15-20 minutes. Which exceeds the operating time of the mechanism that was bought in the store. And of course, the light weight (8-10 kilograms) will not cause difficulties in home use.
How to make a welding generator with your own hands?
To make a cheap welding generator with your own hands, you can use a small gasoline engine. A motor from a lawn mower or moped is suitable here.
The welding generator has impressive dimensions and is quite expensive.
It is best to use a generator from a tractor as a source of electricity. It produces 24 V (volts) and 150 A (amps), just what you need for high-quality and reliable welding.
Operating principle of the welding machine
Iron welding occurs due to the high temperature of the electric arc, which melts the electrode and the edges of the metal being joined.
Figure 1. Operating principle of the welding machine.
Then the molten mass is mixed, and as it cools, the parts are joined. The schematic diagram of a welding generator is as follows: Figure 1, where: I is the generator armature; OYA - armature winding; OVN - magnetization excitation winding; R—rheostat; ORP - series excitation winding; D - electric arc.
After the arc ignites, welding current begins to flow in the armature circuit of the working circuit. It passes through the series field winding, thereby creating a magnetic flux. At this time, an electromagnetic force is created in the magnetizing excitation winding, which is directed in the opposite direction. The energy release that occurs when two EMFs collide is the source of the electric welding arc.
A welding generator can be used not only as a welding machine, but also as a source of backup lighting. To do this, you need to make an additional output and install a socket. The basic connection diagram does not change. The socket is mounted on the body of the device. This use of a welding generator is justified in those farms where disconnecting the main power grid can cause losses. For example, in incubators where chickens are raised.
Homemade welding converter
Figure 4. Diagram of the welding converter.
Such a generator operates without the participation of a gasoline engine. It is supplied with mains voltage, which is converted into welding current. Its power is usually 4 kW, which makes it possible to cook with a “four” electrode. The main element of the working circuit of the device is the stator winding.
The drawings are made in two versions: on a rod and armored magnetic circuit. Visually, this generator looks like this: Figure 4, where:
a - core magnetic circuit; Figure b - version of the armored magnetic circuit.
1 - magnetic core (made up of transformer plates), 2 - insulation gasket (glass insulating tape), 3 - winding (varnished copper wire), 4 - tightening bracket (metal angle), 5 - tie (metal pin with nut and washer ).
It is not difficult to integrate any such generator into a rectifier or design it as a separate unit. If too much work is required, it is advisable to add forced air cooling.
general information
A generator, as a part built into any car model, is a fairly simple mechanism that converts energy into electricity. In cars, this element performs the function of powering electrical equipment during operation.
Welding generator device
The welding generator consists of the following main parts:
- diesel or gasoline engine (ICE);
- an electric generator whose shaft is driven by the internal combustion engine;
- rectifiers (for alternating current generators): necessary to convert alternating current into direct current, which makes it possible to connect a welding machine with both alternating and direct current;
- electrical protection and control unit.
Important: the welding generator (the instructions for use are required) can be operated near a fire shield equipped with fire fighting equipment.
The operating principle of the welding generator is as follows.
- The gases produced as a result of fuel combustion expand and drive the engine pistons. As a result of the movement of the pistons, the crankshaft rotates.
- The rotating moment from the crankshaft is transmitted to the generator rotor shaft.
- The resulting magnetic field generates (via an inductor) an electric current.
- Converting devices bring the current characteristics to the level required for welding.
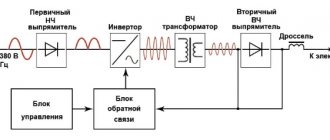
Inverter (pulse power supply for welding)
A homemade inverter welding machine cannot be made simply “on the knee”. This will require a modern element base and experience in repairing and creating electronic devices. However, the scheme is not as scary as it is made out to be. There are a great many similar devices made, and they all work no worse than their factory counterparts. In addition, to create a pulse welding machine with your own hands, it is not necessary to purchase dozens of expensive radio components and ready-made components. Most of them, especially high-frequency elements for the power supply, can be borrowed from old TVs or power supplies from a computer. The cost is close to zero.
The inverter in question has the following characteristics:
- Load current on the electrodes: up to 100 A.
- Power consumption from a 220 volt network is no more than 3.5 kW (current about 15 A).
- Used electrodes up to 2.5 mm.
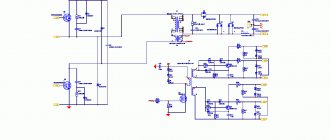
The illustration shows a finished circuit, which has been repeatedly tested by many home craftsmen.
Structurally, the inverter consists of three elements:
- Power supply for the converter and control circuit. Made on an accessible element base, using an optocoupler from an old computer power supply. When making a transformer yourself, the cost is almost zero: the parts are cheap. The values and names of radioelements are shown in the illustration.
- Capacitor charge delay unit (for starting arc). Made on the basis of KT972 transistors (absolutely not a shortage). Of course, transistors are installed on radiators. For switching, an ordinary automotive relay with a current load on the contacts of up to 40 A is sufficient. For manual control, ordinary circuit breakers (packets) of 25 A are installed. Output 300 volts - idle. At load the voltage is 50 volts.
- The current transformer is the most critical component. During assembly, special attention should be paid to the accuracy of the inductors. Some adjustment can be made using a variable resistor (highlighted in red in the diagram). However, if the parameters are not consistent, the required arc power will not be achieved. PWM is implemented on the US3845 chip (one of the few parts that will have to be purchased). Power transistors are the same KT972 (973). Some elements in the diagram are imported, but they can easily be replaced with available domestic ones by searching for analogues on the datasheet website. The high-frequency unit is made from parts of a line transformer from a TV.
Working wires no longer than 2 meters are connected to the output of the welding inverter. The cross-section is at least 10 squares. When working with electrodes up to 2.5 mm, the current drop is minimal, the seam is smooth and even. The arc is continuous, no worse than the factory equivalent.
If there is active cooling (fans from the same computer power supply), the design can be compactly packed into a small case. Considering high-frequency converters, it is better to use metal.
Making homemade welding
It is not difficult to make a welding generator at home. The garage can be used as a workshop. By making a generator in it with your own hands, you will not disturb other family members . To work you need the following tool:
- hammer;
- Bulgarian;
- pliers;
- electric drill;
- welding.
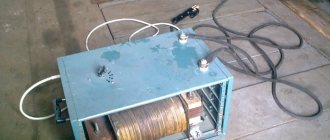
Figure 2. Ready-made welding generator, assembled with your own hands.
Work should begin with the manufacture of a frame for a gasoline engine and generator. For this, a metal corner 40 X 40 mm is used. The corners of the required length are cut with a grinder. Then, using an electric drill, holes are drilled into them for the motor and generator, which are secured using bolted connections.
To prevent the nuts from loosening, washers should be placed under them. The working circuit of the device is very simple. After the homemade welding is completely assembled, it looks like this: Figure 2.
Figure 3. Schematic diagram of the converter operation.
To make it easier to move the welding generator, wheels can be installed on the frame. They are attached either by welding or, after drilling holes in the frame, with mounting bolts. Torque is transmitted from the motor to the generator through a gearbox. Due to the rotation of the armature, an electric current arises in the stator winding. This electric welding scheme is inherent in the operation of all welding machines. Welding converters work on the same principle. The schematic diagram of the converter operation is as follows: Figure 3.
With the help of a network rectifier, alternating current is converted into direct current. After the line filter, the frequency is converted. Then, unlike a welding generator, in a converter the current passes through a transformer. Then it goes to the power rectifier.
Steps to connect to the inverter
Since converting a car model into a welded equipment is not the best idea, it is worth figuring out how, if necessary, to connect a real welding unit to it.
To begin with, the relay-regulator is removed from the autogenerator. The circuit between the relay regulator and the brushes is broken. After this, power must be supplied to the brushes.
For this, a voltage of 12V is used, which is supplied from the battery. Now the device is in working condition, which means you can disconnect the wire connecting it to the battery.
After this, the engine starts. It should run at 3000 rpm. In a self-generator, this number will increase to nine thousand, and it will be able to generate voltage power up to 80V.
This occurs due to the removal of the relay regulator, which in the mechanism is responsible for limiting the current strength.
Eighty volts is enough to power a low-power inverter up to a power of 100 A. This will allow welding work. However, the duration of the work process with such power supply must be limited.
This mode of operation greatly wears out both the inverter and the apparatus powering it.