OST 1 03824-75 op. V
| Continuation of the table. 3 |
| 3.12. 5% of rope seals from a batch are tested for tensile strength until failure, but not less than 2 pieces* The distance between the places where the rope is secured must be at least 300 mm. It is allowed to carry out tests on samples with a length of at least 400 mm, prepared in one batch with ropes of any length. The conditions for the strength of the seal during the tensile test before failure must be satisfied by 100% of the tested cable seals. 2.13. In the event of destruction of at least one of the tested ropes or the rope being pulled out of the seal under a load less than the breaking force indicated in Table. 3 of this standard., the doubled cat-patio of OshchiNmlS is subjected to crushing, Irp mpmi/moiJdii.tH. r^utlgptik rtontapm.l* F?NYT «SHY the entire batch of oadeyaashgmkh ropes is rejected. 2.14. Rope seals must be soaked for 3-5 minutes in gun lubricant according to GOST 19537-83, heated to a temperature of 110-120 °C. Note. Drip!, treated before sealing with a mixture consisting of 50% linseed oil according to GOST 5791-81 and 50% varnish PF-170 or PF-171 according to GOST 15907-70 with hot drying, do not impregnate with grease after sealing. During long-term storage and delivery of ropes in bulk, the seals must be soaked in lubricant. 2D5. Protection against corrosion during storage or storage is carried out with SHA1IM-201 lubricant in accordance with GOST 6267-74 within the time limits specified in the technical documentation approved in the prescribed manner. An example of an entry in the technical documentation for embedding steel ropes tala Sealing 1-OST 1 03824-75 |
Features of embedding steel cables
To ensure that the cables on your boat are always ready for use, their ends must be sealed.
Developed, frayed cables, as well as incorrectly tied knots, are the first sign of a lack of maritime culture among the crew. We advise you to take the end of a three-strand plant cable and during the winter, in your free time, learn how to perform at least the most necessary work with cables - mark, fire, benzel, button, turnip, splash. Having learned these basics of maritime craft, you will already be able to maintain any of your cables in exemplary order.
Brand
Rice. 1. Applying a mark A mark that protects the end of the cable from the development of strands is usually applied to both ends of any cable, regardless of its purpose. Place a strong thread (kabolka, shimushgar) along the cable (Fig. 1), twist one end into a loop, and wrap the other (running) end tightly turn to turn (with hoses) in one row of the cable towards the loop. Then thread the running end into the loop and tighten it under the hoses. The mark must be applied on a dry cable, otherwise it will slide off after the cable dries.
Sometimes a so-called self-tightening mark is applied. In this case (Fig. 2), the end of the thread is placed along the cable and a mark is placed on top of it, but the last few turns are made with slack and the second (running) end of the thread is passed under them, which is then pulled tight.
Button This is a special knot that not only secures the strands of the plant cable, protecting it from development, but also serves as a stopper, preventing the tackle from whipping out of the block or butt. There are many types of buttons, we will only consider a simple button and a turnip.
To seal a simple button (Fig. 3), you must first place a mark on the cable in the place to which the strands will be unraveled. Then the strands are wrapped one under the other, as shown in the figure (positions 1, 2, 3, 4), and tightened. A button curl is formed, or, in marine terminology, a half wheel. If you now make a punch - using a pile, insert the running strands next to the strands of the half-wheel, a full wheel, or a simple button, is formed.
turnip
Rice. 4. Seal the end of the cable with a turnip This is how the end of the cable is sealed in cases where large thickening is not needed. Having closed the cable as shown in Fig. 4, the running strands are punched three to four times through one strand under two, against the direction of the cable lay. The remaining ends of the strands are cut off.
Seizing
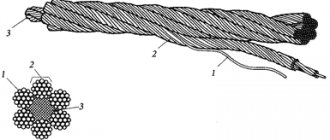
Rice. 5. Applying a bezel If you need to make a permanent loop at the end of a cable, for example, a mooring line, apply a bezel or seal the fire. The bezel (Fig. 5) is applied in the same way as the brand, but immediately on both ends of the cable, pressed one against the other. The adjacent sections of cables laid in parallel are covered with resin and wrapped in strips of thin canvas or insulating tape - cages.
On a thin line, with which the benzel is applied, a loop (point) is made, into which the running end, enclosed around both cables, is threaded. Having tightened the loop, they begin to place benzel hoses one next to the other. When the first row of bezel reaches approximately two cable diameters in length, a thin drag line 1 folded in half with a loop facing the beginning of the bezel is placed on it. A second row of hoses is wound over the dragging. To finish the job, pass the running end of the line with some slack into the pulling loop 2 and pull it under the entire upper row of benzel hoses. Now all that remains is to tie the line across the bezel with a sliding bayonet and grab the end of the line to cable 3.
On a steel cable, the benzel is applied with a thin (3-5 times smaller in diameter) wire rope.
Ogon
Rice. 6. Seal of a simple fire At the end of any working cable that has to be laid - attached to the hull or rigging of the vessel, a fire loop is sealed. As a rule, mooring ropes also end in flames.
A fire on a simple three-strand cable is sealed like this. The cable develops on a strand; in the place where they have finished developing it, and marks are placed on the ends of the running strands. After this, the cable is bent into a loop of the required size and strands are laid on it so that one of them is located on top of the root end, and the other two are on the sides of it (Fig. 6). In this case, the root end 1 should be located on the left, and the running end 2 on the right. Hold the cable with the loop of the wire towards you and the main end away from you.
The weaving of the running end into the main end begins with the middle running strand 3, which, using a pile, is punched under one of the strands of the main end, always against the direction of laying the cable, i.e. from right to left. Having tightened strand 3, they pierce the left running row under the next root row, again against the direction of the cable lay. Then, turning the cable 180°, the remaining running strand is pierced under the corresponding not yet pierced root strand.
Between two adjacent running strands there should always be one root strand. In order for the thickening at the junction to gradually disappear, after two punches, with each subsequent one, you need to cut off part of the thickness of the running strands, reducing their diameter by half. Having finished the work, they cut the mark on the cable, tighten the strands, wrap the connection - the fire splice - with a flywheel, and cut off the excess ends of the strands.
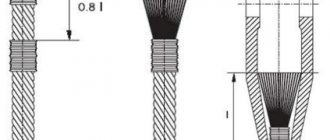
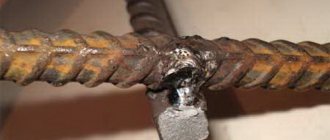
Rice. 7. Seal of a fire on a steel cable When sealing a fire on a four-strand cable, the difference from what is described is only that the first, leftmost running strand breaks through not under one, but under two root strands at once.
To seal a fire on a steel cable, by cutting out the core and applying tight marks, bend the loop (with a machine or in a vice) and, dividing the six running strands into two equal parts - lower and upper, insert the root end of the cable between them (Fig. 7). Then, to prevent the fire from unwinding, the upper left strand is transferred to the right side, and the lower right strand to the left and punching begins.
The first to punch into the root end is the lower left running strand 1, the next is strand 2. In the same way, strands 3 and 4 are punched on the right side. After this, all four punched strands are pulled until the mark comes to the root end, and the remaining strands 5 and 6. Having tightened them, they begin the second punching - through one strand under two against the direction of the cable lay.
Having made four or five punches (also with a decrease in the diameter of the running strands on the last punches), the fire is beaten with light blows of the handbrake and tied with a thin benzene cable.
Sealing the fires when inserting thimbles into them for fastening with a rigging shackle is no different from that described.
Splice If you want to connect the two ends of the cable so that there is no knot, do it using a splice. Splashes are short and long. The short one forms a noticeable thickening on the tackle and is used only when the tackle should not pass through blocks. A long (accelerating) spin, or long-spread, almost does not form a thickening on the tackle, but it is more difficult to make.
Rice. 8. Splicing three-row cables with a short splice You have already practically become familiar with splicing when considering the termination of fires, only now you will need to operate not with one, but with two opposing bundles of running strands. The separated strands of both cables are inserted in a checkerboard pattern, as shown in Fig. 8, bringing the marks as close together as possible, and begin punching the running strands into the root strands pushed apart by the pile, one after another.
Punching begins with running strand 1 of cable A, which covers running strand 6 of cable B and which is then punched (under the main strand 7), tightened and bent so that it does not interfere with work. The same is done with running strands 4 and 5 of cable A: they cover running strands 2 and 7 of cable B, and then pass them under the main strands 2 and 6 of this cable, respectively. Having cut off the mark on cable B, they once again tighten the running strands of cable A punched into it so that they fit more tightly and do not create unnecessary thickening, and then proceed to push the running strands of cable B under the main cables A.
After making sure that the punching is done correctly, i.e. That is, that between each two adjacent root strands there is one running strand, a second punch is made. To do this, each running strand is again covered with the adjacent left molar and pierced under the next one.
With a short splice, two or three punches are made on each cable, with the last one cutting out part of the thickness of the strands.
The steel cable is braided in exactly the same way, but at least three punches are made. Wires of steel cables are always braided or braided. To do this, they wrap the mold, break off all the excess wires, put friction on the entire mold, and then wrap it in castor.
Glossary of terms Heel is a thread twisted from hemp fibers in a clockwise direction.
Catelen is old canvas cut into long, narrow strips.
A cage is a thin line twisted around a cable.
Clanting is the application of castor and cage around the cable opposite its descent.
A thimble is a metal ring with a groove along the edge, embedded inside a loop at the end of the tackle.
Tench is the thinnest hemp rope.
Mushkel is a wooden hammer used for rigging and caulking of wooden ships and decks.
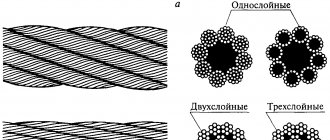
Strand - several heels or wires twisted together; a cable is lowered (twisted) from the strands, called a wire rope or direct descent cable.
Rice. 9. Pile - metal and wood Pile - a metal or wooden wedge-shaped tool (Fig. 9) for punching strands of cable and for other rigging work.
A rigging shackle (lobe) is a horseshoe-shaped steel shackle with eyes at the ends into which a bolt with a head is threaded. A thimble (loop) is inserted inside the bracket to be attached to the save, etc.
Cables are the general name for products twisted from steel wires or twisted from strands of threads made from plant or artificial fibers. Based on the number of yarns, three-strand, four-strand cables, etc. are distinguished.
Trapping is wrapping a thick cable with a shknmushgar, tench or thinner cable (tren) along the strands - in the depressions between the strands - in order to make the surface of the cable more even.
The running end is the free end of the cable (strand) with which the work is performed, in contrast to the fixed (curled into the cable) root end.
Shkimushgar is a line lowered from any number of heels of an old cable.
A hose is a turn, a turn of a cable around a capstan stock, a bollard, or another cable.