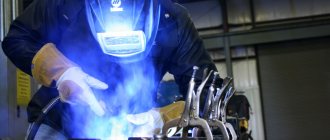
To firmly connect two metal sheets or pipes, a weld must be used. Consider what they are, as well as for what purposes each of them is suitable, the advantages of different types of welding, and how two surfaces are connected using an electric arc in general. Read the article to the end and learn about the stages of creating a welding seam, and what types of descaling exist.
Welding seam Source ad-cd.net
Types of welding, step-by-step instructions and safety instructions
There are different welding methods:
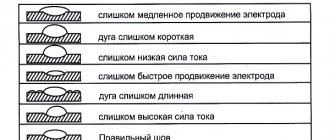
- Crescent. The electrode is positioned at a right or acute angle with respect to the surface and moves in a wave-like manner along the seam level.
- Ladder. The electrode must be positioned in the same way as in the previous version, but when the material is heated, it must be moved away and then brought back.
- Reciprocating. The electrode must be returned to the seam, which hardens.
The Crescent is suitable for beginners and is considered the easiest, but not as reliable as the others. The second and third types will require a little more time, but the result will be better.
Crescent welding method Source i.ytimg.com
There is also a step-by-step instruction for electrode welding:
- The first stage is the processing of areas that will be welded in the future. Cleaning occurs with an angle grinder or a wire brush.
- Next, you need to weld the root of the seam with an electrode to 0.3 cm, making a bead.
- If you need to weld from the outside, then the electrode should be pressed against the material for 1 second or less, then remove it and repeat the procedure again.
- During the process, it is necessary to monitor the uniformity of the arc.
- After this, it is necessary to clean the roller from the slag that formed during the process. If the shape turns out to be convex, then it must be brought to an even state.
- When performing the following steps, you must use a 4 mm electrode.
Cleaning places for welding Source svarkagid.ru
According to these instructions, even an inexperienced user holding a welding machine in his hands for the first time can start welding. Also, when using the system, you must remember several safety rules:
- It is always necessary to cook in a special mask and suit that protects against sparks;
- There should be no flammable objects nearby;
- it is necessary to monitor the serviceability of the machine (or apparatus) in order to avoid dangerous situations.
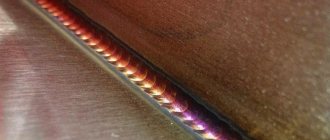
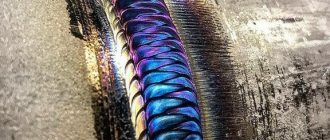
During welding, you also need to make sure that the seams lie neatly, without creating too much of a bulge, otherwise it will be difficult to clean it off later.
Correct seam Source i.ytimg.com
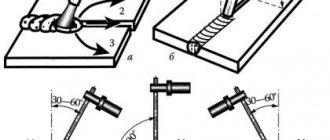
Electrode tilt
Classification of welds is carried out according to several main criteria. Its formation is influenced by the location, speed and trajectory of the electrode. Existing types of welding joints should be considered taking into account all the subtleties of the process.
Work begins after the rod is secured in the holder. Naturally, the required current strength and connection polarity were previously set. Each master has his own “handwriting” for performing welding work, which includes the inclination of the electrode. According to most experts, its location at an angle of 70 degrees relative to the working surface is considered optimal. In this case, an acute angle of approximately 20 degrees is formed relative to the vertical.
In a specific situation, when it is necessary to change the position of the electrode in a limited space, even a strictly perpendicular arrangement of consumables is acceptable. Direction of movement of the electrode: it can be moved towards you or in the opposite direction. This makes a significant difference. In cases where strong heating of the edges is not required, the electrode is moved in the direction “away from you”. But for better heating it is moved in the opposite direction.
Types of seams and joints
All welding joints are interesting and original in their own way. But the main thing is that they are of high quality and durable. There are several types of such seams:
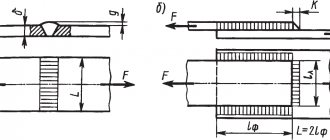
- Butt. The most common connection for different methods. Advantages: high welding productivity, low material consumption, high strength, no structural stresses. But for this seam it is necessary to carefully prepare the edge, and also position the parts so that there are no errors. Used for welding sheets, pipes and rolled metal products.
- Angular. They can be single-sided or double-sided (thus increasing strength). By pre-preparing the edges, you can make any angle of inclination. Used for joining sheet, pipe and shaped blanks.
- Tavrovy. On the element that is welded on top, perpendicular to the bottom, it is necessary to make a trim edge. It is advisable to do this action on both sides so that after welding all parts are held tighter. Used for joining sheet blanks.
T-seam Source mash-xxl.info
- Lapped. For such a seam, you do not need to cut the edges, but it is recommended to use them trimmed. To prevent corrosion between the sheets in the future, it is necessary to weld the connection on both sides. Used for spot and resistance welding.
- Slotted. It comes in closed or open version. Used when it is necessary to strengthen the lap joint.
- With overlays. Also used to reinforce butt or lap joints.
- Tortsovy. The sheets must be placed on top of each other and welded at common ends.
- With electric rivets . The top sheet must be drilled before use, then welded while gripping the bottom part. The connection is considered strong.
Also, the connection can be made in various ways depending on the position of the part:
- horizontal;
- vertical;
- ceiling seam;
- bottom seam (the most convenient, as it is easily controlled, unlike the others).
The first 3 options are complex and require experience in this type of work to complete them.
Bottom connection Source svarkka.ru
Preparation for welding
In order for the seam to be of high quality, proper preparation of the sides for welding is required. If the metal is thicker than 5 mm, one-sided edge cutting is performed with an angle of 45º. With a plate thickness of 10 mm, cutting is required on both sides. Without such preparation, it will not be possible to melt the metal deeply and the connection will be superficial. Based on this, the types of chamfers are:
- V-shaped;
- Y-shaped;
- X-shaped;
- U-shaped.
Rusty metal leads to unstable arc combustion and “spitting” of slag. The sides in the welding zone (at least 20 mm from the connection line) must be cleaned of rust, traces of paint, and oil. If you have to weld thin metal 1-1.5 mm end-to-end, use a copper substrate to prevent burns.
To prevent the workpiece from moving during welding, tacks are first made, and they must be on both sides. This applies to all types of connections.
Horizontal welding
Horizontal welding can be done in any direction as is convenient for the welder. You can make any angle of inclination, the main thing is to ensure that the bathtub does not go to the bottom wall. To prevent this from happening, it is necessary to speed up the movements and heat the metal less.
You can also use another method: tear off the arc so that the metal has time to cool and does not drain. Or reduce the current. But it is important to remember that you should not use all methods at once; you need to alternate them. The horizontal seam can be made in different patterns and patterns, the main thing is that they are durable.
There are also several recommendations for this seam:
- the electrode must be placed slightly back on the seam;
- the movement of the rod should be spiral;
- the arc must be lit at the lower edge and transferred to the upper;
- the welding seam from left to right will be of better quality.
The horizontal connection of the required penetration can be made by moving the end of the electrode transversely between the joining places.
Trajectory of movement
The trajectory of the electrode has a particular influence on the seam. In any case, it has an oscillatory character. Otherwise, it will not be possible to sew the two surfaces together.
Oscillations can be similar to zigzags with different steps between the sharp corners of the trajectory. They can be smooth, resembling movement in an offset figure eight. The path can be similar to a herringbone or a capital letter Z with monograms at the top and bottom.
An ideal seam has a constant height, width, uniform appearance without defects in the form of craters, undercuts, pores, or lack of penetration. The name of the possible flaws speaks for itself. Having mastered your skills well, you can successfully apply any seam and weld a variety of metal parts.
Vertical connection
When making a vertical seam, you need to keep the end of the device at a close distance from the material. This is necessary so that the alloy does not spread under its own weight. If the electrode does not stick, it can be leaned against the surface for convenience. The separation of the edges of the parts depends on the thickness of the material (used from 0.5 cm) and the chosen joining method.
After this, they need to be fixed and connected with transverse seams at a distance of 100-200 mm. Welding of vertical seams is carried out from the top edge of the part to the bottom and back. It is recommended to make a seam from the bottom point and rise to the top, as it will come out stronger, and the liquid part will be pushed higher and leak less. But a vertical seam using electric arc welding is best done by experienced welders who have experience.
The step-by-step instructions are quite simple to use:
- The electrode is placed perpendicular to the part and power is applied to it.
- After melting at the junction, change the angle of the electrode by 15-20 °, while slightly lowering the holder.
Vertical connection Source 3.bp.blogspot.com
See also: Catalog of companies that specialize in the installation of heating and electrical systems.
The electrode must be passed along the connection line in transverse zigzags. Such a seam, according to many welders, is considered durable.
Also, to know how to weld a vertical seam correctly, you need to listen to some tips:
- To avoid spreading of the material, make the roller as thin as possible. But the electrode must be moved without changing the angle of inclination.
- The width of the deposit should differ from the electrode by no more than twice.
- This type of connection should be used at the maximum power of the tool.
Before welding a vertical seam using electric welding, it is necessary to take into account all the nuances of the chosen method so as not to end up with a defective product.
Fixation
Before you begin welding, you need to securely fix the joint being created. This will prevent any shift during the process itself. This is usually implemented using the so-called. potholders. This term refers to small welds that are made where the main seam will lie, but in a transverse direction relative to it and having a cross-section not exceeding half of its width.
Each tack should not be longer than 2.0 cm. Such large elements are allowed only when pipelines are welded. The length of the seam affects the distance of adjacent tacks from one another. The value of this indicator varies within 10.0 cm...80.0 cm. If the seam is short, spot welding can be done along the edges.
Tacks are created in 1 pass. Thanks to their presence, the structure gains additional rigidity. This point is very important for large objects.
Permanent tacks remain after welding is completed, while temporary ones are removed. The place where they are performed is the reverse side of the part. The formation of tacks should be carried out on previously cleaned surfaces.
Vertical welding using an inverter
After analyzing how to properly weld a vertical seam using electric welding, you can learn how to weld a vertical seam using an inverter. The second method is manual, but it works on a slightly different principle, using a welding wire electrode (consumable). With this method of work, you should carefully monitor how the end of the device is guided. If you choose the wrong position of the holders or the angle of inclination, you will end up with a defect.
The parts should be connected in separate sections (points), constantly removing the electrode and putting it back so that the material splashes over the surface. This way the seam comes out better than with a conventional machine, since the arc will be in continuous contact with the surface while the point is being formed.
Inverter Source i1.rozetka.ua
Ceiling seam
Now you can figure out how to weld a ceiling seam using electric welding. It is necessary at a small distance from the surface using a refractory electrode. Because of this, a cap appears at the end that can prevent the material from spreading. As the seam is created, the end of the electrode is evenly removed, and then approaches the arc. As it moves away, it goes out and the metal hardens. To know how to weld a ceiling seam, you should familiarize yourself with the information about what electrodes are used for it. Regardless of the direction of the seam, it should be of small diameter.
When working with ceiling welding, gas bubbles float up at the root of the seam. This could lead to marriage. It is recommended to use it only when it is impossible to complete the bottom seam.
Ceiling connection Source i.ytimg.com
Bottom line
The main types of welded joints are placed within the framework of a precise and clear classification with symbols and a detailed description of technological features and tips. One of the most popular standards is GOST 5264-80, which describes almost all types of welding seams.
You can learn welding on your own according to the principle “from simple to complex.” A “simple” starting point for execution is to take overlapping seams. You can finish with aerobatic work - welding with ceiling-mounted surfaces. We wish you pure metal, good orders and a working mood.
Electric arc
An electric arc is the space that exists between the surface and the electrode at the moment of maximum heating. It should be enough to cause an electrical discharge. The first thing welders learn to do in practice is control it. There are 3 arc gaps during welding:
- Short (0.1-0.15 cm). The main difference between this arc is that the metal does not heat up well across its width. A small depression is formed at the edges of the seam, which indicates poor quality.
- Long (0.35 – 0.6 cm). The arc periodically goes out, which also indicates insufficient heating. The result is also a marriage.
- Normal (0.2-0.3 cm). An option suitable for a welder who is just learning to work with the machine.
It is important to remember that its tension depends on the length of the arc, and also with its help the correct or incorrect structure of the seam is established.
Normal arc Source atl-met.ru
Requirements for welds
The quality of welds is assessed by non-destructive and destructive testing methods. The first includes ultrasound and x-ray scanning of the seams. Such checks are carried out at particularly critical joints subject to high loads.
During destructive testing, seam samples are checked for tension and fracture, based on which the following is assessed:
The required level of each characteristic is specified in the welding drawings.
Cleaning seams
After completing all work, it is necessary to clean the weld from slag, otherwise there is a chance of corrosion. There are 3 main ways:
- Heat treatment . Removes residual stress from the material that forms during welding. There are two types: local (the seam itself is heated or cooled) and general (the entire seam is processed).
- Mechanical restoration. Removes residual slag from the part. The cleaned seam must then be checked for strength by tapping it with a hammer or pliers.
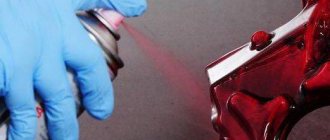
- Chemical processing . A special anti-corrosion material is applied.
Thermal stripping Source gidpokraske.ru
You can use many tools for stripping, the main thing is to choose them correctly. You can use a metal brush, a special grinder or an angle grinder with an abrasive wheel.
For mechanical processing, the easiest method is manual, since its use only requires a metal brush. But the presence of the special machines indicated above will speed up the process. With this cleaning you can remove burrs, oxides, scale and traces of tarnish. It is also important to remember that for high-quality processing it is necessary to choose the right grinding disc.
Chemical cleaning is considered effective if combined with mechanical cleaning. Can be processed by etching or passivation. For the first option, a special composition is used that forms a homogeneous layer, which after a certain time can be removed mechanically. Corrosion does not form on the material after this.
Corrosion on the connection Source otoplenie-gid.ru