A CNC machine with different working fields can be made independently from plywood. This material is inexpensive, easy to work with, moreover, it has high strength and can withstand heavy loads. Products made from plywood are durable and practical. The work on creating a machine is carried out in several stages: first, drawings are made, then materials and tools are prepared, the necessary structural elements are cut out, assembled in the form of construction kits and the machines are set up.
Each stage requires a careful approach. CNC machined plywood will allow you to process wood at home and create furniture from plywood. The finished machine can be seen in the photo. A plywood machine will work no worse than a factory product. The possibilities of such equipment are great.
Operating principle and main components of the drilling machine
A drilling machine is a well-structured product.
Firstly, the bed. As a rule, this is a steel plate (but for small devices it can be made of light alloy) on which the entire product is mounted. A stand is installed vertically on the edge of the bed farthest from the master. The working part, consisting of a motor, a working head with a cartridge and, if there is one, a transmission, moves up and down along it and turns left and right. The head on the stand is fixed in the required position by a locking mechanism.
And precise positioning of the height of the spindle with the chuck and drill is performed with a special handle.
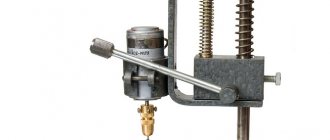
Professional drilling machine
The motor and work spindle can be located on both sides of the stand. In this case, a belt drive is organized on several pairs of pulleys between the motor shaft and the working spindle. By throwing the belt from one pair to another, they set different speeds of rotation of the working body - the drill.
Drilling machine with pulleys and belt drive
Another option is to mount the cartridge on the motor shaft. The design is simpler, but the speed of rotation of the drill must be adjusted by changing the speed of rotation of the motor, and this requires an electrical or electronic circuit.
Drilling machine with chuck on motor shaft
The working tool is a drill. Drills are classified by size and purpose. In the practice of home-made workers, diameters from 0.5 mm to 12 - 18 mm are used. Drills are selected for work on wood, plastic, hard and soft metal, and concrete. They will differ in the sharpening geometry of the working end and the presence or absence of hard surfacing at the end.
Drill
The machine works this way. The motor turns the working spindle, at the lower end of which the chuck sits. There is a drill clamped in it. With rapid rotation and pressure on the surface from top to bottom, the drill cuts into the material with its cutting edges.
Creating a wood lathe for your home workshop
Technical parameters of the corresponding products along with descriptions can be found on the Internet.
The main part is the bed (1). Other parts of the product are attached to it. It ensures not only the integrity of the power frame, but also good stability on the surface. The carpentry machine is designed for processing relatively light workpieces, so this part can be made from hardwood.
In the central part there is a support with a stand for a hand cutter (2). Instead, a holder can be installed to rigidly fix the tool. The workpiece is secured between the front (3) and (4) . It rotates using an electric motor (6). To change the torque on the axis in this design, a belt drive and pulley (5) are used. The support and tailstock move horizontally along a special shaft (7), which is installed inside the frame.
IMPORTANT! THESE DRAWINGS CAN BE USED FOR THE MANUFACTURE OF AN OPERATING MACHINE. PLEASE NOTE THAT ALL DIMENSIONS HERE ARE IN INCHES.
This project can be used to make a wood lathe with your own hands. You just need to supplement it with a special device, which is designed to consistently create identical products.
To secure it in the right place, you need to make a special stand. In this example, 10 mm plywood was used, from which a platform with dimensions of 480×180 mm was cut out. The given dimensions can be changed taking into account the actual parameters of the cutter. Holes in the plywood are cut so that mounting bolts and tools can pass through them. For rigid fixation, wooden blocks are secured along the contour of the platform with screws.
This design attracts with its simplicity, availability of components, and reasonable cost. But some disadvantages should be noted:
- You will have to use two hands to move the cutter. This is necessary to create sufficient force and prevent jamming.
- The minimum radius along which bends of parts will be created is limited by the diameter of the tool (cutter).
- To process workpieces made from different types of wood, precise adjustment of the shaft rotation speed is necessary, but in this example this possibility is not provided.
- This example explains that even a design that has been tested by time and practical experience can be improved upon careful study of the equipment and technological process.
Scope of application of homemade drilling machines
The thought of creating a drilling machine with their own hands arises among people who love to tinker, but at the same time are not involved in the manufacture of any objects on a professional basis, either using metal or other materials (wood, plastic, etc.).
This is due to the fact that home-made equipment will not be able to fully replace industrially produced analogues in full, both in functionality and performance, but will only facilitate the performance of simple repairs and other work.
In addition, radio amateurs and people involved in the independent production of printed circuit boards can also set themselves a similar task, because Having a drilling machine greatly simplifies their work, and purchasing factory-made equipment is unprofitable.
Options and techniques for creating a good drill press
In industrial plants and workshops with large volumes of repetitive procedures associated with the processing of materials, simple designs are not enough.
This is ensured by the fact that during drilling operations, materials with different densities and hardness are machined.
To assemble a high-quality and productive machine for drilling holes, you can choose different options, the most common of which include the following:
- a drilling machine made from a professional drill with a reliable and stable stand;
- equipment with an asynchronous motor and the ability to install drills of different diameters.
Vertical and horizontal drilling machines that differ in design, made by hand, allow you to work with different materials.
These can include plastic, metal and wooden parts, the processing of which requires compliance with the parameters of accuracy and quality of drilling activities.
Using both options, you can significantly save money without spending it on purchasing an expensive factory-made machine that will not be used very often.
Types of do-it-yourself drilling machines
There are different types of drill presses made at home. They differ in: material of manufacture, structure, size.
And home craftsmen never stop coming up with new designs and selecting sizes for drilling machines. After all, not everyone makes machines according to ready-made drawings.
Here are some of the most popular drill press designs:
Wireless machine made of wood. This design is well suited for portable drilling of large items. Since the operation of the drill in such a machine is provided by the battery, it is necessary to make a special wooden box. The machine drawing is adjusted independently to the dimensions of the built-in drill.
Mini drilling machine. Making such a tool will not take much effort and time. This design is considered the most economical and does not require a large amount of materials. The model is designed depending on the size and shape of the drill; the drill itself can be secured with ordinary rubber bands or cable ties.
Machine made of plastic pipes. This option is good for those who have pipe scraps left after plumbing repairs. In another case, this option is very economical, since PVC pipes are cheaper than metal or wood. It’s not that difficult to make, the main thing is to maintain the proportions and dimensions.
These machines are easy to assemble, inexpensive and very convenient. But still, most often craftsmen prefer a more classic version.
Features of do-it-yourself wood jointing machines
A jointing machine for working with wood is used at the final stage of working with elements. It can make the surface perfectly smooth and even. Most purchased models are equipped with a thicknesser, which allows you to make the thickness of the entire workpiece the same along its length.
A wood planing machine for the home, both homemade and purchased, includes several elements in its design:
- bed;
- planing shaft;
- table regulator;
- motor.
To assemble a jointer with your own hands, you first need to decide on the dimensions and prepare a detailed drawing. Here are some examples from “homemade” ones:
To create the simplest jointer, without additional functions, follow the following sequence of actions:
- Prepare all the parts and tools for work, as well as a drawn drawing.
- You make blanks to exact dimensions. Please note that the place for installing the bearings is prepared from several elements.
- Prepare a place for installation for the selected motor. You can attach the unit to a skid.
- Assemble the rotor with bearings and install it in place according to the diagram. In this case, you immediately connect the engine using a belt drive. The rotor should rotate freely.
- Assemble the work surface from two parts: supply and receiving. The second is slightly higher (2-5 mm). For arrangement, you can use multilayer plywood or sheets of metal.
Materials and tools for making the machine
Before starting work, you need to think through the sequence of all technological operations in the manufacture of a homemade machine, plan the manufacturing technology, decide on future materials and tools that will be needed during the work process.
To make a machine with your own hands, you will need the following materials and components:
- Plywood 15 mm.
- Pine board, solid;
- Furniture drawer guides;
- Sleeve;
- Furniture footwear;
- Wing nut;
- Fastening: M6 bolt, self-tapping screws of various lengths.
To make a machine from a drill or screwdriver, you will need the following tool:
- Circular saw or sawing machine.
- Jigsaw.
- Angle grinder (angle grinder or simply “grinder”).
- Drill or screwdriver.
- Grinding machine.
- Various hand tools: hammer, screwdriver, clamps, wood core drill (or simply “crown”), square, marking pencil, etc.
Features of a DIY wood sanding machine
After cutting the wood, it must be sanded and only then proceed to the construction of buildings or the construction of other objects. There are several types of grinding machines:
- Disk. The working surface is made in the form of a circle, onto which sandpaper or another sanding device is fixed on top. You can adjust the processing speed without changing the speed.
- Tape. A continuous strip of sandpaper is stretched between the two shafts. It’s not difficult to make belt sanding machines with your own hands; just prepare a detailed drawing and read the instructions. It is important that the sandpaper in the working surface does not bend under the weight of the workpiece.
- Drum sanders for wood are common among woodworkers. Used for horizontal leveling of planes using the jointer method. The principle of operation is to attach the sandpaper to one or two drums, and under them there is a table with height adjustment. You can set the required calibration and make workpieces of the same thickness.
- Calibrating and grinding machines for wood are universal machines that combine grinding and leveling of workpieces. Two types of equipment are used: disk and tape. You can make such a device yourself, with the right choice of drawings.
To correctly assemble the appropriate version of the machine for grinding and processing wood, select the appropriate drawing and all components. Below are some examples of accessible and convenient equipment schemes:
Drilling machine from a conventional drill
To make a small but functional drilling machine for your home workshop, you do not need to purchase special materials and components. The design of such a convenient and useful desktop device contains the following components:
- The base, which is also called the bed;
- a mechanism that ensures rotation of the working tool (a conventional drill can be used as such a mechanism);
- device for providing supply;
- a vertical stand on which the rotation mechanism is fixed.
Diagram of a homemade machine from a drill
The stand on which the drill will be mounted can be made from a sheet of chipboard. This material is quite capable of supporting the weight of such a device. The bed of such a mini-machine should be more massive, since it protects the entire structure from vibrations, which can negatively affect both the quality and accuracy of the resulting hole, and the comfort of work.
As the material for the frame of such a drilling and adding machine, you can use a regular furniture board, the thickness of which is more than 2 cm. It is most convenient to use the base of an old photographic enlarger for this, slightly modifying its design. Sometimes an old microscope is used, but this is a rather rare option, since such a unit will not be large enough and its use will be limited.
The quality and accuracy that a homemade drilling machine will provide depends primarily on how correctly and reliably the connection of its base and vertical stand is made. The important elements of such a micro machine are two guides along which the block with the drill attached to it will move. Such guides are best made from two strips of steel, which must be securely screwed to the rack using screws.
When making the block, it is advisable to use steel clamps that will securely fix the drill on it. In addition, in order to avoid unwanted vibration processes when drilling, a thick rubber gasket must be installed at the junction of the block and the drill.
After this, you need to make a feed mechanism for such a mini machine, which should ensure the movement of the electric drill in the vertical direction. The manufacturing schemes for such a mechanism can be different, but it traditionally contains in its design a lever and a spring, which is attached at one end to the stand, and at the other to the block with the drill. This spring gives the feed mechanism greater rigidity.
A drilling machine made from a drill, which is not planned to be removed from it, can be made more convenient to use if you disassemble the original switch of the drill and mount a separate button on the frame of the mini equipment. This button will always be at your fingertips and will allow you to quickly turn the device on and off. As you can see, it’s not at all difficult to make a drilling machine from a drill; all you need to do is read these instructions carefully or watch the training videos in this article.
Homemade plywood machine
A drilling machine made of metal is durable and reliable. However, not every craftsman has a welding machine.
Therefore, we offer an alternative option - to make the frame and main parts of the drilling machine from plywood.
Please note: to assemble a homemade drilling machine, the author uses MDF, but it is better to use plywood.
Necessary materials:
- plywood;
- furniture guides;
- edged board;
- plastic legs;
- fastening clamp;
- metal plate.
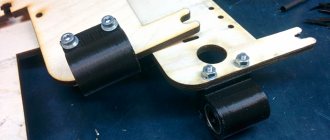
First of all, we take two furniture guides, and after removing the internal movable slats, we screw them to the plywood blocks. The bars themselves will need to be secured to a wide piece, as shown in the photo.
Next, we take another pair of furniture rails - we screw them to the plywood platform between the side rails (we also remove the internal movable strips).
We make a mount for a drill. You must first cut off a metal plate and weld a clamp to it. Additionally, we make reinforcement using round or square rods (this is the only operation where welding is used).
Now you will need to make a movable platform. We saw off a piece of plywood of the required size and screw the internal strips of the furniture rails to it. We connect both parts of the structure together.
Another plywood board must be screwed to the movable platform, to which a metal plate with a clamp is attached.
After this, we cut out the base of the drilling machine and screw plastic legs to its lower part.
Next, we install a stand made of edged boards. The previously assembled structure must be attached to the rack.
Install the return spring. We fix the electric drill or screwdriver in the clamp.
Let's decide on the thickness, decide on price issues and methods of working with the material
Plywood, like wood, is a grateful material, but capricious, it requires a special approach and really does not like rough interference in its structure.
It must be remembered that depending on the thickness of the material, the approach to working with it changes, namely:
- Thin plywood up to 2 mm, this is a specimen for a knife, an ordinary mounting knife, plywood is cut perfectly with it;
- A puff from 2 to 6 mm is already for a jigsaw, and it does not matter which jigsaw you use, manual or electric, this is its client;
- And everything that is thicker than 6 mm is only circular saws.
Although speaking about the design of machines and the role of plywood in this process, one can immediately discard thin plywood, it is not used in this work.
We will be interested in two main instances:
- The first is plywood with a thickness of 4 to 6 mm. Here opinions differ, both from specialists and home craftsmen. Some believe that the thicker the plywood, the stronger it is. Others argue that the layered nature of the material already makes it quite strong, and even compare it to welded or cast structures. As usual, the truth is somewhere in the middle, so we will assume that in this case the price-quality ratio will help us, especially since we do not need super material that will work in the open air or in water. The machine will work quietly in a home workshop with minimal temperature changes and normal humidity levels.
CNC machine.
- The second is an analogue with a thickness of 10 to 20 mm. In this case, it all depends on what purpose the plywood is used for. For example, a machine for cutting plywood, which is designed to work with a full factory sheet, has a wide base and requires a special strength, in this case a twenty is needed. A homemade CNC machine made from plywood is designed for a small fragment area, and, therefore, 10 mm plywood will do the job perfectly.
A little more about cutting
Drawings of a CNC machine made from plywood suggest shaped parts for mobile and stationary modules, which fit so tightly to each other that gaps are even eliminated. All this can be achieved by applying simple cutting rules, especially since the emphasis on cutting material has long shifted from hand tools to electric ones. (see also the article How to cut a circle in plywood: useful tips for shape cutting)
So, here are the rules to remember when cutting plywood:
- Plywood is a layered material and the main cut should go along the fibers of the first layer of material;
Advice! Practice shows that it is not always possible to cut exactly along the fibers; it is often necessary to use a cross cut. And given the modern designs of machines or their parts, then, for example, a CNC machine made from plywood with your own hands requires a large number of not only transverse but also curved cuts. Often there is a need for combined incisions. In this case, the first layer of plywood is cut using a knife according to the patterns; all other layers will go through technical means of cutting.
- When cutting, keep in mind that birch plywood is much denser than its coniferous wood counterparts (they are looser and therefore softer);
- It also matters which side the cut is made from. So cutting from the front side is carried out with a hand saw with small teeth, cutting from the back side is carried out with coarser circular saws;
- When working on disk equipment, the disk rotation speed is set to maximum, and the material supply is minimum;
- The saw moves easily until the first, slight kickback (or noticeable resistance of the material), thus you can significantly reduce the likelihood of chips and other defects.
A fairly simple grinder.
A little practice! When working with plywood, it is better to avoid blades with large teeth altogether; the puff paste is not intended for them. And yet, when working with this material, you can stick regular tape to the place where you intend to cut. The result will be without chips or other defects.
Connection and drilling
We have already mentioned that plywood does not like rough mechanical influences on it, so if you decide to connect parts and assemble machines with your own hands from plywood, then you can forget about nails, by the way, and about self-tapping screws too. In this case, there can only be tenons and grooves, while the tenon fits into the groove like a key into a lock, cracks are not allowed, and PVA glue is used for fixing.
This equally applies to plywood cutting machines, a CNC plywood machine, and all other units where plywood will be used. This is due to the fact that both moving and stationary parts experience vibration and can fall apart at the most inopportune moment if other types of fastenings are used.
And a few words about drilling - a sharp wood drill bit will do.
For your information! When drilling plywood at the drill exit level, chips of the outer veneer level are possible. In order to avoid this, it is necessary to place another piece of plywood under the plywood; it is possible to use waste from sawing the material.
Finishing parts
Any instruction will tell you that at the final stage the plywood is sanded, primed, and finished. Particular attention is paid to edge processing.
Drilling machine made of profile pipe and bearings
Square metal profile is one of the most popular materials for making a benchtop drill press.
There are a lot of options for homemade structures made from corrugated steel pipes. Let's consider the most optimal, in our opinion, tabletop drill stand for a home workshop.
Necessary materials:
- profile pipe;
- threaded rod;
- bolts with nuts;
- metal corner;
- bearings;
- spring;
- channel;
- pieces of metal strip.
First of all, we make a stand. You will need a piece of thick metal (plate) and two pieces of corrugated pipe (20x20 mm and 25x25 mm). The length of each piece is 40 cm.
We drill mounting holes in the metal plate, and then weld two profiles to it.
We make a carriage from four pieces of square corrugated pipe 15x15 mm, as well as bolts with nuts and bearings.
A homemade carriage is placed on a stand made from a larger profile. We place a slider on the second rack measuring 20x20 mm.
We drill a hole in it. Then you need to weld the extended coupling. We strengthen the joint with metal gussets.
To fix the homemade slide at the desired height, use a wing nut.
Next, a lever made from a steel angle is attached to the slider and carriage. A handle made of a profile pipe must be welded to the lever.
A piece of channel is used as the base of the machine. We drill holes in it and fasten the metal plate with the stand using bolts.
In the end, all that remains is to make a mount for the drill. We attach it to the carriage. We install an electric drill. A spring is used to automatically return the carriage to its original position.
Selecting tools and materials
Tools:
- Table saw.
- Band-saw.
- Awl.
- Forstner drills in different sizes.
- Grinding wheels.
- Stationery knife.
- Drill.
- Clamps.
- Jigsaw.
- Angle grinder.
- Protractor.
- Vise.
Materials:
- Thick plywood.
- Switch.
- Melamine.
- Sandpaper.
- Nuts and bolts of different sizes.
- Aluminum can (for gaskets).
- Glue.
- Hardwood cuttings.
- Dowel pins.
- Putty.
- Metal rod.
- Aerosol paint blue.
- Rubber feet.
Steering rack drilling machine
You can make a homemade drilling machine from a drill and a steering rack
Necessary materials:
- sheet metal;
- round pipe (steel);
- car steering rack;
- steel round timber;
- metal strip;
- electric drill.
We start by making the base. From sheet metal 2-3 mm thick, cut a rectangular blank of the required size. We round off sharp corners using an angle grinder.
Next, cut a piece of metal strip 30-40 mm wide.
We weld it to the bottom of the base, and immediately bend it along the contour of the workpiece. The bend area must first be heated with a gas burner, or you can first bend the strip to size on a bending machine.
Using a grinder with a petal wheel, we process the outer part of the base so that the edges are flush with the welded strip of metal.
After this we need a steel disk. We attach it to the base and fix it with welding. Then the author drills three holes to install the bolts - tighten them with nuts.
Now we need to make a vertical stand. A round pipe is used as the starting material. Use a grinder to cut the workpiece to the appropriate length. Using welding, we attach it to a metal disk.
Additionally, you need to strengthen the rack in the lower part with the help of three or four jibs cut from thick sheet metal.
Next, from a pipe and a pair of steel plates, you need to make a tightening clamp that fits onto the rack. It is needed to rigidly secure the working support table.
Two metal plates with holes are welded to the top of the rack, which are needed to secure the steering rack of the car.
A section of professional pipe is welded to the end of the rail, to which the master welds a homemade metal clamp, with which the electric drill will be rigidly fixed.
Now we need to make a support work table (we cut it out of a sheet of metal) and a flywheel to lower and raise the drill.
We clean the weld seams with a grinder with a flap wheel, after which the surface of the metal must be painted - it will last longer and be more beautiful.
The design turned out to be quite inexpensive and easy to use. It is very convenient that a drill is used as a drive - if necessary, it can be removed and used for other purposes.
How to make a compact multifunctional machine
Good day to all brain crafters For those of you who do not have large workshops or small racks for tools, homemade product in this article will be useful, which compactly fits all the useful tools and can be easily moved to other work sites.
When creating this brain craft , I tried to make it as compact as possible so that it could be conveniently used even in a small space, and moved even if you don’t have a car. For this, it has transport wheels, and you can move the craft alone, and if you still use a car for this, you will only need a little help when loading.
This compact homemade includes: a circular table, a milling table and a jigsaw. It also has a large cabinet in which you can store your other tools.
Useful link
To show the craft in action I will make a couple of boxes from cheap pine boards. The video shows how I cut boards for drawers on a circular table using a sled; to obtain the required dimensions, I use an additional strip with a clamp.
Then I make a groove for the base. The desired angle can be obtained using a miter gauge with a guide. By removing the cover, you can set the angle of inclination of the disk, in this case 45 degrees.
The jigsaw guide is adjustable in three axes, so you can use blades of different sizes - from 100 to 180mm, thereby obtaining a maximum cutting height of 70mm.
Next, I make a handle for the drawer, and for this I use a router, which I use to create a rounded chamfer. There is also a guide for the miter gauge, and a remote bearing will also be useful for milling curved lines. The router itself can be tilted at an angle of 45°. The box is ready and it is in its designated place.
The tongue-and-groove connection can be made on this brain table in two ways. First, using a jigsaw, an additional strip and a miter gauge. And secondly, on a circular table, using a special conductor.
With the largest size disc that can be installed on a homemade machine (235mm), you can get a maximum cut of 70mm. There are small adjustment bolts on the guide to reduce the tilt and, if necessary, even to lock it.
To connect the parts, I chose the second method; for this, some parts should be placed on one side of the jig, and others on the other.
And this is what happened, we move on to the router, this time we use a clamping device to make a groove in the base. To do this, you need to raise the circular saw and set the router at an angle of 45°.
Step 1: Cutting the parts
homemade multifunctional table begins with cutting all the parts and numbering them. Next, to obtain a handle slot, 4 corner holes are drilled and “finished” with a jigsaw. Then holes are drilled the same size as the diameter and thickness of the opening system washer. The holes are countersunk.
After this, a place is prepared for installing power and emergency shutdown buttons. Then, using dowels and 50mm self-tapping screws, the body of the brain table . If desired, the body parts are varnished, so the craft will look better and last longer.
Having prepared the body, the 3 upper parts are assembled. To do this, parts of the folding frames are cut and the necessary holes are drilled in them. The hole for the tube is drilled of such a diameter that the tube can rotate freely in it, since it is the axis of rotation of the hinged lids.
Then a cavity is selected for the circular saw. I did this using my 3D router; in the absence of something similar, this can be done with a regular router using the appropriate jigs and guides.
On the front side of the circular table cover, a cavity is selected for a quick-release panel, by removing which you can change the angle of inclination of the disk. The panel itself can be used to adjust the milling depth of the cavity.
Having installed the circular saw in the intended cavity, holes for its fastening are marked. A 3D milling machine is well suited for this, because these holes cannot be drilled on a drilling machine due to its limited working surface.
Step 2: Start Build
homemade workshop begins .
The groove for the guide is marked and selected using a circular table. Two additional pieces of plywood will provide the necessary depth to securely attach the guide strip. Next, a strip with a self-adhesive tape measure applied to it is attached to the lid.
After this, a hole for the router is drilled. Then the tubes for the rotation axes are cut off and the frames of the hinged covers are mounted on the body. In accordance with the drawings, fixing supports are manufactured and installed.
The router cover is applied to the frame, aligned and secured with self-tapping screws through holes in the guide channel.
Then the jigsaw cover is prepared, a groove for this same jigsaw is selected in it. If a material with a non-sliding surface, such as melamine, is used for the cover, then the surface of this cover should be varnished, alternating with sanding.
Having done this, the parts of the vertical lift mechanism of the router are cut out and assembled, with the help of which the milling depth will be adjusted.
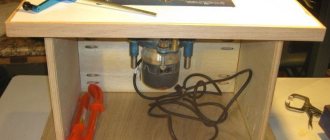
Next, two pieces of plywood are glued together to make a holder for the router itself. A hole of the same diameter, or a suitable one, is drilled into them as when creating the router cover. This brain router can be made on a CNC machine or even ordered online.
The finished router holder is attached to a vertical lift, and now you can try it in action.
To mark the radius of the tilt grooves, ordinary hinges are temporarily attached to the vertical lift, and scraps of plywood are used to make revolving handles.
Step 3: Completing the Assembly
this stage of assembling the homemade product with those parts that I forgot about earlier. They will give stability to the lifting system.
First, the base parts are cut, I did this on my circular table, then they are assembled into a frame, which is attached to the bottom of the body of the multifunctional brain table . The height of this frame should be the same as the height of the existing wheels.
A latch is attached to the flaps of one of the hinged lids, and a lock is attached to the flaps of the other. This can be useful when transporting your craft and act as a preventive measure against theft of your tool.
Next, a 4-slot electrical extension cord is prepared, two connectors of which will include a jigsaw and a router, and the remaining two connectors will connect an additional power tool. The socket for the circular saw is connected through the power button and the emergency shutdown button. The extension cord is wound around special handles made for this purpose.
The quick release panels are made from opal methacrylate. They are placed in place, and the slot in the circular saw panel is carefully made by the saw itself. I used an accessory from an old router kit as a guide bearing. This attachment will be useful when routing curved lines.
After this, the plane of the entire upper part of the craft ; if the hinged lids do not lie in the plane of the central part, this can be easily corrected by adjusting the tilt of the fixing supports.
Next, the perpendicularity of the working parts of the tools and the plane of the table is checked. To check the router, a tube is fixed in it, along which the perpendicularity of the router axis and the table plane is checked, and the parallelism of the guide channel and the circular disk is checked. And finally, the perpendicularity of the jigsaw blade is checked.
After this, the table covers are folded to check whether the brain instruments with each other.
Step 4: Useful Tools
This step talks about making some useful accessories for a homemade .
First of all, the parts of the slide are cut, then a groove is selected for the guide slider.
After this, the two plywood parts are fastened together with screws, and the positions of the screws should be chosen so that they do not interfere with the subsequent modification of this part.
Then a measuring tape is glued onto it in a specially prepared groove, and this accessory for the brain table is varnished, alternating with sanding, thereby creating the necessary smooth surface on this device.
The sleds are assembled, placed on a multifunctional homemade product , the excess is cut off and a middle cut is cut, and then a measuring tape is glued on.
The guide slider is unscrewed from the sled and a groove is made for the tongue and groove conductor. Same as my other circular table.
The channel slider is adjusted so that the roll between the bolts disappears. The slider itself can be stopped if necessary by simply twisting the bot to the maximum.
Next, the parts for the stand are cut, it is assembled, and varnished and sanded. After assembling the rack, a fixing system for it is made. Dowels glued into this fixing system are used as axle guides. At the end of the rack assembly, the locking system handle is made, and then the entire rack is tested in action.
Additionally, a dust collector for the router is installed on the stand, and threaded bushings for the pressure panel are screwed the brain stand
Having done this, the parallelism of the stand and the circular disk is checked, then a measuring tape is glued into the groove of the side wall.
Having finished this, the parts of the tongue and groove jig are cut, which are then glued and cleaned.
Step 5: A few more useful gadgets
This is the last video of this tutorial , and its first part shows how to make a corner stop (to create it, you can paste a printed template or use a ruler). The stop blank can already be cut on the most multifunctional machine.
The thread in the guide slider is inch, but if you need a metric one, you will have to use a tap.
It is definitely worth temporarily screwing the stop blank to the guide to make sure that the turning radius is correct.
Then the parts of the tenon conductor are cut, and in order to reduce friction it is necessary to slightly increase the thickness of the conductor fastening.
To make a pressure panel, a template is glued onto a plywood blank, and the adjustment grooves for this panel are selected using a milling machine . Threaded bushings are mounted in the required places on the cover with the router.
Next, the jigsaw blade guide is made, the fixing system of this guide is the same as that of the stand.
First, a bearing adjustment system is assembled to avoid wear of the plywood using a metal plate. One of the holes is made large in order to adjust the bearings.
The same thing is done with plywood.
After this, the height adjustment system is mechanized, and now the structure can move in three axes, thereby obtaining the required position.
Finally, the finished saw guide can be tested in action, and it is important to hold the board being sawed with both hands so that it fits firmly enough to the plane of the table.
about the compact multifunctional homemade product , good luck in your creativity!
(Specially for MozgoChins #Portable-Workshop
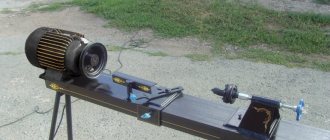
5. Drilling machine driven by washing machine motor
We bring to your attention another budget option for a homemade drill. Only in this case, instead of an electric drill, the motor from the washing machine is used as a drive.
Necessary materials:
- round metal pipe;
- steel corner;
- strip of metal;
- Electrical engine;
- gas lift (shock absorber);
- plywood pulleys;
- belt for belt drive.
First we make a reinforced stand. Usually a profile pipe is used, but in this case it will not work. Instead, we will use a round pipe and a corner.
We take a grinder with a cutting disc to cut the workpieces to the required length. We weld the parts together and clean them with a grinder. Next, we weld the reinforced stand we made to the frame.
We would like to immediately draw your attention to the fact that the base must be heavy and stable enough to support the weight of the electric motor and metal parts.
From sections of corner and strip it is necessary to make a movable structural element that will lower and rise along the rack. Essentially, this part is a carriage with a mechanical feed mechanism.
Next, you need to make a mounting platform on which the motor will be placed. It is welded to the carriage made earlier.
Now you need to make a spindle with a chuck for fixing the drill.
To do this, we need a threaded pin at the end, which will act as the spindle shaft. We put the bearing on it and secure it with nuts.
We cut off a piece of the tube and place it on the pin. We install the second bearing on top of the tube.
We prepare another piece of pipe. We cut it along the entire length. Place it on the installed bearings. The longitudinal cut must be welded tightly. We screw the cartridge onto the shaft.
We weld the spindle body to a metal plate, and the plate itself to the moving part.
To be able to lower the spindle, a lever must be installed.
Instead of a return spring, the author decided to install a shock absorber (gas lift).
Now we are making a work table on which the workpieces will be placed. To do this, you will first need to make a small slider that will move along the rack.
We weld a round table to it (the author uses an old circular saw blade). Additionally, you need to make a retainer.
We machine two pulleys from wood or plywood. We install one pulley on the electric motor shaft, the second on the spindle shaft. We tighten the belt.
All the parts of the drilling machine need to be painted, and then we assemble everything into a heap. Install the on/off button.
Unlike the first option, this design turned out to be quite cumbersome. But such a machine will definitely be more powerful than a drill stand made from a drill.
Making a front panel
I mark the location of the motor shaft on a piece of plywood, then drill a large hole in its place. I attach the blank to the body and mark the dimensions. Using a band saw I cut out a 35x35 cm square.
DIY drilling machine based on an electric drill
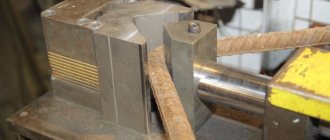
To make such a device you will need:
- a pair of used car shock absorbers;
- electric drill with power handle;
- two housing bearings;
- chain and sprocket;
- profile rectangular pipe;
- spindle feed handle;
- steel sheet, plates and angle;
- stud, bolts, washers and nuts;
- spring.
Let's make a vertical stand. According to the markings, we weld a piece of chain to the wide side of the profile pipe.
Let's make a mobile carriage. Using bearing housings, we mark and drill holes in the steel plate for fastening them with hardware.
We screw a nut onto the stud inserted through the bearing, put on the sprocket and secure it with a second nut.
We mark another plate for installation and welding in the center of the profile pipe.
We clean the old shock absorbers, and after drilling the bottoms, drain the oil and knock off the covers. After wrapping the mirrors of the rods and threads with aluminum foil, we place them in the shot blasting chamber for complete cleaning. Finally, remove the levers.
We place the shock absorbers with their upper parts in the corners at the level of the sloping shelves and weld them.
We fix the shock absorbers parallel to the steel plate at the corners using welding.
We apply a piece of profile pipe to the ends of the painted rods and drill two holes along the marks.
We lay it flat and place a U-shaped bracket in the center with its legs facing outwards and weld it.
For a piece of profile pipe with a length equal to the width of the larger side, remove the opposite edge. Drill a hole in the center of the square base.
We cut a piece of round pipe along the generatrix and weld ears with two holes along the edges of the cut. It turned out to be a kind of clamp.
Insert a bolt into a part made from a profile pipe from the inside and weld it behind the head. We fix the hardware in a vice, place the clamp along the legs with the ears up and connect them by welding.
We place the U-shaped bracket on the profile pipe between the shock absorbers, then the rods will fit into its holes. Screw the nuts onto the threads of the rods and tighten them.
In the photo: clamp for attaching a drill
We turn the shock absorbers over and place an assembly of bearing housings, pins and sprockets on the bracket leg. We weld the assembly plate to the bracket.
We place it on the assembly, then the sprocket will engage with the chain, and weld the shock absorbers to the plates.
Let's make a base for the machine.
We attach a vertical stand to the base of the machine with bolts.
We put the spindle feed handle on the pin and secure it with a nut. For convenience, we screw plastic balls onto the handles.
We secure the drill with a clamp.
The drilling machine is ready for use, so that it is convenient to use workpieces when drilling, we will install a vice on the base of the machine.
Tags: sam_carpenter, sam_tool, sam_kulibin, lathe
Comments 63
D.day) is there no way to resave the model in stl, or obj, or svg format?
Hello everyone, no one is interested in the Metabo swift 260 woodworking machine
No CNC - not kosher)))
Beautifully and correctly made, the only thing missing is protection. But I would rather buy a Soviet machine for schoolchildren. Prices for Avito are around 3-6 thousand. But they are made of metal. School STD-120M. The new STD-450 costs around 8 thousand.
Greetings! There are no words for work! Cool! Judging by the fact that you work professionally with wood, my question would be relevant: tell me what is the best way to glue plywood so that it holds well? I would be very grateful for your answer!
Titebond - expensive and rich, but you can’t imagine anything more reliable. If the area is large, then PVA will also hold perfectly
I apologize for the intrusiveness, but there are countless types of titebond, which one do you use? I need to collect surfaces 4cm wide and 80cm long into a bag using a physical impact on the part along a plane, not edgewise.
I don't glue much and don't consider myself an expert. In your case, I think any wood glue will suit you, the main place of gluing is to press harder
Very noisy and a lot of unnecessary noise. It could have been made much simpler. The same one I've been using for 12 years!
Interesting idea, it’s really hard to come up with a simpler one
I also made myself a lathe... True, it’s made of metal and has a separate engine, reverse, that’s all. And it’s been standing for several years now; I cut out a couple of handles. Why do I need him? It's a shame to throw it away, but it takes up space. What do you do at the lathe?
Cool. But it’s unlikely that the drill is designed for long-term operation.
+1, we should choose something else.
Cool. But it’s unlikely that the drill is designed for long-term operation.
a locking button means that the finger will fall apart before the drill)
I noticed your drilling machine. Is there a review on it?
Eat -
)))) Back in 1998, we were decorating a cottage and there was a wooden staircase with aspen balusters. The customer did not calculate their number and three were missing... it was too late to order, the office was blown away. But there were blanks for them.
A wooden bench like a bed, a powerful Soviet drill installed, a caliper made, an on-off button under the foot and worked only when you pressed it, and a bar, a stop for the chisel. Chinese chisels, long, of different widths. and that’s it!
You cultivate the timber, cut off the corners with an ax, outline the shape according to the template and go ahead! ))) day - baluster, cut and polished with sandpaper )))
Then the bench again acquired a normal appearance))))
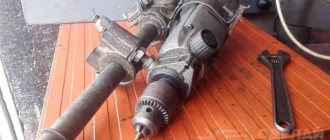
Tabletop drilling machine made from drill
The most common design can be considered a machine made from a hand or electric drill, which can be made removable, so that it can be used outside the machine, or stationary. In the latter case, the switching device can be moved to the frame for greater convenience.
The main elements of the machine are:
- drill;
- base;
- rack;
- drill mount;
- feed mechanism.
The base or frame can be made from a solid cut of hard wood, furniture board or chipboard. Some people prefer a metal plate, channel or tee as a base. The bed must be massive to ensure structural stability and compensate for vibrations during drilling to produce neat and accurate holes. The size of the frame made of wood is at least 600x600x30 mm, of sheet steel - 500x500x15 mm. For greater stability, the base can be made with eyes or holes for bolts and attached to the workbench.
The stand can be made of timber, round or square steel pipe. Some craftsmen use the frame of an old photographic enlarger, a substandard school microscope, and other parts that have a suitable configuration, strength and weight as a base and stand.
The drill is secured using clamps or brackets with a hole in the center. The bracket is more reliable and provides greater accuracy when drilling.
Machine based on the steering rack of a passenger car
A steering rack for a car and a drill are quite massive products, so the frame should also be massive and, preferably, with the ability to attach the machine to a workbench. All elements are welded, since connections with bolts and screws may not be sufficient.
The frame and support post are welded from channels or other suitable rolled products, about 5 mm thick. The steering rack is secured to a stand, which should be 70–80 mm longer than the rack, through the eyes of the steering column.
To make the machine more convenient to use, the drill control is placed in a separate unit.
Assembly procedure for tabletop drilling machines:
- preparation of all elements;
- attaching the stand to the frame (check verticality!);
- assembly of the movement mechanism;
- fastening the mechanism to the rack;
- fastening the drill (check verticality!).
All fastenings must be made as securely as possible. It is advisable to join one-piece steel structures by welding. When using any kind of guides, you need to make sure that there is no lateral play during movement.
Advice! To fix the part in which the hole is drilled, the machine can be equipped with a vice.
You can also find ready-made stands for drills on sale. When purchasing, you need to pay attention to the weight of the structure and the size of the working surface. Lightweight (up to 3 kg) and inexpensive (up to 1.5 thousand rubles) racks are suitable for making holes in a thin plywood sheet.
Homemade drilling machine from a drill with an engine from household appliances - step-by-step manufacturing diagram
A home drill can be used as the main element of a self-assembled drilling machine, for installation of which you will need:
- bed or stable and reliable base;
- device providing power supply;
- securing base for the drilling element.
As a result of the assembly, the master will have a high-quality and productive drilling and additive machine, which has its own benefits.
Design advantages
Machines for drilling deep holes assembled using an electric drill are distinguished by a range of operational advantages:
- optimal compactness and low weight of the structure;
- Possibility to carry and use batteries;
- obtaining high-quality and accurate hole parameters;
- quick assembly and dismantling of equipment without wasting time;
- performing various works and processing all materials.
For repairs and home maintenance, a machine will be enough, but for a garage and larger-scale procedures it is better to choose a different type of device.
Asynchronous motor
By choosing alternative options from which to assemble a drilling machine, you can abandon the idea of using an electric drill needed on the farm.
For the rotation mechanism, you can use a motor of any power with an electric drive; it can be easily removed from old equipment and household appliances.
Manufacturing Features
The procedure for making a drilling machine with your own hands is not complicated, but you must take into account the advice of the experts:
- for a small drilling machine it is better to choose an asynchronous motor from an old washing machine;
- to install a sufficiently powerful engine, you will need a more durable and as stable base as possible;
- During the design and assembly of the installation, it is important to place the engine closer to the rack, which will reduce the vibration level;
- the connection using hexagons should be as strong and reliable as possible to increase the wear resistance of the unit.
This machine is more difficult to assemble even with an accessible circuit, but its main advantage remains increased power, which is suitable for processing different surfaces.
How to make your own PCB drilling machine
A printed circuit board is a plate made of dielectric material, on the surface of which is applied a layer of metal that conducts electric current. The thickness of such products is 1.5–4.5 mm.
In this regard, a drilling machine designed for drilling printed circuit boards is a mini-machine, so when manufacturing it, the following features must be taken into account:
- such a machine does not need large electrical power;
- there is no need for a significant stroke of the machine head with a drill installed in it;
- the machine must be small in size, allowing it to be used on the desktop of a radio amateur or a person engaged in the manufacture of electronic systems;
- the absence of the need for significant power makes it possible to perform a similar installation at a lower voltage class and without the use of bulky chucks designed for installing large-diameter drills;
- On machines for this purpose, special adapters and collets are used to install drills, due to their small diameters.
Working with printed circuit boards is a “delicate” and scrupulous task that requires careful work and precision of the holes made.
You can make a homemade drilling machine for printed circuit boards using the technology considered in the case of using an electric drill or screwdriver, with the only difference being that electric motors of lower voltage and size can be used as a drive.
I'm balancing the disk.
Using foil from a cut aluminum can as a backing and a dial indicator, I balanced the disc.
This is important because if the disc is not balanced, you will have uneven wear on the sandpaper.
Making a drill from a car steering rack
For many, this solution will not be obvious, but experts will immediately appreciate its simplicity and functionality. We make a drill based on the steering rack of a car. To do this, you only need the rack itself from an old decommissioned, disassembled car, or just a rack from a car that no longer exists.
You will also need fasteners and the drill itself. A steering rack drilling machine is an excellent solution for permanent work!
Homemade drilling machines - photo gallery
Sources
- https://nzmetallspb.ru/osnastika/sverlilnye-stanki-svoimi-rukami.html
- https://protechniky.ru/remont/kak-sdelat-samodelnyj-sverlilnyj-stanok-svoimi-rukami-chertezhi
- https://stroitelcentr.ru/idei-kak-sdelat-stanok-dlya-sverleniya/
- https://armatool.ru/sverlilnye-stanki-iz-dreli-svoimi-rukami/
- https://met-all.org/oborudovanie/stanki-sverlilnye/sverlilnyj-stanok-iz-dreli-svoimi-rukami.html
- https://sdelairukami.ru/sverlilnyj-stanok-svoimi-rukami-na-baze-elektrodreli/
- https://sam-stroitel.com/prostoj-sverlilnyj-stanok-svoimi-rukami-39-foto-izgotovleniya.html
- https://www.rmnt.ru/story/instrument/nastolnyy-sverlilnyy-stanok-svoimi-rukami-sxemy-ichertezhi.1229327/
- https://camodelkin.ru/instrument/samodelnyj-sverlilnyj-stanok-iz-dreli.html
- https://podelki.expert/sverlilnyj-stanok-svoimi-rukami/
- https://svoimirykamiinfo.ru/sverlilnyj-stanok-svoimi-rukami/