Published: 03/24/2013 Category: Homemade products and crafts Views: 12401
Wire nozzle for burning
You can make your own nozzles of the required shape from wire. The most popular designs of wire nozzles include beak-shaped and spoon-shaped nozzles.
When making your own nozzle, always remember that the quality of your future projects largely depends on the accuracy and correctness of the nozzle. The main material for creating a wire nozzle is nichrome wire with a diameter of 0.5 to 1 mm.
Wire nozzle for burning
How to make a wire burning tip
Wire nozzle for burning
You can make your own nozzles of the required shape from wire. The most popular designs of wire nozzles include beak-shaped and spoon-shaped nozzles.
When making your own nozzle, always remember that the quality of your future projects largely depends on the accuracy and correctness of the nozzle. The main material for creating a wire nozzle is nichrome wire with a diameter of 0.5 to 1 mm.
Wire nozzle for burning
Master class: burning out a funny puppy
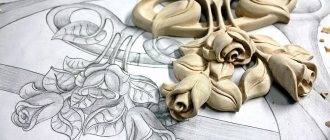
First, let's make a panel with some cute animal, for example, a puppy, using the contour technique. Prepare the following for work:
- plywood blank with processed edges;
- fine-grained sandpaper;
- black carbon copy;
- a simple pencil;
- sketch;
- paints, brushes, clear varnish for wood;
- pyrograph
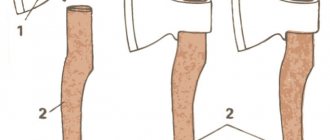
Making a spoon-shaped nozzle
A spoon nozzle is essentially a regular wire nozzle with a small loop at the tip. This attachment, just like the previous one, can be easily made independently, and from the same beak-shaped attachment. To do this, it is enough to flatten its tip (beak) on something hard, for example, a small anvil or on the head of a hammer mounted in a vice or on the body of the vice itself, if they are strong enough.
Wire nozzle for burning
When flattened, burrs may appear that distort the profile of the nozzle and must be removed by carefully treating the nozzle with sandpaper or a needle file.
Many burning kits you can buy in stores come with a set of wire tips, so don't forget that.
Source
Tools and materials
For pyrography, you will need a special device - an electric burner with a pen (tip) made of nichrome or brass or a soldering iron burner. What is the difference?
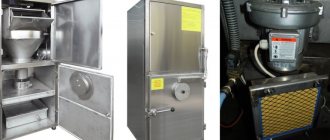
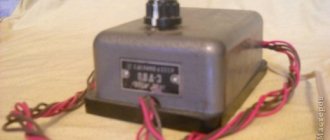
Loop pyrographs consist of a box with a transformer and a handle with a wire loop.
- They heat up quickly to the desired temperature, but also cool down quickly.
- The heating level is adjustable.
- Includes replacement hinges of different shapes and sizes.
- Convenient to use.
- The burning process is relatively fast.
The disadvantages of this type of burner include the fact that the attachments quickly become unusable, they are difficult to change, and due to the rapid cooling of the loop, you have to take frequent breaks. The drawing turns out to be dotted, consisting of small strokes, since it is quite difficult to draw a continuous line.
Soldering iron burners look and work like the device of the same name. The device is a thick “handle” with a sting at the end.
- They heat up slowly, but maintain operating temperature for a very long time.
- Large selection of replaceable nozzles, reliable and long lasting.
- The attachments can be easily changed even during operation.
- Allows you to make drawings with solid fills, shadows, transitions, and draw solid lines of any thickness.
Cons: if the soldering iron pyrograph breaks, you will have to buy a new one. In addition, the temperature and power of the device are fixed, so the process is slow. With desire and diligence, regardless of the type of pyrograph, you can learn to create real masterpieces.
As for the material, it is best to choose plywood, MDF board or plates made of solid poplar, aspen, alder, linden, chestnut, cedar, cherry. It is important that the wood is completely dry, light, smooth, without knots or eyes.
Never use foundations that are coated with anything, such as varnish or paint. You may be poisoned by toxic fumes or suffer from a fire.
To work you will also need:
- fine-grained sandpaper;
- black copy paper (this option will not cause any trouble);
- sharp hard pencil;
- pliers;
- pyrograph stand;
- masking tape;
- paints and varnish, finishing brushes;
- dry clean rag, old terry towel.
It’s best to start getting acquainted with pyrography with ready-made creativity kits. There is everything you need, except the device itself, and most importantly: excellent results are guaranteed.
How to replace the needle in the “Pattern” burner
3. Make sure that there are no objects near the work site that could easily catch fire and cause a fire. Of course, it is better not to start work if any malfunctions are detected. 4. During operation, use the soldering iron carefully, do not drop it or use it as a hammer. 5. When soldering, beware of splashes of liquid solder and do not touch the heated areas of the soldering iron. 6. When taking breaks from work, place the hot soldering iron on a non-flammable surface. Do not pull the plug out of the socket by the wire. If you need to leave your workplace, turn off the soldering iron. 7. When soldering, tinning and working with acids, use rubber gloves and safety glasses, and use tweezers for these purposes. 8. All chemicals used for soldering must be kept in glass containers and ground glass stoppers, because acids are quite dangerous and harmful. Each container must have an inscription with the name of the substance that is stored in it. 9. Pickling of products before soldering and pickling of acid for the production of zinc chloride should only be carried out in a well-ventilated area. 10. Be careful with soldering acids. Do not spill them on the table, floor, clothes or shoes. Do not touch it with your hands and under no circumstances try it on your tongue, especially zinc chloride (acid). 11. After finishing work, carefully turn off the soldering iron. Clean up your work area. Put back the tools you used and the sulfuric acid. Let the soldering iron cool down, after which it can also be put back in place. 12. After work, be sure to wash your hands with soap.
Safety rules when working with pliers 1. Before work, check the serviceability of the tool. 2. Never use pliers as a hammer. Such abuse will most likely result in tool failure. 3. Only bite off hardened wire with pliers designed for this purpose. 4. Always cut the wire at right angles. Never move the pliers from side to side or bend the wire back and forth away from the cutting edges. 5. When working with pliers, do not hold the wire at face level. 6. When working, do not place the fingers of your left hand (if you are left-handed, then behind the fingers of your right hand) between the cutting edges. 7. Hand the tool to a friend with the handles first and closed. 8. After work, put the tool back in its place.
Source
Tips and secrets for beginners
- When making the first point, blow lightly on the sting, and then the beginning of the line will be smooth and will not stand out.
- Try to follow the contours in one line. Move the tip slowly to avoid scratching the wood. Help yourself by moving the material itself.
- Filling is best done with a tip heated to medium temperature. Movements should be soft, circular. If you heat the pyrograph too hot, it will leave deep black grooves in the wood.
- Periodically clean the tip from carbon deposits during operation. This can be done with a regular metal dishwashing sponge.
- Remember that a scorched line cannot be erased, so try to draw it very carefully.
- If you want thick lines, move the tip slowly. Thin lines are drawn quickly.
- The hotter the pyrograph is, the darker the lines will be.
- To achieve smooth tone transitions within one line, use a table fan. It will periodically cool the tip, and the color will turn out darker or lighter. Be careful!
Tuesday, September 4, 2012
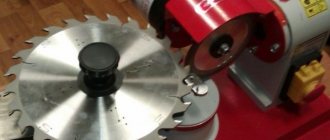
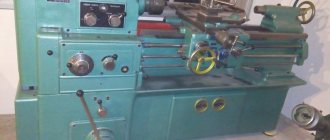
design of a tip for wood burning on a machine
then we insert it tightly into the inside of our case and on top we wrap nichrome, I have 0.5 mm so that it turns out like this
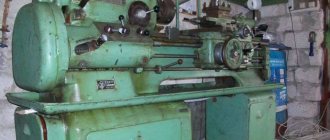
Well, we put it on the machine, I have a floating head on a bearing, it works from both the Z axis and an electromagnet
attached to the head using the insides of a 3-amp block, available in all hardware stores
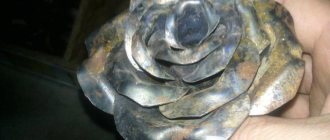
this is what happened as a result,
We sell Chinese ones, but to what extent are they diamond? the copper tip actually oxidized after an hour of work, that’s what I did with the photo: I somehow didn’t think about it right away because the soldering iron really burns. I replaced the tip with an iron one from a nail (temporarily, with difficulty I pulled out the old one with scale; it couldn’t fall out, this is about the issue of falling out) I tried to burn out small text, I can’t even speak and so everything is visible, the height of the letters is 3 mm, but I’m thinking of just burning it out You can try it with diamond.
In relays and contactors, the silver in the contacts is impure and impregnates the base with something like ceramics or sand, I don’t know for sure, there is not enough of it, if you take a few I think it will be enough for a drop, but for such purposes I don’t think cleanliness is so important that it won’t burn, then for faster heating and maintain a stable temperature, wrap the device on top of the thread with a heat-insulating thread, for example, asbestos thread. B By the way, to control the temperature you can use a simple Chinese multimeter with a thermometer, I don’t remember the model, I think 830, but there the sensor works up to a temperature of 1300 degrees and the wires to it are heat-resistant. Today I bought a diamond Chinese glass cutter, the insert in it is made of brass, I tried it out of interest and put the insert on the burner, the result is the same, it burns out) Tomorrow I will deal with the scale, I will lower the temperature and experiment in general) Yes, about the stripes, I burn out the photos due to the small amount of plywood 8x8 or 6x6 cm, whatever you need, and if you look at them, you can see the stripes, but on a large one, there probably won’t be anything, in general, I’ll try. Or he can use the experience of making a disposable tip for a soldering iron, the point is that the copper tip is coated with a substance (liquid glass + quartz sand from fuses (talc can be used), until it becomes sour cream), then dried, then a spiral is wound onto the coating, then everything is wrapped with glass fiber and that’s it, the heater is ready. I did this with a soldering iron 3-4 years ago, it works and works sometimes for days. Pros: Instead of ceramics from the resistor, coating is on the tip itself. Minus the disposable sting.
Next version: I took a ceramic carrier from a lighter with a spiral, heated it up to 1000 degrees, everything was ok! I inserted a 3 mm diameter rod inside, ground into a cone and polished from contact silver, put 4 turns of 0.8 mm nichrome on top, wound it on a mandrel, then inserted ceramics into it, fastened it in the same way as the old one, everything sits quite rigidly, cold and hot, here is a photo:
Also, I redid the burner circuit off-topic and just put it in a pile, the trance from the burner wound up the secondary a little, raised the voltage to 3 volts, removed the factory wire rheostat in the primary circuit because it was heating up because of this the voltage was low, installed a regulator on a triac from a burnt-out vacuum cleaner, and got the output is stable adjustment from 0 to 3 volts. The head heats up to, say, 479 degrees per minute, when in contact with wood the temperature does not drop, it takes a long time to cool down, I got burned wrapping asbestos (I wrapped it with a 2 mm cord on top), the whole structure holds the load and with the electromagnet when it drops when turned off, it doesn’t move. Tomorrow I'll burn it on new plywood and post a photo. I’m answering the question (if any) why I refused the diamond, it’s a little thick, you can’t sharpen it, and I brought out the rod as I needed. Just wondering, has anyone burned out small text 3mm high, did it work? or unrealistic, I don’t set it as an end in itself, it’s just interesting. I had to abandon asbestos due to its disintegration when heated, I wrote the text with an artcam and turned on raising the head with a magnet, asbestos began to fall onto the workpiece due to vibration, not all of it, of course, but there is some. I'll try to coat it with silicate and sand as suggested above. here is a photo of samples of working with artkam, (if the time after lowering the head is reduced, you can write small things, the letters at the top are 3 mm)
then combined 2 ideas into one,
I tried coating it with sand and silicate and it didn’t work out well, I decided to soak it in asbestos and wrapped it around it, dried it by turning on the heater for at least 30 minutes, then added temperature, it worked.
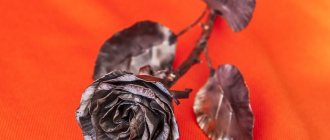
The coating is durable, relatively sure, but don’t jump on it. here are the final photos,
I burned out the head above in the post, the stripes and dots in the photo are my jambs (I adjusted the heating and did not work in Photoshop) the head behaves normally,
But that is another story. Let's see how long this modification will last
Source
How to make a wood burner with your own hands - a homemade pyrograph from a soldering iron
Have you ever wanted to capture a beautiful design or pattern in your wood crafts? Do you have an old, unused (but still working) soldering iron? So you're in luck. This tutorial will teach you how to make your own wood burner and how to turn ordinary nails into versatile, easy-to-use pyrography (wood burning) tools. This project is also great for those who want to learn how to make fires but don't know where to start.
We use an old soldering iron tip as a template when making new pyrography tools, but of a shortened length to reduce heating time.
Burning techniques and methods
Contour technique. If you are just taking your first steps in pyrography, then it is better to choose this method. The drawing is burned only along the main lines, so it is very easy to do. Inscriptions and shading are done in the same way.
Silhouette technique. The desired image is created by burning the background around it. The drawing remains clean, and the background is completely shaded.
Artistic technique involves the combined use of both methods. The drawing turns out to be very complex, it perfectly conveys perspective, and all the details are worked out. This requires the ability to create high-quality paintings in pencil; without this skill nothing will work. It’s better to start with basic geometric shapes, trying to work as carefully as possible on chiaroscuro, volume, and depth.
In addition to burning with an electric pyrograph, there are several more interesting methods:
- With acid. A thin layer of wax is applied to the wood, the contours are scratched, and then the image is etched with a chemical composition.
- Pyrotype. The design is applied to the wood with a hot, ready-made stamp. The harder the pressure, the brighter and clearer the print.
- With electric discharge. The image is “painted” with electrolytes, and then an electric current is passed along the “lines”.
- Laser. This method can create a large-scale, very complex and clear image, since the laser beam is controlled by a computer program.
- The sun. This is the oldest, but very labor-intensive method. The sun's rays are “collected” into a beam with a magnifying glass and directed onto the surface of the plywood. The quality of the drawing is quite low.
Everything for burning in the catalog
Design and principle of operation of a wood burner
The device of a pyrograph is generally very simple. A piece of nichrome wire is attached to a wooden handle, to which electrical voltage is supplied. Under the influence of current, nichrome heats up to a temperature of about 1000 degrees. If you run a hot tip over the surface of a board or plywood, it leaves a scorched mark, just as a pen leaves an ink mark.
Next, we consider the manufacture of a pyrograph powered by a voltage of 5 V from a computer power supply.
Battery operated burner
To make an electric burner, similar to a pyrograph on nichrome wire, you will need: - syringe needles; - two-wire wire; - small toggle switch; - strong threads; — rechargeable battery; - wooden stick.
Take two needles and cut off the lower part from them, which fits onto the “nose” of the syringe. Then screw the wires onto the blunt end of the needles. After this, securely fix the medical needles with threads on the lower end of the wooden stick. Also connect the wires to the toggle switch, and then glue the battery itself and the toggle switch to the handle-holder, carefully connecting the elements together. Detailed diagrams of a burner with a battery can be found on the Internet.
Take the pliers and bend the ends of the needles so that they touch tightly. That's all. Now you can start drawing images and designs on plywood or a wooden blank. [adace-ad id=”1108″]