Hi all! A common job for a turner is making balls. Basically, these products are used for the handles of other machines. Sometimes it seems that these balls are a coveted raft for a machine tool thief.
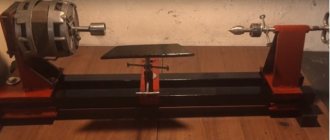
So, usually turning a ball occurs using a template, which is a handle with a ball of the required diameter. The workpiece is peeled to the diameter of the ball, after which two cutting tools are installed in the tool holder. The cutting edge of these cutters can be rounded. We bring the left cutter with a support to the workpiece until it touches, and we move the right cutter with our hands to the template and fasten it in the tool holder.
After this, we touch the end of the workpiece with the left cutter. In order for the right cutter to also touch the right side of the template, you need to move the template with the tailstock quill in the desired direction.
The first disadvantage of this method is the presence of an inaccessible area for the right incisor, which I will further call a copier. This zone is where the pin enters the ball. As you can see in the photo below, a small circle in the center remains unprocessed in the workpiece - this is the very inaccessible zone. It is processed by eye after removing the template.
After grinding and polishing, you can still get a more or less even ball. We are not talking about a ball with the correct geometric shape. For the “correct” balls, special, quite accurate and difficult to manufacture devices are made - balls. The second disadvantage of the described method is the need for a template, which is not always easy to find.
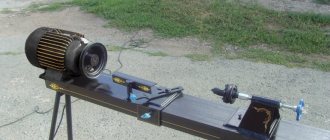
I decided to make a simpler device that does not have the disadvantages of the first method. I first saw the design of this device on the channel of a blogger from Odessa, Dmitry Berbraer. The device is also clamped into the tailstock chuck and acts as a template holder.
Read also: Hair dryer for welding polypropylene sheets
Any washer with the required outer diameter and a hole in the center from 6 to 8 mm can act as a template. As you can see in the photo below, the copier has access to the circle from both sides, since the mount is located at the bottom, and the bracket fits from the back.
Templates can be either selected or made on the same lathe, and after work, put them in one place. This way you can accumulate many templates with different diameters over time. Thanks to Dmitry for the idea, to you for your attention, and the holder takes its place on the shelf with the equipment.
The degree of accuracy and quality of the processed surface depend on the skill of the master to work on a lathe, which does not have a Numerical Program Control system. However, some types of parts are almost impossible to create by turning with a cutter without auxiliary equipment. If there is a need to establish mass production with high processing accuracy, you cannot do without auxiliary equipment. How to make a ball on a lathe, and what equipment is used?
Method of turning on a lathe with a standard support
For large-scale production, a special fixture is created or a CNC system is used. If there is a need to create just a few balls by turning, then the work can be done on a lathe that has a tailstock.
The manufacturing process, which is the answer to the question of how to turn a ball on a lathe, can be divided into the following stages:
- Selection of workpiece. It must be cylindrical in shape, the length and width of which exceeds the required diameter of the ball. Manufacturing occurs by basing a cylindrical body on the ends.
- We create a groove at a given distance from the end. The diameter of the groove is the diameter of the ball.
- Then, using a special prepared rod and tailstock, we fix it (the previously made groove is necessary for fastening with this rod).
- To make a ball, you need to position the cutter at an angle to the surface and turn the excess metal. Removal is carried out until the groove is made. Turning occurs with a cutting tool.
- Turning occurs with a transverse feed, as a result of which a ladder-shaped surface is formed. Then, combining the transverse and longitudinal feed, it is also removed.
- After this, a surface resembling a ball is made with a file while the spindle rotates. Sanding paper is also used to obtain a smooth surface.
- The raw ends, which were used for fastening, are ground off using sandpaper.
Read also: DIY induction oven from a microwave
With this method, no additional device is used. The created groove is a kind of indicator that is used during transverse feeding. The job requires good skills in handling longitudinal and cross feed. How to turn a ball on a lathe without so many operations - you should use a device designed for turning to a given diameter.
Alternative methods for making a topiary base
Polyurethane foam
We squeeze the polyethylene foam into a plastic bag to get a blank - a figure close to the shape of a sphere, but definitely larger than the required diameter of the ball. We wait until the sealant has completely hardened, remove the bag, and use a utility knife to give the mass the desired shape - not just a ball.
DIY foam ball
Instead of polyurethane foam, you can use a foam blank, for example, packaging from household appliances, or glue several sheets together to obtain the required thickness.
But the foam is non-uniform and crumbles a lot: making a topiary ball of the correct shape is difficult, and a lot of debris remains. You can also cut a base for a flat topiary from a foam sheet.
Papier-mâché technique
We inflate the balloon to the desired size, coat the surface with PVA, glue sheets of paper (you can use toilet paper), fragments of old newspapers or napkins. We continue to increase the mass, generously coating each layer with glue, gaining a thickness of at least 7-10 mm.
After the workpiece has completely dried, carefully deflate and pull out the balloon; the frame remains. The result was a fragile but original ball for topiary using the papier-mâché technique. The method is labor-intensive, the base takes a long time to dry.
Knitting thread
The method exactly imitates the papier-mâché technique, but instead of paper, knitting threads are used: the result is a frame suitable for a light crown. We do not recommend using twine instead of yarn: the material is expensive and strongly absorbs glue.
Using a special design
The process can be significantly simplified by using a special design. The device with which the work in question can be carried out allows you to rotate the cutter along a given circle. In this case, the following nuances can be noted:
- The structure must be rigidly fixed, for which you will have to make holes in the frame for its fastening.
- The metal is also pre-processed in a standard way using longitudinal-transverse feed.
- The design features of the design limit the minimum and maximum diameter of the resulting ball.
- In this case, you will also have to use emery to remove metal at the attachment point.
- The entire surface, except for the attachment point, is processed at one time. Pre-treatment for metal removal is necessary because in this case the cross feed is not adjustable (the diameter of the part is adjusted by the distance at which the cutting edge is located from the attachment point).
- The correct shape is achieved without the need for special processing skills.
- You can get a batch of spherical parts that will have the same dimensions.
In conclusion, we note that such a device is often created by hand. Lathes of older models are not suitable for automating the production process of producing spherical bodies.
If you find an error, please select a piece of text and press Ctrl+Enter.
Is it possible to do this?
Creating a spherical part on turning equipment is a simpler process than it seems at first glance. In this case, you can use both auxiliary equipment, if the production of a small batch is planned, and standard equipment of the machine in the case of piece production. The most affordable way is turning using a previously prepared template.
For metal
Working with metal is an order of magnitude more difficult compared to other materials due to its higher hardness, but it is more familiar and does not have unusual features. Turning a ball will take at least two passes and will require working at high speeds to obtain a satisfactory result. In general, the process is little different from other turning operations and has no specific specifics.
On wood
Compared to a metal workpiece, a wooden workpiece is more amenable to processing, which is why it is possible to carry out processing not only with a lathe cutter, but also with hand chisels and crowns intended for this operation.
When turning, instead of the usual shavings, wood dust remains, so you need to work strictly in a respirator, turning on the hood. It would be a good idea to remove oil spills on the machine in advance and install a vacuum cleaner on the tool holder, which will simplify cleaning after work.
Step-by-step instruction
This manufacturing method is suitable for both metal and wood. Additional machine equipment and non-standard designs are not required. All you need is a sample. As such, you can use a machine-turned ball with a rod or a ball from a bearing of the required diameter.
To be able to install the latter, you need to rigidly attach a shank rod of the required diameter exactly in the center to it. This can be done by welding or threaded connection.
Workpiece selection
In both cases, the workpiece must have a cylindrical shape with a margin (approximately 1/10) of length for fastening in the chuck and a small allowance for processing along the width. If steel rod is a standardized material in metallurgy, then for carpentry work most often the raw material is supplied in the form of timber. Before starting work, you need to give the material the shape of a cylinder, secure it in a driving chuck and grind it.
Create a groove
The diameter of the ball is equal to the diameter of the grooves and the distance between them. Clamping the workpiece in a three-jaw chuck, machine the future part at a given distance from the end. The created groove will serve as a kind of mark when processing using cross feed. It is also necessary to countersink the hole for subsequent fixation in a rigid center when processing the workpiece with abrasive.
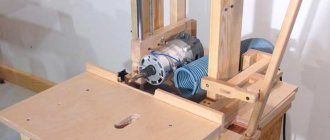
We make a wood milling machine for a home workshop
Milling machines are necessary for working with shaped wood parts. They are used for flat milling and profile processing. Professional equipment is multifunctional and costs a lot of money, so more and more “homemade” people are assembling such equipment for workshops and garages on their own.
Small DIY milling machine
The set of homemade wood milling machines includes:
- Drive mechanism. This is an engine whose power ranges from 1-2 kW. With such a motor, you can use various tools to work with wood without fear of failure.
- Lift for adjustment. Typically, it includes a body, sliding skids, carriages, a fixing screw and a threaded axle. During operation, the carriage moves up and down, and a screw is needed to fix it at the required level.
- Support. The table is made from solid wood.
Before assembly, be sure to draw up a detailed drawing with all dimensions. For manual wood milling machines, you need to think through everything in advance down to the smallest detail.
3D model of a table for a manual machine Equipment components Dimensions of the working element Cutting on a milling machine
The sequence of self-assembly of a convenient and practical wood milling machine for a home workshop is described in the video instructions:
If you are thinking about buying your own equipment rather than assembling it yourself, then to understand how much a manual wood router costs, look at the table with models and prices:
| Model name | Specifications | |
| Milling table Kraton MT-20-01 | site size | 64 by 36 cm |
| possibility of vertical work | There is | |
| equipment weight | 15.7 kg | |
| Milling table Kraton MT-20-01 | ||
| Milling machine Corvette-83 90830 | engine power | 750 W |
| transmission type | belt | |
| spindle speed | 11,000 rpm | |
| vertical stroke | 2.2 cm | |
| spindle diameter | 12.7mm | |
| Milling machine Corvette-83 90830 |
Making a CNC milling machine with your own hands
You can make your own numerical control equipment with your own hands. To do this, select suitable drawings of a CNC wood milling machine. You will need to assemble the model with your own hands strictly according to them.
Ready-made machine for a home workshop Equipment components Detailed assembly diagram Model of multifunctional equipment
Wood milling machines must have great strength, so it is better to take a rectangular beam mounted on guides as a basis. The lifespan of home equipment and its performance depend on proper assembly. Watch the video instructions for making such a device:
Below are photos of finished models of CNC woodworking machines with your own hands from professional “homemade” ones:
Ready-made balls for the tree of happiness
Purchased blanks and improvised bases for topiary:
- Styrofoam ball. For the tree of happiness, it is advisable to use ready-made foam balls with a diameter of 7 to 30 cm.
- Hanging rattan. Ready-made rattan balls are available at decor stores. In addition, you can make them yourself (rattan is wrapped around a balloon).
- Rubber ball. Limited selection of trunks for topiary: only a cable is suitable, which must be attached to the outside of the ball.
- A ball of knitting thread.
- Chipboard is a die-cut made of thick cardboard. Blank for flat topiary on a magnet, thickness 1-3 mm.
- Tennis ball. For miniature trees.
- Ostrich egg. An original base for Easter topiary. Ostrich eggs are very durable and decor sticks well to the surface.
- Foam ball. Multi-colored products are used by magicians to perform tricks, but are also great for our purposes!
- Wooden ball. They are rarely used, but for a certain design a wooden base is optimal.
Turner services
Finding someone who will provide turner services in Moscow is not very easy. There are fewer and fewer good turning specialists left, as young people do not go to study for blue-collar jobs. Turning works photo. We are proud that we have excellent turners in our team. Before answering your question about the cost of turning services, we need to know from you:
- drawing or drawing with exact dimensions (or sample part) (can be sent by email
- type of material processed and type of work required
- required quantity
- material for work, yours or ours
- other recommendations and wishes.
We try to fulfill all orders on time and with high quality. Our prices are quite affordable. Turning works in Moscow.
metal turning works master turning works price
TURNING SERVICES. Turning work photo
Despite the presence of many methods of forming processes (casting, powder metallurgy, etc.), cold metal working is widespread in the engineering industry.
Very often it is simply unprofitable to produce special casting molds and purchase equipment. Or the only way to make a part is from a piece of metal (plate, rod, profile).
: Polishing
At this point, some people start sanding their ball with increasingly finer sandpaper, up to thousands of grits. I saw no reason to do the same, given that the ball was already quite shiny.
Instead, I polished it in several passes with aluminum polish. You coat it generously with polish and then rub it into the metal until it turns black, then you scrub it off with a few rags.
Is it possible to do this?
Creating a spherical part on turning equipment is a simpler process than it seems at first glance. In this case, you can use both auxiliary equipment, if the production of a small batch is planned, and standard equipment of the machine in the case of piece production. The most affordable way is turning using a previously prepared template.
For metal
Working with metal is an order of magnitude more difficult compared to other materials due to its higher hardness, but it is more familiar and does not have unusual features. Turning a ball will take at least two passes and will require working at high speeds to obtain a satisfactory result. In general, the process is little different from other turning operations and has no specific specifics.
On wood
Compared to a metal workpiece, a wooden workpiece is more amenable to processing, which is why it is possible to carry out processing not only with a lathe cutter, but also with hand chisels and crowns intended for this operation.
When turning, instead of the usual shavings, wood dust remains, so you need to work strictly in a respirator, turning on the hood. It would be a good idea to remove oil spills on the machine in advance and install a vacuum cleaner on the tool holder, which will simplify cleaning after work.