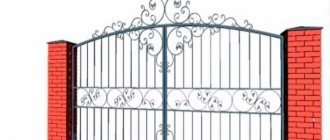
If you have purchased a plot of land, be it a house or a dacha, the question of registering the plot always arises. One of the most beautiful pieces of jewelry that shows the owner’s self-sufficiency and good taste is forged items. It can be either just a forged barbecue or entire compositions of forged products.
From forged metal you can make gazebos that are striking in their beauty; a bench or staircase will fit perfectly into any interior. Forged fences are made, even balconies. You can make a railing on the porch.
Today you can make all this beauty yourself; it is not difficult, as it might seem at first glance. The fact is that these things can be created without resorting to the services of a forge. You can use DIY cold forging machines right at home. And photos of forging clearly illustrate the results.
What you need to know about forging?
Forging is a process of processing a special workpiece. Its purpose is to give the metal the required dimensions and shape. There is a distinction between hot forging and cold forging.
The master needs to get acquainted with both varieties in order to know the advantages and disadvantages of each.
Cold artistic forging
Recently, cold forging has become popular.
It is simpler and requires a minimum of equipment. In addition, this method of making artistic decorative elements is easier to learn. There is no need to know about chemical changes in the structure of the metal, as well as about additional hardening and tempering. Homemade equipment for cold forging is simple to design and operate, and is also quite compact. And the workshop itself is cleaner, unlike a traditional forge, and the products are not contaminated by combustion products.
Workbenches for cold metal working are capable of performing many operations without heating the workpiece faster than the same process was performed with hot forging.
Hot and cold forging in the artistic processing of materials can be combined, because some parts can be created only with heating and forging, while other elements are easier and faster to produce using cold forging.
However, most often these technologies are used separately, because combining them requires a larger amount of equipment, which cannot always be purchased or placed in a small workshop. As a result, cold forging has become more widespread as a simpler way of making a decorative product.
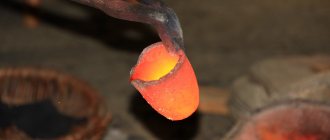
Hot forging method
In the hot method, the metal workpiece is heated strongly. As a result, the metal becomes ductile. Hot forging gives the workpiece the required dimensions and desired shape. The master has a variety of work options available to him.
Heating a metal workpiece also has its disadvantages. First of all, it is necessary to arrange a special room. You will need to buy a forge, for which you will have to buy fuel.
Fire safety rules must be followed; it is important that the master knows how to work with fire.
Having an idea of the temperature conditions used in the forging process, you can easily select the desired type of forging.
Painting of forged products
Any metal product requires a primer before painting. If you do not take such actions, then even the most expensive paint will lose its properties. The thing is that any primer has corrosion resistance and adheres better to the metal. This is why the paint will adhere more firmly to the primer than to bare metal.
Cheap primer and paint will not give the desired effect for forged elements. After their application, the paint quickly fades and peels off the coating.
There are special types of paint - “3 in 1”. They have the combined properties of a primer and paint. Typically, such materials are much more expensive, but when using them you will not need to spend money on a primer.
Cold forging method
Cold forging is a labor-intensive process. To achieve the desired shape from a metal workpiece, it is bent, pressed and welded. The technique is a little simpler compared to the hot method.
The workshop does not require a lot of space, and to set it up you do not need to purchase a special forge; it is enough to buy a forging machine.
The manufacturing process of a product involves working with semi-finished products. If a mistake has been made, it is impossible to correct it.
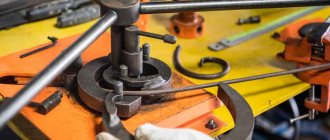
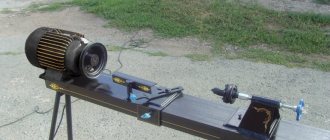
Types of forging machines
For cold forging work, special machines are used. Moreover, each curl or bend requires its own machine for cold hand forging. They are:
- With manual drive;
- Electrically driven.
The first ones are used when it comes to small amounts of work. They are easier to create. Their downside is low productivity. Drawings of a forging machine with your own hands will clearly show the entire process of their assembly.
The latter will be necessary if we are talking about the continuous production of forged products. They have much higher productivity, and do not need to exert physical effort - the drive is carried out by an electric motor.
For those who are just taking their first steps in making forged items, it makes sense to start with a machine called “Snail”. A do-it-yourself forging snail will be an excellent assistant when making a gate and a bench.
If the first steps have been completed and there is an interest in developing the chosen direction, you need to move on to mastering the torsion bar machine. With it you can achieve the use of non-standard approaches to the execution of forged products. Your things will acquire individuality - you can diversify the products produced.
Choosing metal
Metals with certain properties are suitable for hand forging. The more ductile the metal, the easier it is to change its shape. However, ductility is inextricably linked with strength.
An increase in one characteristic inevitably entails a decrease in another. When buying a workpiece, the master must know exactly what its composition is.
Craftsmen make decorative forging elements from copper, steel, duralumin or brass. In addition, alloys can also be used. Information about metals that can be easily forged can be found in the Steel and Alloys Guide.
Cold forging machines
Below we will give you instructions on how to assemble cold forging machines yourself.
Machine "snail"
Making a snail machine is one example of independent design, and it makes no sense to give advice with an exact indication of the dimensions of all parts. You need to be guided by your idea of the operation of the machine, how and what will bend, how many turns of the spiral will be enough for high-quality work, what size the lever with the tabletop will be. If you understand the essence of the machine manufacturing process, then the assembly itself will not cause any particular difficulties.
Machine “snail”
Manufacturing of main machine components
Frame.
The process of bending an iron rod exposes the machine to heavy loads, so when making the frame for the “snail”, only a metal corner, channel or thick-walled pipe is used. Do not make a frame from wooden beams; such a table cannot withstand prolonged loads and collapses.
Tabletop.
The tabletop for the “snail” is made of a metal plate cut in the shape of a circle, at least 4 mm thick. From the same slab, a second tabletop is cut out, repeating the shape of the first. The snail segments will be placed on the second tabletop and the products will be bent. During the cold forging process, the tabletop takes on the bulk of the load, so there is no need to save money and make it from a thinner sheet of iron.
Main shaft and lever.
The main shaft is placed centrally between the tabletops and is attached to the base using four right triangles. The shaft can be made from a thick-walled pipe of the required diameter. The lever is attached to the shaft using a ring and rotates around it; in addition, a roller is installed on the lever for bending the rods on the upper tabletop.
Machine diagram
Marking and installation of attachments
Depending on whether you want to produce only the same type of samples or you need more artistic products, there are three options for the snail device. Option #1. This is the simplest of the three options; its essence is that the outline of a spiral is drawn on the tabletop.
Drawing of the snail segments
At its core, this is a drawing of future products that you will produce on the machine. After applying the diagram, it is enough to cut out several segments from thick strips of iron of different widths that follow the line of the drawing and weld them to the tabletop according to the markings. With such a static “snail” you can make simple bends. Option #2. The second option is the most popular among homemade machines; it involves making a collapsible snail from removable parts. Holes are drilled along the contours of the markings into which threads are cut. Next, templates for the stop segments are made from cardboard or plywood and metal overlays are made from them. Finally, holes are drilled in the pads, which should coincide with the mounting sockets on the tabletop. To secure the segments, bolts are mainly used, but you can also make cylindrical stops. This “snail” design will allow the production of spiral-shaped workpieces with different radii on one machine.
“Snail” made of metal strips
Option #3. In the third option, instead of collapsible stop segments, several removable modules are made with different volute options, which change as needed. The module is made of a piece of iron onto which segments repeating parts of the spiral are welded.
Snail modules
Machine assembly.
- Install the frame in a place where you will have easy access to the machine from all sides.
- Concrete the legs of the frame in the floor or secure the frame in another accessible way.
- Weld the main table top to the frame.
- Install the main shaft by welding it to the tabletop and strengthening it with triangles.
- Place the rotating lever onto the shaft.
- Install the top tabletop by welding it to the main shaft.
- Place the snail segments on the tabletop.
After assembly, test bend the rod. To learn more about assembling a snail cold forging machine, watch the video:
Snail with ploughshare
The device of a bending scroll with a plowshare is shown in the diagram below; The technology for working with such a machine is also described there.
Schematic diagram of a snail machine for cold forging
The advantages of this type of twister bending machine are as follows:
- It is possible to work on a scroll with a rotating share and a collar in an unequipped room: the vertical component of the workload is negligible, and its horizontal components are partially transferred to the support.
- Due to previous point, the supporting structure can be quite simple and light, welded from ordinary steel profiles.
- We can carry out the work process alone: turning the gate with one hand, we press the rod or strip against the template plowshare with the other. As its links bend, they will fall into place on their own.
- Using a cold method, you can twist spirals of up to 5 turns on a snail with a rotary plowshare.
Drawings of a snail machine for artistic forging with a specification of parts are given in Fig. We’ll talk about the dimensions of the links (segments) of the folding share later, but for now pay attention to the steel grades: the share bears heavy loads. If you make it from ordinary structural steel, the template will lead to the middle of the gate or fence section.
Drawings of a snail machine for cold forging
The material for the folding rotary share, as well as the complexity of its manufacture, are not the only weak points of the snail machine with a collar. An even more serious problem is the articulation of the ploughshare links (shown by red arrows in the figure on the right). The joints of the share segments must:
- The design of the folding ploughshare of the snail cold forging machine
To be accurate enough to maintain the shape of the parts being manufactured; - When pressed from the outside, the joints of the segments should become dead center, creating a stable configuration;
- Upon removal of the working load, the joints should self-weed;
- The design and material of the joints of the rotary share must ensure repeated repetition of the cycle according to paragraphs. 1-3 under significant alternating operating loads without the appearance of significant backlash.
It is difficult to fulfill all these conditions together in a well-established and equipped industrial production, so the resources of folding templates for cold forging are generally much less than their material would allow on its own. Poor use of material properties is a serious drawback. In addition, for the same reasons, another weak point of the snail-type machine with a collar is the eccentric clamp of the part. Therefore, novice homemade blacksmiths work more successfully with homemade snail machines for artistic forging, made according to a lever design.
Snail with lever
The lever volute for cold forging is designed similarly to the well-known pipe bender. A homemade lever-type snail machine with a fixed template is significantly inferior in performance to a snail with a collar. The working load in it is more fully transferred to the base, so a strong frame made of special steel or a thick plate of ordinary steel, securely fixed to the supporting surface, is required. As a result, a workshop or outdoor production area is required. Work on the lever scroll progresses slowly: after turning the lever until it jams, you need to move the pressure roller. It is possible to curl up to 3-4 turns on a lever volute. Nevertheless, the advantages of a snail lever machine for home craftsmen are significant, especially when working for yourself:
- All parts, except the pressure roller, can be made of ordinary steel.
- It is possible to use a standard roller bearing as a pressure roller.
- The use of the material properties of the parts is almost complete: the template and frame made of ordinary steel can withstand more than 1000 working cycles.
- You can bend either according to a template (pos. 1 in the figure below) or using spacers, pos. 2 there.
Snail cold forging machines
- When bending along spacers, you can quickly change the shape of the resulting part and create reverse bends, which is basically impossible when bending along a plowshare.
- Securing the end of the workpiece in a volute machine for cold forging
To obtain products of the same quality, the manufacturing accuracy of parts of a lever volute can be an order of magnitude lower than that of volutes with a rotary plowshare. - The end of the workpiece can be secured by simply inserting it into the recess of the template, see fig. on right. The end to be fixed is widened by welding or bending in half.
In addition, the snail lever machine allows the use of a technological technique that is considered the prerogative of industrial twister machines: the template is shifted to the side, and a spacer is placed in the center, pos. 3 in Fig. This creates a small reverse bend in the core of the curl. The part looks more impressive and, when working for sale, the product is more valuable.
Flat bending of steel strip
The lever snail has another rather fat plus: on such a machine you can bend flat curls with a small core from a strip laid flat. The snail with a collar and a rotating plowshare gives up completely here: the workpiece will go in a vertical wave. Wide curls and rings from the strip can be bent flat on a broaching machine with rollers in which grooves are machined, see fig. on right. But the drawing speed, so that the workpiece does not lead, requires a significant one, so you won’t get a narrow curl core.
On a snail lever machine, this problem is solved by installing a pressure roller with a height equal to the thickness of the strip and with a flange (edge), like a railway wheel, only wider. Bending using this method takes a lot of time: the lever must be applied a little at a time, otherwise the inner edge of the workpiece will wrinkle; The flange does not help from this. But it is impossible to obtain a curl from a flat strip with a narrow core in a handicraft production in any other way.
In general, at the start of blacksmithing and artistic activities or when making a forged fence, gate, gate, bench, swing, gazebo, etc., arranging a garden for yourself, it is still better to use a lever-type snail machine for cold forging. Moreover, it can be made from scrap materials without accurate and detailed drawings, see for example. next video.
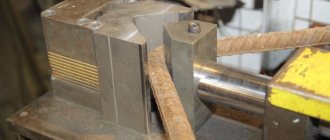
Torsion bar machine
This machine is designed for uniaxial longitudinal twisting of a workpiece from a transverse or square rod.
Torsion bar machine
A channel or I-beam is used for the base of the torsion bar machine. A thick iron strip is attached to it by welding, onto which a vice is installed to clamp the stationary part of the rod. The vice is secured with four bolts with a diameter of M16 or more. To increase the clamping strength of the bar, corrugated sheet steel plates are welded onto the vice. On the opposite side of the base, guide rollers are installed, to which a clamping unit for the movable part of the workpiece is attached. It is made of a steel bushing, in which it is necessary to provide holes for clamping bolts located at an angle of 120 degrees. The bolts must have a flat end and be made of high quality steel. Both clamping devices must be positioned coaxially; to do this, they must be checked using a level, a plumber's square and a caliper.
Types of machines
Next, you need to make a handle for turning the moving part of the clamp. Its lever should hit as long as possible to reduce the applied force. It is better to make the handle itself with a rubber bushing to prevent the hand from slipping during operation. After the machine is fully assembled, it is checked for the reliability of the moving elements and the accuracy of the deformation of the bar. After checking, the machine is attached to the support frame.
A simple model of a torsion bar machine
How to make a torsion bar machine with your own hands, watch the video:
Wave machine
It would be more correct to call this machine a controlled wave. The equipment of the machine consists of a pair of steel disks with a diameter of 140 mm, which are bolted to the worktop. The axis of rotation of the universal wrench is fixed to the drive disk.
Machine “wave”
Wave control occurs as a result of changing the distance between the disks. When the bar is rolled around the drive disk with a knob, a pattern is formed, after which the bar is removed from the conductor and a pattern is formed on the other side. You can watch the machine in action in the video:
Machine "gnitik"
To qualitatively form a corner in a product produced by cold forging, you will need a machine called a “bend”. It consists of a steel plate with a movable stop on which there are two support shafts and a lever.
Machine “gnutik”
The workpiece is placed between the wedge and the support shafts. After this, with the help of a lever, the wedge is shifted towards the shafts, which leads to bending of the workpiece.
Computer model of the machine
Making such a machine is quite simple, the main thing is to follow the given drawing and use tool steel, since during operation a large load is placed on part of the device. You can also watch how to make a “gnitik” machine in the video:
Universal models
Usually we are talking about devices that can combine several functions at once. They help develop not only basic details, but also complex forms for decorative purposes. In each case and each variety has its own instructions on how to make a cold forging machine.
Globes
A kind of repetition of ideas that were inherent in the snail. But the principle of operation differs from those models described earlier. The workpiece is located and secured in one part of the apparatus. Then a special handle is moved, due to which the appropriate shape is given.
Machine - press
A press is needed to form the ends of the rods. This machine works on the principle of a flywheel; first, by rotating the bar with weights, the screw striker is pulled back until it stops. After this, a replacement stamp is inserted into the slot and the workpiece is placed. Next, quickly spin the bar in the opposite direction and leave it to rotate freely. Finally, the striker hits the stamp shank strongly, due to this, a force sufficient for stamping is developed.
Rolling press
As for the manual rolling mill, you can make it yourself, but you still have to order special steel rolls, bearing bushings and shafts, and buy gears in the store. Only “crow’s foot” and “leaf” tips can be produced on such a machine.
Twisters
In this case, the steel workpiece can rotate around an axis. Therefore, the name turned out to be appropriate - from the word Twist, which in English means “to rotate”. The main parts of the machine are two vices opposed to each other.
Connecting and painting parts
Elements produced by cold forging are connected in two ways:
- Welding - parts are welded to each other, and the scale is ground off with a grinder or other grinding machine.
- Clamps - this type of connection looks much more beautiful. For clamps, stamped strips of metal with a thickness of 1.5 mm or more are used.
Finished products are painted using blacksmith enamels or acrylic-based metal paints.
What tools are needed for forging?
Inventory varies depending on the forging method.
A forge with an anvil and hammers with tongs will be needed for hot forging. For the cold method, you need a “Gnutik” tool, which allows you to bend the workpiece at an angle, and a “Snail” machine for forging, which you can make yourself. The latest machine allows you to create decorative elements with a spiral shape.
Note!
- Lamp for disinfection of coronavirus (COVID-19) - an overview of the best options, as well as instructions for use
How to make a medical mask: instructions for making simple and complex masks to protect against coronavirus (COVID-19)
- How to learn to knit and crochet: detailed instructions for beginners
In addition to the basic tools for the cold method, “Flashlight”, “Wave”, “Twister”, a ring machine and others can be additionally used.
The modern market offers industrial machines designed to perform technological operations. In the photo of forging you can see a product made on the “Master 2” machine from the MAH company.
Purpose of forged products
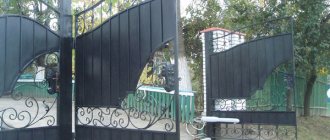
Do-it-yourself artistic forging has firmly taken a leading position in the modern market. These products can be found not only on fences and gates, but also on beds in ordinary apartments. There are several types of products where forging is used most often:
- Gates.
- Fences.
- Lattices.
- Stairs.
- Gazebos, barbecues.
- Furniture and its accessories.
In practice, such a list can be replenished endlessly. After all, it is with the development of progress that forged elements can be useful for anything. What makes them popular is not only the strength of the material, but also its elegant appearance.
Due to such a great demand for forged products, one can’t help but wonder why people like elements of artistic forging so much. After all, metal is a cold, heavy material that is subject to corrosion in the environment. In contrast to these negative factors, there are many favorable ones:
- Durability.
- Exquisite beauty.
- Increased protective functions.
- Possibility of production according to any dimensions and sizes.
- Full possibility of imagination in manufacturing.
- Forged products combine well with other materials.
And this is not the entire list of advantages of forged elements. If we combine all the above expressions, then metal objects are durable, strong and very beautiful products.
DIY forging photo
Note!
How to crochet slippers? TOP 8 best ideas from craftswomen. Step-by-step instructions on how to knit beautiful and warm slippers with your own hands- Washing secrets: how to preserve clothes
- What is the difference between a steam generator and a steamer?