In just two decades, construction technologies have been updated, new building materials and tools have appeared. For example, the old faithful roofing felt has given way to new fused roofing materials, which are better in all respects. No one will argue with this anymore. And accordingly, the bucket with hot bitumen and a brush for coating has gone into oblivion, instead of which builders today use a gas burner for roofing work.
What is a roof burner
A roofing gas burner is a special device designed for installation of built-up roofing materials. In addition, using such equipment, certain elements are heated, surfaces are dried, paint is fired. A typical gas burner model includes the following elements:
- glass made of heat-resistant iron alloy;
- gas supply wire;
- ignition nozzles protected from the wind.
A gas burner for roofing is a small-sized device with strong handles for transportation. It has a relatively small weight (up to one and a half kg) and is equipped with a comfortable plastic or wood handle .
Propane gas is often used as fuel, but on sale you can find devices that run on diesel fuel. The substance enters the device through a gas pipeline. The gas supply and fire intensity are regulated by a special valve located on the body. The integrated gearbox allows you to minimize fuel consumption and control its consumption.
All models of gas burners for roofing work are equipped with an air suction system. A similar function is indispensable. Additional options that increase convenience include the choice of operating modes. For example , when a propane roofing burner stops, the standby mode automatically starts, which allows you to save gas. Such equipment lights up with a regular lighter or matches.
How to use a gas burner: safety rules
The operation of gas burners requires strict adherence to safety rules:
- Work with burners is carried out in special clothing and shoes with non-slip soles. You will also need a belt and walking bridges.
- Before using the tool, it is necessary to conduct an external inspection and ensure that the burner, cylinders and connecting hoses are in full working order.
- During use of the device, only one gas cylinder may be present at the work site.
- Do not stand in front of the nozzle while igniting the gas in the burner. The direction of the metal cup must be such that the fire cannot touch anyone nearby, the gas cylinder and the connecting hoses.
- If you use weldable materials, you must ensure that they do not overheat and do not catch fire. It is necessary to ensure that only the lower part is heated; the material should not be allowed to soften completely.
- The burner can only be lit with matches or a lighter.
- While working with the device, the master is prohibited from going beyond the boundaries of the workspace, as well as going down or up the scaffolding.
Extinguishing the tool occurs in two stages: first, the gas supply is shut off, and then the locking lever is released. Even after a short break in operation, the device should be extinguished. If there is a significant break, then the gas supply must be shut off at the cylinder itself.
Before using the gas-air burner, it is necessary to conduct an external inspection and ensure that it is in full working order.
Helpful advice! If the mouthpieces or connecting hoses are clogged, the device cannot be used, as kickback and popping noises may occur. If backlash occurs or the equipment overheats, you should immediately stop working and turn off the fuel supply to the cylinder. You can cool the instrument by immersing it in a container of water.
Types of gas devices
For installation of bitumen roofing, manual burners are used. They are often “powered” by propane. It is very convenient to use such equipment, and the flame length is adjusted using a conventional lever mechanism . Gas-air roofing burners are considered the least dangerous
Valve models are characterized by low weight and ease of operation. In addition, such equipment is not difficult to repair. Producing an intense flame, they work perfectly even in strong winds.
There are also acetylene roofing torches that operate on a mixture of oxygen and acetone. They are often used for welding.
Compliance with security measures
Due to the fact that you will have to work with fire, you must be as careful and prudent as possible. To avoid unnecessary problems, you must follow the following rules:
- roof installation must be carried out in non-slip shoes and special clothing;
- it is necessary to use the insurance system;
- before turning on the device, you need to carefully examine it for flaws and defects;
- during operation, it is necessary to frequently check the tightness of the gas hose;
- It is prohibited to leave the work area while the equipment is running;
- When extinguishing a device, you must first turn off the gas and then press the locking lever.
Step-by-step burner manufacturing process
The process of manufacturing a gas burner begins with the fact that we insert the supply tube, for which we will use a steel pipe, into the handle and secure it with glue. The divider and body must be machined from a brass rod, the diameter of which should be 20 mm. In the finished body, two radial holes are drilled (each diameter is 5 mm) and four holes are drilled in the divider rod (each diameter is 1 mm).
When assembling, it is necessary to press the divider into the body with a slight tension. At the same time, the flange must be installed inside the housing with a gap, that is, the internal diameter of the manufactured housing must be 0.6 mm larger. diameter machined The resulting gap is responsible for braking the gas flow, which is supplied to the drilled holes in the igniter.
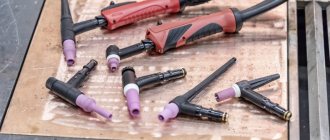
Such nozzles are found in purchased models
Next we grind out the nozzle. For this we need a steel rod.
To make a thin hole in our nozzle, you need to take a drill with a diameter of 2 mm. and use it to make a blind hole, which is 1.5 mm. doesn't reach the exit. Drill with a diameter of 0.4 mm. used for jumper. The resulting hole must be completely caulked with gentle hammer blows. Then you need to sharpen the end. To do this, take sanding paper and sharpen it until the desired cross-section of the outlet hole is found, that is, until the nozzle can be placed on the tip of the threaded burner tube.
A supply hose made of fabric-rubber material must be attached to the end of the gas supply tube. Secure the hose to the tube with a clamp. We set the working pressure, after which we supply gas. Wait until all the air is forced out of the hose, and only then insert the nozzle into the flame of the gas burner.
Attention! The nozzle is introduced into the flame without a housing or a divider.
Next you need to sand the end. The length of the burner flame should ultimately be 5 cm. We put the body together with the divider onto the external thread of the nozzle. Make sure that the burner produces an even flame with no signs of soot.
To achieve the desired effect, slowly rotate the body on the nozzle thread.
If you have a loose threaded connection, seal it with FUM tape.
Equipment manufacturers and their costs
Now on the Russian market you can find various types of roofing burners, both foreign and Russian made. Users speak positively about equipment from the Size and Donmet brands. The products of these companies are characterized by the highest safety and excellent quality. Typically, these are cheap devices that are suitable only for minor roofing repairs. The most productive and advanced equipment is produced by Poap and Rothenberger. These devices are equipped with comfortable operation, a huge number of functions and immense control capabilities.
If you need to make light repairs, it is best to purchase a model that costs up to 1000 rubles. Within the range of 700-900 rubles you can get very good products. Products with the highest price are characterized by greater performance and reliability. Some craftsmen, in order to save money, are going to make a burner with their own hands. As a result, they end up with equipment that is in no way inferior in quality to “purchased” devices.
Self-production of the device
A roofing material burner is a very complex device. To independently produce such a device, it will be useful to study a huge number of rules and have certain abilities. One way or another, it is better to entrust some part of the work to experts. This applies to the fuel storage vessel and its supply system.
A divider and an alloy rod are used as a torch. The handle must be made of heat-resistant wood. The wire supplying the gas can be created with your own hands from brass or borrowed from a welding system.
Interesting read: DIY construction vacuum cleaner for cement dust
It is necessary to work with homemade equipment very carefully, checking for malfunctions and fuel leaks. Even with a minor dilemma, it is better to immediately stop treating the roof.
Roof burner components
During the assembly process of the device, mechanical processing is practically not used. The burner is assembled from ready-made spare parts. To make it we will need:
- A steel valve that can be taken from a cylinder intended for storing liquefied gas.
- A plug used for transporting gas cylinders.
- A nozzle from a blowtorch with a nozzle diameter of 0.8 mm.
- A piece of pipe one meter long with an internal diameter of 10 mm. and steel thickness 2 mm.
- Wooden handle.
You can use the handle from a burnt-out soldering iron as a handle.
Gas burner for roofing work
The past decade has been characterized by the emergence of revolutionary changes in the technology of arranging soft roofing. Traditional roofing felt has given way to modern built-up materials. The composition of the tools needed to perform roofing work has also changed. The bucket of bitumen and brush were replaced by a roofing torch.
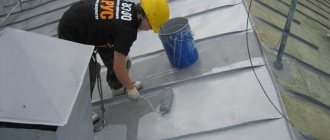
How to lay roofing felt using a gas burner?
Clean the base of the roof from debris. Roll out the rolls of roofing felt with an overlap of 85 cm, glue the ends to the base of the roof on one side, then roll the rolls back. Heat the base of the roof and the inner side of the slowly rolled out roofing material, press the roofing material tightly to the base of the roof with a roller, trying to avoid the formation of air bubbles and folds.
Using a special hook, hook the edges of the roofing material laid overlapping and heat it with a burner, checking the tightness.
The minimum temperature at which a roofing burner can be used is minus 15 degrees Celsius.
What kind of equipment is this anyway?
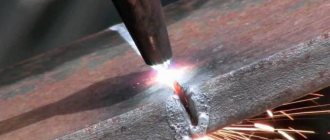
A gas torch is an indispensable hand tool for performing work on installing soft roof coverings using modern weld-on materials. The flame created by the operating burner allows for local heating of the surface to perform the following operations on the roof:
- drying wet areas of the underlying surface;
- heating and melting of the lower bitumen layer of the welded roll material.
In addition to performing work on the roof, a roofing gas burner is used:
- for heating various products and materials to the required temperatures;
- when soldering metals with light alloy solders;
- for burning old paintwork.
Burner design and mechanism
The roofing gas burner includes the following elements:
- nozzle – supplies gas to the combustion zone through a special calibrated nozzle;
- burner glass - mixes flammable gas with air sucked through the holes, protects the flame in the combustion zone from being blown out by the wind;
- control valve - shuts off the gas supply, allows you to adjust the length of the flame;
- main tube – moves the combustion zone in the glass away from the handle and operator’s hand;
- wood or plastic handle – allows the operator to comfortably hold the burner in his hand.
To operate the burner you will need the following additional equipment:
- liquefied gas cylinder;
- gas reducer - reduces the gas pressure from the cylinder to the working pressure (0.1 - 0.15 MPa), equalizes the gas flow in the burner;
- flexible hose – connects the burner to the output of the reducer.
The weight of the burner is small, no more than 1 - 1.5 kg. Almost all models have the ability to switch to standby mode, when during short breaks in operation the gas supply is reduced to a minimum, allowing the flame not to go out.
A convenient function that saves gas and eliminates the need to re-ignite the burner after interruptions in operation. To ignite the burner, an external flame source is usually used: matches or a lighter.
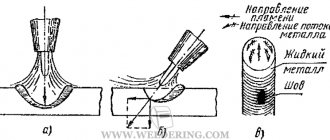
Operating principle of the burner
Regardless of the specific type, all burners operate on the same principle. Gas is supplied from the cylinder through an oil-resistant reinforced rubber hose. Constant pressure values are provided by a reducer; if desired, the parameters can be adjusted with a special bolt on the top cover of the device. The volume of fuel is regulated by a tap. The rubber hose is placed on the metal tube of the burner and screwed tightly with a clamp. The burner has special holes around the entire perimeter, through which air enters to mix with gas.
Gas burner for roofing work
The flame is ignited and directed by a metal nozzle to the desired area. Older models of heating pads are manually ignited with matches or lighters; modern models have piezoelectric elements for remote and safe ignition.
The design of the burner ensures a stable flow of flame; it is not blown out even by very strong gusts of wind. Such burners are used not only during roofing work. Sealing of metal pipelines, some road works, etc. cannot be done without them.
Roof burner application
What are the advantages of a modern industrial burner?
- Small mass. The weight of the device does not exceed 1.5 kg, which greatly facilitates the work. The roofer's hand does not get tired; he has the ability to heat up the bitumen at the same speed. The optimal temperature of the entire area is achieved, the quality of the roof covering is improved, and productivity increases.
- The gas supply valve and reducer allow you to smoothly regulate the intensity of the flame. The torch changes without stopping the operation of the device; the master makes a decision during installation, taking into account the actual state of the old flat roof surface.
- The most modern models have special devices that prevent direct contact of the heated burner with rolled materials or the base. Touching a very hot burner to the membranes can cause a complete breakdown of their tightness, which is considered a defect. Such areas need to be repaired, and this takes time and money.
Types of industrial gas burners
The technical parameters of devices depend on their purpose; you need to choose the one that is best suited for a specific job.
| Type of gas burner | Purpose and brief description |
| GG-2 | It belongs to the small class, has a small length and nozzle diameter. It is used to facilitate the fusing of flexible roofing in hard-to-reach places. Consumes a small amount of gas. |
| GG-2S | An upgraded device with improved combustion parameters. To expand the scope of use, it is equipped with spare burners of various diameters and lengths. The master has the ability to change them as necessary to achieve the required bitumen heating temperatures. |
| GGK1 | Durable housing, used by professionals. Can withstand long cycles and is not afraid of overheating. A reinforced burner has increased weight - this is one of the disadvantages of the device. |
| GGS1-1.7 | The nozzle is located at a great distance from the control handle - making work easier, you can take the most comfortable body position. The gas supply control valve is made of wear-resistant materials, the seals completely eliminate gas leaks, which significantly increases the safety of roofing work. |
| GW | Models GV-900 and GV-550 are produced. They differ in length, the first model has dimensions of 90 cm, the second 55 cm. During fusing of the roof, you can change the units taking into account the distance to the base. |
Gas-air injection burner GG-2u
If a gas burner is manufactured by a licensed company, then it fully complies with existing safety regulations. It is strongly recommended not to purchase cheap fakes; ignition of the units during work causes very severe burns.
Gas trigger burner GGK1 ULTRATurbo
Prices for various types of gas burners and blowtorches
Gas burners and blowtorches
Roof burner models
- GGS-1 is a more common and necessary model. Flame length 600 mm. Versatility and low weight determine a wide range of implementation.
- GG-2 is the basic model of a gas burner. It has a beautiful price-property ratio. An excellent choice for DIY roof repairers.
- GG-2U - the model is similar to GG-2, but differs in the shorter main tube. Comfortable for working in inaccessible places.
- GG-2S – the beginning of the professional series. The burner is adapted for operation in strong winds.
- GGK-1 - has a weighted glass and a trigger gas supply mechanism.
- GGS-4-1.0 - has 4 glasses, immediately engulfs the entire width of the roll with flame. Significantly speeds up work on huge volumes of roofing work.
Gas burner: price and characteristics of some popular models
Gas-air burners for roofing are the safest tools. They are easy to use, lightweight, and capable of creating a flame of sufficiently high power. Modern manufacturers offer models that operate without oxygen:
- GG-2 – propane burner for the roof. This is the best option for craftsmen who perform repair work themselves. It has an acceptable cost;
- GG-2U is a device similar to the previous version, but this model is characterized by a shortened version of the gas supply hose for the gas burner. This device is ideal for performing work in hard-to-reach areas of the roof, as well as for gluing joints;
Before purchasing a burner, it is important to read the specifications of the model and check the quality certificates
- GG-2S is a model that belongs to professional tools and runs on propane. The main advantage of the device is that the device can be used even in strong winds. The device is equipped with two valves and consists of two housings, making it easier to control the operating modes of the device;
- GGS1-1.7 is a universal design, which, despite its small size and weight, is characterized by a high degree of performance. The device can only be used on flat horizontal areas;
- GGK-1 - this burner is heavier than previous designs and is equipped with a very durable glass. This model is suitable for burning old paint, wooden surfaces, as well as for performing waterproofing work. Fuel is supplied using a special lever.
- GGS1-1.0 is used for small works of insignificant volumes. Optimally used on roofs with a large angle of inclination;
- GGS1-0.5 is used for minor repair work. The model is characterized by low fuel consumption;
- GGS4-1.0 consists of four bells, thanks to which the entire roll is heated simultaneously. The use of this option allows you to increase labor productivity and save fuel;
Gas-air burners for roofing are considered the safest tool
- GV-3 is a propane torch designed for welding and even manual soldering of metal. The diameter of the glass is 5 cm;
- GV-111R is used for melting bituminous materials and firing a layer of paint.
- GV-550 and GV-900 are very easy-to-use designs that differ from each other only in the maximum flame length. The first model is more suitable for performing tasks at the junction points of the roof, and the second device allows you to work while standing at full height, since the length of the torch reaches 90 cm;
- GV 500 is used to perform surfacing work during laying of roofing materials. This model melts bitumen with ease. The flame temperature of the GV 500 gas burner is 300 °C;
- GV-850 is a burner that has a special valve, thanks to which you can precisely regulate the amount of technical gas supplied from the cylinder. There is also a lever installed here, with which the master adjusts the length of the torch. This gas burner does not operate on pure propane, but on a mixture that contains technical oxygen. The price of a gas burner for roofing GV-850 is 1700-2200 rubles.
As you can see, the choice of gas burners is very wide, and where to buy a burner: in a store or on the website depends on the wishes of customers. The main thing is to read the specifications of the model and check the quality certificates for the product.
Helpful advice! GV class models are suitable for heating non-ferrous and ferrous metals, melting bituminous materials in rolls when performing waterproofing and roofing work, as well as in cases where the use of only propane is required.
Gas burners are easy to use, lightweight, and capable of creating a flame of sufficiently high power.
Stages of work when laying material with the introduction of a roofing burner
Work on arranging the roof with rolled fused materials is carried out in several steps:
- preparing the surface to be covered , removing the old bitumen coating;
- the roof surface is carefully swept ; it is comfortable to use compressed air to remove debris and dust;
- if there are significant bulges , a concrete screed is made;
- increasing the adhesion of the coating is achieved by applying a thin layer of primer or special polymer mastic to the surface to be covered;
- the roll of material to be deposited is carefully heated by the flame of a gas burner; a change in the color of the pattern on the lower surface of the material indicates that the desired temperature has been achieved;
- the roll is rolled out and the material is pressed tightly against the surface to be covered with a manual roller;
- any subsequent roll is positioned in such a way that an overlap of 8–9 cm wide is formed with the previous strip of material.
Interesting read: Conductors for assembling furniture with your own hands
How to make a gas burner with your own hands?
Now manufacturers offer a wide range of gas burners that can satisfy virtually any user. But, there are times when a homemade tool takes up decent space in a home workshop.
Making a gas burner with your own hands is completely doable at home. If for one reason or another you cannot purchase or create a burner, you can rent/rent it.
What will you need for this:
- Gas jet with a diameter of the nozzle passage of 0.8 mm. The easiest way is to pick up a carburetor from an old car. Home gas stoves are often equipped with a set of additional jets.
- Gas line - copper or brass tube 70 - 80 cm long . The diameter and thickness of the walls are selected such that it is possible to cut the internal thread from one edge to secure the nozzle.
- Wood or plastic handle. Wide range of options. Must be beautiful and comfortable.
- The glass is the body of the burner and protects the combustion zone. You can pick up a piece of thin-walled iron pipe 100 - 140 mm long, with an internal diameter of 25 - 40 mm. Can be made from sheet alloy 0.8 - 1 mm wide. Connect the edges by welding or using rivets. Materials for production: soft iron, copper, brass.
- Control valve. Perhaps a more difficult question is in the design. It should simply shut off the gas and be comfortable to use. You can look for it among the water supply fittings, or pick it up from a home gas stove that has expired.
- Gas cylinder, reducer, flexible hose. There is no need to invent anything, just take something ready-made. These elements directly address issues of non-hazardous operation.
We assemble in the following sequence:
- In the gas main pipe, cut an internal thread on one side and screw in the nozzle.
- We attach a glass to this side of the tube from the outside. We use three spacers from available material.
- We drill a hole in the handle , insert the other end of the gas line into it and secure it with glue.
- We connect the outlet of the control valve to the end of the line protruding from the back of the handle.
- We connect the input of the control valve to a flexible hose and secure it with a clamp.
- We connect the second end of the flexible hose , the reducer, and the gas cylinder.
- We apply gas, wait until the gas pushes out the air in the hose.
- We light it and adjust the required flame length.
Propane burner device
Before you start making your own gas burner, you should understand its design features and operating principle.
Typically, a propane torch consists of the following elements:
- frame;
- lever;
- distribution nozzle;
- gas hose;
- gas tube;
- propane tank;
- gearbox;
- clamps for fastening.
Propane is supplied through a hose from a pressure cylinder. The volume of gas is regulated by the operating valve on the cylinder, but for safety reasons it is worth additionally installing a reduction gear.
These are the main elements that will be present in a homemade device. But depending on the chosen modification, the design may vary slightly
A shut-off valve is used to open/close the gas supply. It is located behind the main valve. The flame intensity is adjusted using a working tap.
At one end of the gas hose through which gas is supplied, a special nozzle is attached, at the end of which there is a nipple. The nipple together with the gas tube are placed in a metal glass, where the flammable mixture is actually created.
Next, the combustible mixture enters the combustion area through a nozzle under pressure. To maintain a uniform combustion process, holes are specially provided in the nozzle.
Having familiarized yourself with the design features of the device, you can begin to create a gas burner with your own hands, especially since it is not as difficult as it might seem at first glance.
Safety rules when working with gas burners for roofing
Carrying out work on the roof with the use of a gas burner immediately affects several sections of labor protection:
- work at height;
- work carried out with open fire;
- appeal with flammable substances.
Taking advantage of it, strictly observing safety precautions, is the basis for preserving human life and health. Accordingly, the entire set of measures to ensure safety can be divided into three parts. Measures to prevent a worker from falling from a height:
- the presence of shoes that prevent the worker from slipping off the roof surface;
- safety devices to prevent falls from a height;
- the presence of fencing of the working area, walking walkways, etc.
Measures to protect workers from high temperatures:
- availability of special clothing, mittens;
- It is not allowed to direct the flame towards people or parts of the gas installation;
- It is not allowed to go beyond the boundaries of the work area or climb the scaffolding with a lit burner in your hands.
Fire safety measures:
- ensure the availability of primary fire extinguishing equipment in the work area;
- work with an open flame can be carried out during daylight hours in the period from 8 to 18 hours;
- there may be no more than one liquefied gas cylinder in the work area at once;
- it is necessary to exclude heating of the gas cylinder;
- Avoid overheating and ignition of the deposited material.
Before starting work, you need to inspect the gas equipment and make sure it is working. Check the tightness of the connections of the cylinder, reducer, hose and burner.
How to make your own gas burner
Not everyone can do it, you need to have soldering and welding skills, be able to work on metalworking machines, and have metalworking tools. For manufacturing you will need a piece of pipe for the nozzle with a length of 110 mm and a diameter of 50 mm.
Piece of pipe for nozzle
Sizes may vary slightly, but not within wide limits. As practice shows, such a nozzle produces a sufficient flame to heat the roof and consumes a moderate amount of gas. The nozzle is fixed to the handle with metal strips; they can be welded or fastened with rivets. The second option takes more time, but is characterized by increased reliability. Riveted joints do not respond to repeated heating at high temperatures; weld seams crack over time under such operating conditions.
Rivet connection
Gas is supplied to the burner by a copper or metal tube. It is advisable to choose a copper one; you can solder a nozzle to it, without having to cut a thread inside a metal tube for it. This makes the work much easier.
A tube
One of the main elements of a gas burner is a nozzle; its diameter should be 0.75 mm. This parameter is written on the front surface. You can buy a nozzle in a store, the second option is to unscrew it from an old gas stove.
Injectors
The hoses are placed on the tubes, the diameters are selected individually.
To solder copper, you need a borax, a copper-phosphorus rod, and a small gas burner to heat the metal.
Step 1. Take a die and cut a thread on the nozzle. If you already have it, great, less work. Work with the die very carefully, the nozzle is thin, and copper does not have much strength. Be sure to lubricate the surfaces with machine oil or soapy water. The movement of the die must be reciprocating.
Step 2. Solder a small fitting of a smaller diameter into the tube. This must be done in this order.
- Prepare your work area. It is better to use fireclay bricks for this; they do not allow heat to pass through, and the metal does not cool as much. In addition, fireclay bricks are not afraid of prolonged exposure to an open flame.
- Use a torch to heat the tubes until dark red. More is needed, overheated copper loses its original properties, and this has a negative impact on its physical parameters. Tear evenly around the entire circumference of the joint with a margin of length.
- Grab some borax with solder and start soldering, constantly maintaining the temperature of the tubes within the required limits.
- Gradually rotate the tube as you solder. Carefully ensure that there are no gaps left, you must achieve complete tightness. The seam should be smooth, avoid the formation of drips.
- Check the quality of welding around the entire perimeter, turn the tube. If you have problems with sealing, apply a second layer. There is no need to save solder - big problems may arise later.
Soldering the fitting
In the same way, weld a fitting for connecting a rubber hose on the other side of the tube.
Important. After the tube has cooled, thoroughly blow it away from scale and slag. Tap the surface from different sides, use a compressor, etc.
If this is not done, then during operation small particles will clog the nozzle nozzle. The fusion of the roof will have to be stopped, which will affect the tightness of the roof. The nozzle can only be cleaned after the burner has completely cooled down. And this takes time.
Step 3. To improve the appearance, you can remove large deposits of solder using an emery machine. But this is not necessary, the correct soldering process gives a very smooth seam.
Step 4. Screw the nozzle into place, check the connection tightness. Use your finger to close the nozzle and blow strongly into the open end. If there is a leak, a drop in air pressure is felt. Then you need to tighten the threads, if this does not help, then moisten all connections with soapy water and blow again. Soap bubbles will appear in places of leakage; they need to be soldered again.
The injector needs to be screwed on
Step 5. Insert the prepared tube with the nozzle into the nozzle, and put on the hose on the opposite side. To increase the strength of the structure, first place clamps on the metal strips. With their help, they will be tightly pulled together, the burner will be very stable.
Assembly of elements
Step 6: Tighten the clamps. It is not necessary very much yet; the distance of the nozzle to the burner will have to be adjusted during the test.
Tightening the clamps
Burner assembly
Recommended part sizes.
- Main copper tube. External diameter 12 mm, internal 8 mm. The length depends on the purpose of the burner.
- Nozzle. Wall thickness 3 mm, length 110 mm, diameter 50 mm.
- Metal strips. Width 10 mm, thickness 2.5 mm.
- The outer diameter of the tube for the nozzle is 8 mm, the inner diameter is 6 mm. It just fits her thread. If the factory thread on the injector is inch, then it is better to convert it to metric.
- On the other side of the tube, the tip of the fitting from the gas cylinder . With its help, the gearbox is fixed; it fits the diameter of a standard rubber hose.
- High pressure hose with internal diameter 9 mm. It is sold in specialized stores; you can purchase any number of meters.
Practical advice. Each technological stage is very important and affects the safety of its use. Always keep this in mind.
Video - Homemade propane gas burner
Structural features of roof burners
The burner, designed to work on a roof structure, is a mobile device equipped with special handles for moving it. The weight of the unit is about 1.5 kg. The burner has a wooden or plastic handle for operation; its length can reach 1 meter. Such equipment is specially designed for heating welded roofing.
The main operations that can be done using a roofing torch:
- firing of old paintwork;
- cutting, soldering of iron products;
- drying surfaces;
- other work that requires heating surfaces to high temperatures during their implementation.
Equipment design elements:
- glass made of heat-resistant alloy;
- ignition nozzles are equipped with special protection from powerful winds;
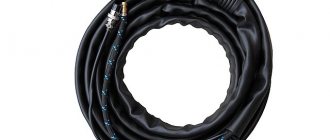
- gas supply hose.
Most often, propane gas is used for such equipment, which is supplied to the housing through a special hose. The gas supply and flame length are adjusted using a valve equipped on the tool, and a reducer is additionally used to adjust the flow rate of the gas mixture.
All designs of this equipment have an air suction system. This feature is essential for the tool. To increase the comfort of working with equipment, a special regulator of operating modes is additionally provided, which provides the opportunity to save fuel when the standby mode is turned on. To ignite the flame of the instrument, you need to have a lighter and matches on hand.
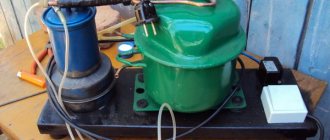
Gas burner for roofing on a cylinder or can
At first glance, it may seem that pulling a gas cylinder onto the roof is the most dangerous idea, especially since there are a lot of hand-held burners on sale. In fact, it is the canister burners that often cause burns, fires and injuries. This is due to the sale of fake and cheap Chinese products. The safety of burners with a large cylinder lies in the fact that the container itself is located far from the flame during operation.
When purchasing, do not pay attention to too cheap models. The main problem with such structures is that the technical data sheet indicates an operating pressure of 0.05-0.08 MPa, which during operation turns out to be several times higher. The gearbox installed on the device is absolutely not designed for heavy loads, so a closed valve may simply not withstand such stress.
Gas burners on a can have a combustion temperature of about 700-1000 °C
Gas burner for a cylinder: characteristics of the device
The design of the gas burner includes a handle, a gas supply tube and a metal cup attached to its end. A hose is connected to the handle, through which the working gas is supplied from the gas cylinder. The handle can be made of plastic or wood.
The gas burner bowl is designed in such a way that the flame is protected from the wind during operation. Glasses of different models have different devices, but their operating principle is the same. It is also possible to adjust the flame length. Modern models are equipped with a special gearbox, on which, using a valve, you can control the pressure and fuel consumption.
By pressing the handle lever, the valve opens and gas enters the glass through a tube and hose. The flammable mixture of working gas and air is ignited with a lighter or with ordinary matches. The combustion temperature of a gas burner is very high and can reach from 500 to 1500 °C.
Absolutely all models of gas roofing burners are equipped with an atmospheric air supply system. There is also a device for adjusting operating modes: operating mode and standby mode. For the manufacture of devices, only high-quality and very durable materials are used, since the burner heats up to the highest temperatures. Typically, the weight of the structure is small and varies from 1 to 1.5 kg, so the tool is easy to hold in your hands.
By pressing the handle lever, the valve opens and gas enters the glass through a tube and hose
Modern roof burners differ from each other in the principle of adding oxygen to the fuel. Older models require connection to an oxygen cylinder, which is not entirely convenient. Modern designs take air from the atmosphere. Typically, propane is used as the burner gas, but there are samples that run on pure methane.
It is important! The length of the handle for holding the gas burner should measure about one meter, but no more. In this case, it is necessary that it be equipped with a special holder made of heat-resistant plastic or high quality wood, thanks to which the master’s hands are protected from burns.
Gas burners on a can: description of the tool
The burner in the form of a nozzle on a gas cylinder with a collet connection is used only in strict compliance with fire safety rules, as well as in places where heavy construction equipment is not working and the risk of damaging the burner with the cylinder is minimal.
The simplest models have a combustion temperature of about 700-1000 °C. Oxygen enters the burner from the air, so it is always in short supply. In tools that have a higher cost, the flame temperature reaches 1200 °C, and they have a specific shape of air supply holes that help increase the amount of oxygen in the burner.
Gas burners on a can are equipped with a flexible or rotating tube and a valve for adjusting the flame
Manual gas burners of the ejector type have an even higher flame temperature. In these structures, air flows to the fire due to rarefaction. Thanks to this, the flame reaches a temperature of 1500-1600 °C. It is also possible to regulate the flame length relatively smoothly using a tap. This model is not designed for delicate work, but is great for heating large areas.
All types of gas burners are equipped with a flexible or rotary tube, piezo ignition and a highly sensitive valve for adjusting the flame. Currently, there is a large selection of tools according to their power and fuel consumption.
Gas burner for soldering: features of models
Ejector lamps for soldering have a special design and purpose. Most often, these tools are used by craftsmen for processing non-ferrous metals. The high temperature and adjustable flame of the torch make it ideal for soldering and hardening of metals or any other heat treatment that requires high temperature accuracy and a clearly defined flame cone.
Gas torches are most often used for processing non-ferrous metals
The sizes of canister burners and nozzles can vary significantly, which allows them to be used in various fields. Very miniature models are used for soldering jewelry and thin metal. Although the tool is not equipped with a device for supplying oxygen, it does an excellent job of filigree work.
Medium type devices have a cone thickness of 0.3 to 0.9 cm and are optimally suited for soldering copper and aluminum tubes. Due to their high power, large burners should be used in artistic forging or metal stamping.
For ejector burners, the use of the concept of an unstable flame is not entirely correct. Since, although flashes are possible from time to time, this has little effect on the temperature in the core of the instrument’s flame.
How to properly use a gas burner for a roof
The procedure for working with a roofing burner using propane gas is divided into separate stages. The main roofing covering, for the installation of which similar equipment is used, is roofing felt.
Work order
- Before starting work, the base for roofing felt is prepared: cleaning of construction debris and other contaminants, smoothing the surface (if necessary, a concrete screed is applied).
- Roofing felt is rolled out on the prepared base, while individual sheets of material are laid overlapping each other.
- Then roll the roofing felt rolls back and fix them at the base of the roof slope with a gas roofing burner. After this, immediately warming up the roofing material and the base of the roof, they slowly roll out the roll covering and painstakingly press it onto the base. Adjacent rolls are soldered together.
- The laid layer of material must be rolled with a roller from time to time so that no air bubbles remain under the coating. The seams are also rolled after soldering.
Operating rules
- It is prohibited to carry out installation work using a gas burner if Toc is less than minus 15°.
- Using this equipment, you can cover a roof with an area of about 500 m2.
- The device must be equipped with reliable protection from powerful winds and have a measured combustion flame.
Preservation techniques
- Before roofing work, gas hoses and gas cylinders are inspected for suitability for use.
- Work is carried out only in overalls, soft shoes and with safety equipment (minimum cables, safety belts).
- The gas cylinder is installed near the workplace; all equipment connections must be sealed.
- The flame at the moment of ignition of the burner, during operation, is prohibited from being directed towards people, a gas cylinder, or hoses.
- It is not allowed to overheat the soft roof covering to prevent it from igniting.
- It is prohibited to leave the workspace with the device running.
- When igniting a propane burner, you must first turn the valve half a turn and vent the device. After this procedure, you can ignite and adjust the power and flame length.
- You need to extinguish the gas burner in several steps: 1st - turn off the gas supply, 2nd - lower the locking lever.
Gas burner assembly
First of all, you need to cut an internal thread at one end of the copper tube using a tap of the appropriate diameter. Copper is not a very hard metal, so it will not be difficult to carry out this operation with your own hands. It will also be easy to screw in the jet.
With a glass everything is more complicated. To do this, you will have to cut one side of the pipe into several longitudinal petals (6-8 pieces), and then bend them towards the center. You will get a cone, but there is no need to bring the petals to the end; you need to leave room for the main tube, onto which the glass is placed. After which the petals are pressed against the tube, where they are sealed. There are slots between the petals that will serve as air supply inside the nozzle. The length of the petals is approximately one third of the entire length of the glass.
Important! The jet should be located at a distance equal to the length of the petals. That is, a flame of propane and oxygen should form at the level of the slots.
The gas burner for roofing work, or rather, its front part in the form of a nozzle is ready. All that remains is to assemble the back part. To do this, you will need two M25 bends made from a pipe with a diameter of 25 mm with threaded threads. In a one-way bend, in a place where the thread is not cut, a cone is formed into which the rear part of the main tube is inserted. This can be done by heating the squeegee with an oxygen torch and tapping it on all sides.
A gas control valve is screwed into it. The second connection, it is double-sided, is screwed into the valve on the other side. Be sure to wrap it on a sealing material. For example, on fum tape. An adapter from a threaded connection to a hose connection is screwed onto the rear end of the second bend. There is no point in making it yourself, because it is sold in any hardware store and is very cheap.
Now all that remains is to make the handle and install it on the prepared device. There are a huge number of options for handles. The main thing here is to hold the entire homemade device comfortably. For example, it can be cut from a wooden board 5 mm thick, you can buy an ax handle and adjust it to the size and shape. It is better to attach the handle to the brackets, because this is the strongest section in the entire structure. Optimally, this is a rear drive, because the control valve should be located slightly in front for ease of use.
There are different ways to attach a piece of wood to a metal tube.
- Make a recess along the entire width to fit the diameter of the pipe of the squeegee, place the squeegee in it and secure it with two clamps made of metal tape.
- Install the squeegee on the side of the handle and also secure with clamps.
So, you have made a gas burner for roofing work yourself, you can connect it to a gas cylinder and carry out testing. To do this, the hose is connected to the cylinder through a reducer, where it is secured with a clamp. Its second end is threaded into the adapter, where it is also secured with a clamp.
The cylinder opens, the supply of propane through the gas reducer opens. And the last thing to open is the control valve on the injector. Gas should flow through the nozzle with a characteristic sound. You must wait until the air inside the device is completely released. After which the gas flow is ignited. The valve near the handle regulates the length and power of the torch.
Attention! A homemade gas burner for roofing work is a high-risk device. Therefore, all operations performed must be approached with special care. This is especially true for the connections of all elements with each other. Complete tightness must be maintained.