The execution of welds requires mandatory compliance with established rules. This condition applies to all welded joints - in construction, mechanical engineering and other sectors of the economy.
- Normative base
- Definition
- Special guidance documents
- Non-destructive steeloscopy of weld metal: application of technology
Therefore, to control the quality of seams, special methods are being developed to allow timely detection of technology violations and prevent serious problems - for example, the destruction of a building or an industrial accident.
However, it must be taken into account that quality control of a welded joint is usually performed on a finished product. Therefore, the use of destructive testing methods makes the seam unsuitable for its intended use. Therefore, to check the reliability of the connection, it is necessary to resort to non-destructive methods that make it possible to preserve the characteristics of the metal at the welds and ensure their strength after testing. One of the key methods used for these purposes is steeloscopy of welded structures.
What is steeloscopy of welds, what is the essence of this method
There are several methods, the use of which allows you to identify minor seam defects before use. One of the most accessible is steeloscopy, which is based on spectral analysis. The method is aimed at identifying the amount of alloying impurities in the weld. In other words, it is possible to determine the chemical composition of the metal at the junction.
Performing a check
The procedure for determining the chemical composition of a metal by steeloscopy is carried out in the following sequence:
- Connections are selected in different places of the structure (bottom, flanges, pipes). If the same type of seams was welded by several welders, then places for inspection are assigned to each employee separately.
- The seam area should be cleaned to a size of 20 x 20 mm. This is done with a wire brush.
- At the same time, traces of oil and scale are removed.
- The head of the device is brought to the product at a distance of 5 mm and the electrode touches the seam. An electric arc is ignited.
- To ensure that light enters the slot of the device, the head is held perpendicular to the surface being tested.
- To determine the spectrum, you can hold the arc on the product for 10-15 s.
- If the result is unsatisfactory, a repeat test is carried out on a larger number of seams to determine the scale of work to rework the joints. If the second degree test shows the absence of alloying substances in the required quantity, then all compounds of this type are checked.
Areas of use
Any products made of alloy steel are subject to control (in addition to standard impurities, specific elements are introduced into its composition to achieve the desired strength, durability and other indicators. Such elements include chromium, nitrogen, nickel, etc.).
The chemical composition of the seam is checked for any containers and pipes that will subsequently be exposed to high pressure and chemically aggressive environments.
The method is relevant for those industries where strict adherence to the composition of alloys is important. It is not used in small private enterprises whose metal structures do not require a high level of control.
Methods of weld quality control
There are various types and means of technical control, they all have their own advantages and disadvantages, features and nuances. But despite the differences, they are all designed to test the seams for strength and durability. The quality of welded joints largely depends on the welder and the components used, so the outcome of the inspection can be predicted. But we still recommend quality control to be sure that the products will last a long time.
The quality of welded joints can be determined by visual inspection (perhaps the most common method), ultrasonic, magnetic, capillary and radiation (radiographic) testing; welds are also monitored for permeability. There are other methods for monitoring welds, but in this article we will list the most common and easy to use. We recommend performing operational quality control, i.e. first inspect the seam, then carry out penetrant testing and so on. However, first things first.
Visual control
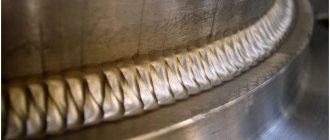
Let's start with visual control. This is the easiest and fastest way to find out the quality of welds. You don't need special equipment or liquids, your attentiveness is enough. Carefully inspect the welded joint: there should be no visible defects such as cracks or chips, the seam should have the same width and height in all areas. External inspection of welding seams also allows you to check the presence or absence of lack of penetration, sagging, and uneven seam folds. All these are defects, the detection of which can safely indicate low quality of the connection. For more effective quality control of welds, we recommend using a powerful lamp and a magnifying glass; a tape measure or ruler, or a caliper would also be useful. With the help of such simple devices, you can measure the size of defects and understand what to do with them in the future.
Technology
The verification procedure is simple, but requires special equipment and certain operator skills.
Equipment used
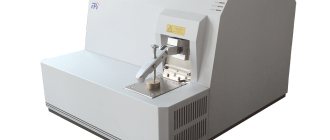
Steeloscope is equipment that allows steeloscopy. There are two types: stationary (used in the laboratory) and portable (suitable for production).
Regardless of size, they are very similar and have a number of identical nodes.
The main element of a steeloscope is an electrode, the main function of which is to ignite an arc on the product . Most often it is made of steel, tungsten or copper and installed on the head of the device. Using a grinding wheel (or less often a lathe), the end of the electrode must be sharpened for it to work correctly. The specialist must have with him a whole set of replaceable electrodes, because measurements can be made only once, after which they need another correction.
The second main element of the steeloscope is a generator connected to the body . Thanks to it, current is supplied to the rod itself, which, in turn, excites the arc. Light emanates from it, which, passing through metal vapor, penetrates the gap. Its width, depending on the type of device, ranges from 0.01 to 0.02 mm.
One of the key elements of a steeloscope is a series of lenses, thanks to which the exact chemical composition of impurities can be determined.
The three-lens system, or photometric wedge, has different focal lengths. It first receives a beam of light onto two prisms, which is then reflected and directed into the eyepiece lens. Such a system is usually replaceable and has different degrees of magnification.
Procedure
Algorithm of actions:
- The surface of the seam is cleaned , removing slag, dust and metal particles from it.
- The sample is placed near the electrode.
- Light up the discharge.
- The operator notes exactly what color of the spectrum the discharge had (from red to violet).
- All possible areas are marked in a special steeloscope atlas.
- Thanks to the tables in the atlas, you can determine the correspondence between the exact concentration of impurities and the brightness of the glow.
- The experiment should be carried out several times to obtain a more accurate result.
Special guidance documents
The technology for checking the integrity of an object using such control methods can vary significantly, taking into account the following factors:
- the material from which the object is made;
- size of the analyzed object;
- the presence of welded joints, moving parts and other features;
- scope of application of the equipment or part;
- other factors.
Depending on the listed reasons, one or another control method may be used to check the object. For the purpose of unifying the procedure within various fields of activity, special guidance documents are being developed.
Advantages and disadvantages of the method
The method is widespread due to a number of positive aspects:
- The method is absolutely safe and to use it you only need to follow electrical safety rules.
- The integrity of the product is maintained after analysis . The operation of the equipment being diagnosed does not need to be stopped.
- The price of the procedure is relatively low.
- The portable steeloscope can easily be placed next to the work surface due to its small dimensions.
Despite the fact that the method is simple and safe, its use is difficult due to some disadvantages:
- Difficulty in preparing and training specialists . On average it takes from 2 to 6 months.
- When steeloscoping, it is impossible to detect the presence of carbon and sulfur , which contribute to the destruction of the seam.
- The glow of the arc has a negative effect on the retina of the eyes . It can be reduced by using special safety glasses.
- This method can only be used in rooms equipped with ventilation , otherwise the gases can harm the operator’s respiratory system.
Normative base
The methods and technologies used in steeloscopy are defined at the legislative level. However, the situation in this area has recently undergone serious changes. They were associated with the implementation of the regulatory guillotine project, which involves a large-scale revision of the current regulatory framework with a view to eliminating duplicative, redundant and outdated requirements. This process also affected such a narrow area as monitoring the reliability of a welded structure, including seams.
Until recently, the general procedure for performing such control procedures was established by the provisions of Rostechnadzor Order No. 490 dated November 21, 2016. This regulatory document defined the general conditions in which a method that is safe for analysis is used, and also defines the rules for performing the relevant work. A list of the main methods of non-destructive testing and typical technologies for their use is given in the interstate standard GOST 18353-79. This standard contained about ten different items. In addition, it indicated that this list could be supplemented by other methods for checking the integrity of objects.
But due to the implementation of the principle of the regulatory guillotine, both of these legal acts were abolished. The list of current regulatory documentation used when steeloscoping any type of welded structure, including parts and seams, now looks like this:
- Rostekhnadzor order No. 478 dated December 1, 2022, approving the rules for the application of non-destructive testing techniques and methods at facilities that are part of hazardous industrial structures;
- national standard GOST R 56542-2019, which contains a classification of types and methods of non-destructive testing of various types of structures, including seams. In 2015, the national standard GOST R 56542-2015 was adopted for these purposes, but it was subsequently replaced by a more modern document that meets the current state of industry and production;
- guidance document RD 26.260.15-2001, dedicated to steeloscopy of base and welding metals, as well as finished products manufactured using them;
- the still valid state standard of the USSR GOST 7122-81, which establishes regulatory requirements for welded seams, as well as deposited metals;
- interstate standard GOST 34347-2017, which contains requirements for parameters that welded apparatus and vessels must meet.
It is worth noting that the main regulatory act on steeloscopy will have a limited validity period. Order No. 478, which establishes requirements for the quality of metal used for welding seams, and other standards in this area, will be applied until January 1, 2027. According to the new principle of formation of the legislative framework, approved by the Government, the limited validity period of most regulations will allow for timely revision of their provisions and ensure their compliance with the current state of affairs in the industry.
Control procedure
The reliability of the analysis depends on the correct preparation of the equipment. Before the steeloscopy procedure of welded seams, it is necessary to properly sharpen the electrode needle on a lathe or grinding wheel. In field conditions, when the operator does not have pre-prepared electrodes, the tip is straightened with a file before each test.
Stages of verification:
- from the total scope of work of each welder, weld inspection areas measuring 20x20 mm are selected;
- clean the seams until they shine with a wire brush to remove scale;
- fix the equipment in a convenient position so that the arc light enters the analyzer slot;
- mark control points of joints, make corresponding marks in control cards;
- position the head of the apparatus at a distance of 5 mm, perpendicular to the surface being analyzed;
- ignite an arc by touching the metal with an electrode needle;
- focus the eyepiece, visually evaluate the spectrum of evaporating vapors using the control atlas, for this purpose the arc is held for 10–15 seconds;
- record the result in a journal;
- Based on the analysis, a final research protocol is drawn up.
If, during steeloscopy, harmful impurities are found in the weld, additional analysis is carried out at three more points.
