How to make a drilling machine with your own hands from a regular drill
Not everyone has an electric drill, but a machine is needed to make neat holes.
You can rotate the drill with your own hands at a speed sufficient for drilling. Many simple and elegant designs based on a hand drill have been developed. PHOTO: mtdata.ru Drilling machine based on a hand drill
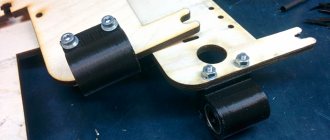
With a spring mechanism: 1 - stand; 2 - metal or wooden profile; 3 — slider; 4 - hand drill; 5 — clamp for fastening the drill; 6 — screws for fastening the clamp; 7 - spring; 8 — square for securing the stand (2 pcs.); 9 - screws; 10 — stop for the spring; 11 — wing bolt for fastening the stop; 12 - base of the machine.
PHOTO: mtdata.ru Drilling machine based on an electric drill
A stand operating on the principle of a screw jack: 1 - frame; 2 - guide groove; 3 - M16 thread; 4 - bushing; 5 - nut welded to the bushing; 6 - drill; 7 - handle, when rotated, the drill moves up or down.
Machines for the home workshop can be made of both metal and wood. The effort and speed are small, and it is easier to work with wood.
What do you need for work?
To work, you need a drill and material for the base and stand. For the frame, you can choose a wooden plate measuring 600x600x30 mm or a steel sheet measuring 500x500x15 mm. A wooden beam with a cross section of 50×50 mm² is used for the rack. It is convenient to use an old photographic enlarger - the stand is already firmly and conveniently installed on the base. Strips of metal will be needed to make parts for attaching the drill to the stand.
Drawings and diagrams
Figures 4, 5 and 6 schematically show general types of machines based on a hand drill. Each master chooses his own sizes based on the resources he owns.
PHOTO: mtdata.ruDiagram of the vertical movement mechanism of the drill
With a spring-hinged mechanism: 1 - bed; 2 — washer; 3 — M16 nut; 4 — shock-absorbing struts (4 pcs.); 5 - plate; 6 — bolt М6×16; 7 - power supply; 8 — thrust; 9 - spring; 10 — M8×20 bolt with nut and washers; 11 — drill chuck; 12 - shaft; 13 - cover; 14 — handle; 15 — bolt М8×20; 16 — holder; 17 — rack; 18 — cup with bearing; 19 - engine.
Step-by-step instruction
First, the frame is cut out, then a vertical stand is installed. To move the drill vertically, use a furniture drawer guide. The movable head on which the drill is mounted has a T-shape in cross section. The edges of the crossbar fit into the grooves of the guide, and a drill is attached to the thickened leg of the letter “T”.
No one makes machines based on a hand drill anymore; the vast majority use an electric drill.
general information
The drill is driven by an electric motor
As a rule, such mechanisms are used exclusively for drilling plastic, wood and metal, although instead of a drill you can attach the same metal brush for grinding something. In the photo above you see the most common assembly, where the spindle rotates by the power of an electric motor. Other elements are already attached to it, for example, a chuck and a drill.
We can say that this machine is better than a conventional drill, since it is fixed in a stationary position, therefore, there is much less chance of breaking the drill. Here, in fact, you just need to timely substitute the various parts in which you need to make a hole. Another important advantage of this mechanism is high accuracy, which cannot be achieved with manual drilling. If the machine is equipped with a vice, then leveling will be guaranteed. Below you can watch a video clip of such a homemade unit.
Video: homemade unit
General information
A drill press is most often used to drill parts. It carries out its work using the power of an electric motor, which, by rotating its shaft, transmits forces to the main rotational element of the unit or spindle. To the last one add:
- adapters;
- drill;
- cartridges;
- bushings.
In essence, such a machine is a mechanism fixed in a stable position, designed for drilling various parts for quite a long time.
A person working on such a unit only needs to place parts in a timely manner, adjust their position and control the operation of the machine. This is much more convenient than if you had to work manually. In addition, it is impossible to achieve high accuracy as a result of manual drilling. The fact is that a person needs to choose the right angle for applying effort. An error of a few degrees can be fatal. And not everyone can handle working at such a pace.
It's a completely different matter when a drilling machine is used for work. In this case, you only need to fix the part in a vice, and then start the machine. All subsequent actions will not take much time and effort.
This is interesting: Milling cutter for cutting door locks and hinges: setup, templates and cutters, video
general information
The drill is driven by an electric motor
As a rule, such mechanisms are used exclusively for drilling plastic, wood and metal, although instead of a drill you can attach the same metal brush for grinding something. In the photo above you see the most common assembly, where the spindle rotates by the power of an electric motor. Other elements are already attached to it, for example, a chuck and a drill.
We can say that this machine is better than a conventional drill, since it is fixed in a stationary position, therefore, there is much less chance of breaking the drill. Here, in fact, you just need to timely substitute the various parts in which you need to make a hole. Another important advantage of this mechanism is high accuracy, which cannot be achieved with manual drilling. If the machine is equipped with a vice, then leveling will be guaranteed. Below you can watch a video clip of such a homemade unit.
Video: homemade unit
Kinds
All drilling devices on the market differ from each other, first of all, in design features and functionality. In addition, they can be equipped with various equipment, the list of which includes, for example, a vice and dust collectors. Additional elements make the operation of the tools as simple as possible.
Based on the principle of use, two categories of devices can be distinguished.
- Stationary stands that turn an ordinary drill, hammer drill or screwdriver into a compact analogue of a machine. Due to their weight and rigid design, these products ensure high precision in all operations. The main disadvantages include lack of mobility and high cost.
- Mobile drilling attachments or guides, which are devices that provide acceptable drilling accuracy with minimal dimensions.
Another important criterion is the functionality of the devices in question.
- Racks for vertical drilling, which are universal holders and are characterized by maximum stability. They often become an indispensable element of mini-workshops and assistants for home craftsmen.
- Rotary devices, which are more complex and functional equipment. In addition to moving the bracket with the attached drilling tool in a vertical plane to set the required distance from the material being processed to the drill stroke, such stands allow you to set the drilling angle. As a result, the equipment can also be used as a milling or polishing machine.
An equally important role is played by the mounting features of the rack itself. As practice shows and reviews indicate, magnetic models are the most reliable option. Most professional devices have this method of fastening. Maximum stability in this case is ensured by a powerful electromagnetic field. Magnetic drilling stands can be securely fixed in vertical, horizontal and inclined planes. This allows you to perform work in difficult operating conditions. As a rule, such equipment has a number of additional options. For example, turning on the tool is impossible if no impulses are emanating from the magnet.
Making your own drilling machine from a steering rack
A steering rack from a car can be used very well as a vertical stand for a drill press. Its toothed surface is adapted for the operation of the mechanism for moving the working head.
The standard automotive steering mechanism can be easily modified to solve the problems of movement in a drilling machine.
Drawings and diagrams
The specificity of the drawing is that the design is tied to a specific product - a steering rack with a toothed surface. There is no need to invent a movement mechanism; it just needs to be correctly installed on a rail that serves as the main rack of the machine.
Drilling machine from a conventional drill
To make a small but functional drilling machine for your home workshop, you do not need to purchase special materials and components. The design of such a convenient and useful desktop device contains the following components:
- the base, which is also called the bed;
- a mechanism that ensures rotation of the working tool (a conventional drill can be used as such a mechanism);
- device for providing supply;
- a vertical stand on which the rotation mechanism is fixed.
The stand on which the drill will be mounted can be made from a sheet of chipboard. This material is quite capable of supporting the weight of such a device. The bed of such a mini-machine should be more massive, since it protects the entire structure from vibrations, which can negatively affect both the quality and accuracy of the resulting hole, and the comfort of work.
As a material for this frame, you can use an ordinary furniture board, the thickness of which is more than 2 cm. It is most convenient to use the base of an old photographic enlarger for this, slightly modifying its design. Sometimes an old microscope is used, but this is a rather rare option, since such a unit will not be large enough and its use will be limited.
The quality and accuracy that a homemade drilling machine will provide depends primarily on how correctly and reliably the connection of its base and vertical stand is made. The important elements of such a micro machine are two guides along which the block with the drill attached to it will move. Such guides are best made from two strips of steel, which must be securely screwed to the rack using screws.
When making the block, it is advisable to use steel clamps that will securely fix the drill on it. In addition, in order to avoid unwanted vibration processes when drilling, a thick rubber gasket must be installed at the junction of the block and the drill.
After this, you need to make a feed mechanism for such a mini machine, which should ensure the movement of the electric drill in the vertical direction. The manufacturing schemes for such a mechanism can be different, but it traditionally contains in its design a lever and a spring, which is attached at one end to the stand, and at the other to the block with the drill. This spring gives the feed mechanism greater rigidity.
A drilling machine made from a drill, which is not planned to be removed from it, can be made more convenient to use if you disassemble the original switch of the drill and mount a separate button on the frame of the mini equipment. This button will always be at your fingertips and will allow you to quickly turn the device on and off. As you can see, it’s not at all difficult to make a drilling machine from a drill; all you need to do is read these instructions carefully or watch the training videos in this article.
An example of a drill machine in more detail
As an example, let's look in more detail at one of the options for a homemade drill assembled at home.
Main stages of work
First of all, using a clamp, the author attaches the electric drill to the steering rack: the master installs the clamp itself approximately in the middle of the body, and in the lower part attaches the drill to the rack using a bolt and nuts.
After this, you need to make the base of the stand. In this case, the master uses a ready-made platform with fastening. We install and fix the steering rack of the car.
Then all that remains is to make a handle with which you can lower and raise the electric drill during the drilling process. The device is completely ready for use.
You can watch the video to learn more about how to make a drill stand from a car steering rack with your own hands.
How to make a wood panel with your own hands
Site headings
- Aviation
- Auto and motorcycle
- Army and Navy
- Archeology
- Animals
- Health
- Celebrities
- Games
- Interesting
- Internet and computers
- Story
- Space
- Crime
- Cooking
- Culture and art
- Fashion & Style
- Music
- Science and technology
- News
- Society
- Hunting and fishing
- Policy
- Nature
- Psychology
- Travel and leisure
- Entertainment
- Religion
- Rodnoverie
- Needlework
- Garden
- Homemade products
- Sport
- Construction and design
- Secrets and myths
- Economy
- Humor, jokes
- Sandbox
When I play Topigr, I would like us to be completely free of problems, and not bess.
Now there is so much that is inexplicable in the world that mom, don’t worry.
Pindos, admit that you have not been to the moon and we will leave you behind.
Basque is the same banderlog as Rotaru! Basques, why aren’t you going to perform in Crimea and Donbass?
The so-called “truly great star” sponsored the genocide of Donbass! Let him speak.
Another pig returned to his pigsty. Donbass has become cleaner.
I agree 90% with the author’s opinion. Here is the opinion of a.filipovic. I still don’t understand who it is.
This is not a sandstorm. The sea receded with the wind and the wind raised the sand.
Manual sewing machine from unnecessary trash
The information and entertainment site “Labuda” is daily, operational, relevant, interesting news and useful information from different spheres of life.
Full or partial copying of labuda.blog site materials is permitted only if an active and indexable hyperlink to the publication source is indicated.
legal information
Dear authors, remember that the publications you post must not violate the laws of the Russian Federation and the copyrights of third-party resources.
*Extremist and terrorist organizations banned in the Russian Federation and the Republics of Novorossiya: Right Sector, Ukrainian Insurgent Army (UPA), ISIS, Jabhat Fatah al-Sham (formerly Jabhat al-Nusra, Jabhat al-Nusra"), National Bolshevik Party (NBP), Al-Qaeda, UNA-UNSO, Taliban, Majlis of the Crimean Tatar People, Jehovah's Witnesses, Misanthropic Division, Brotherhood "Korchinsky, "Art preparation", "Trident named after. Stepan Bandera", "NSO", "Slavic Union", "Format-18", "Hizb ut-Tahrir".
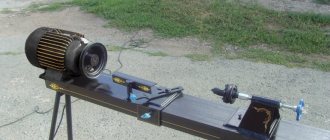
Machine made from an asynchronous motor from a washing machine
Naturally, the engine can be taken not only from a washing machine. This example is simply the most common in everyday life. This version of a homemade drilling machine will allow you to make a variety of holes with high precision, down to micro holes.
The basic principles are the same as with a drill, but in this case you will need a more powerful table: the vibration during operation of such a device will be much stronger. The moving part of the apparatus is best done according to preliminary drawings.
Printed circuit board drilling machine.
The weight of the engine from the refrigerator is much greater than the weight of the entire drill; the table and stand should be an order of magnitude more massive.
For manufacturing you will need the following blanks:
- gear;
- bearings - two pieces;
- two tubes;
- steel clamping ring;
- special hexagon for the pulley.
The steel ring is connected to two bearings, a hexagon and a metal tube, forming a reliable unit. The main mechanism in such a machine is gears and a tube with notches. The movement of the tube occurs due to the connection of the gear teeth with the cuts. The hexagon with its axis must fit into the tube.
The described scheme is complex and not everyone can do it. The optimal way would be to manufacture a unit with an asynchronous motor completely by analogy with homemade machines from a drill. The only negative nuance will be its significant vibration during operation.
Step-by-step instruction
| Illustration | Description of action |
| Selection of equipment PHOTO: youtube.com | Selection of materials and parts from old equipment suitable for use |
| New electronic unit PHOTO: youtube.com | Manufacturing of new parts and control units |
| Head with motor and transmission PHOTO: youtube.com Assembly of the vertical stand to the frame PHOTO: youtube.com | Machine assembly |
| Testing a new machine PHOTO: youtube.com | Testing |
Design features of a homemade drilling machine
The feasibility of making a drilling machine with your own hands lies in the fact that, due to the simplicity of the design, such a device can be made from improvised means that are available in any home workshop or garage.
Quite often among homemade devices of this type you can find a drilling machine made from a steering rack
Before you start making such a machine with your own hands, it is important to understand what structural elements the drilling equipment consists of
Homemade stand design
In the design of any drilling machine, the following components can be distinguished:
- supporting frame;
- a guide along which the main frame moves;
- holder on which the working head is mounted;
- the working head itself;
- a number of additional elements (cartridges, bushings, fasteners, etc.);
- a shock-absorbing device designed to ensure the return of the working head to its original position;
- a device for fixing the workpiece on the surface of the work table;
- power supply, if required by the parameters of the electric motor used;
- handles that transmit torque or force to the machine mechanisms.
Drill attachment point
In homemade drilling machines, the bed simultaneously performs several functions.
- This element is the base on which all other elements of the unit are attached.
- Thanks to the massiveness of the bed, the structural elements of the machine are balanced, which is necessary to ensure its stability during processing.
- The upper part of the base of the bed is used as a work table for the equipment, on which clamping devices (most often a vice) are placed.
- The working head of the machine, as mentioned above, is mounted on the main frame mounted on the bed.
A frame made of a wheel disk, inside of which there is a circle made of sheet steel 10 mm thick
So that the main frame with the working head of the machine can return to its original position, a shock absorber with a handle fixed to it is connected to it. Many homemade drilling machines use a spring shock absorber, but we are considering a design in which the steering rack, which is included in domestic VAZ cars, acts as a shock-absorbing element. The use of such a rack allows for a smoother movement of the main frame and the working head, as well as stable and accurate operation of the lifting mechanism.
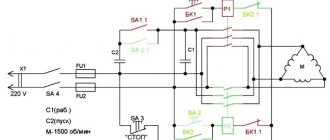
The electric motor of the homemade machine, which will be responsible for rotating the drill, is also attached to the main frame using a specially selected holder. Depending on which electric motor you will use to assemble your machine, a drill chuck is selected for it and connected to the drive unit shaft using adapters. If the electric motor that you install on your machine is not designed for the standard 220 V mains voltage, then you will need to select an appropriate power supply for it.
Drilling head of a machine with a washing machine motor
As a clamping device in which the workpiece will be fixed, you can use a vice, which is the most versatile and reliable device.
How to properly assemble equipment
You can get acquainted with the stages of assembling a homemade drilling machine based on a steering rack and a serial drill in a video that is easy to find on the Internet.
You can also act in accordance with the following simple instructions.
- First, a frame is made, to which the legs are welded for reliable installation on the workbench.
- In the metal sheet, which serves as the upper part of the base of the frame, holes are made for attaching clamping devices.
- A load-bearing post is welded to the base of the frame, which is additionally reinforced with stiffeners at the attachment point.
- The steering rack from the car is securely attached to the supporting rack; a handle for rotation is mounted on it and its stroke is adjusted.
- A special mount is made for the drill, with which the tool is attached to the steering rack in the place where it has mounting bolts. A corresponding video or drawings of such a device will help you make this fastening, which is simple in design.
- After the drill is connected to the steering rack, it is necessary to adjust its correct spatial position relative to the surface of the work table.
- After assembly, the reliability of fastening of all structural elements is checked, and the machine itself is tested.
What is a drilling machine and what is it for?
Drilling through thin material will not be a problem; all you need to do is pick up the drill, take a couple of seconds and the job is done. But what to do if you really need to make an accurate and calibrated hole in a thick beam? Hand tools are not suitable because there is a high risk of damaging the workpiece.
The result of this work will be a shift in the center of the hole, the appearance of a torn edge and a change in geometry. A drilling machine will help you avoid such shortcomings and make a hole with certain parameters. Due to the reliable fixation of the part you will be processing, as well as the centering of the tool, you will be able to ensure drilling accuracy that cannot be achieved when working with a drill.
In order to make an additive machine for furniture with your own hands, you will need to modify the original tool. It will not take much time and effort to make.
We must not forget about the versatility of such a tool - when replacing drills, you can work with absolutely any materials, both soft wood and metal, and it will also be easy to drill through sheet steel. Instead of drills, you can use a milling cutter, and then the device can replace even a low-power milling machine. In addition, a drilling machine will help make the work of the master easier. Believe me, working with stationary devices is much easier, and there is no need to support heavy tools.
What should it consist of?
A basic unit can be made from an ordinary drill. You can add additional devices to it - for example, a milling unit. But each machine must consist of several required elements: a drill, a countersink, a reamer and a tap.
There are many types of drilling units in industry - semi-automatic, spindle, vertical and others. In everyday life, the so-called mini-additive unit with a modest set of tasks is most often used. Before you make a homemade drilling machine at home, you need to understand the functions, basic elements and general operating principles of this type of mechanism.
Vertical version of the machine. Vertical drilling machine. Tabletop mini drilling machine. Drilling machine from a drill. What does a drilling machine consist of? General structure of a drilling machine.
By function, the most popular devices are spindle machines, the main function of which is to transmit rotational motion to the workpieces. In second place in popularity are devices for horizontal and radial drilling. An apparatus for boring parts is also common. With such functional diversity, drilling equipment is generally classified as a device for universal use.
But with this freedom there are a number of mandatory components, without which there are no drilling machines in principle:
- bed;
- steering rack;
- engine.
Scope of application of homemade drilling machines
The thought of creating a drilling machine with their own hands arises among people who love to tinker, but at the same time are not involved in the manufacture of any objects on a professional basis, either using metal or other materials (wood, plastic, etc.).
This is due to the fact that home-made equipment will not be able to fully replace industrially produced analogues in full, both in functionality and performance, but will only facilitate the performance of simple repairs and other work.
In addition, radio amateurs and people involved in the independent production of printed circuit boards can also set themselves a similar task, because Having a drilling machine greatly simplifies their work, and purchasing factory-made equipment is unprofitable.
Homemade design using a washing machine motor
Drill device
Fantasy is an indispensable condition for any creative success, but in mechanical engineering it is useless without accurate calculations and comparison with solutions proven by experience. The history of machine tool construction goes back thousands of years - foot-operated bow lathes and drilling machines were used already at the end of the Stone Age. On the topic of this article, a proven sample is an industrial-style desktop vertical drilling machine. We will refer to it when choosing and deciding how best to make a drilling machine with our own hands: there are only a few examples of drilling machines in use that are over 100 years old, and they still maintain accuracy.
The structure of a desktop vertical drilling machine is shown in the figure:
Design of a desktop vertical drilling machine
Its main modules are a bed, a column, a console and a table for a part. The components of the main nodes are slightly highlighted in color, and their components are brighter in color. The simplest table (not counting a wooden block) is a vice. The rotary-sliding table allows, in addition to drilling, to perform some milling operations. The bed is usually tightly attached to a workbench or other reliable support.
Screw clamp – clamp of the mini-drilling machine console
In operation, the console is installed in the required position in accordance with the size and configuration of the workpiece using the lifting and rotating mechanism of the slider, and is fixed. The spindle is fed into the working stroke by a separate feed mechanism. In amateur and industrial designs for home use, the lifting and turning mechanism is most often the operator’s hand, and the lock is a screw clamp of the slide, see fig. on right; According to TB, both are acceptable. But what must certainly be in the design of a drilling machine according to the requirements of the same safety regulations is a bumper device or just a bumper: if you throw the feed handle, the spindle or carriage along with it should automatically bounce up until it stops. In home drills, the chipper is most often a spring installed in a suitable place, see below.
Features and nuances of manufacturing
The main task seems to be the correct selection of component parts. To analyze the best way to manufacture a given machine, it is necessary to know the advantages and disadvantages of factory copies in order to avoid them, if possible, in the process of manufacturing your own equipment.
One of the biggest drawbacks in the operation of “conveyor” drilling machines is the huge backlash. Because of this reason, it is not possible to make a hole with a diameter of 4 millimeters or less.
To design a drilling unit, you need to think about the following points:
- A mechanism for changing the position of the working components of a machine. An alternative solution is to use a steering rack in the design. Also, this component will be very useful if there is a need to apply a strong clamping force to the processed semi-finished product at the time of processing.
- Support table top and stand for fastening the working unit. The main characteristics when choosing components for the manufacture of these parts are strength and fairly impressive weight. It is best to use U-shaped channels. Rolled steel sheets are most often used for the base.
- Power unit. To design drilling equipment with your own hands, the choice often falls on electric drills. As an alternative, you can consider a system consisting of several pulleys and an electric motor.
Compact drilling machine
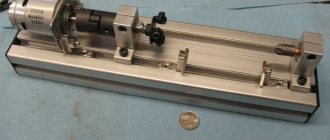
Drawing of a miniature drilling machine.
It is not at all necessary to try to make the device powerful and large in size. It all depends on its purpose. If you are, for example, a radio amateur, you may need a very small machine that can be built on a compact tabletop.
- The unit can be made entirely from available material - metal blanks. The only ready-made parts in this case are the electric motor and mounting brackets. You can work with metal workpieces on a milling or lathe. If this is not possible, all elements can be purchased in stores that sell furniture fittings.
- The frame does not have to be made of metal; it can be made of plexiglass with a base of two layers.
- The spindle plate is mounted on a bushing; it is better to do it on a milling machine. If you don't have one, you can use a regular drill and file. During operation, this plate will move vertically with the engine.
- A chuck is attached to the spindle; the spindle itself consists of a shaft and bearings; it is placed in a sleeve for vertical movement while the machine is operating.
- To ensure good tension of the drive belt and its rearrangement when the rotation speed changes, a bracket for the engine is installed, in which special grooves are made for moving along. The bracket is made in the same way as the spindle plate.
- The rotation speed and torque are controlled and adjusted using a pulley with different diameters.
Home drilling machines can be made from any available materials - the space for engineering is limitless. The main thing is to maintain the reliability and stability of the working surface of the table and a competent mechanism for the vertical movement of the spindle. Well, the precision of manufacturing of all parts, including the smallest ones. Make a machine to suit your needs, don’t be afraid to make your own decisions, you will succeed.
Make or buy?
An electric drill is a ready-made drive, gear, spindle and chuck in a monoblock. Place it on the carriage of the machine and you can drill. In terms of accuracy, the solution, generally speaking, is not optimal (see below), but in many cases it is acceptable, but eliminates the need to order expensive turned parts of increased accuracy, see below. In view of this, frames for installing drills are now sold only on the street from trays; prices are affordable. When choosing one to make a drilling machine from a drill, be guided primarily by the operating mode of the equipment; The price also depends on it:
- Occasional drilling/milling for yourself with the accuracy of what you get - cast plastic bed or stamped steel. The feed mechanism is lever with a cranked lever (see below). Carriage sliding bearings (see below) are steel on steel or with nylon liners. Prices are $20-$30.
- Regular drilling for yourself or to order with ordinary machine-building precision. The materials processed are up to the hardness and toughness of ordinary structural steel. Everything is the same, but the sliding bearings are steel on steel (worse) or with bronze bushings, and the frame is cast iron or (more expensive) composite, also vibration-absorbing. Prices: $30-$40.
- Regular drilling and milling of any materials that can be tooled with periodic overloads of the tool and/or with increased accuracy - plain bearings are only bronze on steel, cast iron frame. The feed mechanism is rack and pinion (see below); vibration-absorbing console. Prices: $60-$180.
Choosing a bed
The stand for the drill (which sellers for some reason stubbornly call stands) must be chosen not according to - not “China”); Now the market is full of “German China”, not to mention products from post-Soviet states. The design needs to be checked.
First, samples with plastic non-nylon liners for sliding bearings are definitely rejected: runout and drill drift of more than 0.5 mm will appear already on the 10th – 20th “hole” and will further increase. The second is console play. We take it by the far end, swing it up and down and to the sides while holding the latch. There should be no noticeable “chatter” (the tactile sense of an untrained person feels a beat of 0.4-0.5 mm).
Next is an inspection of the structure, see Fig. below. For regular drilling, the one shown in pos. 1. The ideal option is at pos. 2: collet clamp of the drill, shifting the column to the side reduces the vibration of the console by an order of magnitude, and by turning it sideways by 45 degrees, you can mill the part by hand with the precision “as best you can” on a standard fixed table, removing a couple of table fasteners, because in this case, its manual displacement relative to the horizontal working axis of the console will be linear.
How to choose a bed (stand) for a drill
And here is a sample for pos. 3 do not take under any circumstances. Firstly, the collar of its column is low and its fastening is unreliable. Secondly, longitudinal grooves under the table facilitate manual milling “as it happens,” but, unlike diagonal ones, they do not dampen vibrations of the bed. Moreover, they will concentrate where shown by the arrows (the tide under the column is made too narrow) and from there they will go straight into the column and table.
Which is cheaper?
Bench Drill Press Spindle Drawings
Let’s say the price for the machine you like doesn’t suit you. Or a drill, if it’s a “crowbar” one, with an impact mechanism, that was used in work on building structures and the beating of the chuck is visible to the eye. Then the first thing we do is find out if there is a craftsman within reach who owns a lathe with high precision (no rougher than 0.02 mm). Which, by the way, is not a fact - a high-precision machine is very expensive and never pays off with the flow of regular orders. But let's say he was found. We take the drawing in Fig. on the right, we go to him and ask if he can turn it out of steel no worse than 30KhGSA, and how much he will charge for the work. “This” is the drawings of the tabletop drill spindle. The rest of its parts can be turned on a regular machine, or found in ruins at an iron market or in your trash. Most likely, it will turn out that it is cheaper to buy a bed + table, and if you estimate the costs for the rest, then perhaps a drill of increased accuracy will emerge. There are some of these on sale; they can be recognized by the absence of a striking mechanism and a collar specifically for installation in the frame: a turned steel cuff is put on it.
How to make a homemade drilling machine from a steering rack?
If you have the necessary list of tools and devices at home, you can do a whole host of necessary technological operations. However, often buying a factory copy is extremely illogical.
One of the realistic options is a DIY steering rack drilling machine. This way, you will not only be able to save financial assets, but also learn how to make the right equipment for your specific needs.
List of tools:
- Set of wrenches;
- Welding machine;
- Grinder for metal;
- Grinder (to remove metal burrs);
- Hammer.
Features and nuances of manufacturing
The main task seems to be the correct selection of component parts. To analyze the best way to manufacture a given machine, it is necessary to know the advantages and disadvantages of factory copies in order to avoid them, if possible, in the process of manufacturing your own equipment.
One of the biggest drawbacks in the operation of “conveyor” drilling machines is the huge backlash. Because of this reason, it is not possible to make a hole with a diameter of 4 millimeters or less.
This is due to the rather light weight of the entire installation, which does not have the ability to compensate for the vibration that appears during the operating moments of the power unit. Upgrading a machine may result in its incorrect operation and, as a result, its rapid breakdown.
To design a drilling unit, you need to think about the following points:
- A mechanism for changing the position of the working components of a machine. An alternative solution is to use a steering rack in the design. Also, this component will be very useful if there is a need to apply a strong clamping force to the processed semi-finished product at the time of processing.
- Support table top and stand for fastening the working unit. The main characteristics when choosing components for the manufacture of these parts are strength and fairly impressive weight. It is best to use U-shaped channels. Rolled steel sheets are most often used for the base.
- Power unit. To design drilling equipment with your own hands, the choice often falls on electric drills. As an alternative, you can consider a system consisting of several pulleys and an electric motor.
Drilling machine from a steering rack: step-by-step instructions
From the very beginning of design, he makes a choice regarding the most optimal type of steering rack. Further, depending on its dimensions, technical documentation of all equipment will be compiled
The main thing that you need to pay special attention to is that this critical component is not chipped or has a large number of surface flaws
The most commonly used working surface in terms of dimensions is 300×400 mm. The thrust components are made from two pieces of rolled metal 40×65×40 mm. The base for mounting the steering column is also made using a channel.
If you use an electric drill as a power unit, you need to make an L-shaped support.
Mounting the steering column to the support post is done manually, using the lugs that are included with the structure. To install the footrest under electric power equipment, you can make a reinforced mount using electric arc welding. The choice of methods fully depends on the specific design features of each individual model.
- Practical tips for constructing a drilling machine using steering racks with your own hands:
- 1) A preliminary check of the gearbox used is done. Unsuitable components must be replaced;
- 2) The height parameter of the rack must be 80...100 mm greater than the steering rack;
- 3) The stroke of the rod must be taken into account. For example, for a VAZ-2105 car this parameter is 210 mm;
- 4) To improve comfort during use, it is recommended to equip the working equipment with a separate control unit.
- The use of stepper mechanical units is impractical, because they do not have the necessary smooth running for this equipment.
- For safety when using this machine, the unit structure must be securely fastened to the working surface.
- Video: DIY steering rack drilling machine.
Selecting suitable elements
Assembling a homemade machine involves using available tools, so the selection of individual parts for the design must be given serious attention.
First of all, the material for the frame is selected. In lightweight machines, such as units for printed circuit boards, the frame can even be made of durable wood, having previously been reinforced with a steel plate and rubber feet. But since we are considering a much more serious unit, we need to approach its assembly differently.
The bed here can only be selected from metal. Moreover, a heavy plate or something similar will do. It is necessary to drill holes in the plate for future vices and clamping strips.
The ideal option would be if you manage to buy a mobile one or remove the old bed from an ancient desktop machine. Now look at your capabilities.
The machine will need an internal rod with teeth
The main stabilizing rail is made from an angle or channel. Its thickness must be no less than 3 mm. Only such a part can withstand loads and will not cause vibrations or play.
The holder for the working mechanism is also made of steel. Here the selection is made depending on the engine itself that they intend to use. We'll look at it a little later.
The main nuance in such a homemade machine design is that parts from the steering rack of a car are used to assemble it. This is due to its compactness and unique capabilities.
When rotated, the steering rack can raise or lower the mechanism fixed to it. Moreover, the manipulations are carried out very carefully, down to the millimeter. Plus, many steering racks have the ability to weaken or increase stress, which leads to the possibility of fine adjustment of its operation.
It is advisable to remove handles from finished machines, but you can create them yourself. Likewise, if necessary, it is recommended to use production chucks and bushings. Fortunately, they are very easy to get.
Selection of working mechanism
Interestingly, the working mechanism in a homemade drilling machine can be not only traditional, but also significantly simplified. We are talking about replacing the motor and power supply with a ready-made drill or unit for drilling concrete, metal, etc. These portable tools have almost the same dimensions as a regular drill. However, their power allows you to drill into metal without any serious resistance.
All that is required of you in this scheme is to attach the drill with several brackets, having first secured it in the correct position. It should be directed completely perpendicular to the base of the machine.
If the machine diagram is considered from the steering wheel, then the use of a drill is even preferable. And it will take you much less time to assemble it.
Device for attaching a drill to the machine frame
The second option is to install an asynchronous motor from some electrical appliance. Here, when assembling it with your own hands, you will have to tinker a little longer. But in general, the technology remains the same.
Stages of assembling a homemade machine from a steering wheel
Let us turn directly to the machine assembly technology. As a basis, we will take a diagram using a steering wheel from a VAZ car and a ready-made drill, which only needs to be fixed and connected correctly.
Stages of work:
- We understand the frame and mount it in the correct position.
- We bore grooves and holes in the frame for future vices.
- We mount the main rail from a corner or channel.
- We attach the steering wheel to it.
- We mount it on the steering handle and adjust its travel.
- We install it on the upper part of the steering mount under the drill.
- We mount the drill in the correct position and adjust its angle.
- We finally fix the working mechanism.
- We connect all the wires, tighten the bolts, and test the system.
As you can see, there is nothing complicated in this matter.
Drilling machine from steering rack and drill
The process is significantly simplified by using ready-made solutions, such as a drill and a steering wheel. Basically, all you have to do is put them all together and make sure the assembly is done correctly.
Differences when assembling a machine with an asynchronous engine
If you are going to use a separate engine, then you will have to think a little here. Although the engine itself creates effort, it still needs to be transferred somehow.
In this case, the engines are often mounted parallel to the steering one, and the mechanism itself is installed on the other side. The transmission of forces is carried out through a standard mechanism of two wheels and a belt. The spindle on the shaft can be taken from the factory; the chuck and all other parts are connected to it.
Also, the engine will probably require a separate power supply, which is placed on or near the frame. And it would be better to hide the entire structure under a metal or wooden case. To avoid possible clogging, breakdowns or accidents.
How to make a drilling machine from a steering rack? (video)
data-full-width-responsive=”true” data-ad-client=”ca-pub-8514915293567855″data-ad-slot=”8040443333″>