Metric fasteners are specified in thread pitch instead of thread count. The thread pitch is the distance between them. Thread is expressed in millimeters (measured along the length of the fastener). For example, a thread pitch of 1.5 means that the distance between one thread and the next is 1.5 mm. Smaller fasteners have finer threads, so they have smaller thread pitches.
Measuring the thread pitch is carried out as follows: using a ruler or caliper, measure a section of the required size on the rod. Then count the number of turns in the measured area. The recommended length of the section to obtain an accurate measurement is 20 mm.
Measuring with a thread gauge
Accurately identifying the threads on a fastener is critical before selecting and installing the correct fittings.
How to measure thread:
- Use a combination caliper to measure the thread diameter. It is worth taking into account that the threads of the used fitting may wear out and become distorted, so calculations may not be accurate.
- Use a thread gauge to determine the number of threads per inch. For metric connections, the distance between the threads is calculated. To do this, you need to place the device on the thread until it fits snugly, and then compare your measurements with the thread diagram.
- If the port is located at an angle, determine the angle of inclination using a protractor on the sealing surface. The center line of the fitting and gauge should be parallel.
Using a combination of three tools, identifying connectors is easy. The use of a caliper, thread gauge and protractor allows accurate measurements of most connections.
To calculate the thread pitch - the distance between the turns of the threads, you need to measure the threaded element with a ruler or caliper and count the number of turns in this area. Dividing the length by the number of turns gives the thread pitch. The value of the indicator is expressed in millimeters.
The distance between the turns of the threads can be measured with a caliper or thread gauge. Less accurate results are obtained by measuring a section of the rod with a ruler, counting the number of turns, and dividing the length by the number of threads. The indicator is calculated in millimeters. The thread pitch is indicated in the technical documentation and in the part markings.
A caliper is used to measure the diameter of an external internal thread. When comparing calibration measurements to thread diagrams, keep in mind that threads on connections that have been in service may be worn and distorted from use. This results in inaccurate comparisons with thread tables.
This is a more accurate way to measure thread pitch. A caliper is used to measure a section of a certain length. Then count the number of turns on it. The thread pitch value is obtained by dividing the length of the section by the number of turns, and subtracting one turn from the result.
For English, British and other European threads, the pitch meter has an inch scale. However, for metric parts, the device will determine the distance between threads in millimeters.
The protractor is used by placing it on the sealing surface. The center line of the fitting end and gauge should be parallel. In English, the thread size system and pitch (number of threads per inch) are specified along with the thread type.
When using a thread gauge, you need to align it with the threads and make sure that it fits snugly. Match the measurement to the thread, then calculate the diameter using a caliper.
Internal connections are measured by inserting the identification part of the device into the connector on the sealing surface. Make sure that the center lines of the connection and the protractor are parallel. This will allow you to determine the correct angle.
It is necessary to measure a certain length of a section of the rod with a caliper or by applying a ruler to the surface. Count the number of turns in this area. It is recommended to carry out the calculation on a length of 20 mm or 10 mm. The thread pitch is obtained by dividing the length by the number of turns.
Using the above methods, you can measure the thread pitch of any fastener. This can be either a nut with a flange and a locking plastic insert, or a washer with an internal cone.
How to find out what thread is on a bolt
1. Contents of the task 1.1. Calculate the bolt and make drawings: bolt, nut and washer. 2.1. The drawings are made on an A3 sheet (together with the stud, the socket for the stud and a simplified image of the stud connection). 3. Procedure and recommendations for completing the task 3.1 Start the design of drawings with the frame and title block 3.2. On format sheets (or a sheet), first make constructions with thin lines, put down dimensions, and make inscriptions. 3.3. Protect the drawing and knowledge of the main provisions on the topic.
The procedure for performing calculations and drawings
Option (by number in the class magazine) Data on options from table. 1 (Fig. 1) h1 - thickness 1 of the connected part h2 - thickness 2 of the connected part d - nominal thread diameter Thread pitch for all options - large
Calculation of a bolt and execution of drawings: bolt, nut, washer and bolted connection
1) Calculate the length of the bolt
Design bolt length L calculated = h1 + h2 + Ssh + m + a + c where h1 is the thickness of the 1st connection. parts (Table 1.1) h2 - thickness of the 2nd connecting part (Table 1.1) Sш - washer height (Table 4) or SSH = 0.15d m - nut height (Table ) or m = 0.8d a = 0.15d - protruding part of the bolt c = 0.15d - chamfer
L—bolt length according to GOST—select the closest value from the table. (left column) b - length of the threaded part of the bolt - is selected at the intersection of the row (bolt length) and column (nominal thread diameter) from the table.
2) From table. 2.2. select other bolt sizes
3) Draw a bolt
4) Bolt designation according to GOST: Bolt M20x80 GOST 7805-70
We determine the dimensions of the nut according to the given (Table 1.1) nominal diameter d Nut - version 2 (Table 6.1) P - thread pitch (Table 6.2) S - wrench size (Table 6.2) e - circumscribed circle diameter (Table 6.2) ) m - height of the nut (Table 6.2) da - diameter of the thread chamfer (screwed part of the nut - it must be greater than d) D=0.9*S - diameter of the nut chamfer Internal diameter of the nut thread = 0.85*d (or d-2P, where P - thread pitch)
An example of a nut symbol. For example, nut version 2 (indicated) with thread diameter d=12mm, with a large pitch (not indicated) (see also [1] p. 477): 2 Nut M12 GOST 5915-70
WASHER. We determine the dimensions of the washer according to the specified (Table 1) nominal thread diameter of the fastener
Washer - version 1
d1 - diameter of the washer hole (Table 4) d2 - outer diameter of the washer (Table 4) Sш - height of the washer (Table 4)
Washer designation: Washer 20 GOST 11371-78
SIMPLIFIED IMAGE OF A BOLTED CONNECTION (poster 1, 2)
Measuring thread pitch without a thread gauge
For metric fasteners, thread pitch is used instead of TPI. Distance is also measured in millimeters.
The distance between the vertices of the threaded profile of a nut is called the thread pitch. To obtain accurate results, use a caliper or thread gauge. A rough calculation can be made using a ruler - by measuring the length of a given section and counting the number of turns without taking into account the first. Divide the length of the segment by the number of turns to get the thread pitch of the nut.
To determine the thread pitch, a caliper is used to calculate the distance from the top of one thread to the next. The formula used for this is M2 x 4 x 5 mm, where M2 refers to the diameter of the bolt (in millimeters), i.e. 4 is the thread pitch in millimeters, which means it is equal to 4 mm between each thread peak, and 5M is bolt length.
Thread pitch is used to measure the threads of a bolt or nut to ensure they fit together. If the threads of the bolt and nut are different, they either do not grip or wear out the threads, resulting in an unusable connection.
Small threaded fasteners have a denser helical structure and are usually less pronounced. A coarse threaded connection has larger and deeper threads. This means that if the threads are slightly damaged, it may still work. Most standard metric fasteners have fine and coarse threads. Each of them can be identified using or thread pitch.
To accurately determine the thread pitch by diameter, use a caliper. The measurement result is obtained in millimeters. Measurement accuracy up to tenths of a millimeter. Compare with the indicators of a standardized table of diameters, which indicates the correspondence of the thread pitch to each diameter.
In the US and UK, fasteners typically have thread sizes ranging from ¼ to 20 inches and ¼ to 28 inches. To determine which of these threads is coarse and which is fine, you simply need to take the TPI number (20 and 28) and compare them.
Don't forget that coarse thread means the thread is larger, so smaller ones will be able to fit within an inch. So 20 means it's a coarse thread and 28 means it's a fine thread. TPI and thread pitch will vary depending on the diameter of the fastener, so the value will not always be 20 and 28.
For metric fasteners, similar parameters would be represented as M8 x 1.25 or M8 x 1. For thread pitch, the distance between two points is the second number, meaning the higher the number, the fewer threads. It follows that M8 x 1.25 is a coarse thread, and M8 x 1 is a fine thread.
The most accurate and fastest way to determine the thread pitch is using a caliper. This tool is used to measure the length of the desired section and count the number of turns located on it. Next, the resulting length is divided by the number of threads, and one turn is subtracted from the result.
Caliber
Unlike a micrometer, calipers and other instruments, for each diameter, type and thread pitch there is its own separate gauge, which is the standard of the maximum permissible value. To match the thread to the gauge, it is necessary that the latter can be screwed freely without any effort or gaps along the entire length. There are nut gauges and plug gauges for external and internal threads, respectively. The advantage of this method is the simplicity and accuracy of measurement. The main disadvantage is the need to use a set of gauges when checking more than one type and diameter of threaded connections.
Measuring threads with a caliper
Accurate measurements of the thread pitch can be performed using a caliper, thread gauge, or inclinometer. This indicator can be determined by the diameter of the bolt, measuring it with a caliper and comparing the results with the indicators of a special table of metric thread pitches.
The first step is to determine whether the threads are tapering. To do this, place the points of the caliper on either side of the object that needs to be measured. Align it to the outside of the threads at the lower end, away from the head. This is how the width is determined.
The thread pitch of the fastener is determined by dividing the length of the rod by the number of protruding elements. The length is measured with a ruler or caliper if you want to get an accurate result. A ruler is applied to the upper parts of the threaded elements. The recommended length for counting turns is 20 mm.
Next, you need to move the tip so that it touches the threads. The measurement should appear on the screen if the instrument has a display. Otherwise, you will need to rely on the numbers on the sliding part. You should then do the same on the threaded area near the head of the fastener. If the number is higher at the head, then it is a tapered thread.
You can also use a caliper to measure the diameter. If the thread is tapered, measure at the 4th or 5th thread down from the head, i.e. in the middle of the threaded area. If it does not taper, then you can measure anywhere along the thread. When using a caliper, you may notice that there are several places where the arms do not meet closely together, sometimes along the edge of the ruler. There is no need to place what needs to be measured in these spaces.
The numbers should be placed in a standard measurement. Once the pitch value is obtained, you can measure the length of the bolt or screw from under the head and place all the numbers into a standard measurement. It will have the diameter, then the thread pitch and the length. If a metric screw has a diameter of 4 millimeters, a thread pitch of 0.4 mm and a length of 8 mm, then the calculation will be M4 x 0.4 x 8M. For an American screw this could be 1/4" in diameter, 20 TPI and 1" long. The formula will be: 1/4 inch x 20 x 1 inch.
The thread pitch can be determined using a ruler. This is not the most reliable, but accessible method. Use a ruler to measure the length of the desired threaded section. Then the number of threads is counted at this distance. The thread pitch value is calculated by dividing the length of the section by the number of turns.
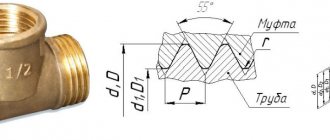
Metric thread. Profile.
Metric thread profile according to GOST 9150 (ST SEV 180)
The nominal thread profile and the dimensions of its elements must correspond to those indicated in the figure and table.
d is the outer diameter of the external thread (bolt); D—outer diameter of the internal thread (nut); d2 is the average diameter of the bolt; D2 - average diameter of the nut; d1 - internal diameter of the bolt; D1 - internal diameter of the nut; P - thread pitch; H is the height of the original triangle; R is the nominal radius of curvature of the bolt root; H1 - working height of the profile.
Notes:
- The shape of the bolt thread root is not regulated and can be either rounded or flat-cut. A rounded cavity shape is preferred.
- The shape of the nut thread root is not regulated.
The table shows the dimensions of the thread profile elements. The shape of the screw thread cavities is not regulated by the standard; rounding of the depressions (with radius R) reduces stress concentration and increases the strength of the screw under cyclic loading.
According to GOST 24705 (ST SEV 182), the thread is metric, the main values of thread diameters are determined by the formulas:
where d3 is the internal diameter of the bolt.
Measuring rivets
Rivets are a kind of fasteners consisting of two parts: a head and a mandrel. The cap is the short side that needs to be measured for its length and diameter. The mandrel is the long, thin end that comes off the rivet during the installation process.
First of all, you need to place the head into the round holes on a special rivet gauge. The holes have different diameters into which rivets fit. When they are inserted into the hole, the cap should fit snugly.
If there is a gap, the size is too large for the rivet. In the opposite situation it is too small. Using the selection method, you need to determine which size most accurately reflects the parameters of the fastener.
Next you need to measure the length of the rivet. To do this, you need to attach the cap to the open upper areas. Make sure that the washer or flange of the rivet is pressed well.
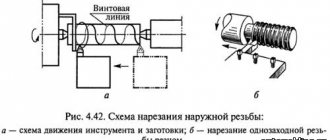
Carving - types, features, methods of definition
There are different types of carving: from artistic to mechanical. The latter is a screw thread applied in a spiral to a rod with a circular cross-section or to the surface of a hole. In modern construction, mechanical engineering and even everyday life, two thread systems are considered the most common - metric and inch.
In fact, there are a huge number of different standards in the international system. But in Russian-speaking countries it is customary to use the metric thread standard ISO DIN 13:1988 with the angle of inclination of the profile top. Domestic standards defining this type of thread are GOST 24705-2004 and DSTU GOST 16093:2019.
Metric thread
The main difference between a thread of this type and similar ones is that only in a metric thread the profile angle is 60° (there are also threads with an angle of 55° and 47°).
Metric threads are used everywhere, including in metric fasteners. Due to its widespread use, it was necessary to create an impressive number of varieties in order to adapt this universal thread to different situations.
Types of metric threads
- Left, right.
- One-way, two-way, three-way.
- Trapezoidal (classical and thrust), rectangular, triangular, round, cylindrical (pipe, conical).
- Tape, modular, pitch, etc.
Left and right metric thread
Types of metric threads
Inch thread
Inch threads have a profile angle of 55°. The main unit of measurement of the inch (imperial) system, as you might guess, is the inch. In writing, it is indicated by an upper quotation mark, placed without a space immediately after the number: 2″.
The most famous inch thread standards are called UNC and UNF.
GOST and the need for unification
For a long time, manufacturers performed theoretical calculations of thread pitch using their own methods and manufactured fasteners using their own technologies. With this approach, connectors from different brands often turned out to be incompatible or did not provide suitable joint quality, which often caused problems for users.
Particular difficulties arose during the assembly of machines, apparatus and other component equipment. Literally each element had to be marked separately so that later it could be placed correctly. Banal preventive cleaning of tools or machines, parts of which were supplied by two or more factories, turned into real torture.
Therefore, from the beginning of the 20th century, the issue of standardization became seriously concerned. The matter was approached with the utmost seriousness, taking into account even the experience of the 12th century, or rather the practice-tested formula stating that the distance between adjacent turns should be equal to 20% of the diameter of the rod. Naturally, they took into account that in those distant times the fasteners were made of wood, and only 20 years later they began to tighten the most loaded points with studs and protect them with nuts machined from a single piece of especially strong rock. Today, completely different materials are relevant, which have completely different requirements.
Food for thought
The first path to standardization began to be paved precisely in Russia: at the Tula plant they began to work according to Nikita Demidov’s drawings, and check the results using the calibers he proposed. This made it possible to control the accuracy of casting and execution of individual parts.
Yes, the famous industrialist did not think specifically about the thread pitch (how to measure it or find the optimal one), but sought to unify production as a whole. And he achieved his goal: in 1787, a commission under the tsarist army purchased 500 domestic guns and the same number of English ones. The inspectors disassembled each of them, arranged the elements according to their functional purpose and thoroughly mixed each group, after which they tried to assemble it. In the case of the Russian models, this was possible - even though they required grinding in, they eventually passed the zeroing - but the pride of the British craftsmen remained a pile of useless iron.
This was the impetus for the following events:
Each regiment created a platoon responsible for servicing weapons, and it regularly received consumables marked with notches to replace small items that had failed.
In France, in 1790, they approved the first pan-European basic system of measures, adopting m and its “derivatives” – cm and mm – as a unit of length, which is still used today; England, by the way, remained with its inches and feet.
THREAD GUIDE - HOW TO DETERMINE THREAD AND FITTING TYPE
| Outer thread diameter (mm) of fitting | Thread pitch | Fitting or adapter type | Internal thread diameter (mm) of nut | |||||||
| from | before | inch thread per inch | metric mm | BSP (T) (K)R | DKOL DKOS DK | JIC (UNF) | ORFS (UNF) | NPTF NPSM | from | before |
| 9,3 | 9,7 | 28tpi | 0.907 mm | 1/8″ | 8,5 | 8,9 | ||||
| 9,3 | 9,7 | 29tpi | 0.876 mm | 1/8″ | 8,5 | 8,9 | ||||
| 9,7 | 9,9 | 1.5 mm | M10 | 8,2 | 8,6 | |||||
| 10,9 | 11,1 | 20tpi | 1,270 mm | 7/16″ | 7/16″ | 9,7 | 10,0 | |||
| 11,6 | 11,9 | 1.5 mm | M12 | 10,2 | 10,6 | |||||
| 12,4 | 12,7 | 20tpi | 1,270 mm | 1/2″ | 1/2″ | 11,3 | 11,6 | |||
| 12,9 | 13,1 | 19tpi | 1.337 mm | 1/4″ | 11,4 | 11,9 | ||||
| 12,9 | 13,1 | 18tpi | 1.411 mm | 1/4″ | 11,4 | 11,9 | ||||
| 13,6 | 13,9 | 1.5 mm | M14 | 12,2 | 12,6 | |||||
| 14,0 | 14,3 | 18tpi | 1.411 mm | 9/16″ | 9/16″ | 12,7 | 13,9 | |||
| 15,6 | 15,9 | 1.5 mm | M16 | 14,2 | 14,6 | |||||
| 16,3 | 16,6 | 19tpi | 1.337 mm | 3/8″ | 14,9 | 15,4 | ||||
| 16,3 | 16,6 | 18tpi | 1.411 mm | 3/8″ | 14,9 | 15,4 | ||||
| 17,6 | 17,9 | 1.5 mm | M18 | 16,2 | 16,6 | |||||
| 18,7 | 19,0 | 16tpi | 1.588 mm | 3/4″ | 3/4″ | 17,3 | 17,6 | |||
| 19,6 | 19,9 | 1.5 mm | M20 | 18,2 | 18,6 | |||||
| 20,5 | 20,9 | 14tpi | 1.814 mm | 1/2″ | 1/2″ | 18,6 | 19,0 | |||
| 21,6 | 21,9 | 1.5 mm | M22 | 20,2 | 20,6 | |||||
| 22,0 | 22,2 | 14tpi | 1.814 mm | 7/8″ | 7/8″ | 20,5 | 20,5 | |||
| 22,6 | 22,9 | 14tpi | 1.814 mm | 5/8″ | 5/8″ | 20,6 | 21,0 | |||
| 23,6 | 23,9 | 1.5 mm | M24 | 22,2 | 22,6 | |||||
| 25,6 | 25,9 | 1.5 mm | M26 | 24,2 | 24,6 | |||||
| 26,1 | 26,4 | 14tpi | 1.814 mm | 3/4″ | 3/4″ | 24,1 | 24,5 | |||
| 26,6 | 26,9 | 12tpi | 2.117 mm | 1.1/16″ | 1.1/16″ | 24,4 | 24,7 | |||
| 29,6 | 29,9 | 2.0 mm | M30 | 27,4 | 27,8 | |||||
| 29,8 | 30,1 | 12tpi | 2.117 mm | 1.3/16″ | 1.3/16″ | 27,6 | 27,9 | |||
| 29,6 | 29,9 | 1.5 mm | M30 | 28,2 | 28,6 | |||||
| 31,6 | 31,9 | 2.0 mm | M32 | 29,4 | 29,9 | |||||
| 33,0 | 33,2 | 11tpi | 2.309 mm | 1″ | 30,3 | 30,8 | ||||
| 33,0 | 33,3 | 12tpi | 2.117 mm | 1.5/16″ | 1.5/16″ | 30,8 | 31,2 | |||
| 32,9 | 33,4 | 11.5tpi | 2.209 mm | 1″ | 30,3 | 30,8 | ||||
| 35,6 | 35,9 | 2.0 mm | M36 | 33,4 | 33,8 | |||||
| 37,6 | 37,9 | 1.5 mm | M38 | 36,2 | 36,6 | |||||
| 40,9 | 41,2 | 12tpi | 2.117 mm | 1.5/8″ | 1.5/8″ | 38,7 | 39,1 | |||
| 41,6 | 41,9 | 2.0 mm | M42 | 39,4 | 39,8 | |||||
| 41,5 | 41,9 | 11tpi | 2.309 mm | 1.1/4″ | 39,0 | 39,5 | ||||
| 41,4 | 42,0 | 11.5tpi | 2.209 mm | 1.1/4″ | 39,2 | 39,6 | ||||
| 44,6 | 44,9 | 2.0 mm | M45 | 42,4 | 42,8 | |||||
| 44,6 | 44,9 | 1.5 mm | M45 | 43,2 | 43,6 | |||||
| 47,3 | 47,6 | 12tpi | 2.117 mm | 1.7/8″ | 1.7/8″ | 45,1 | 45,5 | |||
| 47,4 | 47,8 | 11tpi | 2.309 mm | 1.1/2″ | 44,8 | 45,3 | ||||
| 47,3 | 47,9 | 11.5tpi | 2.209 mm | 1.1/2″ | 45,1 | 45,5 | ||||
| 51,6 | 51,9 | 2.0 mm | M52 | 49,4 | 49,6 | |||||
| 51,6 | 51,9 | 1.5 mm | M52 | 50,2 | 50,6 | |||||
| 56,2 | 56,6 | 11tpi | 2.309 mm | 2″ | 59,2 | 59,6 | ||||
| 194124, St. Petersburg, Yuzhnoe highway, no. 37 Moscow, Mytishchi, Volkovskoe highway, possession 21 Source: komplektsz.ru Article rating: Save to: How to determine thread type Link to main publication |