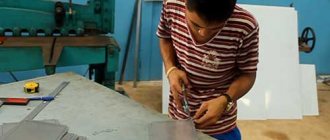
The possibility of making something useful out of unused or worn-out equipment attracts many home craftsmen. One such useful device is a laser cutter. Having such a device at your disposal (some even make it from an ordinary laser pointer), you can decorate products from various materials.
With a homemade laser cutter you can cut thin wooden parts or engrave glass
What is a CNC laser cutting machine?
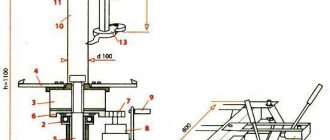
A laser cutting machine has a lifting table designed to hold and move the workpiece relative to the beam. The movement can be linear about the vertical coordinate axis.
Reference : the machine has different lifting capacity, area and can be moved using mechanical or electric drives.
Advantages of a homemade tool
Despite the fact that such a tool cannot provide high accuracy, it is quite profitable to use it in everyday life. In any case, the marking will be more accurate, and the process itself is much simpler than when using a water level. It is for this reason that such equipment is in demand among household consumers. The positive characteristics of the tool include:
- long beam length;
- minimum error;
- high marking speed.
What do you need to assemble a CNC laser cutting machine yourself?
To assemble a laser machine yourself, you should make sure you have important tools, the tandem of which will allow you to get high-quality work from the product.
For cutting metal
The main element is the laser of a writeable disk drive for a PC, which has a high writing speed. You will also need:
- flashlight;
- laser pointer;
- soldering iron;
- locksmith supplies.
If a more powerful tool is needed, then additional parts are needed to produce the driver:
- resistors 2–5 Ohm;
- capacitors (100 pF and 100 mF);
- LED flashlight;
- multimeter
More power can be obtained by using a 60 W laser diode purchased in a store.
It is best to install a product for laser cutting of metal, made independently, on a frame; use a PC equipped with a program for control. Therefore, in addition to the laser, you need:
- frame;
- electric motors;
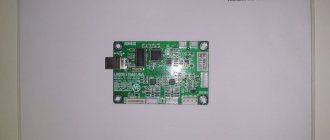
- transistors and boards;
- regulator;
- pulleys and timing belts;
- sheet steel for the production of brackets;
- nuts, couplers, ball bearings;
- controller and switches;
- metal rods and boards.
For cutting plywood
To make a plywood cutting machine, you will need the following elements:
- MDF, chipboard or plywood;
- guide parts - metal rods measuring 12 mm;
- holders;
- bearings and sliding bushings;
- stepper motors;
- running nuts and screws;
- controller;
- controller power supply;
- coupling;
- wires and cables;
- pulleys;
- switches;
- computer.
For cutting wood
The basis for woodworking devices should be hard wood, steel, and aluminum. For high-quality operation of the complex, the development of calipers is necessary. No movement is allowed while they are moving, as this will cause inaccurate milling. Also, to assemble a wood cutting machine you will need the following components:
- guides made of steel, well polished;
- support mechanism made of textolite;
- stepper motors, it is better to use 24 V and 5 A samples;
- a working body fixation block, the configuration of which depends on the available tool.
Making a simple level from a laser pointer
Of the entire list of elements of such a level, you only need to buy a pointer. It is quite possible to make the remaining auxiliary parts yourself. The goal of the presented process is to build a reliable fastener that will allow the device to rotate around an imaginary axis completely unhindered. The tool consists of the following parts:
- laser pointer;
- wooden beams (length - 0.5 meters, width and thickness - 25x25 mm, respectively);
- cord intended for construction work;
- drill for drilling holes;
- support (an ordinary stick will do).
To assemble the equipment, just follow the simple steps described below.
- The block is drilled on both sides. As a result, neat holes are formed, which must be parallel to each other. One of the holes made will be used to securely fasten the pointer, and the other will fit the construction cord.
- The pointer is securely fixed in the hole and a rope is secured, making it possible to install the device above the floor surface. The hole drilled specifically for the cord must be of the optimal diameter so that the cord can pass through it freely.
- A rope is threaded into the hole that was prepared in advance and secured as securely as possible.
How to make a CNC laser cutting machine with your own hands?
A self-assembled CNC device gives the craftsman a reason to be proud and allows him to understand in detail the filigree processing of materials.
For cutting metal
The first step to making a laser metal cutting machine is to disassemble the disk drive to remove the light bulb from it. It is located in the carriage and secured. The fasteners must be soldered with a soldering iron.
Help : during operation, you do not need to subject the light bulb to strong mechanical actions that could damage it.
Before assembling the machine, you need to decide what exactly it will be powered from, where the LED will be mounted and how to distribute the current.
Help : the diode requires a more powerful current than the parts of the pointer.
- You need to carefully disassemble the pointer and replace the diode with a light bulb that you pulled out of the disk drive. For fastening it is best to use glue.
- The power of the pointer may not be enough, so it is increased with batteries for a flashlight. To do this, the lower elements of the flashlight are combined with the part of the pointer in which the light bulb is located. The glass is removed from the flashlight and the light bulb is connected.
- When making the device yourself, an aluminum wire is wound around the light bulb. The resistor parts are connected to the batteries according to the circuit. This requires precision and respect for polarity.
- The body for such a machine is a metal flashlight. After installing the wooden frame, the rods are installed.
- To install electric motors, you need sheet steel brackets that are bent at right angles.
- Brackets should also be made to secure the drive, just bend the sheets into the letter P. The belts are connected to the base with self-tapping screws.
For cutting plywood
Self-assembly of the device for cutting plywood occurs in the following order:
- Cutting and production of base. It is best to use plywood twelve millimeters thick for it.
- Fastening fixed walls to this base and drilling holes for installing guide rods.
- Installation of guides along the Y axis. Sliding supports for the side elements of the frame are pre-strung on them.
- Making side movable walls. You need to drill holes in them for the guides along the X axis and install them on the walls.
- Fastening the walls to supports.
- Assembling the working head of the device.
- Electrical installation. It includes power supply, installation of switches, start buttons and emergency stop.
- Installation of electronics and connection of the controller.
- After checking all the parts, you can start working on your homemade machine.
For cutting wood
The sequence of actions for making a wood cutting machine is as follows:
- Installation of the axles of the support element and their fixation along the edges of the machine.
- Grinding in calipers. You need to move them along the guides until the movement becomes smooth.
- Tightening the screws to fix the support machine.
- Fastening elements to the base of the working mechanism.
- Installation of couplings and lead screws.
- Installation of motors. They are attached to the coupling bolts.
Electronic elements are located in a self-contained cabinet to ensure a minimum of disruptions during operation of the device. The plane for mounting the working machine must be without differences, since the design does not provide level adjustment screws. After completing all of the above, you can safely proceed to operating the machine.
Design and principle of operation
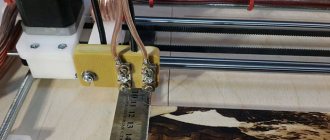
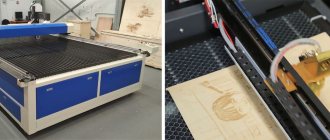
The main element of the engraver is a semiconductor laser. It emits a focused and very bright beam of light that burns through the material being processed. By adjusting the radiation power, you can change the depth and speed of burning.
The laser diode is based on a semiconductor crystal, on top and bottom of which there are P and N regions. Electrodes are connected to them, through which current is supplied. Between these regions there is a P-N junction.
Compared to a regular laser diode, it looks like a giant: its crystal can be examined in detail with the naked eye.
The values can be deciphered as follows:
- P (positive) area.
- P - N junction.
- N (negative) area.
The ends of the crystal are polished to perfection, so it works as an optical resonator. Electrons, flowing from a positively charged region to a negative one, excite photons in the P-N junction. Reflecting from the walls of the crystal, each photon generates two similar ones, which, in turn, also divide, and so on ad infinitum. The chain reaction occurring in a semiconductor laser crystal is called the pumping process. The more energy supplied to the crystal, the more it is pumped into the laser beam. In theory, you can saturate it indefinitely, but in practice everything is different.
During operation, the diode heats up and must be cooled. If you constantly increase the power supplied to the crystal, sooner or later there will come a time when the cooling system can no longer cope with heat removal and the diode will burn out.
The power of laser diodes usually does not exceed 50 Watts. Above this value, it becomes difficult to make an effective cooling system, so high-power diodes are extremely expensive to produce.
There are semiconductor lasers with 10 or more kilowatts, but they are all composite. Their optical resonator is pumped by low-power diodes, the number of which can reach several hundred.
Compound lasers are not used in engravers because their power is too high.
DIY drawings of CNC laser plotters
A CNC plotter requires three axes to function when creating graphs: X, Y and Z. The first two axes are at 90 degrees to each other so that any point on the surface is determined by the value of X and Y. The Z axis is used to raise and lower the pen on paper.
For cutting metal
To correctly complete a drawing for laser cutting of metal, there are programs that work with vector graphic files. They store drawings for laser cutting. When converting a drawing, some distortions or accidentally added elements may sometimes appear. You must keep an eye on this so that you can correct them in time. Drawings must support the formats of the AutoCAD or Corel Draw software packages.
For laser cutting of metal, it is permissible to use a schematic drawing of the part in computer form. For this, CDR or DWG file formats are used. The part sketch must be a closed-loop schematic object. It may have slots and holes.
For cutting plywood
When creating a drawing for laser cutting plywood, electrical routing and connections must be taken into account. This will help reduce the number of errors when designing the machine.
You can make a drawing manually, but it is better to use programs such as Compass, AutoCAD or Visio. They allow you to correct a drawing, and Visio has ready-made templates for electrical equipment.
Ways to organize a hood
There are two main methods for installing ventilation in a room:
- With access to the street. Cheap, but requiring significant effort, option. To lead the pipe to the street or roof, you will need to make holes; Also, surrounding people may be against foreign odors around the workshop. To organize this option, you need a fan with a capacity of at least 150 m3/h, but not a duct one. It is advisable to install the fan at a distance of 7 meters from the machine. A valve is required before venting to the street, then pollution from the street will not enter the room.
- With air filtration system. This involves purchasing a special hood in which a mechanical cleaning filter is installed, which traps the largest particles of dirt, as well as an activated carbon filter that removes excess odors. Such hoods do not require access to the street and can be installed in small shops or workshops. Productivity is selected based on the power of the machine and the type of work performed. Don't forget to change filter cartridges regularly.
Remember that well-organized ventilation means clean air, comfort and health for company employees.
Stages of creating a homemade product
Laser Pointer Conversion
The first step is to make an emitter from a pointer that will project a clear point on the wall (unfortunately, in any case, it will not be able to “draw” a continuous line on a plane, like expensive purchased tools; special lenses are needed). To do this, take the simplest nozzle, without a pattern, cover it with cardboard and pierce a small hole in the center. Now, when we screw the attachment onto the pointer and turn it on, a bright, clear dot will appear on the plane.
Components of the structure
The main element of an industrial laser level is a special laser emitter. In a homemade level, its role will be successfully played by a cheap laser pointer, which can be bought in any office supply department. This is only the main detail, but not the only one; the entire list of what is needed is as follows:
- laser pointer;
- building level (bubble);
- a peg with a square or round diameter (d=5-6cm) 1-1.3m long (you can use a shovel holder);
- thick plywood or board;
- a piece of porous rubber.