For any work to be successful, you must have good equipment and tools. The same statement applies to amateurs (or professionals) “tinkering” with wood. Craftsmen who make furniture or other wooden products always try to acquire various tools and devices that can help them in their work.
For example, a jointer. This device significantly increases the productivity and quality of woodworking. But not all fans can purchase it, because its price is quite high. How to get out of such a difficult situation? There is a solution, and it’s quite simple - it’s to make a tabletop jointer with your own hands. And the manufacturing process itself will be discussed in the article.
Why do you need a jointer?
A woodworking shop can have a variety of machines, but the most commonly used (besides the circular saw, of course) are jointers and planers. These two types of units are slightly similar in their function, but differ in the method of use.
If you need to make a wooden blank in the form of a board, beam or shield, then it is better to use a thickness planer. Such a device, the main tool of which is the same knife, is capable of cutting the source material into two parallel parts. In this case, both of them will be adjusted to certain sizes.
Thicknessing machines are available in both single-sided and double-sided types. In the first case, only one side of the workpiece is processed in one pass. A double-sided thickness planer is more productive. Here the output is an almost finished part.
Thicknessing machines have a shaft located above the tabletop. Moreover, the latter is made massive in order to smooth out large vibrations. In addition, the mechanism is equipped with a special casing, which is designed to dampen noise.
A jointer has a slightly different task. This device is used to create a smooth surface without significant roughness on the workpiece. This machine, like the previous version, is equipped with a shaft with knives, only in the jointer it is located under the table top.
The workpiece is fed onto the work surface from one side, and the output from the opposite side is already partially processed. This way, layer by layer, the desired evenness is achieved. After processing on a jointer, the part can be fed to a surface planer.
Design Features
Planing and thicknessing machines are designed for beautiful and high-quality processing of the front part of wood. All defects and irregularities are removed, giving the product a beautiful appearance. The devices are used both in home workshops and in large-scale production, where these operations must be performed daily.
After processing, the result is a smooth and clean workpiece that preserves the texture of the wood. Some models are capable of not only performing this process, but also chamfering
It should be remembered that it is important to completely dry the wood before starting work. This is the only way the operation will be completed without problems.
Basic Concepts
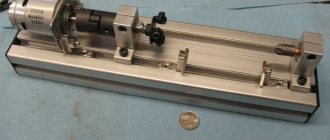
Such equipment will have numerous rotating parts. From this we can conclude that making such a machine with your own hands will not be so easy. Therefore, when starting to manufacture it, you need to calculate your strength. If you already have some similar experience, then you will cope with the task. It is worth noting right away that you will not be able to make a jointing machine entirely from parts of your own making. Of course, it’s possible that you have a large assortment of different devices in your “bins,” but this rarely happens. First of all, this concerns the shaft with knives and bearings. They will most likely have to be purchased or even ordered. But if everything you need is available, then you can safely start designing.
Some parts for the jointer: knife shaft, knife bearings, will have to be purchased or ordered
First of all, it’s worth understanding what kind of “package” you want to receive. There may be several options:
- just a jointer. It will only perform one function;
- set of jointer and circular saw. In this case, the functionality of the machine is doubled;
- equipment capable of performing the role of a jointer, a circular saw, a grinding device, a grinding and drilling machine. Such a device will be very useful for your workshop, but it will be difficult to do it yourself.
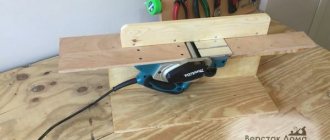
The most optimal and easiest option is to make a jointer and a circular saw on the same bed. Plus, both tools will rotate from the same electric motor. This feature will greatly facilitate our task.
Let's look at the main components of our future tabletop jointing machine. It will include:
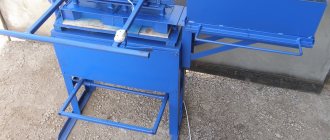
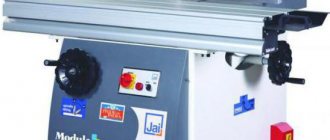
- Bed. This structure will support the entire machine and the equipment installed on it. To make it, it is best to use durable channels with a wall thickness of 8-10 millimeters. The bed can be made either collapsible or permanent. In the first case, all its components will be connected using bolts and nuts. If you do not need a portable machine, then the channels can be secured together by welding. This option will be more reliable. You can do without a bed if its role is played by a desktop;
- Work tool. This is one of the most important components of the machine. The jointer knives and the saw itself - it is with their help that you will saw and process the boards. The knives are firmly attached to the shaft. They must be made of reliable and strong steel. Circular saw with pobedit tips. Such a tool will last you much longer;
- The rotor is where all the tools will be attached. Without this part it is impossible to make a single machine, planer or circular saw. Finding a suitable rotor can be quite difficult, so it is better to order it from a professional turner, having previously provided it with drawings;
- Desktop. For a properly functioning machine, you need three surfaces. One will serve as a workbench for a circular saw, and the other two for a jointer. The thickness of the material for the working surface must be at least five millimeters. Multilayer plywood or metal sheets are suitable for these purposes. In this case, it is advisable to make a slight difference in height for surfaces intended for jointing. The side along which the workpiece will be fed should be a couple of millimeters lower than the side to which the already processed side will go. This difference will make work easier and significantly reduce vibration.
Electric drive of the jointer
And of course, don’t forget about the drive. All mechanisms must rotate. This means that the drive will be the “heart” of the machine. Here are some recommendations for this design element: - first of all, prepare the electric motor.
Electric motor for jointer
It is best to use a three-phase unit for these purposes. Of course, in this case you may have to redo the electrical network in your workshop, but it will be worth it. Three-phase electric motors operating at a voltage of 380 V are capable of developing greater power. In addition, the torque of such devices is suitable for our purposes. The minimum power value should be 3 kW, but the maximum is at your discretion;
- To transmit torque from the electric motor to the working shaft, it must be done using belts. A two-strand wedge-shaped shape is best suited for these purposes. Such belts are more reliable;
- the electric motor itself can be mounted cantilever, directly inside the machine frame. This method will help solve the problem associated with belt tension. If you want to strengthen the engine more firmly, then you need to add a slide to the design, with the help of which adjustments will be made;
- to increase the shaft rotation speed, it is worth using two pulleys. One, larger in diameter, is installed on the electric motor. A pulley with a smaller cross-section is mounted on the shaft.
Be very careful about providing power to the machine. Three-phase current is supplied through a four-core cable. In this case, reliable grounding must be organized. These requirements will help avoid accidents when working on the machine.
Purpose of jointing
The rough base of the board is formed by a wave when sawing, and is subject to warping when drying. It will not be possible to correct such a defect on other types of machines. During jointing on the SF machine, pressure acts in the longitudinal direction to obtain a flat plane. Pressure from above will give temporary equalization, which will go away after the load is removed. The workpiece will be smooth, but not level.
To remove irregularities of a significant size, several passes are made until the desired geometry is obtained. The clamping force is distributed so that the original shape does not change; alignment occurs with a planing device.
The quality of the base side determines the accuracy/distortion of the other three sides.
Joining scheme
Recommendation for jointing
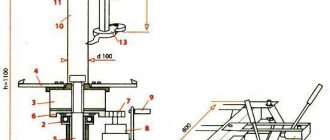
Drawing. The main stages of creating a jointer
Tabletop jointer - drawing
Tabletop jointing machine - drawing (part 2)
A jointing machine, its simplest version without additional functions, can be made quite easily with your own hands. The general progress of work in this case will look like this:
- first prepare all the necessary parts, tools and materials;
- We create a drawing of the future machine. Without this “document” you cannot start work. With the help of the drawing you can calculate all the nuances and prepare for them. In addition, having such a plan will greatly facilitate and simplify the task;
- Next, we transfer all the dimensions of future parts to the workpiece and manufacture them;
- A very important detail is the location for installing the rotor bearings. It is made from several pieces.
When fastening, glue and clamp are used. The recess should ideally fit the dimensions of the bearing;
- Next, we install the electric motor. To do this, as noted above, you can use a console mount, or install the unit on a skid;
- the next step will be to assemble the rotor with the bearing and install them in place. At the same time, a connection is made to the electric motor using a belt drive. Check that the rotor rotates freely in the bearing;
- Next, the work surface is assembled and installed. It will consist of two parts - the serving and the receiving. In this case, the second should be a couple of millimeters higher than the first. The working surface can be made of multi-layer plywood, and for greater strength and increased service life it can be covered with sheet iron.
After creating the system for turning the electric motor on and off, the machine is ready for use. But in order for your new tool to bring only benefit and joy to work, it is worth using it correctly and safely.
Recommendations for use
A rotary machine, like any mechanism, needs proper operation. If you do not follow certain rules, the device can quickly fail. And in the worst case, you yourself will get injured. Therefore, when using, you should follow the recommendations from specialists:
- In order for the machine to operate reliably, it is necessary to periodically carry out preventive maintenance. Such a complex includes the following activities - checking the reliability of the location of the knives on the shaft, injection of bearings, checking the electric motor, inspecting the belt drive to ensure that its tension is sufficient, checking all contacts, and so on;
- Rotating parts are always dangerous. And if they are also equipped with sharp blades, then the risk of getting herbs is very high. To increase operational safety, it is better to cover the shaft with knives with a casing. It will open when a wooden piece is removed, and close again when idle;
- When working on the machine, follow all safety precautions. This is especially true for the quality of workplace lighting. Hang a powerful lamp above the machine, and your workshop itself should be bright. Also pay attention to the quality of the floor. If it is too slippery, then it is better to install a wooden platform or a rubber mat;
- Do not use excessive force when planing or cutting material. Excessive force will not speed up the work, but will only spoil the workpiece or lead to breakdowns of the machine itself;
- do not hesitate to invite an assistant when processing long workpieces. This way the work will be done faster, better and safer for your health.
Of course, it is worth keeping your desktop clean. After finishing work, with the machine turned off and de-energized, clean the device from chips. The same must be done periodically to perform large volumes. Turn off the machine and remove any accumulated chips from all mechanisms and surfaces. Cleanliness will make your work easier and help keep the unit operating for a longer period of time.
The video will discuss in detail one of the options for a homemade jointing machine.
Installation of knives
The blades must be strictly straight.
Special instruments are used to check the details of this parameter. The tested knives are mounted on the shaft sequentially, their edges protrude above the edge of the clearance lining by 1-2 mm. To control the parallelism of the knives, an indicator or a checking parallelepiped is used. The first gives less error when checking parallelism. The knives must not be distorted when fixing them.
Attention! It is strictly forbidden to use any gaskets when installing the blades. Knives that are worn out or mechanically damaged must be replaced as soon as possible.