A laser level or level is used in the field of construction and facing work for the purpose of precise marking on any type of surface. The procedure is easy and quick, which significantly saves time in the work process. Even an inexperienced technician can use the tool: simply fix the device on a support (floor, ceiling, wall) opposite the marking surface and turn it on. On the surface where the marking occurs, a projection of the laser beam will appear horizontally and/or vertically.
The cost of the presented device in various retail outlets is quite high. But, if you use certain instructions, show accuracy and some patience, it is quite possible to make a laser level with your own hands. This approach has a positive effect on saving financial resources that go towards the construction and renovation of various premises.
Device design features
The device is compact and ergonomic. It can be easily placed in a pocket, mounting case or bag. The case is equipped with fastening elements. They may be:
- magnet;
- fastening straps;
- tripod.
The beam projected onto the marking surface is constructed along a plane or in a direction. Construction levels, used to indicate a certain direction, produce a projection in the form of a point. Devices for marking a plane are equipped with a special type of optical instrument that turns the beam into a straight line. Levels are divided into types:
- Rotary devices, due to rotation around their axis, are capable of producing a clear line (used when pouring floors and constructing ceilings);
- positional levels consist of 2 laser radiation sources to create a visible plane (used during finishing work indoors);
- self-leveling (can emit up to 5 beams and are equipped with a sight in the form of a simple cross and pendulums located inside the device).
The price of the presented equipment is several times higher than the cost of a conventional level based on liquid and air bubble.
Power supply
Some of the work is done. Now the homemade device must be provided with electric current. The power supply of a standard diode should be 3V, and the flow rate should be up to 400 mA. These values may vary depending on how fast the disk is written.
There are 2 ways of eating, each of which has advantages and disadvantages. However, each one is powered by a battery(s).
First option
A distinctive feature of the first method is voltage regulation using a resistor. The laser does not require high power. So, the components of a drive with a write speed of 16X will need 200 mA. You can increase this value to a maximum of 300 mA, otherwise there is a possibility of damaging the crystal and forgetting about the homemade laser. The main advantages of this method are the reliability of the product and ease of manufacture. The main disadvantage is possible problems with the placement of batteries.
Second way
It will be more difficult to create a laser using this option. In addition, the finished device is more suitable for stationary placement. The point is the driver (LM-317 chip), which is a board for creating a certain power, as well as limiting the electric current.
As you can see in the diagram, to create a laser you will need:
- Directly, the LM-317 chip.
- 2 resistors at 10 ohms.
- 1 variable resistor per 100 Ohm.
- 1 diode
- 100 µF capacitor.
Regardless of the environment as well as the power source, the driver will maintain 7V power.
Making a simple level from a laser pointer
Of the entire list of elements of such a level, you only need to buy a pointer. It is quite possible to make the remaining auxiliary parts yourself. The goal of the presented process is to build a reliable fastener that will allow the device to rotate around an imaginary axis completely unhindered. The tool consists of the following parts:
- laser pointer;
- wooden beams (length - 0.5 meters, width and thickness - 25x25 mm, respectively);
- cord intended for construction work;
- drill for drilling holes;
- support (an ordinary stick will do).
To assemble the equipment, just follow the simple steps described below.
- The block is drilled on both sides. As a result, neat holes are formed, which must be parallel to each other. One of the holes made will be used to securely fasten the pointer, and the other will fit the construction cord.
- The pointer is securely fixed in the hole and a rope is secured, making it possible to install the device above the floor surface. The hole drilled specifically for the cord must be of the optimal diameter so that the cord can pass through it freely.
- A rope is threaded into the hole that was prepared in advance and secured as securely as possible.
The support should be fixed. Otherwise, it will not be possible to adjust the level correctly. The pointer must be of high power so that the beam can be clearly displayed on any surface. If the presented parameter is insufficient, the equipment will only be comfortable to use in a darkened room.
Video on the topic
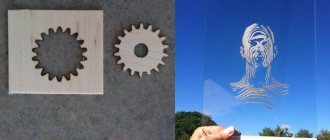
This article describes how to make an inexpensive low-power laser with your own hands. You can use this homemade product to create a homemade building level, when creating lighting effects when decorating a home disco, for an additional rear signal for cars, motorcycles, bicycles, etc.
A laser diode is a semiconductor crystal made in the form of a thin rectangular plate. The beam passes through a collecting lens and represents a thin line; when it intersects with the surface, we see a point. To obtain a visible line, you can install a cylindrical lens in front of the laser beam. The refracted ray will look like a fan.
The proposed homemade product can be made quickly and inexpensively even by a novice radio amateur.
I made it from a 5mW laser, 3V supply voltage from AliExpress. Despite the low power of the laser emitter, it is necessary to observe basic safety precautions not to direct the beam into the eyes.
Watch the entire manufacturing process in the video:
List of tools and materials - laser emitter 5 mW, 3V (link to laser) - screwdriver; scissors; - soldering iron; -cambric; foil textolite; - two 1.5V batteries; - connecting wires; battery compartment housing with headlamp power button; -5 Ohm resistor; -LED with a transparent bulb; - strip of tin.
Step one. Making a laser board.
A laser level is a useful invention that makes the process of leveling fast and convenient. To use it, you don’t need to have any special knowledge; just install it on the floor (some models on the wall) and turn it on. The built-in laser emitter will begin to act and instantly project strictly horizontal or vertical lines onto the surface of the room. The mentioned advantages were appreciated in practice by many construction teams, but the convenient device did not find wide use among home craftsmen. A high-quality laser level (with a small measurement error!) is expensive, so buying it for one-time work and then throwing it on the mezzanine is not reasonable. For these purposes, you can make a laser level with your own hands from inexpensive and accessible parts.
How to check if a homemade level is working properly
Using a simple rope, the device is suspended from a support in the center of the room. The equipment is turned on, directed in the desired direction, and the required distance along the length of the beam projection is noted. After this, a special stick is installed to ensure ease of marking.
After such important events, you can begin to use the device and point it in any direction. If you leave the position of the stick unchanged, the same height of marks will be ensured. After marking the laser dots, they are connected with construction cord. Next, using a measuring meter, preferably a hard one, draw a marking line.
What is the device for?
The purpose of laser devices is varied. They are necessary for the following types of work:
- layout of the territory and installation of equipment with horizontal and vertical position control;
- marking and determining direction;
- surface leveling of floors, walls and ceilings;
- arrangement of concrete screed and assembly of floors with adjustable level;
- construction of communication highways;
- installation of bulkheads and hanging accessories;
- installation of staircases.
In the latter case, the device’s ability to mark inclined planes is used. For example, it is necessary to install railings on a flight of stairs. By fixing a level with a laser on it, it is easier to install the railing parallel to the flight.
You can understand how to use a level using the example of common construction and repair work.
Leveling floor, wall and ceiling surfaces
When carrying out such work, additional control marks will be required. Then the laser beam is directed along the plane. The laser is adjusted according to the marks to more accurately determine the evenness of the surfaces.
When using a laser level and obtaining the same data, the floor turns out to be absolutely flat
Laying ceramic tiles
For such work, it is better to take a device with the function of cross-projection of rays horizontally and vertically. Thanks to them, even a novice master will be able to lay tiles flawlessly.
The intersection of the level lines is placed at the center of the proposed tile joints
Wallpapering
The gluing process itself is quite easy, but using a level makes the work even easier. Focusing on the laser beam projected onto the wall, it is much more convenient to align the wallpaper.
Horizontal projection will facilitate the correct gluing of fillets and borders
Assembly of cabinet furniture
Even if there are straight walls in the house, which is a rather rare occurrence, the interior can be ruined by crookedly hung cabinets, shelves and other hanging accessories. And with the help of a laser that creates a circular level line, you will immediately see how to install hanging furniture without distortions.
The horizontal beam of a laser level will help when installing curtain rods
Redevelopment
The plane builder allows you to simplify this process. To determine the exact placement of plasterboard walls and partition elements, you will need to install the laser so that its projection on the floor, walls and ceiling is a mark for the intended partition.
When installing a metal frame under a plasterboard wall, place the laser level on the floor, direct the beam upward so that it marks the profile installation line
If a lot of external work is expected (digging trenches, laying communication lines, laying a foundation), it is better to get a professional plane builder with a beam visible in sunlight.
Level made from a container of water and polystyrene foam
You will need the following items:
- convenient container;
- plaster or plasticine;
- laser pointer;
- Styrofoam.
Before you begin how to make a laser level with your own hands from the presented parts, you need to make sure your hands are clean and dry. If these rules are neglected, the materials will lose the desired properties. Next, actions are performed that do not require particularly large material and time costs. All of them are described below.
- A clean container (a large saucepan, bucket or bowl made of any material) filled to the brim with water.
- A laser-type pointer is attached to a prepared piece of foam. As a nozzle you need to use a regular point. The fastening can be a thick rubber band, plasticine or a clamp. The device should be mounted as evenly as possible, parallel to the mounting surface.
- Select the height required for marking and place a container of water there.
- The pointer, fixed to the foam, is placed in the reservoir.
- Turning on the pointer.
- By changing the position of the device on the surface where the marking is made relative to the axis of the central view, points are designated. They will be at the same level relative to the established horizon.
Elements must be of high quality and strength. This will ensure the longevity of the equipment. The presented design is far from ideal, but it gives fairly clear marking results. Thanks to this, such equipment is quite popular among budget or private builders.
The simplest laser from a computer mouse
If you need a laser just for fun, it’s enough to know how to make a laser at home from a mouse. Its power will be quite insignificant, but it will not be difficult to manufacture. All you need is a computer mouse, a small soldering iron, batteries, wires and a shutdown switch.
First you need to disassemble the mouse
It is important not to break them out, but to carefully unscrew and remove them in order. First the upper casing, followed by the lower
Next, using a soldering iron, you need to remove the mouse laser from the board and solder new wires to it. Now all that remains is to connect them to the shutdown switch and connect the wires to the battery contacts. Batteries can be used of any type: both finger batteries and so-called pancakes.
Thus, the simplest laser is ready.
If a weak beam is not enough for you, and you are interested in how to make a laser at home from improvised means with sufficiently high power, then you should try a more complex method of making it, using a DVD-RW drive.
To work you will need:
- DVD-RW drive (write speed must be at least 16x);
- AAA battery, 3 pcs.;
- resistor (from two to five ohms);
- collimator (can be replaced with a part from a cheap Chinese laser pointer);
- capacitors 100 pF and 100 mF;
- LED lamp made of steel;
- wires and soldering iron.
Work progress:
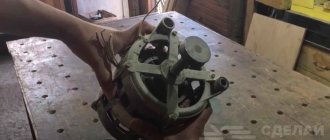
The first thing we need is a laser diode. It is located in the DVD-RW drive carriage. It has a larger heatsink than a regular infrared diode. But be careful, this part is very fragile. While the diode is not installed, it is best to wrap its lead with wire, since it is too sensitive to static voltage
Pay special attention to polarity. If the power supply is incorrect, the diode will immediately fail.
Connect the parts according to the following scheme: battery, on/off button, resistor, capacitors, laser diode. Once the functionality of the design has been verified, all that remains is to come up with a convenient housing for the laser. For these purposes, a steel body from a regular flashlight is quite suitable. Don’t forget also about the collimator, because it is the one that turns the radiation into a thin beam.
Now that you know how to make a laser at home, do not forget to follow safety precautions, store it in a special case and do not carry it with you, as law enforcement agencies may file complaints against you in this regard.
Watch the video: Laser from a DVD drive at home and with your own hands
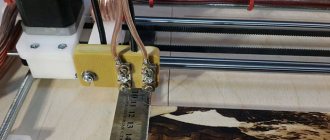
A laser cutter is a unique device that is useful to have in the garage of every modern man. Making a laser for cutting metal with your own hands is not difficult, the main thing is to follow simple rules. The power of such a device will be small, but there are ways to increase it using available devices. The functionality of a production machine that can do anything without embellishment cannot be achieved with a homemade product. But for household chores, this unit will come in handy. Let's look at how to build it.
Making a laser cross with your own hands
This tool is convenient to use for various types of cladding work and installation of hanging furniture. For this reason, it is not only popular among professionals, but is also often an integral element in the toolkit of the owner of a city apartment or private house. To manufacture the device, the following parts are required:
- laser type pointer;
- tripod from a camera or video camera;
- outdated player;
- several unnecessary disks.
You will be required to follow the steps below.
- A rectangular cross is made from pointers, which is attached to the drive from the player. This ensures free rotation of the tool around its axis.
- Ensuring free lifting of the device to the required height.
- The discs are carefully glued together and installed on the drive from the player.
- A cross made of pointers is attached to the disks. You can use tape or other sticky material.
Method No. 1
To make a simple device, you need to prepare all the components and tools in advance:
- wooden block 8x3x2 cm;
- a 9V “crown” battery or an analogue with a connector for a pin connector;
- laser module 3-5 V with a red beam;
- 2 CR2032 batteries with plastic holder with terminals;
- half a round mirror;
- small DC motor (5-12V);
- soldering iron and solder;
- copper wire;
- hacksaw for metal;
- hot glue gun with a rod;
- ruler;
- marker;
- electrical tape.
Procedure
First, a piece of the specified size is separated from the block, which will serve as the basis of the level. Using several pieces of wire, the plastic holder with terminals and the module are connected, taking into account the polarity. Do the same with the battery connector and motor.
Next, the mirror is taped with electrical tape to prevent damage to the surface. From the back side, use a ruler to find the middle, mark it with a marker and glue the engine shaft with hot glue along the mark.
Then, with the same glue, the “crown” is fixed at the end of the block, and the engine with the mirror is fixed at the end. The motor shaft must be positioned outside the block, otherwise the mirror will not be able to move around the axis.
Important! The laser module with the battery holder is glued last, and they act as carefully as possible, because the accuracy of the beam lines on different surfaces will depend on the evenness.
After removing the electrical tape from the mirror, insert 2 CR2032 batteries into the battery compartment. To work with the level, you need to connect the power, direct the beam at the wall or ceiling and evaluate the result.
By securing the level to a bubble level and adjusting its position relative to the base, you can obtain a clearly visible mark. You can work with such a device on drywall, tiles, laminate and other substrates.
Advantages of a homemade tool
Despite the fact that such a tool cannot provide high accuracy, it is quite profitable to use it in everyday life. In any case, the marking will be more accurate, and the process itself is much simpler than when using a water level. It is for this reason that such equipment is in demand among household consumers. The positive characteristics of the tool include:
- long beam length;
- minimum error;
- high marking speed.
The use of the equipment is fully justified for walls, floors, ceilings and other supports of a similar type with any type of surface. Alternative applications include marking the following objects:
- personal plots;
- fence structure;
- facade finishing.
Ingenuity, accuracy and strict adherence to the instructions described above will help to significantly save money and time. Before spending money on expensive equipment, a thrifty person should think about whether it’s worth making the device yourself, saving money? Moreover, its quality and ease of use in everyday life corresponds to an expensive device.
Principle of operation
The basic element of any device whose name includes the word “laser” is an emitter of highly targeted monochromatic (one-color) radiation. The phenomenon is based on forced radiation, which, depending on the power, is perceived differently. Low-power laser emitters based on red, red-orange, yellow-orange and green diodes make it possible to produce a point or beam of light. At a high level of pumped energy, a laser beam can turn into a weapon - it can set fire to materials that absorb radiation well.
Devices used in everyday life and construction and repair work operate on laser diodes of the red, yellow-orange and green spectrum; blue and violet ones are much less common (such models are much more expensive). To concentrate light radiation, biconvex lenses are used, as well as other optical devices that allow the beam to be converted into a plane.
Household appliances have a standard circuit shown in the illustration. Design variations are related to the power of the emitter and additional accessories.