If you ask anyone who is into DIY what their biggest dream is, chances are pretty high that they will say either a 3D printer or a laser cutter/engraver. A laser wood burner is a very cool thing, just like a 3D printer.
Two years ago I was browsing through videos and magazines when I came across an interesting article about a laser engraver. I've seriously wanted one of these cars ever since. I looked for it a couple of times on eBay and Amazon, but they were too expensive. However, now, prices have reached a level where they are affordable for DIY enthusiasts.
In the end I got the 5500mW Laser Engraver.
The CNC pyrograph has the following features:
- Can engrave on wood surface, plastic, bamboo, rubber and leather.
- Cuts paper, foam and thin leather.
- Engraving area: 15cm x 20cm
- Powered by Arduino Nano
- Compatible with Open Source Software
- Operating power: 5500 mW
Despite the fact that the assembly kit arrived quite a long time ago, I only now had some free time. In this instruction, I want to share with you my experience in assembling a CNC burner with my own hands, tell you about its use and what you can do with it. I hope this information will be useful to many.
Save the photo in .bmp format
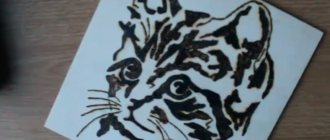
And here is the final result
Preparing an image for burning using the “ contour drawing” method. No special preparation is required here. Select (prepare) a drawing in vectors.
Video of burning a vector design on a desktop milling machine Modelist3040
Next, we move on to preparing the file for engraving in the ArtCam program.
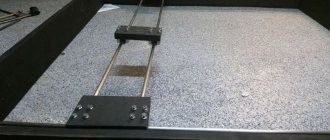
Instructions for assembling and connecting the laser for installation on a milling and engraving machine
Set the required size of the picture.
! To obtain a high-quality result of burning using the “point to point” method with a blue laser, you must remember that the optimal size of the pattern is 4 dots (pixels) per 1 mm or, accordingly, 16 pixels per 1 square. mm.
We convert the size of the original photo to the size of the burned pattern. In our case, we set the height of the document we need to 200 mm, while maintaining the proportions, the width of the document turned out to be 146.35 mm. Then, choosing a resolution of 40 pixels per centimeter (= 4 pixels per millimeter) or, the same thing, 102 dots per inch, set the desired document size in pixels (dots) - 800 px by 585 px (200mm x 4 pixels by 146.35 mm x 4 points). Image -> Image size -> ok
Tasks for nichrome
The beam printer works with nichrome wire and applies the image using the contact method, so the evenness of the flat surface on which the image is applied is important for this machine. It is also important for the machine that the surface is rectangular or square. The machine will not be able to apply an image on a round surface due to the cleaning of the tip.
The machine was created for burning portraits and other raster images, such as landscapes, still lifes, animals. The pyroprinter copes with burning text, but not too small. Those. This machine will be able to sign the work with the phrases “Happy Anniversary”, but will not be able to burn out a business card.
We figured out the purpose of the machines. But besides the tasks of the machines, there are other characteristics on which your choice may depend. For example, this is an opportunity to install equipment at home or in the office.
Setting up and debugging a CNC burner
Setting up a CNC machine begins with installing the NC. It is loaded ready-made from external media (floppy disks, flash drives, magnetic tapes). The program is located on a memory card, computer hard drive, or solid-state drive. One of the best programs for CNC burning is Pyroprinter, adapted for Windows XP, 7, 8, 10.
To program the machine for a specific operation, you need to load an image (picture) that needs to be burned onto the workpiece. The graphic file is pre-translated into DXF, Exeilon, HPGL or Gerber format. The programming process is controlled on the monitor. The UP gives commands to move the tool in the form of G and M codes that are understandable to the device. In the Pyroprinter UE, the controller based on Arduino Nano V3 is responsible for micro-movement of up to 4 coordinates simultaneously and gives a stable movement speed of 10 m/min at 20 steps/mm.
Setting up and debugging of the machine is ensured strictly in accordance with the instructions. During the setup process, the necessary information is displayed on the screen indicating which keys to use. If necessary, you can adjust the transferred image.
CNC burners allow you to create original drawings and inscriptions on the surface of different materials and transfer entire paintings and portraits onto workpieces. The required image is entered into the computer, and then the device reproduces it on the surface of the product. The work does not require artistic skills, but aesthetic taste is required.
- 06 September 2020
- 4892
Let's convert the picture into bit format.
Image -> Mode -> Bitmap
Default resolution (40 px/cm or 120 px/inch) Difusion Dither method - transforms the image using the diffusion method, starting with the top left pixel of the image. If the pixel value is above medium gray (128), it becomes white, if lower, it's black (since the original pixel is rarely just white or just black, an error inevitably occurs, which is transferred to surrounding pixels and randomly distributed throughout the image, forming a granular, grainy texture).
We adjust the sharpness, brightness and contrast of the image.
Since burning reduces the sharpness of the image, it is necessary to sharpen the photo. Filter -> Sharpen -> Smart Sarpen
Select the “smart sharpening” values that are optimal for your photo.
Adjust the brightness and contrast values: the more contrast the drawing has (but without exaggeration), the more expressive it will be after burning. Set the optimal balance of brightness and contrast for the given image. This can be done in Photoshop using tools
Brightness and Contrast Image -> Adjustments -> Brightness/Contrast
Image Levels -> Adjustments -> Levels
PREPARATION FOR WORK
The engraver has 2 ports. One port with a USB connector is used to power the device (Unfortunately, the power supply is not included).
As a power supply, I took a charger from a mobile phone, the current strength of which is 2A. The device itself consumes 1A.
The second connector has a miniUsb port, which connects directly to the USB port of the PC and is used for data transfer.
The first thing you need to do after connecting the machine to your PC is to install the driver from the memory card.
Installing drivers
We connect the memory card, go to the Driver folder and run Driver.exe.
Run Driver.exe and click INSTALL
After installing the driver, you can start the program. After starting the program, select the port and click the “connect” button (You can view the port for connection in the Device Manager).
After successful connection, you can start working.
We select the image we need and simply drag it into the program window. Almost all elements in the program are intuitive. The maximum image resolution should not exceed 512*512px
Having decided on the image, you need to send the picture to the engraver (using the Sent image to machine button), and then place the object to be engraved on the machine platform.
We focus the laser beam with a lens (the smaller the focusing point, the more effective the work) and click on Start.
If necessary, we can always stop the burning process or pause it.
The yellow button on the machine allows you to start and stop engraving without using a PC (for this you need to first download the image)
Problems for the laser
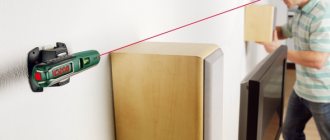
Let's start with the fact that the laser burns using a non-contact method, so it does not care about the thickness, surface irregularities and edges of the workpiece. Another advantage of the laser is a large selection of materials for burning. The laser works with materials such as: wood, plywood, veneer, leather, aniline, eco-leather, paper, cardboard, felt, jeans, ceramics, glass, etc. Moreover, it only engraves some materials, and some can even cut. Looks especially interesting for scrapbooking.
An example of work done on a laser:
The laser machine is designed for applying vector images and text to a large number of materials. A common type of laser is used to engrave phone cases. It easily and quickly handles very small text, like what is used for business cards.
The laser does not cope well with burning portraits, because... It has a method of drawing an image with dots. This method creates penumbra poorly, and where without penumbra in a portrait. Upon closer inspection, the portrait looks like a printout in a cheap newspaper.