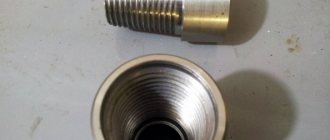
UNC (Unified National Coarse) inch thread is a national American thread with a large pitch and a profile angle of 60°. This thread is a modification of the 55° BSW (British Standard Witworth) thread, also known as a Whitworth thread. Inch threads are based on the inch measurement system, while in Russia the metric system is adopted, for this reason many questions arise related to the definition and search for such fasteners on the Russian market. UNC inch thread is common in the USA, Canada, and Great Britain. UNC thread geometry and form are regulated by ASME B1.1-2003 (The American Society of Mechanical Engineers).
A distinctive feature of inch threads is the designation of diameter and length in fractions of an inch. The English inch is used as a basis, equal to 25.4 mm. Such sizes are indicated by inch, in or double stroke “. In this case, the size will be indicated in fractions of an inch, for example 1″ or ½”. The thread pitch of an inch fastener refers to the number of threads in a 1-inch piece, for example 1″ - 8 UNC. In this case, the number of threads per inch may not be indicated, since in the UNC thread standard, each thread diameter has a certain number of turns. Then the thread designation could be 1″ UNC. Small thread diameters, less than 1/4″, are designated by a conventional number from 0 to 12 and the symbol No. or # is added, for example # 4 - 40 UNC.
Designation principles
To determine the main qualities, you need to understand its designation.
The thread designation in the drawings is slightly different from those used by the manufacturer in the production of products. Thread tables allow you to determine the main characteristics only by designation. The features of the marking include the following points:
- Symbol for the thread in question G.
- The diameter size is indicated after the letter. An example of notation is 1 ½.
- The symbol L indicates that the turns are left-handed.
- The next symbol H indicates the accuracy class.
- The make-up length is represented by numbers at the end of the marking.
The drawing provides an indication of the accuracy class. A symbol indicating the accuracy class may be indicated in the technical documentation. The creation of turns is carried out in compliance with one of three classes. In addition, the letters “A” and “B” may be indicated next to the number: the first indicates an external indicator, the second internal. The first class corresponds to the coarsest threads, the third is the highest quality.
Peculiarities
Pipe thread: main types and sizes
The peculiarity of this thread is determined based on the following parameters:
- geometric parameters;
- size (number of threads per inch);
- cutting direction;
- required drill diameter;
- accuracy class;
- application area.
All types of UNF threads belong to the fine category. It can be thought of as metric 60 degrees. A distinctive feature is the unit of measurement - this is an inch. That's why it's called inch thread or American thread. Each small carving has its own distinctive dimensions. Its analogue is the English BSW thread sizes, which are located in special tables
Specific features can be identified by markings. It consists of the following elements:
- in the first place is the abbreviation UNF (literally translated means “Unified Group of Small Threads”);
- Next comes the size in inches;
- completes the marking of the step value.
All parameters and features are given in more detail in special tables indicating the purpose and rules for using fasteners in American connections.
Can you supply inch fasteners with small diameters?
GOST R 50864-96 conical locking thread for drill string elements. profile, dimensions, technical requirements
These dimensions start from #1 (1.854 mm)
up to
#12 (5.436mm)
the TK Hardware company can supply for you to order.
The lead time for these items will be approximately 4-6 weeks
.
The average minimum packaging for such diameters is 200 pieces.
Fasteners with small diameters can be presented in the form of screws with a semicircular head (the so-called computer screws with inch threads), with a countersunk head, with a cylindrical head, in the form of bolts with a hexagonal head, as well as nuts and washers for them. The material in which they can be made is from black (without coating or black) to non-ferrous and stainless metal.
Tapered inch thread
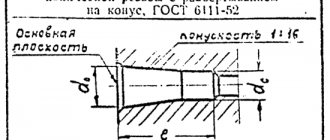
The diameter is reduced towards the edge of the workpiece. Manufacturers produce parts in accordance with GOST 6211-81. According to its cross-section in the drawing, the profile is an isosceles triangle. According to GOST 6211-81, the angle between the sides is also 55 degrees. There is a rounding at the top of the triangle. In its shape it corresponds to the configuration of the grooves.
It is possible to produce conical inch threads in accordance with GOST 6111-52. According to the standard, the angle between the sides of a triangle is 60 degrees. This configuration allows a connection to be made that is resistant to mechanical stress. Manufacturers mark the drawing in the form of the letter “K”.
UNC Inch Fastener Torque Chart for SAE Grade 5 Bolts and Nuts
| Thread size, inches | Tightening torque for standard bolts and nuts | N*m* lbf-ft** |
| 1/4 | 12± 3 | 9±2 |
| 5/16 | 25 ± 6 | 18± 4,5 |
| 3/8 | 47± 9 | 35 ± 7 |
| 7/16 | 70± 15 | 50± 11 |
| 1/2 | 105± 20 | 75±15 |
| 9/16 | 160 ± 30 | 120± 20 |
| 5/8 | 215± 40 | 160 ± 30 |
| 3/4 | 370 ± 50 | 275 ± 37 |
| 7/8 | 620± 80 | 460 ± 60 |
| 1 | 900 ± 100 | 660 ± 75 |
| 11/8 | 1300 ± 150 | 950 ± 100 |
| 1 1/4 | 1800 ±200 | 1325 ±150 |
| 1 3/8 | 2400 ± 300 | 1800 ± 225 |
| 1 1/2 | 3100 ± 350 | 2300 ± 250 |
*1 Newton meter (N*m) is equal to approximately 0.1 kgm. ** Pound-force-foot is the British and American equivalent of N*m.
American UNC thread
Threaded hole sizes: tables, tools, cutting process
International standards for fastening connections: UNC Unified Coarse Thread (UNC) is a type of inch cylindrical thread with a large pitch and a profile angle of 60°.
It is very popular in Europe and North America.
In Russia, parts with left- and right-hand UNC threads can be found among components for foreign-made household and industrial equipment (lawn mowers, cultivators, cars, etc.).
Contact phone number: WhatsApp.
Brief history Inch carving appeared in Great Britain during the Industrial Revolution in the 18th century.
Since a significant part of the North American continent was for a long time in the zone of direct influence of the United Kingdom, the English system of measures took root in Canada and the United States.
After unification, certain standards for thread cutting were developed: profile angle, pitch, shape of peaks and valleys, etc. This is how basic standard sizes and principles for marking connections arose, which are still used today.
Technical features Externally, the geometry of the UNC thread is not much different from the profile of a conventional metric thread. The main feature of the connection is the use of the inch as the main dimensional unit.
The maximum pitch is 6.35 mm (4 threads per inch).
How are UNC threads cut? The most difficult thing when cutting inch threads is to correctly determine the pitch size. To do this, you need to use special gauges (thread gauges).
When measuring the distance between the valleys and the peaks, the thread gauge plates are applied to the part one by one until 100% coincidence of the profile is achieved.
If the size was determined correctly, the thread pitch will correspond to the value marked on the side of the template.
Two types of tools are used for cutting UNC threads:
- dies. Required for external threading; - taps. Used to form threads on the inside of a part.
Threads can be cut either manually or using special industrial equipment. The direction of rotation is determined individually in each case.
Inch thread - table, sizes, types
Fastening with threads has been known since antiquity. Scientists are still finding remains of parts that look like modern screws and nuts. But carving became most widespread during the industrial revolution of the 18th century.
Initially, the spread of detachable threaded connections was hampered by the lack of standardization, which made it impossible to ensure the interchangeability of products. The talented English engineer Charles Whitworth solved this problem. He developed a unified system of sizes and designations, using the English inch for this.
This is how inch thread was born. And all sizes are listed in the table according to GOST.
Options
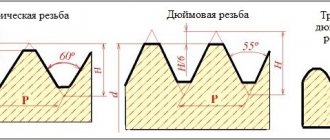
An inch thread is a detachable connection of a triangular profile, the angle of the vertices of which is 55 degrees. Its unit of measurement is inches. It is worth noting right away that in Russia the use of inch threads when designing new products is prohibited.
Its use is permitted only in the case of the manufacture of spare parts of equipment for which inch threads have already been manufactured.
In addition, it is allowed to use this thread as a pipe connection and in the manufacture of sealing hydraulic elements.
Inch, like any other, is characterized by the following basic parameters:
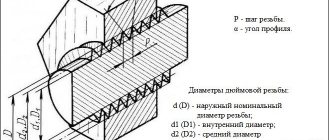
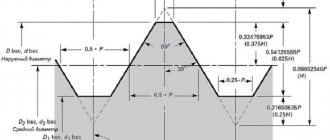
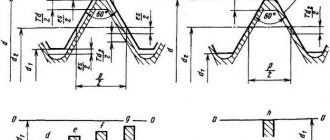
- Outer diameter is the distance between the tops of the threads located on opposite sides of the thread. The larger the value of this parameter, the greater the axial load the thread can withstand. The other side of the coin is the deterioration of tightness associated with the accumulation of errors during thread cutting.
- Nominal (average) diameter is a circle inscribed in the thread profile, the diameter of which depends on the pitch, and occupies an intermediate position between the internal and external diameters. This parameter is difficult to measure under normal conditions, and there is a reference table for threads to determine it.
- Internal diameter is the diameter of a circle inscribed along the recesses of the thread profile.
- Pitch is the distance between adjacent ridges of a threaded connection. This parameter is measured in the number of threads per inch. The pitch size characterizes the value and distribution of stress between the turns of inch threads. Designers in their practice increase the pitch when subjecting the thread to large mechanical loads. If requirements are imposed on the thread to maintain tightness, then the pitch is reduced.
- The angle of rise of the turns is the angle between the sides of the profile of the turns. Initially, its value for all types of inch threads was 55 degrees. But now, inch threads with a profile angle of 60 degrees are becoming more and more common.
Inch dies for thread cutting UNC, UNF, 8-UN
Warehouse arrivals, promotions, sales!
Complex supplies of tools in small and large wholesale from 3,000 rubles for individuals and legal entities from St. Petersburg across Russia, to Belarus, Kazakhstan in the shortest possible time. Call or submit a request right now! We are updating the catalog. If you have not found the product you need, call back (from 9 to 17:30 Moscow time) or send a request through a convenient form (daily, 24 hours a day).
Inch dies for thread cutting UNC, UNF, 8-UN wholesale
Inch dies (dies) are a cylindrical tool designed for applying external threads to metal products: pipes, rods, rods.
This is a typical standard for America, since it is there that the inch as a unit of measurement is much more common than the centimeter. In Europe and Russia, the inch standard is quite rare.
When processing a pipe with a die, the cut inch thread has a conical shape (angle of inclination 60°), the relief is cut off - both the valley and the top.
Inch dies - features of marking and use
An inch die is marked with the letter K. It differs from R-lerks not only in that its diameter is measured not in centimeters, but in inches. Such a thread almost does not cause deformation of the turns. Also, the inch standard differs from the R type models in the wider profile of the threaded “tooth”. In this case, the pitch size is taken to be the number of thread turns per inch.
For the manufacture of blades, only durable material is used - hardened alloy or high-speed steel.
An inch die has a specific classification determined by the thread pitch size.
- Designation UNC - inch dies, allow you to create threads with a wide (large) pitch.
- The designation UNF is an inch standard, indicating that the thread has a fine pitch.
- The UNEF designation is an inch standard used to mark dies that cut threads with particularly fine pitches.
There are also dies marked 8-UN. This designation indicates that the lechers have a single pitch value, regardless of the diameter of the tool. It is 8 threads per 1 inch.
The thread that such a die cuts can be either left-handed or right-handed. It is possible to use both machine and manual pipe processing methods. An inch die is often used for carving non-ferrous metals. It is also used for cutting tool or structural steel.
"Metal Gears" - high-quality tools inexpensively
In the Metal Gears online store you can buy high-quality tools from Russian and foreign manufacturers. We cooperate with American, Asian, European factories and enterprises located in the CIS.
Our company works with manufacturers without intermediaries, therefore we offer goods with a minimal margin. From us you can buy tools wholesale or retail, order specific models or ready-made sets.
And we will contact the manufacturers and ensure prompt delivery of the tool.
For residents of St. Petersburg and the region, goods can be picked up from the warehouse. The remaining regions of the Russian Federation are served through transport or our own courier service “Metal Gears”.
Differences between inch and metric threads
The main difference is the profile of the turns. According to GOST 6211-81-inch, the angle of the sides of the triangle is 55 degrees. Metric has 60 degrees.
In addition to the profile configuration, a distinctive feature of the inch version is the use of other units of measurement. For metric threads, the pitch is determined in millimeters, for inch threads - in whole and fractional inches.
Main settings
The regulatory document that stipulates the requirements for the dimensions of cylindrical inch threads is GOST 6111-52. Like any other, inch thread is characterized by two main parameters: pitch and diameter. The latter usually means:
- outer diameter, measured between the top points of the threaded ridges located on opposite sides of the pipe;
- internal diameter as a value characterizing the distance from one lowest point of the cavity between the threaded ridges to another, also located on opposite sides of the pipe.
Parameters of an inch thread
Knowing the outer and inner diameters of an inch thread, you can easily calculate the height of its profile. To calculate this size, it is enough to determine the difference between these diameters.
The second important parameter - the pitch - characterizes the distance at which two adjacent ridges or two adjacent depressions are located from each other. Throughout the entire section of the product on which the pipe thread is made, its pitch does not change and has the same value. If such an important requirement is not met, it will simply not work; it will not be possible to select a second element of the connection being created for it.
You can familiarize yourself with the provisions of GOST regarding inch threads by downloading the document in pdf format from the link below.
Types of inch threads
Inch threads can be cylindrical or conical. With a cylindrical connection, the dimensions of the outer and inner diameters are maintained along the entire length of the spare part. The threaded pitch has a fixed size, and the number of threads is related to the pitch. Spare parts with such a connection are more durable and reliable.
With a tapered connection, the thread has a variable diameter. The most widely used threads are those with a tapering diameter, in which the diameter at the base is larger than the diameter at the tail of the spare part. Parts with a tapered connection are often double marked, indicating not only the initial but also the final diameter. Inch tapered threads are stronger and wear out more slowly, but they are more difficult to apply, and errors in the procedure can seriously deteriorate the quality of the connection.
Accuracy classes and rules for marking inch threads
Inch threads according to GOST can correspond to one of the accuracy classes: 1, 2 or 3. The letter A (corresponds to external thread) or B (internal) occupies the adjacent place with the number indicating the accuracy class. Note that the 1st class of accuracy corresponds to the coarsest threads, and the 3rd class is the most precise, and the most stringent requirements are imposed on them.
To understand what parameters a specific threaded element corresponds to, you need to understand the symbols that are printed on it. The label contains the following information:
- nominal inch thread size;
- number of turns per inch of length;
- group;
- accuracy class.
The marking is applied to the part itself or packaging with parts and is an alphanumeric code of the following type: T1 T2 X Y1 Y2 - Z.
This code is deciphered as follows.
- T1 - the parameter indicates the category of the threaded spare part and can have several values: M (metric thread), MK (conical), Tr (trapezoidal single-start), S (thrust single-start), G (cylindrical pipe).
- T2 - indicates the outer diameter of the spare part; for inch threads it is indicated in inches.
- X is a separator symbol that does not carry any semantic load, but is required to be applied according to GOST.
- Y1 is the width of the thread pitch, which is indicated in millimeters even on inch threads. In rare cases, a parameter may be indicated in inches, but then two notches are placed next to the number, which indicate that we are looking at inches.
- Y2 is the direction of the threaded screw. There is a left-hand thread, the parameter is designated as LH. If it's on the right, they let him through.
- - also refers to delimiter characters that separate the main part of the code from the Z parameter.
- Z is a parameter that indicates the thread accuracy class. Can take the form of designations 4k, 6h, 6E, 8G, 8D, etc.
An example of a symbol for an inch thread.
Explanation of the markings for an inch thread.
Let us look at the designation of inch threads in the technical documentation using the example of marking G 2” LH-2-40.
- G - indicates that the pipe thread is cylindrical.
- The number 2 indicates the outer diameter size in inches.
- LH - these letters indicate that the thread is left-handed.
- Number 2 informs about the accuracy class.
- The number 40 indicates the screw length.
Table of sizes of inch and metric threads
| Outer diameter, mm | thread pitch | Thread | Internal diameter, mm | |||
| Inch G , R | Metric | Inch ORFS , UNF , JIC | Inch NPTF , NPSM | |||
| 9,3-9,7 | 28 threads | 1/8″ | 8,5-8,9 | |||
| 9,3-9,7 | 29 threads | 1/8″ | 8,5-8,9 | |||
| 9,7-9,9 | x 1.5 | M 10×1.5 | 8,2-8,6 | |||
| 10,9-11,1 | 20 threads | 7/16″-20 | 9,7-10,0 | |||
| 11,6-11,9 | x 1.5 | M 12×1.5 | 10,2-10,6 | |||
| 12,4-12,7 | 20 threads | 1/2″-20 | 11,3-11,6 | |||
| 12,9-13,1 | 19 threads | 1/4″ | 11,4-11,9 | |||
| 12,9-13,1 | 18 threads | 1/4″ | 11,4-11,9 | |||
| 13,6-13,9 | x 1.5 | M 14×1.5 | 12,2-12,6 | |||
| 14,0-14,25 | 18 threads | 9/16″-18 | 12,7-13,0 | |||
| 15,6-15,9 | x 1.5 | M 16×1.5 | 14,2-14,6 | |||
| 16,3-16,6 | 19 threads | 3/8″ | 14,9-15,4 | |||
| 16,3-16,6 | 18 threads | 3/8″ | 14,9-15,4 | |||
| 17,2-17,5 | 16 threads | 11/16″-16 | 15,8-16,0 | |||
| 17,6-17,9 | x 1.5 | M 18×1.5 | 16,2-16,6 | |||
| 18,7-19,0 | 16 threads | 3/4″-16 | 17,3-17,6 | |||
| 19,6-19,9 | x 1.5 | M 20×1.5 | 18,2-18,6 | |||
| 20,5-20,7 | 16 threads | 13/16″-16 | 18,8-19,3 | |||
| 20,5-20,9 | 14 threads | 1/2″ | 1/2″ | 18,6-19,0 | ||
| 21,6-21,9 | x 1.5 | M 22×1.5 | 20,2-20,6 | |||
| 22,0-22,2 | 14 threads | 7/8″-14 | 20,2-20,5 | |||
| 22,6-22,9 | 14 threads | 5/8″ | 5/8″ | 20,6-21,0 | ||
| 23,6-23,9 | x 1.5 | M 24×1.5 | 22,2-22,8 | |||
| 25,1-25,4 | 14 threads | 1″-14 | 23,6-23,8 | |||
| 25,6-25,9 | x 1.5 | M 26×1.5 | 24,2-24,6 | |||
| 26,1-26,4 | 14 threads | 3/4″ | 3/4″ | 24,1-24,5 | ||
| 26,6-26,9 | 12 threads | 1.1/16″-12 | 24,3-24,7 | |||
| 29,6-29,9 | x 2 | M 30×2 | 27,4-27,8 | |||
| 29,8-30,1 | 12 threads | 1.1/16″-12 | 27,6-27,9 | |||
| 29,6-29,9 | x 1.5 | M 30×1.5 | 28,2-28,6 | |||
| 31,6-31,9 | x 2 | M 32×2 | 29,4-29,9 | |||
| 33,0-33,2 | 11 threads | 1″ | 30,3-30,8 | |||
| 33,0-33,3 | 12 threads | 1.5/16″-12 | 30,8-31,2 | |||
| 32,9-33,4 | 11.5 threads | 1″ | 30,3-30,8 | |||
| 35,6-35,9 | x 2 | M 36×2 | 33,4-33,8 | |||
| 36,1-36,4 | 12 threads | 1.7/16″-12 | 34,4-34,7 | |||
| 37,6-37,9 | x 1.5 | M 38×1.5 | 36,2-36,6 | |||
| 40,9-41,2 | 12 threads | 1.5/8″-12 | 38,7-39,1 | |||
| 41,6-41,9 | x 2 | M 42×2 | 39,4-39,8 | |||
| 41,5-41,9 | 11 threads | 1.1/4″ | 39,0-39,5 | |||
| 41,4-42,0 | 11 threads | 1.1/4″ | 39,2-39,6 | |||
| 42,5-42,7 | 16 threads | 1.11/16″-16 | 40,7-41,0 | |||
| 44,6-44,9 | x 2 | M 45×2 | 42,4-42,8 | |||
| 44,6-44,9 | x 1.5 | M 45×1.5 | 43,2-43,6 | |||
| 47,3-47,6 | 12 threads | 1.7/8″-14 | 45,1-45,5 | |||
| 47,4-47,8 | 11 threads | 1.1/2″ | 44,8-45,3 | |||
| 47,3-47,9 | 11.5 threads | 1.1/2″ | 45,1-45,5 | |||
| 51,6-51,9 | x 2 | M 52×2 | 49,4-49,6 | |||
| 51,6-51,9 | x 1.5 | M 52×1.5 | 50,2-50,6 | |||
| 59,2-59,6 | 11 threads | 2″ | 56,2-56,6 | |||
| 63,1-63,4 | 12 threads | 2″-12 | 61,1-61,4 | |||
Slicing methods
Cutting inch threads of the required size is possible in two ways. This is done using hand tools or on a lathe. In the first case, the work is performed in a certain sequence:
- Place the workpiece in a vice. Fixes it securely to avoid turning during operation.
- Select a tool of the appropriate size. A die is used to process the outer surface. To cut inch threads inside, select a tap of the required size.
- They remove the chamfer. When cutting, sharp edges are formed. Before processing the outer surface, smooth the edges with a file. At this stage, the resulting irregularities and burrs are removed.
- Cut grooves in inch threads by rotating the tool in the desired direction.
The device rotates smoothly without jerking. This way it is possible to obtain correctly cut recesses of the required size.
When using a mechanized method for cutting external inch threads on a machine, a specialized cutter is used. The part is fixed in the chuck and the required rotation speed is set. It is determined taking into account the data from special tables. Using a lathe, in accordance with GOST, inch threads of the required size are cut with higher accuracy.
Drilling diameter table for inch threads
| Size designation | UNC (mm) | UNF (mm) | UNEF (mm) |
| #0 | — | 1,25 | — |
| #1 | 1,5 | 1,55 | — |
| #2 | 1,8 | 1,9 | — |
| #3 | 2,1 | 2,15 | — |
| #4 | 2,35 | 2,4 | — |
| #5 | 2,65 | 2,7 | — |
| #6 | 2,85 | 2,95 | — |
| #8 | 3,5 | 3,5 | — |
| #10 | 4 | 4,1 | — |
| #12 | 4,65 | 4,7 | 4,78 |
| 1/4″ | 5,35 | 5,5 | 5,56 |
| 5/16″ | 6,8 | 6,9 | 7,14 |
| 3/8″ | 8,25 | 8,5 | 8,77 |
| 7/16″ | 9,65 | 9,9 | 10,3 |
| 1/2″ | 11,15 | 11,5 | 11,9 |
| 9/16″ | 12,6 | 12,9 | 13,1 |
| 5/8″ | 14,05 | 14,5 | 14,7 |
| 3/4″ | 17,0 | 17,5 | 17,9 |
| 7/8″ | 20,0 | 20,4 | 21,0 |
| 1″ | 22,85 | 23,25 | 24,2 |
| 1 1/8″ | 25,65 | 26,5 | — |
| 1 1/4″ | 28,85 | 29,5 | — |
| 1 3/8″ | 31,55 | 32,75 | — |
| 1 1/2″ | 34,7 | 36,0 | — |
| 1 3/4″ | 40,40 | — | — |
| 2″ | 46,30 | — | — |
| 2 1/4″ | 52,65 | — | — |
| 2 1/2″ | 58,5 | — | — |
| 2 3/4″ | 64,75 | — | — |
| 3″ | 71,10 | — | — |
| 3 1/4″ | 77,45 | — | — |
| 3 1/2″ | 83,8 | — | — |
| 3 3/4″ | 90,15 | — | — |
| 4″ | 96,5 | — | — |
IMPORTANT: The nuts have an internal thread, the outer diameter (D) of which is equal to the size of the hole in the body of the nut for the thread (table below). That is, if for a 1/4″ bolt it is 6.35 mm, then for a 1/4″ nut it will be 5.35 UNC and 5.5 UNF, and 5.56 UNEF (mm).
Marking of inch fasteners
Inch fasteners have a more complex marking system that does not allow visually, without the use of special tables, to determine the mechanical properties of the fastener. The most common markings on the heads of inch bolts and their correspondence to strength classes are shown in the table below.
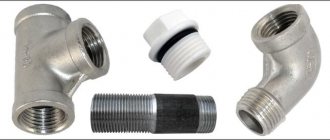
Inch threads are used primarily to create pipe connections: they are applied both to the pipes themselves and to metal and plastic fittings necessary for the installation of pipe lines for various purposes. The main parameters and characteristics of the threaded elements of such connections are regulated by the corresponding GOST, providing tables of inch thread sizes, which experts rely on.
Plumbing products with inch pipe threads
American UNF thread
Until the end of the 19th century, there was no unification in fasteners. Each enterprise produced its own thread and parts based on it. In 1841, the British engineer Joseph Whitworth solved the problem by developing the BSW standard (approved in Great Britain in 1881).
In 1864, industrialist William Sellers simplified the BSW standard in the United States. He changed:
- angle (from 55° to 60° like a metric thread);
- the shape of the thread profile (giving up roundings at the tops of the profile).
Simpler and cheaper to make, American carving quickly spread throughout the world. However, incompatibility with the British standard caused a lot of problems, which were solved only in 1948 by the Unified System. It includes unified inch cylindrical threads UNF (fine) and UNC (coarse) developed by the American National Standards Institute (ANSI/ISO).
UNF threads are used for high-precision and adjustment fasteners throughout the world.
Contact phone number: WhatsApp.
Such threads have a designation that includes a letter designation of the type of thread and the nominal diameter in inches. Additional markings indicate: thread pitch in the number of turns per inch (through a dash), direction (right or left). UNF thread ratings less than 1/4” are usually designated by numbers (calibers) from No. 0 to No. 12.
An example of marking a bolt with an inch thread 1/4” - 28UNFx2 1/2”, where:
- UNF – thread type;
- 1/4” - thread diameter;
- 28 - thread pitch;
- 2 1/2” is the length of the bolt (in inches).
UNF threads are found in household appliances, machine tools and automobiles, and measuring instruments created for the US and Canadian markets.
You can cut American threads on CNC screw-cutting lathes (by setting the necessary program). The simplest solution at home would be to use taps and dies of the appropriate size, UNF standard.
Send your order by email or call:
+7
Request a call
American UNC thread
Download UNF thread parameters
Parallel inch thread
According to GOST, the outer or inner diameter does not change throughout the entire cut section.
Applied to fasteners of various diameters. Allows for reliable connection of parts of the same size. Technical characteristics are indicated in GOST 6357-81. The profile section is an isosceles triangle. The sides are located at an angle of 55 degrees relative to each other. There is a rounding at the top of the triangle. In its shape it corresponds to the configuration of the grooves. To determine sizes, manufacturers apply the following designations to products:
- G - inch thread of cylindrical configuration;
- 1, 2, 3 – designation of accuracy class;
- A, B - thread location. External or internal;
- LH – designation of the left-hand direction of turns.
After the letter “G”, manufacturers indicate the internal diameter in inches. Taking these designations into account, it is possible to quickly determine the required dimensions.
Tool design
The UNF/UNC tap is a screw with flutes and corresponding sharpening of the front, back and other corners. The main elements of the tool are the cutting (taking) and calibrating parts, grooves for removing chips. The cutting part is made of high-speed steel or hard alloy. A suitable shank is available for manual use or installation in a chuck.
The advantage of the tool is the simplicity and manufacturability of the design, as well as high cutting accuracy and the ability to work due to self-feeding. The difficulty is the need to apply large cutting forces and friction forces, and difficulties in removing chips.
Depending on the design, UNF/UNC taps are divided into:
- manual or metalworking;
- machine-manual;
- machine;
- nuts and others.
Making threads
The procedure and rules for cutting it according to the American UNF standard do not differ from the cutting method using the metric system. The only difference is the use of special tools and methods for setting up the machine. As for metric connections, manual or mechanical thread cutting is used. Both methods are applicable for cutting internal and external threads.
The basic rules that must be followed when cutting are:
- selection of the required drill diameter;
- preliminary selection of diameter (it must be equal to the diameter minus the pitch).
These data are provided in reference tables. If such tables are missing, the calculation must be done independently.
At enterprises engaged in the mass production of parts that use inch American cylindrical threads of this standard, mechanical cutting methods are used. This operation is performed using the following equipment:
- lathes equipped with special taps;
- threading machines capable of producing external and internal cutting;
- screw-cutting lathes equipped with numerical control.
The third type of machines is equipped with special programs that allow you to cut the entire list of UNF.
Dimensions
The scope and exact purpose of each product on which it is applied is determined by its geometric parameters. The dimensions of the unified American UNF thread include parameters that are listed in a special table. Such a table has rows that display the number or size. For example, the designation 5/16¢¢-24 UNF indicates that this is an inch thread with the specified dimensions. The columns indicate the names and values of the clarifying characteristics: length, diameter and pitch, number of threads per inch, required drill diameter for drilling a hole before cutting.
All parameters are given in inches and comply with three established standards:
- international ISO 725;
- English BS 1580;
- American ANSI and ACME D1.1.
The standards contain tables in which all sizes of this type are located. They list the features of this type:
- profile according to UN specification;
- profile height (this indicator is indicated by the letter “H” and is equal to 0.866025Р);
- apex angle (for UNF thread it is equal to sixty angular degrees);
- the maximum outer diameter reaches 38.1 mm;
- the thread pitch varies from a minimum of 0.317 millimeters to a maximum of 2.117 millimeters;
- depression shape;
- the number of turns per inch of its length;
- accuracy classes.
According to the American standard, the shape of the cavity is of two types: flat, designated UN, and radius, designated UNR. In accordance with the ANSI standard, three accuracy classes are defined for external and internal fasteners. External has accuracy classes with designations 1A, 2A, 3A, internal, respectively, 1B, 2B and 3B. The smallest number (one) indicates the lowest accuracy class. The largest number is about the highest class. The highest class has the highest processing and cutting requirements. The most common is the middle class. Each class has its own scope of application. For example, low class (first 1A and 1B) is used even for fasteners where partial contamination and slight deformation are acceptable. The third class is used in units where it is necessary to ensure the strongest connection with the smallest gap.
For example, the designation of the external thread of a 1/4" bolt - 28UNFx2 1/2" allows us to determine that it is of the UNF type. That is, it is a unified inch thread with a fine pitch. The 1/4” fraction indicates an outer diameter of 6.35 millimeters. The number 28 indicates the step. In this case, it is said that there are 28 turns per inch (25.4 mm). The final number indicates the total length of the bolt. In this case, converting inches to the metric system, you get: 2 1/2” corresponds to approximately 63.5 millimeters.
If you find an error, please select a piece of text and press Ctrl+Enter.
An inch thread is a thread, all parameters of which are expressed in inches, the thread pitch is in fractions of an inch (inch = 2.54 cm). For inch pipe threads, the size in inches characterizes the clearance in the pipe, and the outer diameter of the pipe itself is slightly larger.
Inch threads are used in threaded connections and screw drives. Inch threads come in the following types:
- Inch cylindrical – UTS (Unified Thread Standard). This type of carving is widespread in the USA and Canada. The apex angle of this thread is 60 degrees. Depending on the step, it is divided into: UNC (Unified Coarse); UNF (Unified Fine); UNEF (Unified Extra Fine); 8UN; UNS (Unified Special). The most widely used thread is UNC. This thread conforms to ANSI 1 standard.
- British standard inch thread - BSW. Fine pitch threads are called BSF (British Standard Fine). The apex angle of this thread is 55 degrees.
- Inch tapered NPT or cylindrical NPS. Meets ANSI/ASME 20.1. This thread is used for pipe connections. Has an apex angle of 60 degrees. In Russia, such threads correspond to GOST 6111-52.
Most often in Russia recently you can find fasteners with inch UNC threads (unified coarse thread). Such fasteners are often found on equipment imported into our country (lawn mowers, trimmers, generators, cultivators, American-made cars, etc.) from the USA, China and some other countries. When working with inch fasteners, you must remember that the sizes of the keys for inch fasteners are different from the keys for metric fasteners.
American inch thread, section sizes
Unified inch threads of the UN standard (UNC, UNF and UNEF) are widespread in America and Canada, where the inch measurement system is used. Here this standard is the main one for bolts, screws, nuts and many other fasteners used in mechanical engineering. Their production is regulated and controlled by ASME and ANSI organizations.
American thread has the same profile with an apex angle of
60°
as the metric ISO standard, but its main parameters are expressed not in millimeters, but in inches.
Depending on the frequency of turns, it can also be large (main) UNC, small UNF and superfine UNEF. The number of turns per inch is called pitch TPI, while in the metric the pitch refers to the distance between adjacent vertices of the helix P (mm).
These parameters are related by the ratio: P = 1″/ TPI (remember that 1″ = 25.4 mm).
Legend
The thread designation indicates its outer diameter - D
, followed by a pitch -
TPI
(threads per inch) and its type -
UNC
or
UNF
.
For diameters less than 1/4″
The size is indicated by an integer from
0 to 12
, which appears after the
#
or
No
.
Each number corresponds to a specific external D, the exact value of which can be found in the reference table. For all other diameters above 1/4″ this value is expressed in inches.
American thread with coarse pitch - UNC
| Thread size | Threads per inch | D - outer diameter | Dp - average diameter | Di - internal diameter | Thread pitch, mm | |
| inches | mm | millimeters | ||||
| #1 | 1,85 | 64 | 1,85 | 1,6 | 1,42 | 0,40 |
| #2 | 2,18 | 56 | 2,18 | 1,89 | 1,69 | 0,45 |
| #3 | 2,51 | 48 | 2,51 | 2,17 | 1,94 | 0,53 |
| #4 | 2,84 | 40 | 2,84 | 2,43 | 2,16 | 0,64 |
| #5 | 3,17 | 40 | 3,18 | 2,76 | 2,49 | 0,64 |
| #6 | 3,50 | 32 | 3,51 | 2,99 | 2,65 | 0,79 |
| #8 | 4,16 | 32 | 4,17 | 3,65 | 3,31 | 0,79 |
| #10 | 4,83 | 24 | 4,83 | 4,14 | 3,68 | 1,06 |
| #12 | 5,49 | 24 | 5,49 | 4,8 | 4,34 | 1,06 |
| 1/4 | 6,35 | 20 | 6,35 | 5,52 | 4,98 | 1,27 |
| 5/16 | 7,94 | 18 | 7,94 | 7,02 | 6,41 | 1,41 |
| 3/8 | 9,53 | 16 | 9,53 | 8,49 | 7,81 | 1,59 |
| 7/16 | 11,1 | 14 | 11,11 | 9,93 | 9,15 | 1,81 |
| 1/2 | 12,7 | 13 | 12,70 | 11,43 | 10,58 | 1,95 |
| 9/16 | 14,3 | 12 | 14,29 | 12,91 | 12,00 | 2,12 |
| 5/8 | 15,9 | 11 | 15,88 | 14,38 | 13,38 | 2,31 |
| 3/4 | 19,1 | 10 | 19,05 | 17,40 | 16,30 | 2,54 |
| 7/8 | 22,2 | 9 | 22,23 | 20,39 | 19,17 | 2,82 |
| 1 | 25,4 | 8 | 25,40 | 23,34 | 21,96 | 3,18 |
| 1 1/8 | 28,6 | 7 | 28,58 | 26,22 | 24,65 | 3,63 |
| 1 1/4 | 31,8 | 7 | 31,75 | 29,39 | 27,82 | 3,63 |
| 1 3/8 | 34,9 | 6 | 36,93 | 32,17 | 30,34 | 4,23 |
| 1 1/2 | 38,1 | 5 | 38,10 | 35,35 | 33,52 | 4,23 |
| 1 3/4 | 44,4 | 5 | 44,45 | 41,15 | 38,95 | 5,08 |
| 2 | 50,8 | 4 1/2 | 50,80 | 47,13 | 44,69 | 5,64 |
| 2 1/4 | 57,1 | 4 1/2 | 57,15 | 53,48 | 51,04 | 5,64 |
| 2 1/2 | 63,5 | 4 | 63,50 | 59,38 | 56,63 | 6,35 |
| 2 3/4 | 69,9 | 4 | 69,85 | 65,73 | 62,98 | 6,35 |
| 3 | 76,2 | 4 | 76,20 | 72,08 | 69,33 | 6,35 |
| 3 1/4 | 82,5 | 4 | 82,55 | 78,43 | 75,68 | 6,35 |
| 3 1/2 | 88,9 | 4 | 88,9 | 84,78 | 75,68 | 6,35 |
| 3 3/4 | 95,2 | 4 | 95,25 | 91,13 | 88,38 | 6,35 |
| 4 | 101,6 | 4 | 101,60 | 97,48 | 94,73 | 6,35 |
American fine pitch thread - UNF
| Thread size | Threads per inch | D - outer diameter | Dp - average diameter | Di - internal diameter | Thread pitch | |
| inches | mm | millimeters | ||||
| #0 | 1,52 | 80 | 1,52 | 1,32 | 1,18 | 0,32 |
| #1 | 1,85 | 72 | 1,85 | 1,63 | 1,47 | 0,35 |
| #2 | 2,18 | 64 | 2,18 | 1,93 | 1,76 | 0,40 |
| #3 | 2,51 | 56 | 2,51 | 2,22 | 2,02 | 0,45 |
| #4 | 2,84 | 48 | 2,84 | 2,50 | 2,27 | 0,53 |
| #5 | 3,17 | 44 | 3,18 | 2,80 | 2,55 | 0,58 |
| #6 | 3,51 | 40 | 3,51 | 3,09 | 2,82 | 0,63 |
| #8 | 4,17 | 36 | 4,17 | 3,71 | 3,4 | 0,71 |
| #10 | 4,83 | 32 | 4,83 | 4,31 | 3,88 | 0,79 |
| #12 | 5,49 | 28 | 5,49 | 4,90 | 4,40 | 0,91 |
| 1/4 | 6,35 | 28 | 6,35 | 5,76 | 5,37 | 0,91 |
| 5/16 | 7,94 | 24 | 7,94 | 7,25 | 6,79 | 1,06 |
| 3/8 | 9,53 | 24 | 9,53 | 8,84 | 8,38 | 1,06 |
| 7/16 | 11,1 | 20 | 11,11 | 10,29 | 9,74 | 1,27 |
| 1/2 | 12,7 | 20 | 12,70 | 11,87 | 11,33 | 1,27 |
| 9/16 | 14,3 | 18 | 14,29 | 13,37 | 12,76 | 1,41 |
| 5/8 | 15,9 | 18 | 15,88 | 14,96 | 14,35 | 1,41 |
| 3/4 | 19,1 | 16 | 19,05 | 18,02 | 17,33 | 1,59 |
| 7/8 | 22,2 | 14 | 22,23 | 21,05 | 20,26 | 1,81 |
| 1 | 25,4 | 12 | 25,40 | 24,03 | 23,11 | 2,12 |
| 1 1/8 | 28,6 | 12 | 28,58 | 27,20 | 26,28 | 2,12 |
| 1 1/4 | 31,8 | 12 | 31,75 | 30,38 | 29,46 | 2,12 |
| 1 3/8 | 34,9 | 12 | 34,93 | 33,55 | 32,63 | 2,12 |
| 1 1/2 | 38,1 | 12 | 38,10 | 36,73 | 35,81 | 2,12 |
