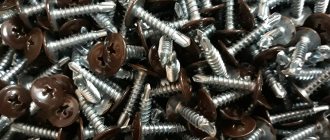
Many people, when doing DIY repairs and dealing with wood, metal, plywood or drywall, cannot do without using self-tapping screws. In unskilled hands, self-tapping screws can bend, even break, and all due to ignorance of the techniques and techniques for working with self-tapping screws. Therefore, it is important to know how to screw in a self-tapping screw.
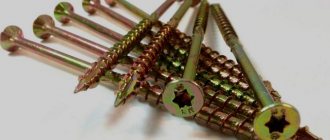
Self-tapping screws come in a wide variety of types and classifications. First of all, they are divided into screws for metal and wood. The fundamental difference from each other is the thread pitch. Those used for wrapping in wood have a much wider thread pitch, those used for metal have a smaller thread pitch. And this is not without reason. For example, if you try to screw a wood screw into metal, it will most likely break or bend. Self-tapping screws with fine metal threads will also not stick to wood, because the wood will not penetrate well between the narrow turns and cling to them weakly. By the way, metal screws have two types: with a drill at the end and without it.
Types of self-tapping screws
Note!
When working with self-tapping screws without a drill, a hole is pre-drilled in the metal into which they will be screwed with a drill slightly smaller than the diameter of the self-tapping screw. The self-tapping screw is then screwed into it.
If you don’t make holes in thick metal, then you won’t be able to screw in such screws, no matter how hard you try. Unlike simple self-tapping screws, self-tapping screws with a drill do not require pre-drilling, and they make their own way through the thickness of the metal. Roofing screws also have such drill tips. They are made with a hex key head and equipped with a rubber gasket to prevent water from penetrating under the roofing.
Self-tapping screw diagram for roofing
Types of screws
Let's start with the fact that a screw is a cylindrical rod with a special head onto which a screw groove is applied. Screws are produced according to a number of regulatory documents, including GOST 1144-80, GOST 1145-80, etc.
Screw
However, there are two main types of hardware:
- classic screws;
- self-tapping (also known as self-tapping screws).
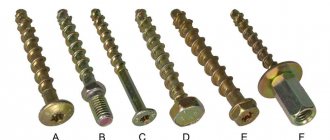
Carving self-tapping screws for metal and wood
For designation in this case, the diameter and length of the screw are used (for example, a product with a diameter of 5 mm and a length of 3.5 cm will be designated as 5x35 mm). In addition, hardware can be classified according to the shape of the slot and the features of the head itself:
- with a flat (countersunk) head;
- with the same, but smaller type;
- with press washer;
- with a hemispherical head.
Types of screw heads
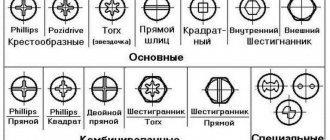
All of these varieties are produced with a Phillips, straight (flat) and Torx slot (the latter is also known as an “asterisk”), as well as with an internal hexagon and other less popular options. There are also self-tapping screws with hexagonal and octagonal heads (roofing), which are also made with different slots.
On a note! According to the type of thread, screws are also divided into several varieties, which is determined, first of all, by the materials being connected and the specific purpose (for metal, wood, drywall or small household appliances).
On wood
The main difference between self-tapping screws for wood is the rare thread, unlike their counterparts intended for metal. Such fasteners can be black, gold and white. So, if it is necessary to screw a golden hinge on a door, then a golden self-tapping screw is selected accordingly. In most cases, the choice falls on a black self-tapping screw.
For metal
As already mentioned, the thread on such a self-tapping screw has a frequent pitch. This is due to the fact that metal is a fairly hard material, so the adhesion must be made strong. Moreover, some metals should not be pre-drilled, such as tin. For thicker metals, you will need to make a hole.
Roofing
Such self-tapping screws are used for fastening roofing sheet material. It must be equipped with a rubber seal. As a result, the connection, in addition to strength, becomes airtight.
Furniture or confirmation
This type of self-tapping screw requires pre-drilling a hole in the furniture piece. A hex wrench is used to tighten it.
These are perhaps the most common types of self-tapping screws that are used in various fields of construction. Let's look at the details of how to screw this or that self-tapping screw into different surfaces.
Some tips
It remains to focus on one more point: the color of the screws used. Some people who are far from construction believe that white or yellow hardware is decorative, they look better, and therefore are used for visible fastenings. In fact, their color is given by a special anti-corrosion coating, which prevents rusting of fasteners installed outdoors or in damp areas.
Black self-tapping screws do not have such a coating, so it is recommended to use them only for relatively light, unloaded structures in dry rooms.
Another frequently asked question: is it possible to screw metal screws into wood? The answer is no. Fine threads will not hold the fastener in loose material, and over time or under load it will fall out of the hole.
Assortment and sizes
There are several types of designs of this material. They are divided into hexagonal and rectangular.
Hexagonal screws for concrete are a cone-shaped or cross-shaped slot. This type of screw is screwed using a spanner or open-end wrench. The rectangular appearance is characterized by a rounded head; this feature of the product allows you to hang suspended structures on self-tapping screws.
These types of fastenings are sold in all hardware stores. It is better not to take goods from the markets, because... Often sellers deceive buyers who do not understand products of this type.
Self-tapping screws also differ in the processing method, which can be of the following types:
- Copper plating.
- Galvanization.
- Blackout.
The darkened type of screws is the most fragile, because... exposed to moisture. For this reason, it is not recommended to use this type of product in places with high humidity. Copper coated rivets are sensitive to temperature fluctuations. For this reason they are used indoors only. The most common model is galvanized self-tapping screws; this type can be used in any conditions.
To select fastening material for a concrete wall, a number of parameters should be taken into account. For example, the head height should fit within the range of 2.8 to 3.2 mm. The diameter of the cap should be 10.8-11.8 mm. Depth - from 2.3 to 2.8 mm. The length of the screw can be from 5 to 18.5 cm.
The size of the internal section is 5.1-5.5 mm, and the external section fits within the framework of 7.3-7.7 mm. The outer diameter is 6.3-6.6 mm.
It is also important to take into account the thread pitch, which is 2.5-2.8 mm. To insert self-tapping screws, it is important to choose the correct drill bit, the size of which corresponds to the thickness of the fastener.
Into metal
As for screwing the self-tapping screw into metal, only metal fasteners are used here. The twisting method depends on the thickness of the workpiece. If it is thin sheet metal, then you can often tighten it without much effort using a screwdriver or screwdriver. Moreover, there are different types of screws. Some have a small drill with sharpened teeth on the tip, as shown in the picture.
Self-tapping screw with drill with sharpened teeth
If the metal is too thick, then the best option would be to pre-drill a hole with a drill/drill, and then screw the fasteners into it. This method is not associated with any problems.
When making a hole, remember that its diameter should be smaller than that of a self-tapping screw. When the hole is ready, it can be lubricated with machine oil. This will allow you to tighten the screw without much difficulty.
The metal screw used should be made of solid steel, which is harder than the product.
Specifications
To make self-tapping screws for concrete, which can be screwed in without drilling, special hardened steel is used. This composition gives the product high strength. The top of this steel is coated with zinc. This combination makes it possible to improve not only the mechanical qualities of the product, but also to give the fasteners anti-corrosion properties.
Self-tapping screws that have a cross-head slot can be screwed in without any problems using a screwdriver. Products that are labeled as TORX, with hinges, protruding heads or external threads, as well as a 6-sided head, require the use of special tools designed for this type of screws.
If the fastener has an uneven thread, the adhesion to the concrete is stronger than with a uniform thread. This occurs due to the fact that there are special notches on the fasteners. Such structures hold well even on porous walls and in blocks with an empty interior.
What to use when you need to screw in a self-tapping screw
If there is only one self-tapping screw or if their number is very small, you can easily use a regular screwdriver. If you are assembling some complex structure with a large number of fasteners, then it would be better to arm yourself with a good-quality screwdriver.
To choose the right screwdriver, read our article, which we devoted specifically to this issue. The effectiveness of this device increases significantly if it is used with quality bits.
Now let's move on to the most important thing - screwing in the screws.
Types of screws for concrete
Among the most common concrete screws it is worth highlighting:
- with countersunk head;
- with a cylindrical head.
The first type of screws are made from steel, onto which a thin layer of zinc is applied, which protects the product from corrosion. You can use such a screw without a dowel, since its full thread ensures fastening strength.
If there are voids in the concrete wall, a flared or impact dowel is used.
Which ones to choose?
The type of fastener is one of the main factors influencing the reliability and quality of drywall fastening
Therefore, special attention should be paid to their selection
When buying self-tapping screws, it is advisable to consider a few simple rules.
Give preference to self-tapping screws with a countersunk head. This will make it easy to embed them into the drywall structure. It is undesirable to use hardware for such work that has a hemispherical head.
The self-tapping screw must match the type of base. For example, in a log house they use wood fasteners that will easily fit into the tree and secure the sheet. A similar algorithm can be used for wooden frames formed when covering the ceiling or walls.
The length of the screw is selected individually for a specific situation
It is important that it goes inside the frame no less than 2-3 cm. This is especially true for self-tapping screws, which are not supplemented with dowels and represent the main fixing element.
The choice of dowels for plasterboard structures is an important step and involves the assessment of several parameters.
Purpose
Today, dowels can be used to fasten drywall to the base or fix other products on top of this material. If you need to attach a baguette or baseboard in the kitchen, then a butterfly or driva may be the solution. The molly dowel does an excellent job of fastening shelves or plumbing fixtures.
Fastening technology
Screwing in the dowel-drive is not particularly difficult. If you need to use other types of structures, you should understand that they need additional space. This is due to the fact that when the butterfly is opened, the support systems move. Therefore, if a sheet of drywall is attached tightly to the main wall, it is technically unrealistic to use such fasteners. The solution to this problem is ordinary dowel-nails and the correctly selected screw size.
Load capacity
Almost all varieties are used for fastening structures on top of drywall. Fixation of heavy products (for example, a massive chandelier, shelf, cabinet) is carried out only with the help of special anchors or molly dowels. These systems can support weights of up to 50 kg. Driva has proven itself well in fixing structures weighing up to 30 kg. Butterflies are considered the simplest and most unreliable, with which you can hang structures weighing up to 11 kg.
Fastening a screw to a concrete wall
Concrete is much stronger than all other building materials, so to drill it you should use a special drill, which is a product with a carbide insert at the end.
As for the tool, it is best to use an impact drill, but if it is not possible to purchase one, the work can be done with a regular drill. But in this case it will be difficult to drill, but also to rotate the drill around its axis. Otherwise, the concrete may not yield.
To begin with, the location of the future hole is marked in the wall and only after that can you start drilling it. The depth of the hole should correspond to the length of the screw.
The drill becomes very hot during operation. To prevent it from overheating, it must be moistened with water.
Having made a small depression, a pre-prepared pin is driven into the hole and turned. Thus, you need to proceed until the required depth is obtained.
All dust and debris are removed from the hole made. After this, a dowel and a screw are inserted into it.
A screw, like a self-tapping screw, is screwed in with a screwdriver; this cannot be done with a screwdriver. Otherwise, it may simply fall out after it hits the end of the hole.
Into drywall
When finishing the ceiling and walls, plasterboard is often used.
And given that this material is relatively fragile, it is important to be careful when screwing a screw into it. So, to screw a self-tapping screw into drywall, you will need a screwdriver with an attachment or a Phillips screwdriver. Fastening diagram
The diagram shows correct and incorrect tightening:
Scheme of correct and incorrect screwing in of a self-tapping screw
After screwing, the head of the fastener should be 1 mm below the general surface level. This will ensure sufficient tension.
What to do if you were unable to successfully tighten the self-tapping screw and it broke through the cardboard? In this case, unscrew it back, fill the hole, and screw in a new screw at a distance of 50–80 mm.
As for the type of self-tapping screw, its choice depends on the material used for the sheathing, whether it is wood or metal. As for the length, it is enough for it to fit into the profile up to 10 mm.
Choosing a self-tapping screw for fastening drywall
How to choose a drill and dowel
If you plan to attach a lightweight object to a concrete wall, you can use a plastic impact dowel and a Pobedit drill bit. The diameter of the dowel and drill should be 6 mm. In this case, the length of the dowel is selected depending on the wall thickness of the object that is planned to be fixed.
To fasten objects weighing from 5 to 10 kg to a concrete wall, an impact dowel with a diameter of 8 mm and a drill with the same diameter are used. The number of dowels is at least four pieces.
Fastening heavy objects, such as hanging cabinets, TV stands, should be done using a dowel with a diameter of 10 mm and a ten-millimeter drill. To ensure a more durable fastening, you will need at least six dowels.
The best option for screwing in long fasteners
And now we come to the main thing. There is a safe and easy way to screw in hardware and wood, without drilling. In fact, it can be compared with the previous one, but here a paraffin candle is used instead of soap. Naturally, few people use these now, but you can find them (in extreme cases, holiday candles for a cake will do).
Before screwing in the fasteners, the threads should be rubbed with paraffin, and when screwed in, under the influence of friction, the screw and wood will begin to heat up, which will lead to the melting of the paraffin. It will begin to melt and soak into the wood around the screw. As a result, it will be easy to screw in the screw, and both the thread and the wood will be protected. Also, no matter how much time passes, it can be easily unscrewed to replace the board or even simply disassemble the structure.
Application
Self-tapping screws for concrete are used to attach metal, plastic, wood and concrete structures. You can hang various products on a self-tapping screw without drilling or carry out small repairs indoors using these parts to form a connection.
If you use such fasteners in heavy concrete, then it is necessary to carry out additional preparation of the intended location before inserting the screw. You can screw a self-tapping screw into lightweight concrete without a dowel. A special drill must be selected for heavy concrete.
How to use fasteners on solid substrates
To screw concrete screws into solid foundations, a hole is drilled on the surface of the wall, the size of which is selected taking into account the parameters of the fastener. The hole size should be a few mm larger to prevent accumulation of concrete. When screwing in this fastener, it is important to ensure that the axis does not deviate. The fastener should be screwed in at low speed.
If there is no special equipment, then any drill will do, the main thing is to choose the required size and use a hammer. To do this, set the drill perpendicular to the head and gradually hammer it in with a hammer, turning the drill clockwise each time.
How to screw in a self-tapping screw without drilling
Not every builder knows how to screw a self-tapping screw into concrete without drilling. There is no need to drill a hole in walls made of expanded clay concrete or aerated concrete. Just as an additional prepared hole is not required.
For installation in such walls, screws with dowels are often used. The seal is made of cellophane, nylon and polypropylene. When the fastener is screwed in, the material begins to delaminate and comes into close contact with the wall.
But this type of fastening requires a prepared hole using a drill, the drill of which is selected taking into account the seal. The screw can be screwed in using a standard screwdriver.
Auxiliary Tools
Before you screw a self-tapping screw into drywall, you need to think about tools that can make the job easier. Let's look at what tools and devices you can use:
- The curly screwdriver is a classic of the genre. With its help, the pressure is always easily controlled. With such tools, the screws will be screwed in as needed. The main disadvantage is the complexity of the work. It will take a lot of effort to tighten several hundred screws with a screwdriver;
- A screwdriver has long become an indispensable tool during repair work using plasterboard. At first, it will be difficult for a beginner to screw in the screws to the required depth the first time. It will be necessary to adjust the power of the screwdriver so that the screws are fully tightened, but do not break through the sheet of drywall. Unfortunately, not every tool has a power regulator;
- The belt screwdriver is known only to professionals. This tool is quite expensive for an ordinary person doing repairs at home to afford. With a belt screwdriver, many questions regarding how to secure a self-tapping screw in drywall disappear. This tool has a special tape where screws are already inserted. You just need to place it on the drywall and press a button, and the self-tapping screw will be squeezed out of the tape and screwed into the surface;
- bit with limiter. A similar device is used on conventional screwdrivers to ensure that the self-tapping screw is recessed to the desired depth. A bit with a limiter should be used by anyone who is faced with the need to screw self-tapping screws into drywall for the first time.
A belt screwdriver will speed up the process of screwing screws into drywall
Location requirements
There are requirements for the location of hardware, for example, markings are necessary in order to screw in the necessary fasteners efficiently and at the required distance. There are the following rules for placing screws:
- from the edge of the product that is attached, it is necessary to retreat a distance equal to twice the length of this fastener;
- the hole in the wall should be slightly larger than the screw;
- the minimum dowel fit for light material is 6 cm, heavy material is 4 cm;
- the distance between the screws is from 12 to 15 cm, depending on the density of the concrete;
- The diameter of the hole is equal to the cross-sectional diameter of the self-tapping screw together with the dowel.
Regular matches
Everything is simple here, if your broken holes are not large, say, a piece of chipboard has not fallen out, then you can use ordinary matches.
How it works? Just hammer a match into the hole (great if the diameter is not large). And then we screw the screw in there. The match is pressed against the wall and thus the fastening is restored.
However, it is not suitable for heavily loaded doors that you rarely use. If you constantly open or close the sash, it will not last long . BUT as a temporary solution, why not?
Features of choice
Nowadays there is a large assortment of building materials in stores, and an ignorant person cannot accurately decide and make the right choice. In such cases, it is better to listen to the opinion of professionals or, if possible, calculate the future load on the fasteners, taking into account the humidity in the room and temperature conditions. It is important to choose fasteners depending on what they will be intended for.
Anchors for concrete (bolts): types and types, as well as methods for their fastening and installation in foam concrete and aerated concrete Anchors for concrete are special fasteners necessary for...11/129/2018 Features of the selection and installation of dowels for foam block (foam concrete) Dowel for foam block is a special fastening element,
Tools for tightening screws
Depending on the head, you will need a tool to tighten the screw. Usually this is a screwdriver with various attachments or a screwdriver. A screwdriver is useful if you need to screw a couple of screws into a soft material. But working with a screwdriver requires some skill.
SCREWDRIVER WITH AUTOMATIC BITS “REVOLVER”
Briefly about the main thing
Something as simple as screwing a self-tapping screw into the most ordinary materials can suddenly turn out to be difficult if you do not have experience and do not know how to do it correctly. To cope with this task, you need to choose the appropriate fasteners and tools, evaluate the features of the base on which you need to fasten. Most solid materials require pre-drilling or punching at mounting points. You can do without them when working with soft wood or thin sheet metal.
Source
Description of the dowel
A self-tapping screw for concrete consists of a pointed rod and a head with a cross notch. Due to its high strength, it does not deform or collapse under heavy load.
Pins are made of brass, carbon or stainless steel. These materials are similar in strength and price characteristics. However, carbon steel is most in demand, since self-tapping screws made from it are coated with a protective layer that does not allow oxidation. Each type of coating has its own color, which indicates the rules of application:
- The silver layer is made of zinc and is a universal option.
- Yellow protection also means zinc, but its scope is narrowed to interior work.
- The black color is an oxidized coating. It exhibits maximum protective properties only indoors with normal humidity levels.
Screws hold various structures in concrete, for example, a plastic window profile or a door frame.
The hinges tore out of the chipboard (cabinet door) - how to fix it? Details + video version
Nowadays, most furniture, such as cabinets, bedside tables, kitchens, and so on, are made of chipboard. The material is good, quite flexible (there is one for every taste and color). However, it has a big disadvantage. Over time, especially if this is a frequently used door, the hinges can be pulled out by the roots (probably many have experienced this), and the hinge dangles... the sash sags, or even comes off altogether. In general, how can I fix this whole thing? Detailed instructions + video version...
The essence of the problem is that it will not be possible to screw the “screws” back into these torn fasteners. They simply won’t stay there. We need to fix it some other way. For me personally there are only three. I’ll tell you about each one separately.
Requirements for the location of self-tapping screws for concrete
Before using screws, you need to mark the fasteners:
- they retreat from the edge of the structure to a distance of at least twice the length of the anchor;
- the depth of the hole must be greater than the length of the self-tapping screw by the value of one of its diameters;
- the minimum recommended dowel insertion depth for lightweight concrete is 60 mm; for heavy ones - 40 mm;
- distance between anchors - 120 mm for porous, 150 mm - for dense materials;
- The diameter of the hole must correspond to the cross-section of the dowel.
The fasteners are positioned so as not to cause the formation of cold bridges.
Glue + sawdust
The solution is as old as time, and it should be noted that it works well. Perfect if you have a piece of chipboard torn out.
The idea is simple - we take sawdust (you can take it from a chipboard, a piece of which has been torn out), or find it near furniture factories, next to large construction supermarkets (usually there are pieces lying around that no one needs), crush them, mix them with glue (previously we used PVA) this Apply the mixture to the broken areas and let dry. And that’s it, tighten the “screws”. It's holding up well.
However, now there are a large number of adhesives; on the Internet I even saw a guy pouring a lot of glue from a glue gun into broken places. And everything seems to be holding up
I used to repair hinges in the kitchen a long time ago. BUT due to the fact that the sash was used often, it broke quite quickly.
So this is again an option for a while, for constant use (10 - 15 openings per day), this is not the best way.
HOW TO SCREW A SCREW INTO A CHIPBOARD OR WOOD WITH YOUR OWN HANDS Watch and learn!
The rotation speed determines the purpose of the device. When used exclusively in the mode of tightening or unscrewing screws, the speed is set to 350 rpm. If the device is used in drill mode, then the speed should be more than 1000 rpm.
How to screw a self-tapping screw into wood with a screwdriver.
In most cases, you have to screw self-tapping screws into wood with two types of slots, flat and cross-shaped. To tighten such screws, select the appropriate screwdrivers with a flat (marked SL) or cross-shaped (marked PH) tip. You can also find cross-shaped bits marked PZ on sale. PZ bits have additional edges and are used for self-tapping screws with a recessed slot. Sometimes flat-head screwdrivers are called minus-head screwdrivers, while those with a Phillips-head tip are called plus-head or figure-head screwdrivers. In addition to the letter index, their marking also contains digital indexing, which indicates the width of the flat tip or the group to which the cross-shaped tip belongs. When making furniture with your own hands, you most often have to use a screwdriver to tighten self-tapping screws whose diameter ranges from 2.2 to 4.2 millimeters. Therefore, for screwing flat-head screws into wood, the screwdriver designation must be SL from 4 to 8, and for screwing cross-slot screws into wood, the screwdriver designation must be PH or PZ 1 or 2.
How to screw a self-tapping screw into wood with a drill.
To screw screws into wood, the drill must have an electronic speed control function. In other words, the rotation speed of the drill chuck should gradually increase as you press the button. It is also worth remembering that most drills do not have a maximum force adjustment function like a screwdriver, and therefore you need to independently control the depth of screw tightening and remove your finger from the button in time. A regular drill has enough force to drive a screw deep into wood or even tear off the head of the screw.
How to screw a self-tapping screw into wood with a screwdriver.
Even a person who is far from this business can handle screwing a self-tapping screw into wood with a screwdriver, since the screwdriver will do all the work for you, you just need to choose the right attachment for the screwdriver (bit). The rules that must be followed when choosing a bit for screwing screws into wood are the same as when choosing a screwdriver.
How to tighten a self-tapping screw without a screwdriver or a screwdriver.
This method of tightening self-tapping screws is, of course, an exception to the rule, but in some cases when it is really necessary and only a drill and self-tapping screws are at hand, there is nothing else left to do but clamp the head of the self-tapping screw directly into the chuck and slowly tighten it. To prevent the screw from spinning in the chuck, you can hit the edge of the screw head with a hammer several times so that it becomes slightly deformed rather than round.
What drill to use to drill a self-tapping screw into wood.
There is no need to pre-drill the hole, since a self-tapping screw is nothing more than a self-tapping screw, and according to the manufacturer’s specifications, it is screwed into wood and plastic without drilling. To confirm this, you can think about what a drill should be like for drilling a self-tapping screw into wood 4.8*100, and if you think logically, the diameter of the drill should be approximately 3 mm. and the length is at least 130 mm. (Drill 100 and clamp 30 into the drill chuck). It is unlikely that such a drill can be found on sale.
And finally, remember that a poorly driven screw holds much better than a well-tightened nail.
We analyze popular installation mistakes
Let's look at the main mistakes - the more you know about them, the more reliable your roof will be:
- Drill bit too big. The result is no tightness or load-bearing capacity of the connection.
- Drill bit too thin. This will certainly lead to either broken fasteners or biting of the thread - its partial destruction. And such a mount, of course, cannot be called high-quality.
- The screw is tightened too loosely. In this case, the rubber gasket will not fit tightly to the surface of the metal sheet, and moisture will easily get under it.
- The screw is tightened too tightly. In this case, the rubber gasket will quickly crack due to overvoltage and begin to leak water.
The following illustration will help you understand this:
To avoid over-tightening the washer or breaking the drill, it is necessary to use the appropriate tool. A screwdriver with a low rotation speed (up to 1800 rpm) is suitable for this purpose, which allows you to control the angle of entry of the self-tapping screw into the roof.
Be careful: self-tapping screws for corrugated sheets are equipped with a washer, which is sensitive to tightening when screwing.
But what to do if you screwed the self-tapping screw into the wrong place (for example, you missed the sheathing), and twice? There is a way out: you need to close the hole from the self-tapping screw with sealant and a rivet. As a result, the consequences of incorrect fastening will be almost invisible:
Another good tip for the same problem:
As you can see, anyone can make a mistake, but if you know how to correct it, you can avoid problems in the future.
Restoring the hole
First of all, we measure the thickness of the chipboard. Next, take a wood drill and set either a limiter or a mark on it to make a hole of a certain depth. If your material thickness is, say, 9 mm, then you need to drill to a depth of no more than 7 mm. The thickness of the drill is also selected individually, everything depends on the diameter of the screw being screwed in and the nature of the damage. I took a 5 mm drill. Carefully drill a blind hole.
There is no need to rush, because if you accidentally drill the front side, it will not be pleasant.
Pour wood glue around the edges. You can use the classic one - PVA or any other.
Naturally, the chopik must be pre-fitted to this hole in diameter and length. Carefully drive it into the hole.
We are waiting for the glue to dry. Next, we drill a hole under the screw so that when screwing there is less internal stress, since the chop is made of a single piece of wood and with excessive pressure it will easily burst or crack.
That's all! The hole has been restored.
You can screw the screw into place.
The connection is very strong. Most likely even stronger than it was, since the insert adds additional density. We repair all the necessary holes for the hinges. Using this simple method, you can repair and restore a hole not only in chipboard, but also in other, absolutely any wood.
How to learn to distinguish between self-tapping screws for different materials
A home craftsman most often has to work with metal, wood, and materials such as plywood, particle boards, and OSB. In each case, you need to select screws not only by size, but also by purpose. They differ in thread pitch.
The so-called metal screws are actually universal - they can be used to screw everything except wooden parts. This is due to the structure of the material. Wood is fibrous and quite loose. Frequent threading will simply crush the fibers, so it is made sparse so that the wood fits between the protrusions of the metal spiral.
Plywood and chipboard have a denser and more uniform structure; universal hardware with fine threads are better suited for them. But if you need to screw a thin steel sheet to a wooden base, choose wood screws, since it is wood that performs the load-bearing function.
Wooden “chopik” + glue
I think this method is the best. After such a repair, the door in my kitchen worked for several years, and nothing was torn out again.
The principle is this: Remove the sash - door, then you need to take a drill and drill out the torn holes.
We take a drill with a diameter slightly smaller than a wooden “chopik”, for example, my chopstick is 9 mm in diameter, and the drill is 8 mm.
We do not drill to the full depth of the door, usually 80% is enough, the main thing is not to drill further, because the drill will come out on the other side of the door, which is not always necessary. To do this, there is a special limiter on the drill, or at the required depth, you need to screw electrical tape onto the drill and not go beyond its limits.
Next we pour glue into the hole, I take “MOMENT” which glues the wood (you can take any other one; there are now dozens of different ones). Well, we hammer in the “chopik”, do it carefully so as not to break the back wall!
Let it set for about 15 minutes. Then in our wooden inserts, I drill another hole in the center, also not to the full depth. This is done in order to tighten the “screw” freely, but do not overdo it. For example, I have a “screw” with a diameter of 4 mm, and I take a drill with a diameter of 2 mm.
I tighten it on the removed door, try it - it holds perfectly! Now you can hang it on the closet .
This third method, I think, is the best for repairing chipboard doors. Moreover, it is suitable for frequent openings.
Now we are watching the video version
This is where I end, I think my materials were useful to you. Read our construction blog, there will be a lot more useful.
Source: remo-blog.ru