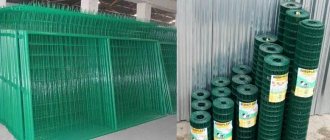
Today, chain-link is produced from polymers, steel and stainless steel. All types of materials have their own advantages and disadvantages. Galvanized steel mesh is considered the most durable. If installed correctly, it can last more than 20 years. If you are installing a temporary fence, you can purchase a less expensive vinyl chain link fence. In addition, a fence made of this material will be ideal for mounting on a non-concrete base, as it is light in weight.
Step-by-step mesh installation
You can install a fence from a regular chain-link mesh with your own hands without guides without special equipment, especially if you use ready-made elements for installation and tension. For quick installation, it is recommended to purchase all fasteners in advance.
By guides
Chain-link fences along guides are installed in two stages:
- Guides are installed.
- A polymer mesh is being installed.
First, we install guides on the posts. Preliminary fixation is carried out with mounting wire, then the guides are welded by electric welding.
Then, using plastic clamps, the canvas is gradually lifted and fixed on the fence. The final tension and fixation with wire or a metal strip is done afterwards and secured by electric welding. The plastic mesh on the guides is fixed only with wire or special clamps.
Without guides
A fence without guides, tensioned with a cable or wire, is suitable as a temporary barrier or for a summer cottage. Installation is carried out on installed supports with mounting clamps. The work is carried out in the following order:
- The canvas is laid out along the entire length of the installation segment.
- The cable or wire is pulled along a template over a distance of one span.
- The ends of the cable are fixed to the support post.
- One edge of the canvas is secured to the pole with plastic clips.
- On the second pole, the lower cable is first secured and tensioned, then the upper cable.
- Having reached the corner post, the cable is threaded so that the plastic mesh goes around the post from the outside, and the tensioners and clamps are on the inside to connect to another segment.
- The final stretching and fixation of the entire length of the segment is carried out.
The video below will help you look at the DIY installation process in more detail.
Installation in sections
The fencing in the frame of the sections is installed on already concreted supports. Installation is carried out using templates and special holders that fix the section on the pole.
It is better to install on corners pre-welded to the posts or special brackets for bolted connections. Prefabricated screw piles and bolts allow, if necessary, to dismantle the fence at the lowest cost.
The work order is as follows:
- The section is lifted and pre-fixed in a vertical position to wooden or iron supports.
- The bolts are installed in the mounting holes and lightly tightened with nuts.
- The frame lines are aligned with the level.
- Final fixation is carried out.
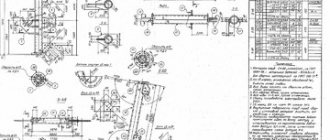
Sectional fence installation diagram
Materials, tools and calculations
So, to get started, you will need:
- poles (metal, wooden logs, asbestos-cement poles)
- Rabitz
- wire 2-3mm thick
To avoid unnecessary costs, try to calculate the required amount of material as accurately as possible. For this:
- Drive in pegs along the entire perimeter of the future fence and stretch the cable through them; - measure the length of the tensioned cable to find out the perimeter (this is how much mesh you will need to buy)
- divide the length of the perimeter into intervals of 2.5-3 meters
- the resulting number is equal to the required number of future pillars
Choosing pillars
It is very important to decide on the optimal material for your fence posts. Wooden poles are short-lived. However, they are much easier and cheaper to buy. Metal poles are the best option
Such a support will be better than others combined with a chain-link fence, as it is strong enough and not too massive.
In addition, metal poles are very convenient to use: they can be easily painted and repainted in any suitable color. Asbestos-cement pillars are good only if you already have them.
The fact is that specifically purchasing a super-heavy material made of cement for a fairly light mesh fence is not entirely profitable or reasonable. To attach the mesh to any type of posts, you need to attach hooks to them.
Choosing a chain-link mesh
To begin with, decide on your preferred fence width and the ultimate purpose of its purpose. Let's say you want to install a fence for chickens, then the mesh cells should be chosen smaller so that curious chicks do not “leak” through them at any time.
When deciding on the material from which the chain-link mesh is made, you need to know that: black mesh is for temporary use; galvanized - for longer operation, since its polymer coating has high anti-corrosion resistance, in addition, its appearance looks very aesthetically pleasing.
Installing pillars
To install the posts correctly, you need to dig holes of the appropriate depth for them. Namely, the depth of the pit should be approximately 1/3 of the height of the fence. Accordingly, if you plan to build a fence 1.5 meters high, the depth of the hole will be 50 cm.
To prevent subsequent subsidence of the pillars, sand and crushed stone must be placed at the bottom of each hole, compacting them thoroughly. Only after this, a pole is installed in the hole, which is gradually filled with soil and compacted. Using metal posts to support the fence, it is better to concrete them.
Stretch the mesh
The process of installing a chain-link fence is as follows. Start by connecting individual pieces of mesh: “unscrewing” the outer wire, “screwing” it back, while grabbing the second piece.
For metal ones - with wire. But the optimal option for attaching a chain-link mesh still remains special hooks. If you prefer a black chain-link mesh for the fence, which does not have anti-corrosion properties, secure it 10 cm above the ground to avoid too rapid damage to the product. After securing the mesh to the first post, gradually unwinding the roll, attach it to each subsequent support in a similar way.
To prevent subsequent sagging of the mesh, tighten it as tightly as possible. To be sure, you can stretch a strong wire at the upper and lower edges of the fence, each end of which is then attached to the posts. Also, for better tension, you can use horizontal beams between the pillars.
Benefits of mesh fences
Chain-link has a number of significant advantages that justify the decision in favor of choosing this product. Among the main advantages of this construction material it is worth highlighting:
- significantly lower financial and time costs for arranging a mesh fence compared to fences made of profiled sheets and wooden picket fences;
- low price of supporting elements for hanging mesh fabric and tensioning attributes;
- high strength compared to wooden barriers;
- ease of installation, allowing you to install a mesh fence with your own hands, easier than all other types of fence materials.
Self-tapping screws
Fastening in sections
Sectional fencing is distinguished by a more aesthetic appearance and at the same time the complexity of self-production.
Section ready for fencing manufacturing
To make one section of the fence you will need:
- metal guides, which can be profile pipes, round pipes of small diameter, corners. The guides are welded together, forming a frame of a section of given dimensions;
- net;
- welding machine;
- pliers;
- roulette.
To fix the chain-link mesh to the guides, the following fastening methods are used:
- fixation with a metal rod;
- fixation with metal hooks.
Fastening with a rod
The most popular and reliable method of fastening to the guides is fixation with a metal rod, which is done in the following order:
- a section is separated from the mesh roll, its overall dimensions fully corresponding to the similar parameters of the finished section frame;
Disassembly is done with pliers by removing the connecting wire from the mesh.
Preparing the mesh for fixation
- then a metal rod is passed through the mesh cells along the entire perimeter;
- the rod is welded to the guides.
Fixing the mesh chain-link by welding through rods
Fastening with hooks
The metal mesh is attached to the guides with hooks using the following technology:
- in the manner indicated earlier, the mesh is prepared for fixation, that is, individual sections are prepared in accordance with the overall dimensions;
- special metal hooks are welded around the perimeter of the frame, which can be in the form of rectangular or rounded plates;
For stronger fixation, the hooks are welded at a distance of 25 cm - 35 cm from each other.
- The mesh is pulled over the hooks and secured by clamping.
Hook fixation technology
Sections prepared by any of the above methods are easily secured to poles (usually using a welding method), forming a finished fence (fence). Gates and wickets can be made using similar methods.
How to attach chain-link mesh to wooden posts
Wooden posts are rarely used when installing a chain-link fence. The exception is cases of temporary fencing. This is due to the fact that wood is the least durable of all types of materials that can be used to build a fence. Wood is prone to destruction at drilling sites. That is why it is advisable to attach the mesh to a wooden post using wire.
Sometimes metal staples are used to secure the mesh. They are easy to install, but do not provide a secure fit in the long term. Plastic ties can serve as alternative fasteners. But, from a practical point of view, it is not advisable to use plastic ties, because... When exposed to ultraviolet radiation, plastic is destroyed. Material prepared for the website www.moydomik.net
Installation process
All work must be performed in strict sequence, carefully taking measurements. The most important thing is to be extremely careful at each stage, otherwise you will have to repeat certain steps.
To ensure that you are completely satisfied with the result, we offer a detailed action plan.
The first step is marking
This step is extremely important, since it will give us an understanding of the amount of materials required to complete the entire project. The first step is to install pre-prepared pegs at the corners of the perimeter of the future fence. The main point when performing this step is compliance with the standards for the distance between products. Maintain a distance of 2.5 - 3 meters. In the future, pillars will be installed in place of these pegs.
Next, between these pegs, you need to stretch the cord. This way we can determine the dimensions of the mesh:
- the length of the cord is responsible for the length of the fence;
- The width of the fence is determined by the required height.
The second step is to install the pillars
After we have decided on the markings and the amount of required materials at the first stage, we can proceed directly to the installation of the pillars. Key points for completing this stage:
- It is necessary to dig holes with a depth of 1 meter.
- Their base must be covered with crushed stone, sand, and then compacted.
- After this, you can proceed to installing the pillars.
- When there is already a post in the hole, we fill it with earth and compact it thoroughly.
When these steps are completed, everything will be ready for further installation of the grid itself. They serve as the basis and this stage can easily be called the most labor-intensive. Let's move on.
The final stage is tensioning and fixing the fence
To avoid sagging, it is necessary to install the roll where the corner post is located, the edge is securely fixed. To achieve the most reliable fastening, you can use hooks that are welded to the pole.
Important - we strongly do not recommend fastening using wire, as this will put the entire fence at risk. As an alternative, you can also use clamps, nails, staples
Next, the fence is unwound and secured in a similar way. If the mesh is not galvanized, it is recommended to raise it from the ground by 5-10 cm. The final touch is to protect the entire fence from corrosion processes - special paint is applied for this.
Methods of tension and fixation
The chain-link mesh can be fastened using the tension method:
without the use of any additional elements;
Installation without fixing elements
using a metal rod, which is passed through the mesh and subsequently fixed to the posts. You can use either one rod, which will be located at the top of the fence, or two rods at the top and bottom of the fence;
Stretching using a metal rod
using metal plates that replace the rod. This method of tensioning is considered the most acceptable, as it allows you to firmly fix the mesh on the fence and get a pleasant appearance.
Fastening with plates
Attaching the chain-link mesh to the posts without the use of additional elements is done:
metal clamps, which are installed on poles by welding or fixed using fastening plates;
Fastening with a threaded clamp
ordinary wire. This method is less reliable, since with any load on the mesh the wire will weaken;
Using metal wire for fixation
hooks that can be welded to posts or installed using self-tapping screws.
Welded hooks for fixation
Tension metal plates can be fixed to poles in the following ways:
- welding The most durable method, which is available only to persons who have a welding machine and know how to use it;
- threaded fixation. In terms of strength, this method is not inferior to welding, but its implementation does not require special equipment or skills.
The technology for threaded plate fixation is simple:
- a hole is drilled in the post through the tension plate;
- a bolt or self-tapping screw is screwed in, securing the plate.
The metal rod, which is used to tension the Chainlink mesh, can be fixed on the post in any of the following ways, but the technology most often used is the installation of tension couplings:
- Tension couplings are installed on the poles using bolts, wire or special fasteners, which can be made in the form of sliding hooks or special housing mechanisms;
Hook shaped tension coupling
- the tension cable is passed through the mesh and secured to the couplings;
- By adjusting the couplings, the final tension of the mesh between the fence posts is performed.
Fastening with tension sleeves and wire
To add rigidity to the fence when choosing fastening with tension couplings, jibs are installed additionally to each post.
How else can you secure the Chainlink mesh, look at the video.
Whatever method of fixing the Chainlink mesh in the manufacture of fencing is chosen by the builder, it is important to fasten it correctly and reliably, which will allow the fencing to serve for a long period of time.
Step-by-step instructions for installing a fence
- We buy a special drill, you can even use a hand drill, it’s cheaper. From the corner wedges we pull the cord around the perimeter. This is a necessary operation, we will use the cord to guide us, otherwise (without the cord) the fence will turn out crooked and uneven.
- We measure the distance between the pillars (we remember the dimensions, I wrote above). In each place where there will be a support, we drive in a wooden peg (for reference). Next we work with a drill (we also already know about the depth, I usually dig a meter deep).
- The holes are ready around the perimeter. Next, we prepare the concrete for pouring the pillars. Regular concrete, three parts sand, part cement and five parts crushed stone (fine, of course). Mix thoroughly, post into hole, then work with a level to “break through” the vertical.
- The concrete was poured, slightly trampled, poured again and left to dry completely for a couple of days. That's it, the pillars are sorted out.
All that remains is to stretch the mesh, we start from any corner, you need to work together, if there are hooks on the posts, then everything is clear, if there are none, then we stretch the mesh, one person holds it in tension, the other twists the wire.
In the case of wooden supports, we fasten the mesh with nails, and bend the nails with a hammer. In general, that's it, the work is finished.
How to choose a grid
First of all, decide how tall the fence would like to be built. The most common height of chain-link mesh rolls is one and a half meters, but both two-meter and one-meter mesh can be found on the market.
If you want to use a chain-link fence as a fence for your personal plot, choose a coarse mesh - 50 or 100 mm.
If you need a fence for chickens, you will need a larger mesh, because birds can get stuck in large mesh and even die from suffocation. In this regard, opt for a mesh with cells of 25 - 30 mm.
Next about the material from which the mesh is made
The chain-link is made of black, galvanized and aluminum wire.
All three types are used to make fences, but galvanized mesh will last longer, since black mesh is less susceptible to corrosion.
Aluminum chain-link mesh has even higher anti-corrosion properties, but if you install a fence made from it as an external fence for an area, there is a high risk that it will simply be stolen by non-ferrous metal hunters.
Types of plaster mesh
Today, manufacturers offer two main varieties:
- metal,
- fiberglass (plastic).
The question of which one to choose comes up often. To determine the need for use, you will need to examine the surface of the wall for differences and irregularities. If the difference is within 5 cm, then it is better to use a metal product. If within 2-3 cm, then fiberglass will do.
Synthetic product for plaster
Fastening the blade
The chain-link roll is installed vertically at the first corner support. The end of the canvas is hooked onto hooks that were previously welded to the pipe. If there are no fastenings, the canvas must be firmly screwed in 3-4 places with steel wire.
The bottom edge of the material should be 100-150 mm above the ground level to prevent the accumulation of debris. To reduce sagging, a reinforcing rod is passed vertically through the first row of cells and welded to the post.
Then the roll is untwisted and attached to the next support. To prevent sagging of the material along the perimeter of the fence, steel wire is passed through the upper and lower parts at a distance of 100-200 mm from the edges.
Installation of fiberglass sheeting
Having figured out how to fix the meth. mesh for plaster, we will easily understand how to attach a plastic mesh. The fiberglass panel bends easily and weighs little. Therefore, it is easier to attach it to the wall. Usually they do this with self-tapping screws only along the top edge, lowering the “fabric” from top to bottom like wallpaper. The entire panel “sticks” to the wall using plaster mortar.
Sometimes, in order to increase strength, the panel is attached with self-tapping screws and along the bottom (near the floor).
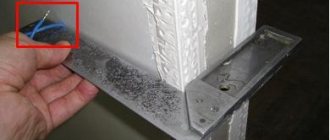
Using a solution, the network is attached to the base, doing this:
- Apply a layer of plaster composition to the surface. The width of the applied layer is equal to the width of the mesh. The composition is applied with a trowel (50 cm) or a wide spatula.
- The canvas is unwound and applied to the upper edge of the wall with its end. The remaining part of the canvas is lowered down.
- The panel is straightened so that its edge runs parallel to the corner line. Craftsmen often place the edge on the surface of the adjacent wall (3 cm).
- Using a wide spatula or trowel, finally leveling, the net is embedded in the layer of solution. The plaster mixture appears through the meshes above the network and is immediately leveled with the same tool.
- Allow the reinforced plaster to dry, after which the following finishing work is carried out according to plan.
The technology of arranging a fence is extremely simple
- Posts are dug in along the perimeter of the fence (in increments of 1.5 - 3 m). For reliability, the pillars can be additionally secured with concrete mortar.
- A mesh is attached to the posts. This can be either a single roll or pre-cut sections.
Let's take a closer look at how the metal mesh is attached to the support posts.
Wire or clamps.
The simplest, fastest and least reliable method. The mesh is attached to the post using ordinary (preferably metal) clamps or using wire (preferably steel). With this fastening method, the material of the pillars is completely unimportant.
To increase reliability, additional supports can be used (this, by the way, applies to any fastening method) in the form of horizontal strips between the pillars.
Sectional chain-link fence
A tension fence can stretch and sag over time, which means it will lose its attractive appearance. If you weld a frame from a metal corner and fasten the same chain-link inside it, you will get sections for a more durable and beautiful fence. Just like a picket fence, it will let enough light and air into the area, but it looks much more solid.
A sectional chain-link fence will weigh more than a tension fence, so the supports must be secured more firmly and reliably. Here are some tips for installing support posts:
Dig a hole 40 cm deep, then place a post in it and drive it into the ground another 40 cm. Thus, the support will be buried into the soil a total of 80 cm. The hole is filled with cement-sand mortar. For strength, you can add small crushed stone to the solution, and fragments of bricks or stones into the pit itself.
Another approach to installing supports is butting. A support is installed in a hole 60-80 cm deep, and then the hole is filled to the top with concrete waste, broken bricks, and stone. The contents of the pit must be thoroughly compacted, for example, with a crowbar.
The best option is to concrete the pit to its entire depth. To do this, dig a hole 80 cm deep, install a post and fill the hole to the top with cement-sand mortar with added crushed stone. A support with such a base will definitely stand strong for many years.
If the site is located on a slope, this does not mean that the fence needs to be installed on a slope. The fence sections should be positioned strictly horizontally, so your fence will be stepped. If you want to create a more substantial fence, you can create a small concrete border and install fence sections on top of it.
The finished mesh sections are attached to the supports using bolts and nuts or welded. Once the installation work is complete, all you have to do is paint the fence the color you want.
As you can see, building a chain-link fence is not at all difficult. Put in just a little effort and you will definitely have a beautiful and neat fence!
How to make a chain-link fence with your own hands
The fact is that a chain-link fence is lightweight. Moreover, it is light both in terms of its own weight and in terms of perceived wind loads. No matter how strong the winds blow, the pressure transmitted by the mesh to the poles remains insignificant. Due to their low weight, this technology for installing pillars can be used: in a hole, backfilled with sand or crushed stone, without concrete. Moreover, such a fence can stand without problems even on heaving clay soils with a high level of groundwater, and even with a large freezing depth.
Without guides
Here's how it works. We are talking about the simplest design: just pillars with a mesh stretched between them. As you can see, the pillars are buried to a depth of less than a meter. What happens to such a fence on soils that drain water normally? All water located near the column goes down through the sand or crushed stone to the bottom of the hole. There it leaves naturally - it seeps into the underlying layers. Even if frost hits and the sand or crushed stone around the post freezes, the moisture contained is not enough to have any significant impact on the post.
The simplest design of a chain-link fence
Yandex.RTB RA-1479455-7
On clays and loams you can use the same principle, but you must fill it with gravel. And be sure to pour 10-15 centimeters of gravel at the bottom of the hole, and only then install the post. What happens in this case? Water still accumulates below, but it leaves very slowly. It may well happen that by the time it freezes, the crushed stone will still be wet, or even in water.
What will happen then? It will freeze and become hard. But since the soil also freezes, it puts pressure on the crushed stone. The forces are considerable, and the ice breaks, the crushed stone becomes mobile and compensates for most of the pressure created by the soil. As a result, if any movement of the pillars occurs, it is very small - from a few millimeters to several centimeters. Since the structure is not rigid, the mesh will easily transfer it without any harm. After everything thaws, the pillars will lower into place. But this scenario only happens if they are positioned perfectly vertically. Otherwise, the pillars may tilt and everything will have to be corrected.
With guides (slugs)
Sometimes, to make the fence more solid and hold its shape better, two longitudinal guides are attached to the posts. They may be made of pipes, or they may be made of timber. Wood, as a plastic material, will withstand ground movements remarkably well, but a welded pipe will create additional difficulties.
Chain-link fence with metal guides
Yandex.RTB RA-1479455-3
The degree of rigidity of such a fence is higher, and during heaving, if the posts are squeezed out, it is quite possible that in some places the pipes may be torn off. To prevent such a situation, you will have to dig below the freezing depth in your region. Everything else remains the same: the hole is 15-20 cm deeper than required, there is crushed stone at the bottom, then a pipe is inserted and filled with well-compacted crushed stone.
Sectional
There is another design of a chain-link fence. Frames are made from the corner, onto which the mesh is then stretched. The finished sections are welded to the exposed posts.
Sectional chain-link fence
Yandex.RTB RA-1479455-8
As is clear from the description, the design is also quite rigid. This means that on heaving soils (clay, loams) it is necessary to bury the pillars 20-30 cm below the freezing depth of the soil, but it is also advisable to do this without concreting. If you fill crushed stone with concrete, the likelihood that the pillar will “squeeze out” increases many times over.
Types of mesh
Before stretching chain-link mesh onto a fence, it is important to understand its types. This material is made from galvanized and black wire, so product quality may vary.
Black wire material is quite cheap, but is short-lived and becomes rusty over time, which can happen after the first rain or fog, while after 4 years the material can become completely unusable.
You can extend the life of non-galvanized chain-link by covering it with liquid rubber or paint. This must be done before the installation of the canvases, and after that the protective layer will have to be renewed from time to time. Before you stretch the chain-link mesh onto the fence, you should also know that the material made of non-galvanized steel is not afraid of corrosion, so it is ready to last longer. This mesh is a little more expensive, but does not require processing.
Fences made of galvanized chain-link look attractive and neat. The mesh can also be classified according to the size of the cells, the height of the roll and the thickness of the wire. As for the cells, they can have dimensions ranging from 10 to 65 mm, while the wire diameter varies from 1 to 5 mm. The height of the roll can be from 0.8 to 2 m. However, the most popular material is the one whose height is 1.5 m. The standard roll length is 10 m. Rolls of 20 m can be purchased upon request. The material is more expensive the smaller the cells , because this increases the consumption of raw materials.
Types of fasteners depending on wall material
hardware for attaching plaster mesh
For installation work, use fasteners that match the base material. So nails are only suitable for working on wooden surfaces, and sometimes on brickwork. To attach a metal mesh to a metal structure, spot welding is used. For concrete and brick surfaces, self-tapping screws and dowels are used.
It is better to purchase self-tapping screws, taking into account the fact that the plaster solution is a wet environment. The best hardware is those that are not afraid of exposure to water.
Attaching a plaster mesh is not as difficult a job as installing beacons or decorative plaster. But the reliability, strength and durability of the finish depend on its quality.
Preparing for work
So, you have decided to fence your site with a chain-link fence. You should start by determining the amount of material required. To do this, you need to measure the perimeter of the fenced area. To do this correctly, you should drive small wooden stakes into the corners of the area and stretch a rope or cord between them. The length of the cord will correspond to the length of the mesh. Depending on it, you can calculate the required number of fence posts. Typically the distance between posts is from 2.5 to 3 m.
Then you need to purchase the material. In stores, chain-link is sold in rolls and has different lengths, widths and mesh sizes. The width of the material affects the height of the fence. The higher the fence you want to build, the wider the mesh you need to choose.
Materials and tools for working with chain-link mesh: cord for marking, tape measure, wire, grinder, garden auger, level, drill, metal pipes, crushed stone.
Which pillars to use
There are several options:
- Wooden pillars - made of timber or logs. The cheapest, but also the most “perishable” option. Antibacterial treatment is required before installation. The best option is a special protective impregnation. To save money, you can paint the above-ground part, and it is better to impregnate the part that will be buried with mining: immerse the pillars in a container for several hours. Before installation in the hole, you can additionally wrap this part with roofing felt. Chain-link fence on wooden posts
- Metal pillars. They can be made from a round or square pipe or a metal corner. The wall thickness is 2-3 mm, the pipe diameter is on average 50 mm, the profile section is 40-50 mm, the angle flange is 50-60 mm.
- Concrete pillars. The most inconvenient installation option: it is too difficult to attach the mesh to them, and it is difficult to install. In addition, the strength resource of reinforced concrete will not be in demand: too small loads are created by a chain-link fence.
The most convenient option of all those mentioned is a profile pipe, and preferably a rectangular one. It is easy to attach the mesh to it, and you can weld hooks or wire if necessary. If possible, install these. The optimal cross-section for a pillar is 25*40 mm or so. There is no need to take a larger cross-section - the fence is light.
The order of installation of pillars
First, the pillars are placed in the corners of the site. If you need to fence only one side, place one post at the beginning, the second at the end. Their verticality in all planes is strictly checked, and the height is adjusted. At the very top and 10 cm above ground level, two cords are pulled. The rest of the pillars are placed on them. The height is leveled along the upper cord, the lower one serves to facilitate orientation: by applying a plumb line to a point on the upper thread, you can find the place where the hole will be drilled.
Installing posts under a mesh fence
The installation step of the pillars is 2-3 meters. Less is too expensive, more is no point, the mesh will sag. When installing a grid without a guide wire, it makes sense to place posts every 2 or 2.5 meters. This makes it easier to tighten the mesh without sagging. For other models - with wire, slugs (guides) or sections - the step can be 3 m.
Example of corner post reinforcement
If the mesh is pulled between the pillars, the outer ones will bear a considerable load. To prevent them from being led away, they put up jibs. They are placed, dug in, and welded to the installed pole.
Installation of intermediate supports
A rope should be pulled between the corner posts, departing 15 cm from the ground. The line is divided into equal segments that will correspond to the width of the span. The optimal width for the fence will be a distance of 2.5 m. If this parameter is increased, the mesh will sag.
You can find out how to install it correctly and how to tension the chain-link mesh if you read the article. In place of the pegs, which are installed at the marking stage, you should drill holes for intermediate posts and prepare a cushion for them according to the method described above. To make it more convenient to control the upper edge of the supports, you can stretch a rope between the outer pillars. Now you need to install the pipes, level them vertically and in height, add soil and crushed stone, pour concrete on top and level the surface.
Installation of pillars
- Perimeter marking. To ensure that the fence is level, the cord is pulled and the location of the posts is determined. The supports must be located at even intervals of at least 2.5 m.
- Installation of fence posts. Holes 120–150 cm deep are prepared for the pillars, the bottom of the wells is filled with crushed stone and sand 10–15 cm thick.
Each layer is moistened with water and compacted. The pole is installed in the hole, checked for verticality and supported. - Mixing mortar and concreting pillars. Concrete is poured into the well and carefully compacted with a crowbar or reinforcing rod. You can start installing sections and stretching the mesh no earlier than in a week, then the composition will be strong enough.
Return to contents
Obvious advantages
Non-galvanized mesh is made of ferrous metal. Its service life is about 3 years due to its high susceptibility to corrosion. This mesh can only be used as a temporary fence. If you plan to install a permanent fence, then it should be well painted and updated every 4-5 years.
Galvanized mesh is resistant to corrosion, which is why it is in great demand. Plasticized mesh is made of metal and coated with a special polymer that increases anti-corrosion resistance.
Also, the chain-link mesh can have different shapes and cell sizes. The smaller the size, the stronger the mesh, but the less sunlight it can transmit. Most often, a mesh with a mesh size of up to 40 or 50 mm is stretched - through such holes, at a standard height of the fence, neither animals nor people will be able to enter the area.
What does the market offer?
In the modern construction market today there are three types of chain-link, differing in material:
- A black wire chain-link can last no more than three years. Moreover, already on the fourth day after its installation, rust may already appear. Such a fence is often installed as temporary with the prospect that in the future a fence will be erected from a different material. If such a grid is left, then it will need to be renewed with paint every five years.
- The galvanized analogue of ferrous metal mesh is completely resistant to corrosion, which is why it is considered more popular.
- Another type of mesh made from chain-link is plasticized. It is also made of metal wire, but coated with a polymer, which has a protective effect against corrosion. In appearance, it is much more aesthetically pleasing than the previous two types and is not at all afraid of moisture. This material appeared on the domestic construction market not so long ago and is already very popular in summer cottages.
Advantages of galvanized mesh
They produce galvanized mesh from metal wire. Its rods are arranged perpendicularly and are fastened at the connection points by welding. The cells of the welded mesh are made rectangular, square, less often diamond-shaped, trapezoidal or other shapes.
The wire for the mesh is galvanized or with an additional polymer coating. Fencing made of welded galvanized mesh has its advantages:
- Affordable price;
- Simple and quick installation of the mesh can be done with your own hands;
- Light weight, does not require foundation construction;
- Transparency and good visibility allow it to be used at protected sites;
Fence design made of galvanized mesh and metal corners