Hi all! You can write a very long article about how to drill metal with a drill if you wish. But I see two main problems here:
- inability to drill accurately in the place where the hole is required
- rapid dulling of drills
Typically, inexperienced users encounter such problems. Experienced men know what to do in such cases. Well, considering myself an experienced person, I will take the liberty of telling you how to cope with these problems. Well, I’ll also give you some tips that will also come in handy.
How to drill in the right place?
If you think about this question a little, the answer should come to your mind even without a hint. Well, at least it seems so to me. But if you don’t want to think, then read.
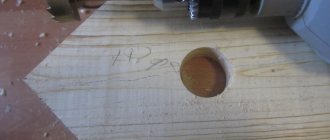
For this case you will need a core. This is a tool made of durable steel, having a cylindrical shape and a point at the end.
We place the tip at the desired drilling location and hit the roll on the other side with a hammer several times.
Now that you have finished drilling, place a drill on the surface of the roughness and start drilling - the tip will not run away anywhere.
Safety precautions
Basic safety rules when drilling concrete walls:
- When using diamond tools, wear protective clothing for the operator. The protection kit includes goggles to prevent fine dust from getting into your eyes.
- It is prohibited to drop the working tool and strike it. Before drilling into concrete, the reliability of the tool’s fixation in the chuck is checked.
- Local legal requirements must be taken into account when carrying out repair work. For example, in Moscow it is allowed to carry out repairs in residential premises from 09-00 to 13-00 and from 15-00 to 19-00.
Since electrical cables are laid in the walls, all work is carried out after the power supply in the room is turned off. Power to the instrument is supplied from a separate outlet connected to the distribution board. When using a water-cooled tool, ensure that no liquid gets into the electrical connectors.
How to avoid dulling drills?
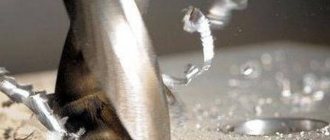
Metal drills become dull if they get too hot during operation, causing them to lose their strength. Heating occurs due to friction. Moreover, the faster it spins, the more it heats up.
Hence the obvious rule - you need to drill at low drill speeds. They should be no more than 1000 per minute. But who will measure this during work? So just don't press the start button all the way. The correct speed can be assessed as follows: the eye should see the rotation of the drill. That is, the grooves on it should not merge into one for vision.
When working with thick workpieces, additional cooling is necessary. It is provided by special lubricants or pastes that are added to the drilling site, or the drill is dipped into them. In addition, they not only cool, but also lubricate the tip, resulting in less friction.
In domestic conditions there is no need to have special lubricants and pastes. You can get by with regular machine oil.
So, use a core, drill low and add some lube or oil and this job will be a cakewalk.
Well, a few more tips on this topic.
How to choose a drill
Safety
In terms of electrical safety, commercially available power tools belong to class II: double working insulation, use without additional grounding is permissible, i.e. Such a drill can be plugged into a regular, non-European socket through an adapter. At “iron bazaars” you can find class I (“industrial”) tools with a grounding terminal on a metal body. It is dangerous to use it in everyday life, and its chuck is most often used for a drill with a conical shank (Morse taper), unsuitable for rotary impact drilling. Therefore, do not buy such a drill, even if it is powerful and inexpensive.
Class I is indicated on the nameplate of the drill, and if there is no designation, the body is partially or completely plastic, and the cord with a Euro plug is a class II tool. Class III - a power tool with an operating voltage of up to 42 V (low voltage) can be recognized by the class designation on the nameplate and by a special plug with flat crosswise contacts. It is suitable for home use, but inconvenient: you need a powerful step-down transformer.
For protection against foreign objects and moisture, power tools and equipment are marked with the letters IP (Ingress Protection) with two numbers after them: the first - from foreign objects, the second - from moisture. If the protection for any position is zero, the letter X is placed instead of the corresponding number. Thus, an IP32 drill can be used outdoors in good weather; IPХ2 - only inside, IP34 - outside in fog and drizzling rain, and IP68 can work during the Samum in the Sahara and under water.
Important: the first number 2 means that the device is finger-resistant; for example, a household socket has a degree of protection of IP22. But this in no way means that if you grab a drill chuck with the same degree of protection with your hand while working, it will stop on its own. The IP standard is not fool proof.
Cartridge
The regular three-jaw chuck is accurate and good at rotary drilling. When using a rotary impact drill, it quickly becomes loose, and the chuck itself loses accuracy and may completely fail: the threaded race of the cam mechanism bursts. For work on hard, brittle materials, the three-jaw chuck is suitable for occasional use or with a diamond working body in rotation-only mode.
In a quick-release chuck (you can recognize it by its corrugated plastic collar), the drill is clamped by a collet. Such a chuck holds the drill better during impact-rotary drilling, but is less accurate and is of little use for delicate work. Powerful drills are equipped with a two-sleeve collet chuck - clamping and loosening are carried out by different rings.
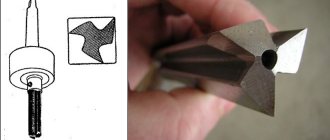
The SDS cartridge (Steck-Dreh-Sitzt, German “inserted-turned-sits” or Special Direct System, special direct system, English) was invented by Bosh. SDS is ideal for construction work: the system of shaped grooves, see figure, absolutely securely fixes the working element according to the principle of a Chinese puzzle; replacing the drill is done with just two light movements.
Unfortunately, SDS is not suitable for metalworking and carpentry: the centering accuracy of the drill is insufficient. An adapter from a three-jaw chuck to an SDS makes no sense: it will become loose from vibration, just like a regular drill. Therefore, the SDS drill is incompatible with the conventional working tool fit.
Note: SDS fit comes in three types: SDS+, SDS Top and SDS Max. SDS Top is rarely used, as an intermediate and generally unsuccessful option; SDS+ is designed for one-handed tools weighing up to 5 kg; SDS Max – for heavy two-handed.
Power and speed
When buying a rotary impact drill for general work, you don’t need to skimp on power. Power reserve is needed to create the required torque at low speeds. The external characteristics of a series-excited commutator motor used in drills are close to ideal, but the low-power motor overheats at low speeds due to high current. It is also advisable to purchase, if not included, a front slip handle.
The maximum speed of the drill is also important. The diamond tool is literally “eaten up” before our eyes at a rotation speed of less than 1600-1700 rpm; its normal operating speed is from 2500 rpm. Carbide tools require at least 1500 rpm. If you come across a drill at 600-1200 rpm, this is a special tool, unsuitable for general-purpose work.
For precision work on metal, a simple, rotation-only, low-power drill - 120-200 W - is best suited. A stand that turns the drill into a tabletop drilling machine will be very useful. And if you also fork out money for a rotary table for the bed, then you can mill small parts with a dental bur.
Mains or battery?
A home craftsman needs a cordless drill in two cases:
- If you work on the side, this is your more or less regular extra income.
- If you have a non-electrified cottage or garage.
In any case, an expensive professional drill with a lithium battery and a charging time of 10-20 minutes is unlikely to pay for itself. This is an option for professionals who work full shifts day after day. A regular alkaline battery, charged in 4-8 hours, will suit you. In extreme cases, you can “pump it up” to a hole or two in half an hour.
Section summary
All of the above can be reduced to the following recommendations:
- Regular construction work, including metal structures - you need a hammer drill and an impact drill of 350 W or higher.
- Occasional household work – rotary impact drill from 250 W.
- For precision drilling - an additional precision drill for rotary drilling at 120-150 W; preferably with a frame.
Drill types
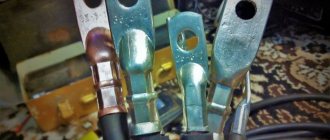
For drilling, use only metal drills (not wood, for example). They have their own sharpening and are made from certain types of steel. The most common ones are marked P6M5 - this is high-speed steel, which foreign manufacturers label as HSS.
To provide additional strength, the above drill bits are coated with titanium nitride. That's why they are yellow.
There are also stronger P18, which are used respectively for hard steels.
Also, to increase strength, cobalt can be added, and then the marking P6M5K5 is obtained.
Well, the most durable ones are drills with carbide tips. They are used for drilling alloy steels. It will also take ordinary steel, but buying it just for this will be somewhat savvy, since the price for them is quite high, and although it is hard, it still dulls. But it will be difficult to sharpen it later, since this requires a diamond blade, which is also not very cheap, and you can’t buy it everywhere.
What and how to drill
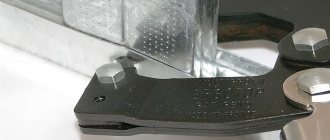
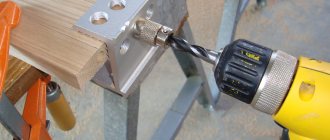
Whenever drilling, the hole locations must be marked. For metal this is done with a center punch, and for glass, ceramics and stone - either with a special diamond center punch, or with half a pobedit roller from an old glass cutter, clamped into a homemade holder. Marking (more precisely, scratching with rotation) hole marks in fragile hard materials must be done manually. Now let's move directly to drilling technology.
Steel, brass, bronze, massive duralumin
Drilling of metal of normal viscosity is carried out at medium drill speeds, 400-1000 rpm depending on the hole diameter: 400 revolutions - with a maximum drill diameter of 13 mm for a conventional drill; 1000 – with a diameter of 3 mm. For smaller diameters, the speed is again reduced to the same 400 rpm for 1 mm.
We mean maximum speed at idle. During the drilling process, the regulator itself will reduce them according to the tool feed, i.e. according to how hard you lean on it. Selecting the feed when manual drilling by weight requires a certain skill: if the feed is too low, crumbs will form, the hole will end up with uneven walls. And from the same crumbs the drill will overheat and quickly become dull.
If the feed is excessive, so-called drain chips will form - thick, curling in a spiral. The result is the same. To develop the feeding skill faster, you need to drill even small holes with both hands, with a cap handle. The chips should be thin and fragile. For steels 42 and 44 (regular structural steels), chips with a bluish tarnish color are acceptable.
Bronze and some types of duralumin require special attention: they do not produce flush chips at all, and duralumin sharply loses strength when heated above 160 degrees. It is permissible to monitor bronze by its tarnish: its appearance is undesirable. The duralumin needs to be cooled with liquid machine oil: if it boils, you need to press it lightly.
You can set the idle speed by clicking the regulator. If the drill is at 2800 rpm, and the regulator gives 14 clicks from edge to edge, then 1 click is 200 rpm. The adjusting characteristic of the regulator is not always linear, so you need to carefully monitor the drilling process and then make the necessary correction: know at what clicks of this particular tool you need to drill a given material.
Note: When drilling steel and brass, no lube is needed, it will only prevent proper chips from forming.
Sheet metal
For the same materials, but sheet materials, so that drilling does not lead to bending of the sheet, two methods can be recommended:
- When drilling from the bed, give more revolutions, up to 1500-2000, and quickly “pierce” the sheet, which should lie on a wooden pad. To prevent the sheet from turning and injuring you, it must be secured with nails driven into the cushion at its edges, or pressed to the table with a clamp; better - two.
- When drilling by weight, as soon as you feel increased resistance to feed (this means that the drill is about to come out), you need to drill a hole on the other side, pressing the “pimples” inside with a center punch.
But a radical way to get a wide hole in a thin sheet of metal with a regular drill is to first drill a hole with a diameter equal to the thickness of the sheet, then in one or three steps expand it to the diameter of the required hole minus double the thickness of the metal, and drill cleanly. Each subsequent hole should be wider than the previous one by twice the thickness of the metal. The maximum permissible diameter is 5-6 metal thicknesses. That is, in a 2 mm sheet you can drill a hole with a diameter of 13 mm, and it will be round, and not like a triangle with heavily smoothed corners.
Aluminum
Aluminum is a soft metal, very viscous and fusible: its melting point is only 660 degrees. Because of this, when drilling, it may melt on the cutting edge, the hole will spread out, its edges will bulge and the drill will bite. Therefore, when drilling aluminum, the speed should be one and a half times less than for other metals, cool the drill with liquid machine oil, emulsion or water, and feed the tool little by little, without interference.
The drill bit for aluminum must be sharp, factory sharpened or sharpened on a special machine. Hand-sharpened drills are not suitable for aluminum.
Stainless steel
Stainless steel is drilled in the same way as structural steel, but with a solid carbide drill bit sharpened for metal. Such drills are very fragile, so the tool must be fed easily and without the slightest distortion. It is best to drill with a low-power precision drill in a stand.
Wood, MDF and plastic
Industrial wood is drilled with a twist drill or a feather drill, sharpened to look like wood. Dense woods (oak, beech, walnut) can be drilled with a core bit and a centering drill. Drill revolutions are 400-600 for a twist drill and 200-500 for feathers and crowns.
Drilling of plastic windows, MDF, plastic tiles and polished wood is done either with a special wood drill (with shaped sharpening and a centering threaded cone) or with solid feather drills. In the latter case, a centering hole of 3-5 mm is drilled in advance; it can be drilled with a regular drill. Turnovers are the same as for industrial wood; The feed is easy, without pressure.
Concrete and reinforced concrete
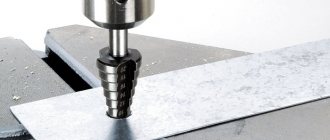
Drilling of concrete is carried out using special drills for concrete with a super-hard solder or liner, using a rotary impact method at medium or 2/3 of the maximum speed of the drill. The best option is an SDS drill. If reinforced concrete is drilled, then the drill hitting the reinforcement most often leads to its damage: the hard tip gets chipped. Therefore, before drilling reinforced concrete, it is highly advisable to determine the location of the reinforcement using a reinforcement detector; This device works on the principle of a metal detector.
Drilling holes in the walls for socket boxes is done with a crown for stone (for brick walls) or concrete, with the same precautions in the case of reinforced concrete. If the hole is drilled with a crown without a centering drill, then it is applied tightly, without distortion, to the wall, pressed, and with sharp, quick pressure, turn on the drill.
There is a special tool and technology for through-drilling walls, but this is the subject of a separate description.
Ceramics and stone
How to drill tiles is, without exaggeration, a whole science. The material is decorative; chipping of the edges of the hole is unacceptable. They drill into already laid tiles, so cracking is also unacceptable. The drill can easily slip on a smooth surface, which is again unacceptable. Drilling - only by rotation.
Drilling ceramic tiles is done as follows:
- A hole with a diameter larger than the thickness of the centering drill web is punched manually with a diamond or carbide center punch; its diameter is 2.5-3 mm. When drilling a large diameter hole, the diameter of the centering drill should be equal to the diameter of the centering rod of the compass drill.
- A centering hole is drilled using a concrete drill. When drilling holes for dowels up to 6 mm, you can immediately drill clean.
- Using a concrete finishing drill, the hole is finally drilled.
Porcelain tiles are drilled in the same way as ceramic tiles. Drill speed is maximum, except for drilling with a circular drill; serving – light, minimal. It is advisable to ensure continuous cooling of the working area with water. You cannot cool the tiles with oil - when heated, it can ruin the decorative surface.
Drilling ceramics with a circular drill requires special care and steady hands: misalignment is unacceptable, and the drill is not balanced. Even experienced workers need to drill with a cetrobur with both hands, placing the front handle on the drill. The revolutions are higher, but not more than 900, because with large ones, an unbalanced drill will break the hole and chip off its edges.
Working with some types of metal
- When drilling into thick aluminum pieces, chips often clog the drill channels, making it more difficult to rotate. Therefore, when working with such material, remove the drill from the recess more often and remove the chips. Well, don’t forget to pour plenty of oil on it.
- If you need to drill black cast iron, then you do not need to add any lubricating and cooling substances, since it drills very well even dry
- Unlike black cast iron, white cast iron has increased strength, which means strong drills and lubricants are required to process it.
These are the basic rules for drilling metal with a drill. I hope I was able to bridge this gap in your knowledge. Good luck with your homework and see you soon!
Drilling wood
Drilling a large hole in a board at home is a very difficult task, because the shank of a large drill cannot be clamped in the chuck of a hand drill. A hole with a diameter of 15 to 40 mm can be made using a simple device consisting of a metal rod and a piece of hacksaw blade of the required size. Its cutting edges are sharpened at an angle of 45 degrees, inserted into a longitudinal slot previously made in the rod, and soldered or fixed with a wedge, which is driven into the slot.
An experienced person will never begin to drill into a round log before he has secured it securely. He knows that without taking precautions, he most likely will not be able to drill a hole exactly along the intended path, and besides, he may lose the drill.
Place a 1.5-2 cm long spring between the handle and the “runner” of a hand drill for wood, and even with sudden movements of the “runner”, a finger that accidentally ends up between it and the handle will not get pinched.
When drilling a large diameter hole (20-30 mm) in wood, you may not have the required drill or perk. In this case, first drill a hole of a smaller diameter, and then insert a flat steel washer (preferably a new one) into the rotor chuck and go through the hole again. This method is also applicable for countersinking holes.
If you need to drill a lot of holes at right angles in wooden parts, then take a cube of hard wood and drill a reference hole in it with great accuracy. And then use this conductor in your work. The cube placed on the drill will also serve as a drilling depth limiter.
A capsule cap from lemonade or beer is quite a good substitute for a drill; when you need to drill compass needles in a wood holder, you will reduce the risk of breaking it when there is a hole with a diameter of about 20 mm in a fibrous material or plaster. Pierce the plug, place it on the bolt, secure with two lock nuts, and drill.
It is difficult to make a hole in laminated plywood, it splits. Take a steel tube of the required diameter, sharpen the cutting edge inside with a round file and cut teeth on it with a triangular file. Inside the tube, insert a wooden cylinder with a nail without a head. During operation, the end of the nail protruding 1-2 mm serves as a guide.
To prevent them from spinning when drilling small parts made of sheet material, we recommend placing sandpaper under them.
If you attach a drill with a diameter of 0.8-1.1 mm, you will drill small-diameter holes in wood, textolite, and plastic.
There are quite a few devices for cutting large diameter holes in sheet material - plastic, plywood, chipboard, etc. You can use the design: a bracket is bent from a strip of steel 2-3 mm thick, its ends are ground in, and a hole is drilled in the center, then the bracket is put on a bolt with a pre-sawed off head. To operate, the device is clamped in the chuck of an electric drill.
You can cut a large hole in sheet material in a simple way: hold a nail in a vice (it will serve as an axis) and a piece of a drill (this will be a cutter). The circle is cut by rotating the sheet around its axis.
A circle of any diameter from plywood can be cut accurately, accurately and quickly using a wooden strip and two pointed nails driven into the strip.
The pencil sharpener bit (sold separately) can be successfully used for boring holes in wood and plastic. It is fixed in the chuck of an electric drill and the edges of the hole are processed.
A potato peeler in the hands of a craftsman is an almost ready-made tool for processing round holes in plywood. You just need to sharpen its cutting edge.
When drilling a board or plywood, remove the burrs at the same time, for which you string several rings of thick felt onto the drill.
Drill fixation mechanism
It is difficult to perform tasks using a drill that is inserted incorrectly.
It may fly out or break, then the hole in the surface will turn out crooked.
The drill is equipped with a jaw chuck.
This means that the adjusting ring moves along the surface of the hollow cylinder. The chuck is attached to the drill shaft using a base with a threaded or tapered hole.
How to insert a drill correctly
To properly secure the equipment, you need to know some nuances. The hole, which acts as a clamping device, has a depth of 2 cm. The deeper you can push the drill inside, the more securely and firmly it will be fixed.
Standard drills have one of two types of clamping mechanisms:
- Manual - it must be tightened by hand;
- Key - fastening occurs using a key.
Modern drills are equipped with a quick-release (manual) chuck. It has a simpler device and quickly fixes the drill.
To secure the equipment in the chuck, they work according to the following scheme:
- In a stationary position, the chuck jaws are connected. The adjusting ring is turned counterclockwise by hand. This is done until the cams are completely separated. The distance will be slightly larger than the size of a standard drill;
- The drill is then inserted as deep as possible. For precise fastening, its diameter should be in the range from 2 to 13 mm;
- To tighten the drill, the adjusting ring is turned in the opposite direction;
- Now a special key should be inserted into the hole on the cartridge. The teeth on it should close with those located on the instrument;
- The key is turned clockwise with little effort until it stops. If the chuck has several holes for the key, you should gradually turn it in all of them so that the clamp is uniform.
Less common is a quick-release mechanism that should be locked without using a key. It can be with one or two sleeves for adjustment and anti-slip notches. If one sleeve is used, the device must be kept stationary. If there are two sleeves, then only the part fixed to the spindle does not move. The moving part should be turned clockwise by hand.
How to remove a drill from a chuck
Before removing the attachment, make sure that the drill is not plugged into an outlet. If the tool is powered by a battery, you need to eliminate the possibility of accidentally pressing the start button.
If the device of the tool requires a chuck with a key, proceed as follows:
- The drill turns off, the chuck stops completely;
- The key is placed in the chuck hole;
- The key is turned counterclockwise to move the chuck;
- The cartridge is unscrewed by hand, at which time the jaws move apart;
- The drill is removed;
- The key is placed in a pocket or other convenient place. Often, craftsmen glue a piece of electrical tape to the drill wire to hold the key.
Please be aware that the attachment and chuck become hot when rotated. Therefore, you should not grab them with bare hands, it is better to use gloves when you want to change the drill.
How to remove a drill from a drill without a key
Some drills use a keyless chuck. If removing the attachments does not involve using a wrench, proceed as follows:
- Release the power button;
- Wait until the rotating chuck comes to a complete stop;
- Take the drill chuck with one hand and turn it counterclockwise with the other;
- Pull out the nozzle with your hands after the chuck jaws move apart;
- Place the nozzle in a visible place so as not to accidentally lose it or step on, for example, a table.
You cannot start pulling out the equipment until the chuck has completely stopped after turning off. It is also prohibited to stop the cartridge with your hands, as this may cause serious injury.
Keep two sets of drills
Some pros rely on a new set of drill bits just to start drilling, then replace the old one and continue drilling.
Follow us on Pinterest for more interesting articles.
Useful short videos from Make-Self.net
Basic tools for drilling aluminum
Drilling is used to obtain holes for:
The necessary tools are an electric drill and drills. The electric drill is installed in a drill stand. Basically, low and medium speeds from 500 to 1000 rpm are used for drilling metals. The use of high speeds leads to heating of the drill, and its annealing or softening may occur. There is no need to apply strong pressure when working. The feed should be slow and smooth.
Twist drill bits for drills are manufactured:
- made of tool steel;
- coated with hard alloy;
- solid carbide;
- with carbide insert.
They are used for all work on all kinds of materials.
Conclusions on selecting a drill for dowels
To choose the right type, diameter and length of dowels, you need to know the following:
- What material is the supporting structure?
- What is the load on the fastening element?
- What is the mounting location: vertical or horizontal?
- What is the depth of the future hole?
- How deep will the screw go?
By answering these questions, you can decide what type and size of fastener is suitable for a particular task. And the markings will tell you how to choose the right drill.
In our company you can purchase high-quality dowels in bulk from a direct manufacturer. To place an order, call us or leave a request in the form on the website.
How to drill a wall
How do they drill into walls? This is the question most often asked by novice craftsmen. The simplest solution is household drills and even screwdrivers. If you have a hammer drill, however, you should use it. But if you approach the issue professionally, it is better to use drilling rigs, which are either hydraulic or electric. As for consumables, this includes crowns and drills.
Drill selection
You can drill into the wall with a regular drill. But if you are just planning to purchase it, you need to take advantage of the large selection in the store. Models of this equipment are:
- mechanical;
- pneumatic;
- electric.
Devices can also be classified by the presence or absence of a shock option. If the impact mode is present, with the help of such a device you can make holes even in particularly strong concrete. At the time of purchase, it is still better to incline your choice to this particular model, since it is distinguished by its versatility.
Also pay attention to the presence of a speed regulator. This will allow you to select the number of revolutions. If you plan to carry out drilling at a professional level, you should select a tool with an additional handle. This will relieve the master's back and make the process faster.
Drill selection
In order to drill a wall and achieve a positive result, you should also choose the right drill. When the diameter varies from 4 to 10 mm, and you plan to install a dowel, you should choose a drill or equipment with a cylindrical shank. When the diameter is larger, but does not exceed 42 mm, SDS-plus or -max shanks are suitable.
Attention! If, when drilling a wall, you need to make holes of impressive diameter, you should first use small equipment, and you will have to work in several approaches. This will eliminate the risk of damaging the large drill bit and will ensure a smooth edge to the hole.
Main functions
The drill is designed for drilling holes in various surfaces.
The instrument was invented by Wilhelm Fein in 1895. The plastic case of the product contains the following parts:
- Electrical engine;
- Start button;
- Gearbox;
- Reverse;
- Capacitor;
- Retainer;
- Impact mechanism.
Using threads and a screw to secure it, a chuck is attached to the drill spindle to hold the bit. The equipment, which is used to perform various jobs, can rotate both clockwise and counterclockwise. This is done thanks to reverse. Its use is permitted only when inserting the nozzle into the surface and unscrewing the screws. You can run it for a short time at low speed.
Drill operating modes
Previously, to make holes in surfaces, you had to hit them with a bolt. Nowadays this kind of work can be done quickly using a drill with the correct settings. It has two main operating procedures:
- Unstressed. The mode is intended for performing metalwork or carpentry work.
- Shock. Used on concrete, stone or brick surfaces. At the same time, the drill rotates around its axis and makes translational movements.
Each task has its own speed limits. They are manually adjusted in two ways.
Ways to adjust the speed of the drill:
- Mechanical. On the tool itself there is a scale on which you can set the required speed. If it decreases for any reason, then the torque element increases. The output power does not change even when performing heavy loads. The speed can be changed while the drill is operating.
- Electronic. When using it, the speeds are regulated using a built-in rheostat. If a person presses the corresponding button weakly, the speed remains low. The greater the force that is applied to the drill button, the higher the speed rises (up to the set limit). To limit the extreme position, a wheel on a button is often used. When using this control method, the output power is reduced.
You should not select a nozzle rotation speed or operating mode that does not comply with the recommendations in the technical manual for the device. Each material and type of work has its own standards, and they should be followed.
Preparing for work
Proper preparation should be made before starting work. To determine whether a tool is ready to perform tasks, there are several conditions:
- When the drill is started using the power cord, it must be connected to the mains;
- If it operates using a battery, it must be connected and charged;
- A drill is inserted and fixed inside the drill.
Important! To obtain a straight hole, the working side of the nozzle should be as sharp as possible. Therefore, to use the tool, you should take new attachments, or sharpen blunt equipment with a grindstone.
To check the functionality of the drill, you need to click on the power button. If the chuck rotates fast enough, there is enough charge and you can start working. If it rotates very slowly, then the battery is discharged and needs to be recharged.
Tips for drilling
If it is necessary to make many holes in metal, there is a possibility of overheating and dulling of a drill made of any metal. To avoid this, periodically during the drilling process it is necessary to lower the drill into a container filled with machine oil, or used oil. This will prevent it from overheating and will greatly facilitate the drilling process.
Using this simple technique, it is possible to drill many holes with just one drill, which shows no signs of wear throughout the entire work and after. The disadvantage of this method is the splashing of lubricating oil. However, you can solve the problem by drilling through paper or a plastic bag.
Our company is ready to perform aluminum drilling work to order.