Today, chain-link is produced from polymers, steel and stainless steel. All types of materials have their own advantages and disadvantages. Galvanized steel mesh is considered the most durable. If installed correctly, it can last more than 20 years. If you are installing a temporary fence, you can purchase a less expensive vinyl chain link fence. In addition, a fence made of this material will be ideal for mounting on a non-concrete base, as it is light in weight.
Step-by-step mesh installation
You can install a fence from a regular chain-link mesh with your own hands without guides without special equipment, especially if you use ready-made elements for installation and tension. For quick installation, it is recommended to purchase all fasteners in advance.
By guides
Chain-link fences along guides are installed in two stages:
- Guides are installed.
- A polymer mesh is being installed.
First, we install guides on the posts. Preliminary fixation is carried out with mounting wire, then the guides are welded by electric welding.
Then, using plastic clamps, the canvas is gradually lifted and fixed on the fence. The final tension and fixation with wire or a metal strip is done afterwards and secured by electric welding. The plastic mesh on the guides is fixed only with wire or special clamps.
Without guides
A fence without guides, tensioned with a cable or wire, is suitable as a temporary barrier or for a summer cottage. Installation is carried out on installed supports with mounting clamps. The work is carried out in the following order:
- The canvas is laid out along the entire length of the installation segment.
- The cable or wire is pulled along a template over a distance of one span.
- The ends of the cable are fixed to the support post.
- One edge of the canvas is secured to the pole with plastic clips.
- On the second pole, the lower cable is first secured and tensioned, then the upper cable.
- Having reached the corner post, the cable is threaded so that the plastic mesh goes around the post from the outside, and the tensioners and clamps are on the inside to connect to another segment.
- The final stretching and fixation of the entire length of the segment is carried out.
The video below will help you look at the DIY installation process in more detail.
Installation in sections
The fencing in the frame of the sections is installed on already concreted supports. Installation is carried out using templates and special holders that fix the section on the pole.
It is better to install on corners pre-welded to the posts or special brackets for bolted connections. Prefabricated screw piles and bolts allow, if necessary, to dismantle the fence at the lowest cost.
The work order is as follows:
- The section is lifted and pre-fixed in a vertical position to wooden or iron supports.
- The bolts are installed in the mounting holes and lightly tightened with nuts.
- The frame lines are aligned with the level.
- Final fixation is carried out.
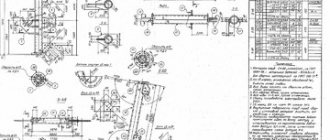
Sectional fence installation diagram
Final finishing - decoration, photo
A fence built with your own hands using chain-link mesh has a neat appearance, but nothing more. Over time, the desire arises to somehow decorate it. You don't have to be an artist or designer to do this. It is enough to show your imagination, and your fence will become a piece of art.
The easiest way to transform a fence is to plant climbing plants next to it. In a few months, your fence will turn into a flowering wall. The pillars can be decorated with clay pots, this will give the fence ethnic beauty.
Fence cells can be turned into canvas for embroidery. Just like drawing on a canvas, you can weave beautiful patterns with your own hands. For this you will need wire. If you use colored twine, then with its variety of colors and shades you can create three-dimensional images.
Recently, it has become popular to decorate the fence with a photo grid. The drawing can be absolutely anything. The peculiarity of this material is that from a distance a continuous pattern is visible, but in fact it consists of a fine polymer mesh, which is perfectly ventilated.
Wire resembling lace is an interesting option for those who have nothing to hide. Painted roses look elegant. The main thing is that the design on the photo grid matches the landscape. Wide grape leaves will decorate and hide the area from prying eyes
How and with what to close the fence from neighbors: options with photographs
Since a chain-link fence is completely transparent, any home owner will want to hide it from prying eyes. It is not advisable to cover it with any shields or boards.
The easiest way is to cover the fence with camouflage netting. Visibility through the fence will be much less, but the appearance will also be unattractive.
You can cover the fence with reed mats. This method is more expensive than the previous one. Attaching them is not difficult; you just need to unwind the roll and secure it in several places with wire.
A similar option is to use artificial pine needles. This material is sold in rolls. It is used in making wreaths and baskets, but it can also be used for fencing.
A fence that is covered with a camouflage net looks aesthetically pleasing only if you are in a paintball zone Rolls of reeds are a more expensive option
The use of artificial needles looks original
Materials, tools and calculations
So, to get started, you will need:
- poles (metal, wooden logs, asbestos-cement poles)
- Rabitz
- wire 2-3mm thick
To avoid unnecessary costs, try to calculate the required amount of material as accurately as possible. For this:
- Drive in pegs along the entire perimeter of the future fence and stretch the cable through them; - measure the length of the tensioned cable to find out the perimeter (this is how much mesh you will need to buy)
- divide the length of the perimeter into intervals of 2.5-3 meters
- the resulting number is equal to the required number of future pillars
Choosing pillars
It is very important to decide on the optimal material for your fence posts. Wooden poles are short-lived. However, they are much easier and cheaper to buy. Metal poles are the best option
Such a support will be better than others combined with a chain-link fence, as it is strong enough and not too massive.
In addition, metal poles are very convenient to use: they can be easily painted and repainted in any suitable color. Asbestos-cement pillars are good only if you already have them.
The fact is that specifically purchasing a super-heavy material made of cement for a fairly light mesh fence is not entirely profitable or reasonable. To attach the mesh to any type of posts, you need to attach hooks to them.
Choosing a chain-link mesh
To begin with, decide on your preferred fence width and the ultimate purpose of its purpose. Let's say you want to install a fence for chickens, then the mesh cells should be chosen smaller so that curious chicks do not “leak” through them at any time.
When deciding on the material from which the chain-link mesh is made, you need to know that: black mesh is for temporary use; galvanized - for longer operation, since its polymer coating has high anti-corrosion resistance, in addition, its appearance looks very aesthetically pleasing.
Installing pillars
To install the posts correctly, you need to dig holes of the appropriate depth for them. Namely, the depth of the pit should be approximately 1/3 of the height of the fence. Accordingly, if you plan to build a fence 1.5 meters high, the depth of the hole will be 50 cm.
To prevent subsequent subsidence of the pillars, sand and crushed stone must be placed at the bottom of each hole, compacting them thoroughly. Only after this, a pole is installed in the hole, which is gradually filled with soil and compacted. Using metal posts to support the fence, it is better to concrete them.
Stretch the mesh
The process of installing a chain-link fence is as follows. Start by connecting individual pieces of mesh: “unscrewing” the outer wire, “screwing” it back, while grabbing the second piece.
For metal ones - with wire. But the optimal option for attaching a chain-link mesh still remains special hooks. If you prefer a black chain-link mesh for the fence, which does not have anti-corrosion properties, secure it 10 cm above the ground to avoid too rapid damage to the product. After securing the mesh to the first post, gradually unwinding the roll, attach it to each subsequent support in a similar way.
To prevent subsequent sagging of the mesh, tighten it as tightly as possible. To be sure, you can stretch a strong wire at the upper and lower edges of the fence, each end of which is then attached to the posts. Also, for better tension, you can use horizontal beams between the pillars.
How to attach a chain-link mesh: a review of the best methods
Fencing is a mandatory attribute of a personal garden and summer cottage. Some owners choose to build a permanent fence, while others, on the contrary, do not want to shade the plants on the territory, so they prefer to install lightweight structures - mesh ones.
This solution has quite a few advantages over solid walls, not the least of which is the strength of a metal wire fence along with ease of installation. You don't need to be a jack of all trades: just have or find the right material, and then learn how to attach the chain-link mesh to ensure its ideal tension.
There are even several methods; the owner will only have to choose the one that is more convenient in terms of work, the one that will be as reliable as possible.
Types of chain-link mesh, its characteristics
The very name “grid” does not allow much imagination to run wild. Chain-linking is made by screwing wire spirals into each other. Cells can be strictly rectangular or rhombic, in which the upper and lower angles are equal to 60°.
Their size (the accepted value is the distance between the opposite corners of the cell) also varies: it can be 10-100 mm, but for fences the numbers are different - 40-50 mm.
Smaller size is synonymous with greater reliability, which means its cost is also the highest.
Such unpretentious material is convenient, even when it comes to transportation: it is transported in rolls that do not take up much space. The range of products is not too large, but everyone will find an option for themselves: both in price and in quality. The chain-link mesh is:
- Simple - non-galvanized, short-lived. After installation, such material needs a protective coating - paint (liquid rubber), otherwise soon - after the first rain or fog - the mesh will rust, and after a few years it will have to be thrown away.
- Galvanized. This chain-link is not afraid of corrosion, so its service life is quite long. Fences with zinc coating look more attractive, but for this beauty, coupled with reliability, you will have to pay a little more.
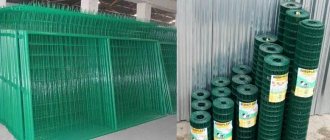
- Plasticized, coated with an anti-corrosion polymer - polyvinyl chloride with additives. Plastic shells have different colors (green, red, gray, blue, black), which owners can choose at their discretion. This super-protected chain-link is the most reliable product, which is why it has the highest price. However, this drawback does not prevent its popularity from growing.
These differences do not affect the way it is attached. Installation of any type of mesh is done in the same way. There is another variety - plastic, but it is not suitable for serious fencing. The exception is the use of polymer material on the border with neighbors, but only with friendly ones.
The secret of her attractiveness
Chain-link mesh is in constant demand among buyers. The reason is the strength, reliability of the fence, availability of the material, and its low cost. For some, the following advantages of the material are also important:
- does not interfere with the penetration of air and sunlight necessary for plants;
- gives a feeling of spaciousness and overview to those who do not want to close themselves off from everyone and everything;
- promises relative ease of fence installation even for a non-professional;
- does not require special care, but only if a quality product is purchased;
- allows owners to decorate the fence with climbing plants.
Chain-link has some disadvantages. This:
- fragility if the most budget type of mesh is purchased;
- low degree of protection from “criminal talents”;
- not a very pretty look.
For some, these disadvantages will be significant. Other people's point of view will be exactly the opposite.
How to choose a quality mesh?
To buy a reliable product, you need to carefully examine each of the rolls. You can hope for a successful purchase if their edges are not curved, and the cells located above and below have curved tails that extend further than half the length of the side of the cell. This product will greatly facilitate installation work.
Same wire thickness, cell evenness are other important indicators. All deformations indicate one thing - the low quality of the product. When purchasing plasticized mesh, you need to inquire about its warranty period.
Unscrupulous manufacturers offer chain-links covered with ordinary plastic. Such a product will begin to crumble after a few seasons. Buying a cheap product in any case becomes a “good” chance of running into a fake.
A high-quality coating can stay on the mesh for 10 years or more.
Design options, installation methods
A chain-link fence is a lightweight structure in every sense. Due to its low weight and the fact that wind loads are not dangerous to it. The last fact is the basis that allows us not to put forward increased demands on the supporting elements, since the pressure on them even in a strong (hurricane) wind will be insignificant.
It’s not for nothing that the methods for installing a chain-link fence are called simple: a concrete foundation is not needed in this case. The pillars are installed in dug holes, then covered with sand or crushed stone.
Such a fence can be installed without fear on any problematic soils: where the freezing depth is shallow, on clayey heaving soils, where the groundwater level is also high.
Installation is done in several ways: without guides, with them, sectional.
Without guides
This design is the most elementary: the mesh is stretched between installed pillars. The depth of digging the supports into the ground is less than a meter.
On soils that are capable of draining water normally, the water that accumulates around the post easily goes to the bottom of the hole through sand or crushed stone, and then seeps into deeper layers.
Frost is also not a problem for these supports, since frozen building material will not have a significant impact on it due to the small amount of moisture.
Clays and loams differ in installation: here only gravel acts as backfill: first, 100-150 mm of material is poured onto the bottom of the hole, then a pillar is mounted.
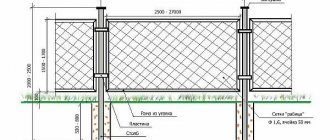
With guides
This method is chosen by those who want the fence to look better and be guaranteed to keep its shape. In this case, 2 longitudinal guides are usually attached to the supports. Potential materials are timber or pipes. The advantage of wood is its plasticity; it gives a chance to withstand ground movements without any problems. Welded metal can create some difficulties.
To avoid difficulties due to the higher degree of structural rigidity and to prevent the guide pipes from being torn off, the pillars are buried lower than the freezing depth in the region. There are no other differences: the hole is made 150-200 mm deeper than the underground part of the pillar, then a layer of crushed stone is poured into the hole, a support is inserted, covered with the same material, and compacted.
Sectional
This is an even more rigid structure, since in this case the frames are made from a profile (angle). A chain-link is pulled inside the welded sections, then the finished elements are mounted to the posts in the same way.
On clays and loams, supports are also buried deeper than the soil freezing level (200-300 mm). Concreting here is also not recommended, since the increased likelihood of the pillar being squeezed out will become not a theoretical, but a very real threat.
Potential pillars, their installation
The choice of material for fence supports is the first thing that site owners have to think about. There are several options.
- Wood - a log or beam. The materials are inexpensive and easy to process, but any structural elements (especially poles) made of wood have an Achilles heel - vulnerability. To ensure their long existence, the material is treated with protective impregnations: for example, waterproofing mastic. A budget alternative is painting the above-ground part, followed by long-term (several hours) impregnation and treatment of the underground part. For greater reliability, before installation, the “submersible” part of the supports is wrapped with roofing felt.
- Metal - square, round, rectangular pipes, corner. The recommended thickness of walls or shelves is 2-3 mm. The diameter of the round pipes is 50 mm, the profile cross-section is 40-50 mm, the length of the corner flanges is 50-60 mm. The best candidate is a rectangular profile pipe with a cross-section of 25x40 mm or less. There is no need for more value, since the fence will be quite light. The reason for the successful choice of metal is the ease of attaching wire, hooks, and mesh.
- Reinforced concrete pillars. The worst of the candidates, because installation will be difficult due to the heavy weight, and you will also have to tinker with attaching the chain-link to such a support. In this case, the owners will need to show miracles of resourcefulness, since it is only possible to use a long wire.
Metal supports promise the least fuss, but painting them and installing a plug to protect the inside of the pipe from moisture is mandatory. Metal or plastic caps are chosen for this role.
Procedure for installing supports
The first posts are installed in the corners of the site, or at the beginning and end if only one side needs fencing. Key elements are checked for verticality in each plane, and their height is simultaneously adjusted.
2 cords are pulled tightly between them: one, to adjust the height, at the very top of the supports, the second, to make it easier to find a place for the holes using a plumb line, at a distance of 100 mm from the ground. The installation step is 2-3 m. If you plan to install the mesh without guides, then 2-2.5 m will be ideal; this distance will avoid sagging. With any other method of installing a chain-link, 3 m is allowed.
A mesh stretched between corner posts without auxiliary elements can cause the supports to “lead.” To eliminate such a load, bevels are used, they are positioned correctly, and then welded between the installed racks.
Methods for installing chain-link
Getting started does not foretell any difficulties. The mesh is first attached to one of the corner posts. Four places on each support is the required minimum. The most basic way is to attach it with wire passed through the cells. Such simplicity can cause a “tragedy”: one “fine” day the owners will come to the dacha, but will not find the nets.
More reliable options exist. Some owners act like this:
- Find a steel rod whose diameter is at least 4 mm. It is threaded through the meshes of the chain-link, and then welded to the support, the pitch is 400-500 mm.
- Take 3-4 rods at once, each up to 6 mm thick. They are welded to each support, then a mesh is strung on them, and the ends of the rods are bent.
- 2 through holes are drilled in the pillars, a piece of rod bent into a horseshoe is inserted there so that it grips the cells. The ends of the “hoof device” are flattened (riveted), twisted or welded.
Tension method
In this case, the chain-link mesh is stretched from pillar to post, without missing any of them. If you fasten it through one support and then work on the remaining ones, then problems (sagging or uneven tension) cannot be avoided.
Possible sagging is dealt with this way: a rod is inserted vertically into the mesh, one person pulls it strongly, and then holds it in the optimal position. Meanwhile, the assistant fastens the chain link. Without an assistant, such an ideal job is impossible.
Wire help
The tension option attracts the speed of work, but such a fence will always be threatened by sagging of the upper edge. The culprit of the fact could be a person or a large dog who decided to travel a little. To avoid such consequences, a wire is pulled through the top row of cells: steel or protected with plastic.
This operation is performed by wrapping the pillars with wire loops. They start with the outermost element, then move on to organizing the perimeter: on every 2-3 supports, wire loops are again made, trying to stretch the material as much as possible. Then the wire is twisted on the “loop” posts using a thick metal rod. The last stage is attaching the mesh, which is fixed to the wire.
A few more “wire” methods:
- Attaching to lug-bars welded to the top of the posts, however in this case the work runs the risk of going much slower.
- Using factory wire tensioners. After being secured to the first support, on the second the wire is passed through the device. It is secured in a clamp and screwed onto a drum.
- Installation using a cable and rigging - lanyards - hooks with clamps. In this case, the cable is passed through the cells, so the best type of chain-link is plasticized.
Welded rod
This method also involves fastening through mesh cells, and you can use both the top row and the following ones. A steel rod is threaded through them, its diameter is 6-8 mm. It is first cut into pieces, the length of which corresponds to the distance between the pillars. Sections with a strung mesh are welded to the supports.
Fastening in sections
Sectional fencing is distinguished by a more aesthetic appearance and at the same time the complexity of self-production.
Section ready for fencing manufacturing
To make one section of the fence you will need:
- metal guides, which can be profile pipes, round pipes of small diameter, corners. The guides are welded together, forming a frame of a section of given dimensions;
- net;
- welding machine;
- pliers;
- roulette.
To fix the chain-link mesh to the guides, the following fastening methods are used:
- fixation with a metal rod;
- fixation with metal hooks.
Fastening with a rod
The most popular and reliable method of fastening to the guides is fixation with a metal rod, which is done in the following order:
- a section is separated from the mesh roll, its overall dimensions fully corresponding to the similar parameters of the finished section frame;
Disassembly is done with pliers by removing the connecting wire from the mesh.
Preparing the mesh for fixation
- then a metal rod is passed through the mesh cells along the entire perimeter;
- the rod is welded to the guides.
Fixing the mesh chain-link by welding through rods
Fastening with hooks
The metal mesh is attached to the guides with hooks using the following technology:
- in the manner indicated earlier, the mesh is prepared for fixation, that is, individual sections are prepared in accordance with the overall dimensions;
- special metal hooks are welded around the perimeter of the frame, which can be in the form of rectangular or rounded plates;
For stronger fixation, the hooks are welded at a distance of 25 cm - 35 cm from each other.
- The mesh is pulled over the hooks and secured by clamping.
Hook fixation technology
Sections prepared by any of the above methods are easily secured to poles (usually using a welding method), forming a finished fence (fence). Gates and wickets can be made using similar methods.
Fastening the chain-link mesh to metal posts: to a profile pipe without welding
Before attaching the chain-link mesh to the profile pipe, the pillars must be prepared. Why do they need to be cleaned of rust, if it appears, painted with a spray or brush.
But most importantly, before attaching the chain-link mesh to metal posts, you need to weld hooks to fix the mesh material (considered the best option for tension fencing).
If this option is not available, fastening to the corrugated pipe can be done with clamps, staples or wire.
How to attach a mesh metal sheet without welding
Characteristics and application of chain-link mesh
The mesh is made of metal round wires intertwined with each other. This is how diamond-shaped cells are formed. The difference between the types of connection is determined by the diameter of the wire used and the cross-section of the resulting cell.
Today, several common mesh options are manufactured. Moreover, various companies have the opportunity to produce different types of chain-link, taking into account the specified parameters, features and scope of use.
The most common models are meshes with a cell cross-section of 15–120 mm and wire with a diameter of 1–6 mm. For the construction of wickets, gates, and fences, as a rule, a universal size of 55×55 mm is used, where veins up to 3 mm are installed.
The height and length, technical characteristics of the profile differ, but the most popular sections are 3x10 m. The chain-link is packed in rolls and wrapped in special paper.
The popularity of the material in domestic conditions and various construction areas is explained by its low price and ease of attachment to the fence, excellent strength indicators and long service life.
Fastening to a corrugated pipe does not require special knowledge or effort and is done with your own hands.
Attachment to round pipe
Today the mesh is used in the following areas:
- Production of cages for different types of domestic animals.
- Construction of fences.
- Production of concrete monolithic slabs.
- In industry (for example, installation of partitions).
- Thermal insulation of the pipeline.
- For garden plots (rose garden fencing).
- Construction of houses (during laying the foundation and plastering the walls).
Fastening with self-tapping screws to wooden veins
Pros of mesh fences
Chain-link mesh is popular in the building materials market and has established itself as an affordable and easy-to-install material.
Advantages of metal mesh fencing:
- Every person who is not involved in construction will be able to install this iron fence;
- can be purchased at a relatively low price, and in the Leroy Merlin chain of stores delivery is made free of charge to the site, taking into account the order estimate;
- air circulation throughout the entire territory;
- mesh fences are characterized by good quality and long service life, taking more than 30 years;
- the fence fits perfectly into any landscape design;
- this fence does not shade the garden area;
- if the homeowner has dogs, they can guard the area as effectively as possible so that thieves cannot steal something;
- This is a really reliable fence on which you can install barbed wire if required, this ensures inaccessibility.
The product is an excellent material intended for fastening in internal areas of a certain territory, for example, in playgrounds, places where animals are kept and other types of fences. In addition, the list of disadvantages is not as long as the advantages.
Disadvantages of attaching mesh fencing to corrugated sheets:
- There is an opinion that a fence made of a profile pipe and chain-link is not prestigious and unpopular. But such a statement is controversial.
- The mesh has high transparency. This can be corrected by organizing hedges. In addition, you can fill the base with decorative plastic or wooden panels.
Installation of fence posts
There are different methods for installing a fence to a corrugated pipe. But, one way or another, this is an important stage - marking the site and attaching the chain-link mesh to the support.
Selection of section and dimensions
Before attaching the chain-link mesh to the posts, you need to clearly measure the fence being built, taking into account the documentation, and calculate the location of the gate and wicket. The area for fence construction must be cleared of debris.
Next, you should drive wedges of wood or reinforcement in place of the corner posts. To find out the location of the intermediate supports, you need to stretch a strong rope or cable between the wedges, and then measure the distance.
It is best to install corrugated pipe supports every 2 meters. That is, the resulting length of the fence will need to be divided by 2, rounding up. This method allows you to determine the total number of pillars.
Areas of future racks also need to be marked with stakes. Taking into account the type of land, the thickness of the corrugated pipe and the type of fencing, several methods of installing poles are chosen.
Sketch of fixation with a cable
Board support is short-lived; concrete fence posts can create difficulties when attaching the chain-link. The solution is a round or rectangular pipe with a cross-section of 50x50 or 60x60 mm.
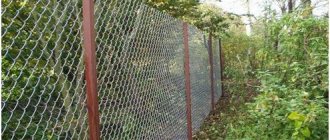
The photo shows metal poles made from corrugated pipe.
Metal fence in the village
Methods for manufacturing sections
A roll of mesh for the fence is laid out on the ground, measured approximately 2 meters and carefully cut with a grinder, taking into account the selected size. Next, reinforcement rods are installed in the outer rows of links. The metal rods do not need to be connected to each other.
You can also make a frame from a 40x40 mm corner and attach a chain-link to it. Welding will be required to make the frame. This method of fastening will be more expensive.
The photo shows a fence made of profile pipes at the dacha.
Metal fencing made of corrugated pipe
How to attach sections to corrugated pipe posts
The chain-link is laid out on the frame and welding is used to attach the upper part of the reinforcement to the inside of the corner. Then carefully straighten the mesh from below and weld the lower rods. Next, the side parts are installed.
The prepared structure is installed vertically to a column made of corrugated pipe and secured to steel plates or corners. You can also attach the fragment with screws by making a hole of the required size.
When installing the next element to the corrugated pipe, you need to make sure that the extreme sections of adjacent frames are in the same plane. Even a difference of a centimeter is noticeable; it will give the fence an untidy appearance. Finally, the mesh is primed and painted. In this way, interconnected sections can be easily installed to any length.
The photo below shows a fence at the dacha.
Sectional fence option
Fastening the chain-link to the pipe using the tension method
To ensure the rigidity of the mesh fence during attachment to the corrugated pipe, a cable with a cross-section of 5–7 mm is stretched from above. This is necessary to resist wind and prevent the chain-link from sagging. This structure can be attached to metal posts and tensioned in any way, but it is better to use special tensioners.
When installing a fence made of chain-link and corrugated pipe and fastening it with guy wires, the distance between the supports can be made larger, up to 3 m. But it must be taken into account that during the tension process, the load on the metal posts, which are located at the edges, increases. It is necessary to increase their strength in contrast to posts with a regular fence.
Installation process
All work must be performed in strict sequence, carefully taking measurements. The most important thing is to be extremely careful at each stage, otherwise you will have to repeat certain steps.
To ensure that you are completely satisfied with the result, we offer a detailed action plan.
The first step is marking
This step is extremely important, since it will give us an understanding of the amount of materials required to complete the entire project. The first step is to install pre-prepared pegs at the corners of the perimeter of the future fence. The main point when performing this step is compliance with the standards for the distance between products. Maintain a distance of 2.5 - 3 meters. In the future, pillars will be installed in place of these pegs.
Next, between these pegs, you need to stretch the cord. This way we can determine the dimensions of the mesh:
- the length of the cord is responsible for the length of the fence;
- The width of the fence is determined by the required height.
The second step is to install the pillars
After we have decided on the markings and the amount of required materials at the first stage, we can proceed directly to the installation of the pillars. Key points for completing this stage:
- It is necessary to dig holes with a depth of 1 meter.
- Their base must be covered with crushed stone, sand, and then compacted.
- After this, you can proceed to installing the pillars.
- When there is already a post in the hole, we fill it with earth and compact it thoroughly.
When these steps are completed, everything will be ready for further installation of the grid itself. They serve as the basis and this stage can easily be called the most labor-intensive. Let's move on.
The final stage is tensioning and fixing the fence
To avoid sagging, it is necessary to install the roll where the corner post is located, the edge is securely fixed. To achieve the most reliable fastening, you can use hooks that are welded to the pole.
Important - we strongly do not recommend fastening using wire, as this will put the entire fence at risk. As an alternative, you can also use clamps, nails, staples
Next, the fence is unwound and secured in a similar way. If the mesh is not galvanized, it is recommended to raise it from the ground by 5-10 cm. The final touch is to protect the entire fence from corrosion processes - special paint is applied for this.
Manufacturing of tension fence
This is a simple and economical way to install a chain-link fence with your own hands, for which you will need:
- profile or round pipes for racks;
- net;
- clamps or hooks;
- drill, shovel;
- tape measure, bubble level or plumb line;
- crushed stone, sand, water;
- Bulgarian;
- anti-corrosion agent.
Site marking
Before installation, the fence line is cleared, freed from excess vegetation, and large mounds are cut off. A cord is pulled between the extreme points and the installation locations of the supports are marked in increments of 2-2.5 m along a plumb line.
Pit preparation.
Using a hand or gasoline drill, holes are made at marked points to a depth of 0.7-1.2 m. First, the blades are rotated in one direction, then in the other. The soil from the hole is discarded. Add crushed stone to the bottom in a layer of 10 cm and compact it with a long crowbar.
Installation of poles
The pipes are treated against rust and primed. After drying, the primers are installed in the wells strictly vertically. If there is no assistant who could hold the pole, it is fixed with improvised materials. The following operation is carried out depending on the chosen method of foundation construction:
- butting - crushed stone is covered in layers, each compacted with a crowbar;
- partial concreting - first, concrete is poured to 2/3 of the height, crushed stone is poured on top;
- full concreting - the hole is filled with concrete, pierced with a rod to release air bubbles.
On dry soils with low groundwater levels, pipes can be installed by plugging. To avoid flattening the top of the stand with a striking tool, a metal “glass” is placed on it.
Fastening the mesh
After the concrete has hardened, a mesh is fixed to the outermost column. The reinforcement is threaded into the cells and hooked. You can weld the rod to the stand.
The roll is unwound 2.5 m, tensioned and sequentially secured to the racks using clamps, hooks, screws with overlays or other devices.
If it is unsafe to install mesh on clamps in your area, you can pass a steel rod through the cells and weld it to the post after 20-30 cm. Another way to prevent the theft of the mesh is to use anti-vandal nails or hardware with tear-off caps.
It is not recommended to outline corners with a solid canvas. The mesh must be cut and secured thoroughly on both sides of the post separately.
Methods of tension and fixation
The chain-link mesh can be fastened using the tension method:
without the use of any additional elements;
Installation without fixing elements
using a metal rod, which is passed through the mesh and subsequently fixed to the posts. You can use either one rod, which will be located at the top of the fence, or two rods at the top and bottom of the fence;
Stretching using a metal rod
using metal plates that replace the rod. This method of tensioning is considered the most acceptable, as it allows you to firmly fix the mesh on the fence and get a pleasant appearance.
Fastening with plates
Attaching the chain-link mesh to the posts without the use of additional elements is done:
metal clamps, which are installed on poles by welding or fixed using fastening plates;
Fastening with a threaded clamp
ordinary wire. This method is less reliable, since with any load on the mesh the wire will weaken;
Using metal wire for fixation
hooks that can be welded to posts or installed using self-tapping screws.
Welded hooks for fixation
Tension metal plates can be fixed to poles in the following ways:
- welding The most durable method, which is available only to persons who have a welding machine and know how to use it;
- threaded fixation. In terms of strength, this method is not inferior to welding, but its implementation does not require special equipment or skills.
The technology for threaded plate fixation is simple:
- a hole is drilled in the post through the tension plate;
- a bolt or self-tapping screw is screwed in, securing the plate.
The metal rod, which is used to tension the Chainlink mesh, can be fixed on the post in any of the following ways, but the technology most often used is the installation of tension couplings:
- Tension couplings are installed on the poles using bolts, wire or special fasteners, which can be made in the form of sliding hooks or special housing mechanisms;
Hook shaped tension coupling
- the tension cable is passed through the mesh and secured to the couplings;
- By adjusting the couplings, the final tension of the mesh between the fence posts is performed.
Fastening with tension sleeves and wire
To add rigidity to the fence when choosing fastening with tension couplings, jibs are installed additionally to each post.
How else can you secure the Chainlink mesh, look at the video.
Whatever method of fixing the Chainlink mesh in the manufacture of fencing is chosen by the builder, it is important to fasten it correctly and reliably, which will allow the fencing to serve for a long period of time.
Methods for fastening chain-link mesh to profile pipes and wooden posts
When building a fence with your own hands, you have to solve many issues. One of these problems is how to attach the chain-link to the support posts. In particular, this question is of interest to those who install a fence based on a mesh - chain-link.
Have you already chosen which poles you will attach to?
Choosing fence posts
Among the questions faced by those who decide to independently build a fence near the house, the first thing that needs to be decided is which posts to use when building a fence?
In practice, the following supports are used:
- made of wood;
- steel;
- made of concrete.
As usual, each of them has its pros and cons, let’s look at this in more detail.
The use of wooden poles looks quite attractive, the main factor is that they are chosen because of their availability and low cost.
But when choosing such a rack, you must be prepared for the fact that in ten years you will have to either change them or install new ones. This comes from the properties of the tree itself.
That part of the post placed in the ground begins to rot and, as a result, the post begins to tilt and falls, pulling the entire fence with it.
Installing poles made of wood means that they must be treated with an antiseptic compound and the lower part of the pole must be protected with waterproof mastic.
Metal supports, of course, will last longer with anti-corrosion protection; in addition, several methods of fastening the fabric to the support are used - welding, using fasteners (bolts or self-tapping screws), using clamps.
Metal racks require attention, which is expressed in an annual preventive inspection and, as soon as they are detected, immediately eliminating rust stains, etc. During the installation process, the racks are coated with an anti-corrosion compound.
For the manufacture of pillars, profile pipes are used, including pipe pipes, rails, etc.
To use pillars made of reinforced concrete, you will need to purchase them either from the nearest reinforced concrete products, or make them yourself. And this is a troublesome matter.
To fasten the fence sheet to the posts, welding and clamps are used. For welding, embedded parts must be installed in the body of the pillar.
From metal From wood From concrete
How to attach chain-link mesh to metal posts
Attaching the chain-link to metal poles is done using different methods.
The simplest method of attaching the mesh to a metal pole is welding. If the support is coated with a layer of zinc, then when welding is performed, the coating will burn off and after installing the fence, the welding areas will need to be treated with a protective coating. That is, apply a layer of protective primer.
Prut
To secure the network using this method, you need to do the following. Along the edges of the mesh, a rod made of steel is passed through the cells. It will serve as the basis for attaching to the rack. This rod is welded to the stand, or a clamp is passed through and thus the mesh is fixed.
By sections
How to attach the chain-link mesh to the posts, the answer to this question is known to the craftsmen who install such fences.
Among craftsmen who install chain-link fencing, the most popular method of attaching the mesh to the frame is the method using a metal rod. The sequence of this operation looks like this:
- A section corresponding to the parameters of the finished sectional frame is separated from the roll.
- A steel bar is passed around the perimeter of the mesh. Its diameter should not interfere with passage through the cells.
- The missing rod is welded to the corner from which the mesh frame is assembled. To create a supporting frame, a steel equal-flange angle is used; the width of the shelf ranges from 25 to 50 mm.
Hooks
Attaching the chain-link to the corners using hooks is done using this method:
- The chain-link is prepared for installation according to the method indicated above, that is, steel rods are passed along the edges of the mesh.
- Pre-prepared hooks are welded around the perimeter from the inside.
- The mesh is pulled over the installed hooks.
Useful Sectional fence made of green mesh
The assembled sections are mounted on already installed poles. For this purpose, electric welding is used. It is also possible to use mechanical methods, but in this case you will have to make modifications, for example, weld plates with holes for installing bolts onto the surface of the pole.
Methods of tension and fixation
When constructing a fencing structure, it is carried out without the use of additional fasteners.
For fixing a steel bar passed through a mesh. By the way, it is permissible to install wire instead of a rod. One is fixed at the top of the section, the second at the bottom.
Sometimes, instead of a rod, a metal strip is passed through the mesh, and it is attached to the rack. This method allows you to securely fix the mesh and get an attractive look.
Using metal plates replacing the rod. This method of tensioning is considered optimal, since it allows you to firmly attach the mesh to the fence and get an interesting appearance.
Fastening the mesh can be done using fastening clamps, which are either attached to the pole by welding or using plates.
Installation Tips and Tricks
Sometimes, during installation, the fence is folded in such a way that no matter how tight the mesh is, it will be weakened in the corners of the structure. In this case, the fabric is cut and tied with steel wire.
When installing a chain-link on a fence, it is undesirable to install it close to the ground; the moisture that comes from the ground will cause the chain-link to rust.
A fence made of such a mesh, which is built with one’s own hands, has long and reliably occupied the hearts of sensors. This design is distinguished by its durability, transparency, cost and ease of installation. With proper organization of work, such a design will solve all the tasks assigned to it for a long time.
If a chain-link is used as a canvas, then you can be sure that such a fence will last for decades.
Installation of the chain-link in place can be done either manually or using a specially made comb. It represents the following design for a square pipe, the length of which is equal to the height of the roll. Hooks are welded onto the pipe, the distance between which should be equal to a multiple of the distance between the cells.
By using this device, you can hook the edge of the chain-link either manually or using small-scale mechanization to obtain the required tension when installing the network on supports.
How to build a fence without wooden or metal posts
In this case, asbestos cement pipes are used. They are purchased at specialized retail outlets that sell similar products. But such pipes are not popular among summer residents or owners of country houses.
The fact is that network fixation causes difficulties. For this, clamps and a steel cable are used, which are woven into the mesh. This is inconvenient, the cable is cut, and this raises doubts about the strength of asbestos cement products.
Some owners of dacha plots create a fence using chain-link, using shrubs and trees located along the perimeter of the dacha. This method will lead to damage to the vegetation, or even its death.
Do we take asbestos-cement pipes? PreviousNext
Step-by-step instructions for installing a fence
- We buy a special drill, you can even use a hand drill, it’s cheaper. From the corner wedges we pull the cord around the perimeter. This is a necessary operation, we will use the cord to guide us, otherwise (without the cord) the fence will turn out crooked and uneven.
- We measure the distance between the pillars (we remember the dimensions, I wrote above). In each place where there will be a support, we drive in a wooden peg (for reference). Next we work with a drill (we also already know about the depth, I usually dig a meter deep).
- The holes are ready around the perimeter. Next, we prepare the concrete for pouring the pillars. Regular concrete, three parts sand, part cement and five parts crushed stone (fine, of course). Mix thoroughly, post into hole, then work with a level to “break through” the vertical.
- The concrete was poured, slightly trampled, poured again and left to dry completely for a couple of days. That's it, the pillars are sorted out.
All that remains is to stretch the mesh, we start from any corner, you need to work together, if there are hooks on the posts, then everything is clear, if there are none, then we stretch the mesh, one person holds it in tension, the other twists the wire.
In the case of wooden supports, we fasten the mesh with nails, and bend the nails with a hammer. In general, that's it, the work is finished.
Installation of a sectional fence
Marking and installation of supports is carried out similarly to a tension fence. A pair of plates with a thickness of at least 4-5 mm are first welded onto each post, to which the sections will be attached.
Frame assembly
To make a frame, corners are cut according to the size of the section:
- the length is equal to the pitch of the pillars minus 10-20 cm;
- height - length of supports minus 15-20 cm.
The frame is welded and polished. You can weld hooks to attach the mesh.
Section preparation
We will tell you how to secure a chain-link using reinforcing bars and welding. This method is convenient because the mesh is often tangled and its edges are uneven. The rods will help not only fix, but also evenly tension the mesh.
The chain-link is spread horizontally, a Æ 6 mm rod is inserted into the outer cells. Stretch the roll to the required length. Place the mesh on the frame. Align the edges. If any wire has become untwisted, it is twisted in a circular motion around the axis.
To prevent the mesh from getting tangled, weld the rod to the corner, cutting off the excess. The step between the welding points is 25-30 cm. Slightly pulling the chain-link, measure the required length. Unscrew the wire, thus disconnecting the fabric. A rod is inserted and secured by welding to the frame.
On the sides of the mesh, the wire is aligned and bent with pliers. The rods are threaded into the cells, cut to size and welded. Clean the seams from scale and prime them.
Installation
The section is installed vertically into the fence span. For fixation, you can use 2 methods:
- welding - the frames are welded to the plates, aligning the top edge horizontally;
- assembly - drill holes and tighten with bolts and nuts.
Welded seams are ground, all sections and pillars are coated with a primer, if this has not been done previously, and finally painted.
One part of the hinge is welded onto the gates and gates, and a counter part is welded onto the post. The panels are hung and adjusted for height and uniformity of movement.
If the area is flat, the level of adjacent fence elements should match. When there is a difference in height, the sections are secured with “steps”.
How to choose a grid
First of all, decide how tall the fence would like to be built. The most common height of chain-link mesh rolls is one and a half meters, but both two-meter and one-meter mesh can be found on the market.
If you want to use a chain-link fence as a fence for your personal plot, choose a coarse mesh - 50 or 100 mm.
If you need a fence for chickens, you will need a larger mesh, because birds can get stuck in large mesh and even die from suffocation. In this regard, opt for a mesh with cells of 25 - 30 mm.
Next about the material from which the mesh is made
The chain-link is made of black, galvanized and aluminum wire.
All three types are used to make fences, but galvanized mesh will last longer, since black mesh is less susceptible to corrosion.
Aluminum chain-link mesh has even higher anti-corrosion properties, but if you install a fence made from it as an external fence for an area, there is a high risk that it will simply be stolen by non-ferrous metal hunters.
Features of installation on a profile pipe
To install sections on a pipe you must:
- Install the mesh onto the frames using a rod welded around the perimeter.
- Place the section between the supports, level it and secure it with steel corners. For fastening, use screws screwed into pre-drilled holes. Adjacent edges of the frames must be in the same plane; a skew of 5-10 mm gives the fence an untidy appearance.
Profile pipes with a stretched mesh netting.
If it is necessary to fix a rolled mesh on a pipe, then clamping strips with screws are used to hold the chain-link. There are designs on wire threaded through cells and holes in the support, and then tensioned with a crank.
You can secure the mesh with metal clamps or pieces of wire; you should not use plastic fasteners with locks due to the low resistance of the material to ultraviolet radiation and low temperatures.
Fastening the blade
The chain-link roll is installed vertically at the first corner support. The end of the canvas is hooked onto hooks that were previously welded to the pipe. If there are no fastenings, the canvas must be firmly screwed in 3-4 places with steel wire.
The bottom edge of the material should be 100-150 mm above the ground level to prevent the accumulation of debris. To reduce sagging, a reinforcing rod is passed vertically through the first row of cells and welded to the post.
Then the roll is untwisted and attached to the next support. To prevent sagging of the material along the perimeter of the fence, steel wire is passed through the upper and lower parts at a distance of 100-200 mm from the edges.
What metal posts to use for the chain link
To build a fence, steel supports should be used; wooden products with antibacterial impregnation are not durable and begin to lose strength after 3-4 years. For fences, posts made of round or square steel pipes with a wall thickness of at least 2 mm are used (the diameter and edge length are 50-60 mm).
It is allowed to use a corner with a shelf from 50 to 60 mm.
Steel structures make it possible to weld mounting hooks; in the event of a break, the fasteners can be easily put back in place without partially dismantling the fence.
The technology of arranging a fence is extremely simple
- Posts are dug in along the perimeter of the fence (in increments of 1.5 - 3 m). For reliability, the pillars can be additionally secured with concrete mortar.
- A mesh is attached to the posts. This can be either a single roll or pre-cut sections.
Let's take a closer look at how the metal mesh is attached to the support posts.
Wire or clamps.
The simplest, fastest and least reliable method. The mesh is attached to the post using ordinary (preferably metal) clamps or using wire (preferably steel). With this fastening method, the material of the pillars is completely unimportant.
To increase reliability, additional supports can be used (this, by the way, applies to any fastening method) in the form of horizontal strips between the pillars.
Sectional chain-link fence
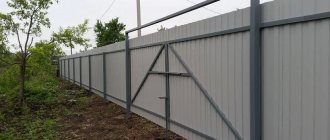
A tension fence can stretch and sag over time, which means it will lose its attractive appearance. If you weld a frame from a metal corner and fasten the same chain-link inside it, you will get sections for a more durable and beautiful fence. Just like a picket fence, it will let enough light and air into the area, but it looks much more solid.
A sectional chain-link fence will weigh more than a tension fence, so the supports must be secured more firmly and reliably. Here are some tips for installing support posts:
Dig a hole 40 cm deep, then place a post in it and drive it into the ground another 40 cm. Thus, the support will be buried into the soil a total of 80 cm. The hole is filled with cement-sand mortar. For strength, you can add small crushed stone to the solution, and fragments of bricks or stones into the pit itself.
Another approach to installing supports is butting. A support is installed in a hole 60-80 cm deep, and then the hole is filled to the top with concrete waste, broken bricks, and stone. The contents of the pit must be thoroughly compacted, for example, with a crowbar.
The best option is to concrete the pit to its entire depth. To do this, dig a hole 80 cm deep, install a post and fill the hole to the top with cement-sand mortar with added crushed stone. A support with such a base will definitely stand strong for many years.
If the site is located on a slope, this does not mean that the fence needs to be installed on a slope. The fence sections should be positioned strictly horizontally, so your fence will be stepped. If you want to create a more substantial fence, you can create a small concrete border and install fence sections on top of it.
The finished mesh sections are attached to the supports using bolts and nuts or welded. Once the installation work is complete, all you have to do is paint the fence the color you want.
As you can see, building a chain-link fence is not at all difficult. Put in just a little effort and you will definitely have a beautiful and neat fence!
Types of designs
The mesh material is characterized by low rigidity and requires the installation of power elements for reliable fastening. The chain-link is pulled between the pillars, and additional jumpers are introduced between the supports. There is a technology for assembling a fence from ready-made sections of standard sizes. The owner of the site independently chooses the method, focusing on the budget and durability of the fence.
Installation of a mesh fence can be done in several ways.
Without guides
The technology involves installing vertical iron pillars from water pipes in increments of 2.5-3 m; the base is buried 80-100 cm into the soil. The mesh is stretched between the pillars and secured with staples. If the soil in the area is sandy, then rain and melt moisture freely goes into the lower layers. On clay soils, a gravel cushion is provided in the pits for supports; in the absence of a substrate, during the period of soil heaving, the fence warps, and cracks form under the lower edge of the chain-link.
When installing a mesh fence without guides, the chain-link is attached to the posts with staples.
With guides
The design is distinguished by the installation of 2 horizontal jumpers made of steel profiles or timber. For fastening, welding or bolts are used; a rigid joint leads to warping of the fence when the soil swells and the concrete base of the post is squeezed out of the hole. To prevent deformation, holes are dug to a depth below the freezing level (depending on the region). A gravel cushion is poured onto the bottom, and then the vertical element of the fence is filled with concrete mortar.
Mesh fence with horizontal guides.
Sectional
The structure consists of a steel frame in which the mesh is fixed. The sections are installed between vertical pipe elements, the upper part of the support is closed with a plug to protect against moisture and the occurrence of corrosion. The frames are fixed by electric arc welding or metal brackets with bolts. The product has a neat appearance, increased strength, the depth of the holes for the posts should be 20-30 cm below the soil freezing line.
Sections of a mesh fence are represented by separate frames in which a chain-link is fixed.
Types of mesh
Before stretching chain-link mesh onto a fence, it is important to understand its types. This material is made from galvanized and black wire, so product quality may vary.
Black wire material is quite cheap, but is short-lived and becomes rusty over time, which can happen after the first rain or fog, while after 4 years the material can become completely unusable.
You can extend the life of non-galvanized chain-link by covering it with liquid rubber or paint. This must be done before the installation of the canvases, and after that the protective layer will have to be renewed from time to time. Before you stretch the chain-link mesh onto the fence, you should also know that the material made of non-galvanized steel is not afraid of corrosion, so it is ready to last longer. This mesh is a little more expensive, but does not require processing.
Fences made of galvanized chain-link look attractive and neat. The mesh can also be classified according to the size of the cells, the height of the roll and the thickness of the wire. As for the cells, they can have dimensions ranging from 10 to 65 mm, while the wire diameter varies from 1 to 5 mm. The height of the roll can be from 0.8 to 2 m. However, the most popular material is the one whose height is 1.5 m. The standard roll length is 10 m. Rolls of 20 m can be purchased upon request. The material is more expensive the smaller the cells , because this increases the consumption of raw materials.
Selecting a mesh for metal poles
When selecting material you must:
- Explore the bays. The corners of the squares located at the bottom and top should be formed by intertwined pieces of wire with bent ends. The size of the bent part determines the ease of tension; it is recommended to take a chain-link with bends having a length of about 50% of the size of the cell edge.
- Make sure that the weaving is uniform and there is no deformation of the wire. Bends indicate low quality steel, which will begin to rot after 2-3 winters. If the surface of the wire is coated with a polymer composition, then the warranty period should be specified. Budget plastic is destroyed under the influence of ultraviolet light and temperature changes over 1-2 winters. When a high-quality coating is applied, a mesh fence will last from 15 to 30 years without corrosion.
- Assess the quality of galvanization. The presence of dark spots on the surface indicates cold technology. Zinc is applied in a thin layer with low strength.
Preparing for work
So, you have decided to fence your site with a chain-link fence. You should start by determining the amount of material required. To do this, you need to measure the perimeter of the fenced area. To do this correctly, you should drive small wooden stakes into the corners of the area and stretch a rope or cord between them. The length of the cord will correspond to the length of the mesh. Depending on it, you can calculate the required number of fence posts. Typically the distance between posts is from 2.5 to 3 m.
Then you need to purchase the material. In stores, chain-link is sold in rolls and has different lengths, widths and mesh sizes. The width of the material affects the height of the fence. The higher the fence you want to build, the wider the mesh you need to choose.
Materials and tools for working with chain-link mesh: cord for marking, tape measure, wire, grinder, garden auger, level, drill, metal pipes, crushed stone.
Attaching a chain-link mesh to a profile pipe: to metal posts without welding, photos and videos
Attaching the chain-link mesh to the profile pipe is done in various ways. A mesh fence is the most economical fencing option for summer cottages. Read on for details on where to use and how to attach mesh netting to metal supports.
In the country
Properties and applications of chain-link mesh
The chain-link is used for fencing:
- agricultural crops;
- fields;
- nurseries;
- garden and summer cottage plots;
- temporary fencing of construction sites.
Profiled pipe with chain-link mesh
It is made of galvanized wire or with additional PVC coating. This construction material is resistant to external environmental factors and is easy to install independently.
Benefits of mesh fences
Chain-link has a number of significant advantages that justify the decision in favor of choosing this product. Among the main advantages of this construction material it is worth highlighting:
- significantly lower financial and time costs for arranging a mesh fence compared to fences made of profiled sheets and wooden picket fences;
- low price of supporting elements for hanging mesh fabric and tensioning attributes;
- high strength compared to wooden barriers;
- ease of installation, allowing you to install a mesh fence with your own hands, easier than all other types of fence materials.
Self-tapping screws
Types of chain link
To attach the chain-link mesh to the profile pipe, you need to select the optimal type of mesh material. These products are classified as follows:
- without zinc coating;
- galvanized;
- with PVC coating.
Tension fastening method
In the manufacture of non-galvanized chain-link, wire made of black low-carbon steel without a protective coating, 1 or 5 mm thick, is used. The main disadvantage of such products is their high susceptibility to corrosion and, accordingly, a short service life of 2–3 years. This material is only suitable for installing temporary fencing.
Meshes with zinc and PVC coating have high anti-corrosion properties, therefore they are more in demand. Mesh material is available in various shapes and mesh sizes.
Fence post made of corrugated pipe
The strength of the product is determined by the size of the cells. The smaller they are, the stronger the mesh. The standard hole size of the mesh material used to construct the fence is 40–50 mm.
Installation of fencing support elements
Before filling the perimeter of the fence with mesh, support posts are initially installed. There are several types of supports for fastening the chain-link:
- wooden;
- plastic;
- concrete;
- asbestos-cement;
- metal.
Support installation diagram
The easiest and cheapest way is to use wooden posts, but the strength of such posts is low. The mesh material is attached to them with nails or staples. Supporting structures made of wood have an increased degree of susceptibility to rotting.
Therefore, before being immersed in the soil, the base of such supports must be treated with antifungal compounds.
The most acceptable option is metal racks in the form of profile pipes of rectangular or square cross-section. A metal profile with a cross-section from 40x40 to 50x50 mm with a wall thickness of 3 mm is used for the mesh fence.
A photo of a mesh fence mounted on supports made of profile pipes is presented below.
Attaching the mesh cloth
Having decided on the choice of products for covering the perimeter of the fence and its load-bearing elements, an estimate of the monetary costs for the purchase of the required volume of mesh material and profile pipes is drawn up. After purchasing all the components, you can begin installing the supporting structures.
Tools required for installation
To properly install support posts made from profile products, you will need the following materials and tools:
- profile pipes;
- sledgehammer;
- drill or shovel;
- leg-split;
- measuring instruments (plumb line, building level).
Mesh gates
Installation of pillars
The height of the pillars depends on the dimensions of the mesh. The standard roll width is 1.5 m, the standard length is 10 m. Taking into account the part of the support immersed in the soil (about 1 m), pipes of 2.5–3 m will be needed.
Drawing for installation of profile pipes and mesh
The supporting elements of the fence are installed in stages:
- Before installing the supports, the area is marked taking into account the opening of the gate and wicket. Wooden stakes are driven into the areas marked for the posts at a distance of 2.5 m (the optimal span between the posts), and a cord is pulled between them.
- The corner posts should be installed first. To do this, in the places where the pegs are hammered, holes with a diameter of 20 cm and a depth of 60 cm are made in the ground with a drill.
- Corner supports are installed by analogy. The profile pipe is placed in the well and driven another 40 cm into the ground with a sledgehammer through a board placed on top. Then the pillars are aligned vertically using a level and plumb line, fixed with temporary supports and twine is pulled between them. Using the stretched cord as a guide, intermediate posts are installed in the same way.
Chain-link fence design
Pits with clogged pipes are filled with cement mortar. Given the lightness of the mesh material, it is not necessary to concrete the supports. An easier way to strengthen the racks is to fill the holes in layers with earth and broken bricks, with periodic compaction.
Before installing the supporting elements, in order to avoid the formation of corrosion, each post is primed, covered with a layer of paint and covered with a rubber plug on top. After installing the supports, you can begin hanging the mesh fabric.
Sketches
Taking into account the increased load on the corner posts and those on which the gate and wicket will be attached, stronger pipes with a diameter of 100x100 mm are installed in these places.
Attaching chain-link mesh to metal posts
Before we figure out how to secure the chain-link mesh to the support posts, let’s consider what methods exist for installing this material.
Scheme of fastening to metal poles
Attaching the chain-link mesh to the corrugated pipe is carried out in 2 ways:
- Tension method.
- Fixation of sections.
Regardless of the chosen method, for installation work you will need:
- mesh material in rolls, in the volume necessary to cover the perimeter of the fence;
- steel strips and angles;
- welding machine;
- screwdriver;
- fasteners (bolts, screws, nuts, washers);
- perforator;
- wire cutters and pliers.
Option for fixing the chain-link to the corrugated pipe
Correct installation of the fencing mesh is carried out with extreme caution.
Therefore, protective gloves will also be needed. The main danger is the sharp ends of the horizontal parts of the wire. They must be bent immediately after the chain-link is fixed.
Installation of intermediate supports
A rope should be pulled between the corner posts, departing 15 cm from the ground. The line is divided into equal segments that will correspond to the width of the span. The optimal width for the fence will be a distance of 2.5 m. If this parameter is increased, the mesh will sag.
You can find out how to install it correctly and how to tension the chain-link mesh if you read the article. In place of the pegs, which are installed at the marking stage, you should drill holes for intermediate posts and prepare a cushion for them according to the method described above. To make it more convenient to control the upper edge of the supports, you can stretch a rope between the outer pillars. Now you need to install the pipes, level them vertically and in height, add soil and crushed stone, pour concrete on top and level the surface.
The procedure for installing the fence
Like most construction work, fence installation is carried out in several successive stages:
Territory preparation and marking
Before you stretch the chain-link mesh onto the fence, you should clear the strip along which it will be mounted. In addition, at the preparatory stage, the necessary materials and tools are collected.
To mark the installation locations of the posts on each straight section of the fence, drive pegs at the mounting points of the two outer supports. After this, pull the cord between them and, measuring the required distance, mark with pegs the installation locations of the remaining pillars.
Digging holes, installing and concreting pillars
Digging holes for installing pillars can be done using a regular bayonet shovel, but it is much more convenient to use a special hole drill. It can be manual or mechanically driven. This will be especially relevant if there are a large number of pillars being installed.
The diameter of the hole must be no less than the cross-sectional dimensions of the pipe with an addition of 100-150 mm in each direction. The depth of the excavated holes is 400-500 mm for ordinary stable soils or 800-1000 mm for heaving, heavily moistened and other unstable soils.
The procedure for installing the pillars is similar to marking. On each straight section of the fence, the two outer supports are first installed. After the concrete has hardened, you need to pull a cord between them and install all the other pillars along it, be sure to check the vertical using a building level. The concrete mixture for pouring pits with installed supports is prepared from cement, sand and crushed stone in a ratio of 1:3:4.
General procedure for installing a fence.
Mesh installation
As mentioned above, the design of a chain-link fence can be different. Each option has its own advantages and disadvantages, usually associated with the level of reliability of the fence and ease of installation.
Tension method
The simplest method involves fastening the mesh to installed supports without the use of additional elements and fasteners. To do this, roll out the mesh on the ground to a distance of about one and a half spans between the posts. Bend the edges of the wire spirals with pliers if this has not been done by the material manufacturer. This will prevent possible injuries during work and improve the appearance of the fence.
The mesh laid out on the ground must be lifted and secured to the posts using wire or clamps. You will need an assistant or two to complete the job. It is almost impossible to ensure the tension of the mesh while working alone.
Strengthening the structure with lags
To more securely fasten the mesh and prevent possible sagging over time, you can weld horizontal logs from a thin profile pipe or even a metal rod with a diameter of 6-8 mm to the installed racks.
If you use a rod, before welding it can be passed through the cells of the mesh, which then does not need to be tied. If a profile pipe is used, the fence is fixed using plastic self-clamping clamps.
The presence of logs will not only strengthen the structure, but also place various decorations on the surface of the mesh for the final design of the fence. In addition, the logs will pull the entire system into a single whole, i.e. you do not need to install special slopes to stabilize the corner posts.
Sectional fence
This design is a fence in which rectangular sections welded from a corner are fixed between installed posts, inside which a chain-link mesh is stretched.
It is somewhat more difficult to manufacture, but it has a number of advantages over simple tension systems. To install a sectional chain-link fence:
- on a flat, hard surface, draw a rectangle corresponding to the section configuration;
- place a corner on the line and weld the frame;
- inside the corner shelves, in increments of 150-200 mm, weld small pins made of wire or rod with a diameter of 6-8 mm;
- lay the mesh inside the section and pass its edges through the pins;
- bend the pins with a hammer, fixing the position of the mesh;
- the sections are secured to the supports by welding lengths of steel strip to the post and frame.
After installation is completed, all unpainted surfaces must be covered with a layer of paint.
Obvious advantages
Non-galvanized mesh is made of ferrous metal. Its service life is about 3 years due to its high susceptibility to corrosion. This mesh can only be used as a temporary fence. If you plan to install a permanent fence, then it should be well painted and updated every 4-5 years.
Galvanized mesh is resistant to corrosion, which is why it is in great demand. Plasticized mesh is made of metal and coated with a special polymer that increases anti-corrosion resistance.
Also, the chain-link mesh can have different shapes and cell sizes. The smaller the size, the stronger the mesh, but the less sunlight it can transmit. Most often, a mesh with a mesh size of up to 40 or 50 mm is stretched - through such holes, at a standard height of the fence, neither animals nor people will be able to enter the area.
Advantages and disadvantages of a mesh fence
Positive aspects of the material:
- ease of erection of fencing;
- the low weight of the components allows you to abandon the need for pillar foundations;
- ensuring air flow and lighting the area along the fence;
- lack of windage, the presence of cells removes wind loads from the surface;
- suitability of chain-link for installation of decorative elements decorating the local area;
- the mesh does not require periodic cleaning and painting;
- the ability to install an additional protective line of barbed wire or Bruno spiral on top of the fence.
The mesh fence is not difficult to install and is resistant to wind loads.
Disadvantages of the material noted by builders and home owners:
- reduced mechanical strength of the fence;
- ease of destruction of the mesh by an attacker using wire cutters or metal scissors;
- lack of protection of the territory from prying eyes and strong winds;
- sagging of the canvas during operation;
- the tendency of mesh made of structural steel to corrosion under the influence of atmospheric moisture;
- short service life of the fence (when using chain-link with a galvanized surface, the canvas begins to deteriorate after 8-10 years);
- the cells do not protect the local area from small debris and dust;
- lack of aesthetics, since the mesh fence was originally created to fence off industrial facilities.
What does the market offer?
In the modern construction market today there are three types of chain-link, differing in material:
- A black wire chain-link can last no more than three years. Moreover, already on the fourth day after its installation, rust may already appear. Such a fence is often installed as temporary with the prospect that in the future a fence will be erected from a different material. If such a grid is left, then it will need to be renewed with paint every five years.
- The galvanized analogue of ferrous metal mesh is completely resistant to corrosion, which is why it is considered more popular.
- Another type of mesh made from chain-link is plasticized. It is also made of metal wire, but coated with a polymer, which has a protective effect against corrosion. In appearance, it is much more aesthetically pleasing than the previous two types and is not at all afraid of moisture. This material appeared on the domestic construction market not so long ago and is already very popular in summer cottages.
Selection of auxiliary materials and tools
To complete the fencing, you must first prepare everything necessary. After measuring the length of the proposed fence, you can determine how long the mesh will need to be stretched. Material is purchased with a 10% allowance for overlaps and emergencies.
Mesh tension diagram
In addition to the chain-link itself for tensioning, the owner will need to prepare:
- blanks for supports;
- wires for fixing the chain-link to the supports;
- corner for making supporting structures;
- fastening elements;
- pliers and other plumbing tools;
- angle grinder;
- welding machine;
- concrete for fastening pillars.
In some cases, in order to tension the mesh, you can do without welding. But often for certain fencing options it is impossible to do without a welding machine.
Drawing for mounting poles
If you plan to perform welding work in order to pull the panel onto the fence, you will additionally need to purchase electrodes and supply a power cable to the installation site of the fence.
Wire tensioner in the vineyard. Single-plane trellis for grapes
Industrial vineyard with single-plane trellises in a row.
This is the simplest and most common type of support for grapes. This type of trellis does not require large financial costs for materials and installation work, is easy to implement and can be done by any gardener.
From the name it is not difficult to guess that this type of trellis consists of one plane on which the entire green mass of the bush is located.
Metal pipes, wooden stakes made of hardwood (oak, ash...) impregnated with antiseptics against rotting, concrete pillars, asbestos pipes, etc. are most often used as supports.
Scheme of a single-plane trellis: 1-extreme support in a row. 2-stop (anchor). Inclined post to prevent the support post from collapsing. 3-intermediate support in a row. 4-wire or cable. 5- fastening the wire to the support.
The height of the supports most often ranges from 170 to 220 cm. When choosing the height of the trellis, I recommend proceeding from the height of the winegrower himself, and using a trellis to the top wire of which you can easily reach with your hand.
Intermediate supports in a row are located at a distance of 3-4 meters from each other. It is advisable to concrete all the supports in the ground, and additionally strengthen the outer ones in the row with an inclined stand on the inside of the row or with an anchor.
The first (lower) wire is attached at a distance of 50-100 cm from the ground, depending on the plant formation used in the vineyard. The fruit links of the grapes are most often located on the first wire.
Various methods of strengthening the side supports: a, b - stops c - tilt in the direction opposite to the load d, e, f - various types of anchors.
The second wire must be secured at a distance of 25-30 cm from the first. On it, the first garter of young and fragile grape shoots at the base occurs, which can break off under their own weight when they reach 30-40 cm.
The remaining wires are located at a distance of 40-50 cm from each other. The wire or cable used on the trellis should have a thickness of less than 3-4 mm. To avoid corrosion, it is better to use galvanized wire or cable in a PVC sheath.
It is also necessary to purchase or make the simplest tension mechanisms yourself to periodically remove the slack from the wire stretching under the weight of the crop and green mass of plants.
The minimum distance between rows of single-plane trellises can be easily calculated by multiplying the height of the trellis by a factor of 1.5. For example, you are planning to make trellises 2 m high. Then we multiply and get 2 * 1.5 = 3 meters. Let me remind you that this is the MINIMUM distance at which the rows practically do not shade each other, and if space allows, it is better to increase this distance by another 0.5-1 m.
A lanyard is a device for tightening and removing slack in rigging, cables, etc. It usually consists of two screws with opposite threads, screwed into a special ring with two threaded holes.
I also want to note that the best orientation of the rows of the vineyard in space is the North-South direction; it is with this orientation that both sides of the trellis plane will be fully and equally illuminated - half a day on each side.
Advantages of a single-plane trellis:
- Simplicity of the device and relative cheapness of materials.
- Provides good ventilation and lighting of the vineyard.
- The most convenient and accessible type of trellis for caring for grapes.
Homemade wire tensioner.
Disadvantages of a single-plane trellis:
- The difficulty of placing vigorous grape varieties in the form of large formations with a large number of fruit vines on this type of trellis.
- Less rational, in my opinion, is the use of vineyard area compared to a two-plane area.
Conclusion: without a doubt, a single-plane trellis is the simplest and most convenient type of support for a grape plant for a winegrower. If you have enough space to grow the planned number of bushes in the vineyard and the varietal characteristics of the grapes do not require very large formations, definitely choose this type of support.
Installing a chain link on a fence section
The chain-link fence section is a frame structure, the filler of which is a wire mesh. Its length should be 5-8 cm less than the distance from the pillars to fit between them and make a simple connection. According to the material of manufacture, the frame can be:
- Made from wooden planks. The frame is assembled from a wooden block. The mesh is attached to it with self-tapping screws so as to ensure tension. Next you need to fasten the section boards with self-tapping screws to the profile pipe.
- From metal corners. Using welding, the corners are connected at right angles to obtain a rectangular section. The chain link is attached to the profile along the inner wall of the corner.
- On cross beams. Metal logs are welded to the posts or wooden boards are nailed as cross members. The boards must be secured to the profile pipe using galvanized fasteners. On the logs, in increments of 40-50 cm, a mesh is secured in a tensioned position. This is done using the same self-tapping screws with the grower.
How to stretch a chain-link mesh onto a fence with your own hands
Chain-link mesh has found wide application in everyday life and in construction. Recently it has been in great demand both in our country and abroad. This is a universal building material that has found application for construction purposes; its areas of use are constantly expanding.
The mesh is used to strengthen the banks of rivers and seas, against landslides and ground collapses, and in anti-erosion measures. The material is used to reinforce heating main pipes and cover them with heat-insulating material. Chain-link is used in production, for screening out particles, for making partitions and protective screens.
There are probably no buildings that do not contain a grid in their structures. This includes installation of self-leveling floors, plaster reinforcement and wall cladding. But more often they are used for installing reliable fences. The mesh is widely used in summer cottages, as it has an aesthetic appearance and does not obscure the territory.
The open, traditional grid structure fits into sophisticated garden design. Metal mesh is used to fence off private territory, private homes, sports or playgrounds.
Let's talk about how to install support posts, stretch a chain-link mesh over them, and what is needed for this.
Step-by-step installation of SIP cable from pole to house: 12 stages
In order to install a SIP cable from a pole to a house, it is better to seek help from professionals. Installation of a SIP cable from a pole to a house is carried out when it is necessary to insert a power cable into a separate building. Before the start of construction and installation work, design and estimate documentation is drawn up. It takes into account the required power, technical characteristics of the wire, the selected installation technology and standards for safe operation. The more pedantry the builder shows, the less he risks his own life and health.
Advantages of technology: tensioner for SIP
Experienced and less experienced builders always pay attention to the positive and negative aspects of any technological solution. When it comes to SIP, self-supporting insulated wire, the first thing people immediately pay attention to is the aluminum conductors.
Thanks to this, the system is less susceptible to the destructive effects of the vagaries of nature and even minor sagging and tension.
The insulating coating has experimentally proven resistance to aggressive environments and frequent temperature changes.
If we talk about other advantages, they look like this:
- Ease of installation,
- Easy to maintain
- The ability to save the area required for laying a high-voltage line,
- Can be placed on supports in direct sunlight for several days without compromising the integrity of the insulation,
- The guaranteed service life is at least four decades.
Based on the above, it becomes clear that the technical characteristics of the tensioner used must correspond to those that the manufacturer stated for the SIP cable. Experienced builders do not recommend trying to save money, otherwise the actual cable tension will decrease, which will cause rapid wear.
Let's get started: installing SIP cable on poles
The 4x16 cable has proven itself well, so in the absence of technical contraindications, this is what is used. Once all issues with the cable have been successfully resolved, the technically correct fittings must be selected. This is where the difficulties begin, because it is extremely difficult for a beginner to distinguish one species from another. Understanding the entire process will help greatly simplify the situation.
If you decide to install SIPs on poles yourself, then you must first read the step-by-step instructions
The wire is pulled and attached to the wall of the house using a hook and several anchors. If we talk about the pole, then it should be secured using bandage tape. It follows that the hook must have a hole for insertion under the anchor.
In addition, it would not hurt to learn about some other nuances:
- It is recommended to use a hook marked GHP-12,
- To prevent the wiring from shaking in strong winds, a construction staple is used as an additional fastener for the bandage tape,
- The winch will be securely fastened if a tension clamp of two units is used as a fixing element,
- The terminals must be marked TTD151/NTD151.
Caution and attention to detail eliminate many problems at the stage of practical operation. To ensure that work does not have to be forced to stop, it is necessary to ensure that the necessary markings are present on the fasteners and brackets.
What will you need?
Simple installation of a chain-link fence does not pose any difficulties even for novice builders. First you need to prepare building material, as well as ordinary construction tools: pliers, hammer, metal scissors, grinder, concrete mixer.
The following building materials will be required:
Using these affordable and common tools and materials, you can quickly get the job done to build a beautiful and inexpensive fence.