GOST 21348-75
Official publication
STATE COMMITTEE OF STANDARDS OF THE COUNCIL OF MINISTERS OF THE USSR Moscow
DEVELOPED, INTRODUCED AND PREPARED FOR APPROVAL by the All-Union Scientific Research Institute for Normalization in Mechanical Engineering (VNIINMASH)
And about. Director Gerasimov N.N.
Topic leader and performer Zaroslova M.P.
APPROVED AND ENTERED INTO EFFECT by Resolution of the State Committee of Standards of the Council of Ministers of the USSR dated December 12, 1975 No. 3875
UDC 62—472.001.24 : 621.882.082.22—434.1(083.74] Group G13
STATE STANDARD OF THE USSR UNION
CYLINDRICAL PIPE THREAD HOLES Diameters
Holes for threading pipe cylindrical thread. Diameters.
GOST
21348—75
Instead of MH 5388—64
By Decree of the State Committee of Standards of the Council of Ministers of the USSR of December 12, 1975 Ng 3875, the validity period was established
from 01/01/77 to 01/01/87
1. This standard establishes the diameters of holes for cutting cylindrical pipe threads in accordance with GOST 6357-73 in steel products in accordance with GOST 380-71, GOST 4543-71, GOST 1050-74, GOST 5058-65 and GOST 5632-72 (except for alloys on nickel base) and copper according to GOST 859-66.
2. The diameters of the holes and maximum deviations must correspond to those indicated in the table.
Dimensions in mm
| Threaded hole diameter | |||||
| Nominal thread size in inches | Number of threads per G | Step R | Nom. | Prev. off for accuracy classes | |
| A | IN | ||||
| AND | 28 | 0,907 | 8,62 | + 0,10 | +0,20 |
| N | 19 | 1,337 | 11,50 | + 0,12 | + 0,25 |
| n | 15,00 | ||||
| And | 18,68 | ||||
| And | 14 | 1,814 | 20,64 | +0,14 | +0,28 |
| And | 24,17 | ||||
| And | 27,93 |
Official publication ★
Reproduction is prohibited
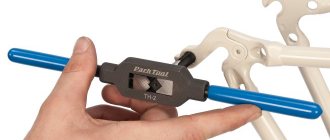
Tools for internal threading
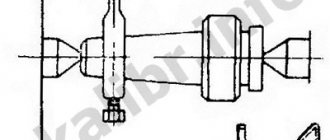
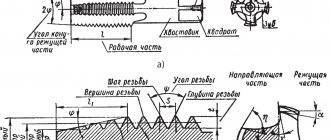
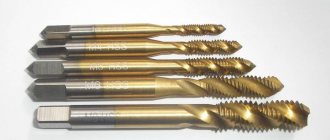
To make internal cutting, you need a tap - a screw-shaped tool with sharp grooves.
The rod can be shaped like a cone or a cylinder. The grooves run lengthwise and break the thread into sections called combs. It is the edges of the combs that are the working surfaces. Single taps are also found on sale; they are often used to correct broken threads. To cut a new one, buy a kit. Therefore, taps are usually sold in pairs: for roughing and for finishing work. The first one cuts a shallow groove, the second one cleans and deepens it. There are also three-pass tools. Thin taps, up to 3 millimeters, are sold in twos, wider ones - in threes. Three-pass taps are inserted into the gates. The design of the knobs is different, but their size must match the size of the cutter.
The tools in the set are distinguished by the marks marked on the tail end. If you look closely, you will notice differences in shape:
- the first tap has heavily cut tooth tips, the outer diameter is slightly smaller than the other tools in the set;
- second tap with shorter fence segment, longer ridges. Its diameter is slightly larger than that of the first;
- the third tap has full ridges of teeth, and its diameter should match the dimensions of the future thread.
Taps are divided into pipe taps (marked “G”) for cutting threads inside the pipe, and metric taps, which are more common.
Homemade tap for aluminum alloys
To create internal threads in brass or light alloy parts, you can use homemade tools and drills from a regular set. Calibrated steel wire will do. Using a die, an external thread is cut on it, after which the workpiece is hardened. After hardening, it is necessary to release the part to the color of ripe straw. The cutting edges are sharpened using a whetstone or sharpener, after first clamping the part into a collet chuck.
Video on how internal threads are cut:
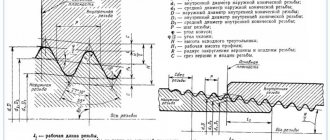
Hole parameters
Threads are distinguished according to the following characteristics:
- Unit of measurement. Throughout the country, the metric system is predominantly used. Inch values were used in the pipe industry.
- Thread pitch and number of thread starts. Non-standard parameters are used in the automotive and machine tool industries.
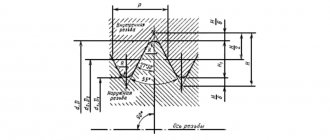
- Profile form. The figures differ in the type of cutting. There are elements of triangular, rectangular, trapezoidal and round shapes.
- Direction of turns. There are right- and left-handed cuts.
- View. External or internal.
- Surface type. It can be cylindrical or conical.
The main condition for a high-quality connection is the correspondence of the indicators of the external and internal threads. If one of the parameters does not match, the fastening will be unreliable.
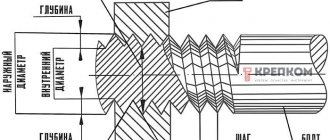
Drilling depth is one of the most important indicators. When calculating, the following factors must be taken into account:
- screw-in depth of the threaded element;
- the size of the external thread;
- presence and chamfer parameters.
To calculate the screw depth, the type of material being processed must be taken into account. For steel, titanium, bronze and brass no corrections are needed, but for gray and ductile cast iron a multiplying factor of 1.25 is used. For light alloys this figure is even higher - it is doubled.
How to cut correctly
Threads can be applied to almost any metals and their alloys - steel, copper, aluminum, cast iron, bronze, brass, etc. It is not recommended to do it on hot iron - it is too hard, it will crumble during operation and it will not be possible to achieve high-quality turns, which means the connection will be unreliable.
Tool for the job
Preparation
You need to work on clean metal - remove rust, sand and other contaminants. Then the place where the thread will be applied must be lubricated (except for cast iron and bronze - they must be worked “dry”). There is a special emulsion for lubrication, but if it is not there, you can use soaked soap. You can also use other lubricants:
- linseed oil for steel and brass;
- turpentine for copper;
- kerosene - for aluminum.
Metric thread parameters
You can often hear advice to use machine or mineral oil or even lard when cutting threads. They work well, but experts say that it is better not to do this - the chips will stick to the viscous substance, which will lead to rapid wear of the tap or die.
Slicing process
When cutting external threads, the die is placed strictly perpendicular to the surface of the pipe or rod. During operation, it should not wiggle, otherwise the turns will turn out uneven and the connection will be ugly and unreliable. The first turns are especially important. How they “lay down” determines whether the connection will then be skewed.
By applying the internal thread, the part is fixed motionless. If it is a small piece, you can clamp it in a vice. If the plate is large, ensure its immobility using available methods, for example, by fixing it with bars. M
The tap is inserted into the hole so that its axis is parallel to the axis of the hole. With little effort, little by little, they begin to twist in the given direction. As soon as you feel that the resistance has increased, unscrew the tap back and clear it of chips. After cleaning, the process continues.
Photo cutting process
When cutting a thread in a blind hole, its depth should be slightly greater than required - this excess should include the tip of the tap. If this is structurally impossible, the tip of the tap is cut off. At the same time, it is not suitable for further use, but there is no other way out.
In order for the turns to be of high quality, two taps or dies are used - rough and finishing. The first pass is done as a rough pass, the second as a finishing pass. There are also combined devices for applying threads. They allow you to do everything in one pass.
Another practical tip: to prevent chips from getting into the working area, when cutting, make one full turn clockwise, then half a turn counterclockwise. After this, return the tool to the place where you stopped and make one revolution again. Continue this way until the required length.
Adaptations
To apply carvings with your own hands, use small devices:
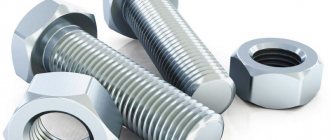
- dies (they are also called dies) for applying turns from the outside (usually onto a pipe or metal rod (pin);
- taps - for internal ones (you first need to make a hole for them).
All these devices are made of alloys characterized by increased strength and abrasion resistance. Grooves and grooves are applied to their surfaces, with the help of which their mirror image is obtained on the workpiece.
Any tap or die is marked - they have an inscription indicating the type of thread that this device cuts - diameter and pitch. They are inserted into holders - collars and die holders - and secured there with screws. Having clamped the thread cutting device in the holder, it is put on/inserted into the place where you want to make a detachable connection. By turning the device, turns are formed. How correctly the device is positioned at the beginning of work determines whether the turns will “lay down” evenly. Therefore, make the first revolutions, trying to keep the structure level, avoiding shifts and distortions. After a few turns, the process will become easier.
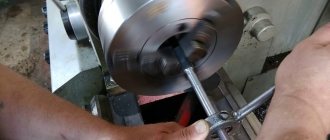
You can cut small or medium diameter threads by hand. Complex types (two- and three-way) or working with large diameters by hand are impossible - too much effort is required. For these purposes, special mechanized equipment is used - lathes with taps and dies attached to them.
Thread cutting order
Before cutting, it is necessary to chamfer the outer part of the pipe or workpiece at an angle of 45°. This is necessary to facilitate the first turns and fix the die.
Further actions:
- Secure the pipe or workpiece in a strictly vertical position. The best option to avoid distortions is a bench vise, but you can also use a gas wrench.
- Lubricate the tool with oil.
- Place the die on the head of the rod in a strictly horizontal position and start with the first few circles.
- If there is obvious misalignment in the first laps, remove the die, tap the workpiece and start again.
- When rotating on the first turns, simultaneously press evenly on the handles of the driver to begin the cutting process.
- After the first few turns, check that the thread is cut correctly. This can be done by checking the horizontality of the dies and the knob, which can be checked with a level. Next, with the correct position of the tool, you can continue cutting the pipe thread with a die to the entire required length.
- When approximately the middle of the length is reached, the pressing force can be weakened, then the self-tightening process begins.
- After one or two turns, it is necessary to turn the die half a turn back to remove chips.
- After cutting to the desired length, simply return the tool back along the finished thread.
It is necessary to take into account that the die can have several numbers, most often 2. In this case, after cutting the rough thread, it is necessary to go through each of the numbers in turn to finally form the thread profile.
Types of thread
They differ in their main characteristics:
- diameter calculation system (inch, metric, others);
- number of passes (two-, three- or single-pass);
- profile shape (rectangular, trapezoidal, triangular, round);
- direction of rotation of the screw (left or right);
- placement on the part (internal or external);
- shape of the part (cone or cylinder);
- purpose (running, fastening and sealing or fastening).
According to the listed characteristics, the following types are distinguished:
- cylindrical (MJ);
- metric and conical (M, MK);
- pipe (G, R);
- Edison round (E);
- trapezoidal (Tr);
- round for plumbing fasteners (Kp);
- persistent (S, S45);
- inch, including cylindrical and conical (BSW, UTS, NPT);
- oil range.
How to cut correctly
Threads can be applied to almost any metals and their alloys - steel, copper, aluminum, cast iron, bronze, brass, etc. It is not recommended to do it on hot iron - it is too hard, it will crumble during operation and it will not be possible to achieve high-quality turns, which means the connection will be unreliable.
Tool for the job
Preparation
You need to work on clean metal - remove rust, sand and other contaminants. Then the place where the thread will be applied must be lubricated (except for cast iron and bronze - they must be worked “dry”). There is a special emulsion for lubrication, but if it is not there, you can use soaked soap. You can also use other lubricants:
- linseed oil for steel and brass;
- turpentine for copper;
- kerosene - for aluminum.
You can often hear advice to use machine or mineral oil or even lard when cutting threads. They work well, but experts say that it is better not to do this - the chips will stick to the viscous substance, which will lead to rapid wear of the tap or die.
Slicing process
When cutting external threads, the die is placed strictly perpendicular to the surface of the pipe or rod. During operation, it should not wiggle, otherwise the turns will turn out uneven and the connection will be ugly and unreliable. The first turns are especially important. How they “lay down” determines whether the connection will then be skewed.
By applying the internal thread, the part is fixed motionless. If it is a small piece, you can clamp it in a vice. If the plate is large, ensure its immobility using available methods, for example, by fixing it with bars. M
The tap is inserted into the hole so that its axis is parallel to the axis of the hole. With little effort, little by little, they begin to twist in the given direction. As soon as you feel that the resistance has increased, unscrew the tap back and clear it of chips. After cleaning, the process continues.
Photo cutting process
When cutting a thread in a blind hole, its depth should be slightly greater than required - this excess should include the tip of the tap. If this is structurally impossible, the tip of the tap is cut off. At the same time, it is not suitable for further use, but there is no other way out.
In order for the turns to be of high quality, two taps or dies are used - rough and finishing. The first pass is done as a rough pass, the second as a finishing pass. There are also combined devices for applying threads. They allow you to do everything in one pass.
Another practical tip: to prevent chips from getting into the working area, when cutting, make one full turn clockwise, then half a turn counterclockwise. After this, return the tool to the place where you stopped and make one revolution again. Continue this way until the required length.