How to weld seams in the down position and corner joints
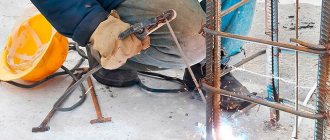
for beginners For beginner welders, it is best to learn to weld seams in the down position. In this case, the molten metal itself, under its own weight, tends to fill the weld pool. In this case, the welded edges of the product hold the molten metal, preventing it from flowing beyond the boundaries.
In addition, when welding in the lower position, the gas tends to rise, pushing the slag along with it, which is very important, since at the very beginning of training you need to learn how to separate metal from slag. All this contributes not only to easy learning, but also makes it possible, at the very beginning of the journey, to obtain a clean and high-quality welding seam.
Based on all of the above, you need to learn how to weld with manual arc welding in the lower position. What nuances should be observed and what should be taken into account?
What is the spatial position when welding?
Different standards have the following definitions for the term "welding position":
- the position of the weld in space, determined by the angles of inclination of the axis and rotation of the front surface of the weld relative to the horizontal plane. (GOST R ISO 6947 and ISO 6947)
- the relationship between the weld pool, the elements being joined and the heat source during the welding process. (AWS A3.0)
- The welding position is determined by the angle of inclination of the longitudinal axis of the seam and the angle of rotation transverse to the axis of the seam relative to their zero values. (GOST 11969)
The welding position, due to gravity, directly affects the nature of the transfer of the molten metal of the electrode into the weld pool and the welder during the welding process must take this into account and change the welding modes, the technique of oscillating the electrode and other parameters. The most famous are the lower, horizontal, vertical and ceiling positions, but there are a number of other positions that have their own designations, which will be discussed further.
Down position
The first steps in training all novice welders begin from the bottom position since it is the easiest. Welding is performed from above with the part located horizontally. Under the influence of gravity, the molten metal flows down and spreads evenly in the weld pool.
Vertical position
In a vertical position, the axis of the weld is located vertically, and welding is actually carried out horizontally from edge to edge. In this case, the molten metal, under the influence of gravity, will tend to flow downward, which entails its accumulation at one point, rather than its uniform distribution over the entire width of the roller.
Horizontal position
Compared to the bottom and vertical, the horizontal position is more difficult and the welder will need more skills and abilities to make a quality weld. The axis of the weld is located horizontally, and the main problem is that the molten metal of the weld pool tends to flow downwards, which is why weld defects often form in the form of undercuts.
Ceiling position
In the ceiling position, welding is performed in the most inconvenient position - above the head and requires a highly qualified welder. Before you begin welding ceiling seams, you must master welding in all other spatial positions. The molten metal of the weld pool tends to flow vertically downwards, so during the welding process it is necessary to ensure that the surface tension of the molten metal is greater than gravity and the metal remains in the weld pool. During the welding process, you must try to keep the weld pool as small as possible.
Let's sum it up
Having learned to work with welding equipment, it will be possible to solve many everyday problems that often arise when working in the country or in the garage. Beginners should pay special attention to the polarity of welding parts of different thicknesses with an inverter.
By understanding how to properly configure the equipment and choose an electrode, you will be able to obtain high-quality seams on any product. Be sure to pay attention to the forward and reverse polarity of connecting the welding inverter.
When welding thick parts, direct polarity is used when welding with an inverter, and for thin parts, reverse polarity is used.
Sources
- https://moiinstrumentu.ru/kak-varit-svarkoj.html
- https://WikiMetall.ru/spravochnik/kak-nauchitsja-varit-jelektrosvarkoj.html
- https://mrmetall.ru/kak-pravilno-varit-jelektrodami-nachinajushhim-jelektrosvarkoj/
- https://sovet-ingenera.com/santeh/svarka/elektrosvarka-dlya-nachinayushhix.html
- https://kak-sdelano.ru/instrumentyi/cvarka-invertorom-dlya-nachinayushhix
- https://instrumentiks.ru/sovety/svarka-invertorom
- https://tokar.guru/hochu-vse-znat/svarka-elektrodami-kak-pravilno-varit-nachinayuschim.html
- https://svaring.com/welding/teorija/azy-svarki-elektrodami
- https://www.svarbi.ru/articles/kak-varit-svarkoy-elektrodami-dlya-nachinayushchikh/
- https://tutsvarka.ru/vidy/svarka-invertorom-dlya-nachinayushhih
Designation of spatial positions on the electrode packaging
Welding is increasingly moving from the professional industry to the amateur industry, and proof of this is the presence of a welding machine in almost every garage or summer cottage. Manufacturers of welding materials, meeting the consumer halfway, do not indicate all these intricate designations of welding positions H45, B1, H1, H2, 2G, PA, etc., but provide information in an intuitive form. Some manufacturers indicate acceptable welding positions in the form of arrows on the packaging of electrodes, others - in the form of images, and some additionally indicate welding modes.
There will be those who will say that the designation of coated electrodes also indicates the permissible spatial positions and they will be right, but we wrote about domestic brands of electrodes in the article on manual arc welding, and about imported ones - this is the topic of a separate article.
What types of welding tools are there?
Before you learn how to use welding at home, let's look at the types of electric welding tools. The arc that occurs when melting metal can be formed in two ways - using direct and alternating current. If welding is performed with alternating current, then this indicates the use of transformers. Inverter devices cook with direct current.
Transformers for welding are used less and less, as they are being replaced by more efficient, reliable, inexpensive and lightweight inverters. Transformer types of devices are welded using alternating current, which results in the occurrence of arc jumps. Transformer devices are heavy because they are based on metal cores with copper windings.
If we talk about other disadvantages of transformer welding machines, they have a lot of them:
- Makes noise when working
- The network “sits down” when performing work, so voltage drops are observed that negatively affect the operation of household appliances
- It is very difficult for beginners to master the technique of transformer welding.
If we talk about advantages, then transformer devices also have them. They are easy to use, last almost forever and are not expensive.
Inverter devices operate from a 220V AC network. Their main difference from transformer devices is their size and weight. Instead of a bulky transformer, the design of inverter devices uses a board with semiconductor elements. They are not only small in size and weight, but also easy to use. If you are going to learn how to work with a welding machine, then it is recommended to do this using an inverter device. Using the example of inverter welding devices, we will consider the principle of applying welding seams in order to combine two metal parts.
Table of provisions and their designations in accordance with NAKS, ISO, AWS and GOST standards
In order to summarize the information presented above, we can say that each standard has its own nuances in the methodology for designating the positions of welds. In the article we tried to pay attention to all the main points of differences in the designation, and in the table below everything can be seen more clearly.
By the way, you can download this table from the link, which you can print out if you wish so that it is in front of your eyes.
| Drawing | NAKS | ISO | AWS | GOST | ||||
| H1 | lower | PA | lower | 1G | flat | N | lower | |
| P1 | ceiling | P.E. | ceiling | 4G | overhead | P | ceiling | |
| IN 1 | vertical (welding from bottom to top) | PF | vertical from bottom to top | 3G | vertical | IN | vertical | |
| AT 2 | vertical (welding from top to bottom) | PG | vertical from top to bottom | |||||
| G | horizontal | RS | horizontal | 2G | horizontal | G | horizontal | |
| H1 | lower | PA | lower | 1F | flat | L | into the boat | |
| H2 | lower T-joints | P.B. | horizontal position of T-joints | 2F | horizontal | N | lower | |
| IN 1 | vertical (welding from bottom to top) | PF | vertical from bottom to top | 3F | vertical | IN | vertical | |
| AT 2 | vertical (welding from top to bottom) | PG | vertical from top to bottom | |||||
| RS | horizontal | G | horizontal | |||||
| P2 | ceiling T-joints | P.D. | ceiling position of T-joints | 4F | overhead | P | ceiling | |
| H1 | lower with horizontal axes of pipes welded with rotation | PA | lower (rotating pipe) | 1G | flat rotated | |||
| IN 1 | variable with horizontal axes of pipes welded without rotation (uphill) | PH | vertical from bottom to top (fixed pipe) | 5G | multiple | |||
| AT 2 | variable with horizontal axes of pipes welded without rotation (downhill) | P.J. | vertical from top to bottom (fixed pipe) | |||||
| G | horizontal with a vertical arrangement of the axes of pipes welded without rotation or with rotation | RS | horizontal | 2G | horizontal | |||
| H45 | variable with an inclined arrangement of the axes of pipes welded without rotation | H-L045 | inclined position (fixed pipe) welding from top to bottom | 6G | multiple | |||
| J-L045 | inclined position (fixed pipe) welding from bottom to top | |||||||
| H1 | lower with horizontal axes of pipes welded with rotation | 2F | horizontal rotated | |||||
| H2 | lower when the axis of the pipe is vertical, welded without rotation or with rotation | P.B. | horizontal position with vertical position of the pipe axes | 2F | horizontal fixed | |||
| IN 1 | variable with horizontal axes of pipes welded without rotation (uphill) | PH | vertical position from bottom to top (fixed pipe) | 5F | multiple fixed | |||
| AT 2 | variable with horizontal axes of pipes welded without rotation (downhill) | P.J. | vertical position from top to bottom | |||||
| H45 | variable with an inclined arrangement of the axes of pipes welded without rotation | H-L045 | with inclined axes, with a welding direction “from bottom to top” and an inclination angle of 45° | 6F | multiple fixed | |||
| J-L045 | with inclined axes, with a welding direction “from top to bottom” and an inclination angle of 45o | |||||||
| 1F | flat rotated | |||||||
| P2 | ceiling with a vertical pipe axis, welded without rotation or with rotation | P.D. | ceiling position with vertical pipe axes | 4F | overhead fixed | |||
| Pg | semi-horizontal | |||||||
| Pv | semi-vertical | |||||||
| pp | semi-ceiling | |||||||
Types of welded joints
Currently, welding has become one of the most popular technological processes for connecting various parts and structural elements. The process is so technologically advanced that it is sometimes difficult to make a complete classification of all types of such a process. They are classified into two groups: the weld itself and preparatory work (edge preparation).
Types of welded joints
What are the types of welding seams and connections classification?
All types of welded joints are classified according to the following criteria.
By method of execution
According to the method of execution, the technological process is carried out as follows:
- high temperature melting;
- through pressure.
Melting creates conditions for improving atomic-molecular bonds due to high temperature and the introduction of additional metal.
The second method differs from the previous one in that plastic deformation of elements under strong pressure occurs near the welded zone. This helps improve the quality of the final result.
Welding methods
The heating itself is carried out using various types of technical techniques:
- creating an electric arc;
- formation of a flame using an oxygen gas mixture;
- high frequency current;
- using a laser beam.
To protect the area adjacent to the joint, various methods are used: work in special baths, an environment of inert gases. According to experts, the types of welds have more than 70 well-developed methods, called welding.
By degree of convexity
This parameter is defined as the cross-sectional profile of the resulting joint. Its shape depends on the loads that will be applied to the finished structure. The following types of seams are distinguished according to the degree of convexity:
- convex (with varying degrees of geometric roundness);
- normal (the seam is triangular in shape, the leg of the triangle is equal to the thickness of the sheet being welded);
- concave (the leg of the triangular joint is less than the thickness of the sheet by approximately 0.8);
- For fillet welds, special profiles are used (they deviate from the rule of creating an isosceles triangle and create a figure that has individual parameters).
