A hand router is a universal device that every home craftsman should have in his arsenal. The versatility of this power tool lies not only in the ability to perform various technological operations with its help, but also in the fact that, using the appropriate equipment, you can work with such a router not only on wood, but also on plastic, glass, natural and artificial stone, colored metal. In order for a manual router to effectively cope with all the tasks assigned to it, you should know how to choose the right device, as well as have an idea of its design features, technical characteristics and types of equipment that can be used with it.
It is very easy to get confused in the variety of milling cutter models on the market. Our task is to understand the nuances and make the right choice
Setting the basic parameters of a wood milling machine
Before you start working with a wood router, you should install the working attachment - a cutter, and set the main parameters - rotation speed and immersion depth.
Installing the attachment on the router
Cutting attachment
To insert a working attachment into a wood milling machine or replace an old one, you should adhere to the following algorithm of actions:
- Disconnect the router from the power supply. Check that the start button is turned off.
- Place the machine on its side so that the spindle lock button is at the top.
- Press the button while turning the spindle until it engages with the lock. Unscrew the collet nut with a wrench. Not all models of wood milling machines have a spindle lock button. Then you will need two wrenches. One is put on the nut located on the spindle for fixation. Use the second key to unscrew the collet nut.
- After unscrewing the nut, remove the cutter shank from the collet clamp.
- New equipment is inserted. The shank is immersed all the way.
- The nut on the collet clamp is screwed back - securely, but without much effort, so as not to strip the thread.
- Remove the lock from the spindle.
Clamping the router bit in a collet
Important! You cannot tighten the collet clamp nut if the cutter is missing - you can break the clamp.
Router bit speed
The choice of rotation speed of the cutting attachment of a wood router depends on two main parameters:
- type of material being processed;
- cutter diameter.
There is a general rule: the higher the cutter rotation speed, the cleaner and smoother the processed surface will be. At the same time, you should avoid exceeding the permissible speed, since the wooden workpiece may catch fire. It is recommended to work with hard wood at lower speeds than with soft wood.
Speed depends on wood hardness
There is an inversely proportional relationship between the diameter of the cutting part of the cutter and the rotation speed. The maximum permissible speeds depending on the diameter of the wood router bit are given in the table:
| Diameter, mm | Speed, thousand rpm |
| less than 25 | 24 |
| 26-50 | 18 |
| 51-63 | 16 |
| 64-75 | 14 |
| more than 75 | 12 |
Setting the milling depth
To work with a wood router at great depths, it is recommended not to immediately set the required indicator, but to achieve it in several stages. This is done to reduce the load on the machine and the working cutter. Adjustment of the depth level is carried out using a turret stop. This is a disk located under the barbell and equipped with stops of different heights - legs. As a rule, there are from 3 to 7. The turret stop is secured in the selected position with a special lock in the form of a flag.
Step-by-step procedure for setting the milling depth:
- Place the wood router on a flat surface, releasing all clamps.
- Press the cutter with your hand until it rests on the surface.
- Unscrew the turret stop lock.
- Select the leg that corresponds to the required immersion depth of the milling attachment and turn the disk.
- You need to hold the bar with your finger, but do not fix the screw. The movable pointer moves until it coincides with the zero mark, as shown in the photo.
Adjusting the moving pointer to zero
- Raise the rod to the mark corresponding to the milling depth.
- The turret stop lock is lowered.
Interesting! Some expensive models of wood milling machines are equipped with a wheel for precise depth control. Due to this, you can adjust the value without disrupting the previous settings.
Milling depth adjustment wheel
What do you pay special attention to?
When working with a hand router, first of all, you must follow safety precautions :
- reliable fastening of the workpiece on the table and the cutter in the chuck;
- installation of a cutter and any repair work with a guaranteed de-energization of the tool;
- attentiveness when working, concentration, stability of position;
- use of protective measures - glasses, gloves, buttoned clothing, respirators.
The movement of the router should be opposite to the direction of rotation of the cutter to avoid dynamic impact. In one go, you should not sample material to a depth of more than 5-6 mm.
What kind of work can be done with a wood router?
Step-by-step technologies for work performed with a hand-held wood cutter: cutting grooves, sharpening ends and edges, inserting locks, tongue-and-groove joints.
Work on sampling open and blind grooves
To mill an open groove in a wooden workpiece, the following algorithm works:
- Lower the milling cutter head to the desired depth, securely fixing the workpiece.
- Connect the machine to the power supply, start the engine and start milling.
- After the cutter has completely made the groove, it is raised and the clamp clamp is loosened.
- Turn off the router.
Open recess
Using the same principle, a blind groove is selected, with the difference that work begins not from the edge, but from the beginning of the planned recess.
Sampling deep grooves
Before cutting a deep notch in a wooden part, it is worth starting from the basic principle. Each pass of the milling machine attachment across the processed area of a wooden workpiece requires setting a new depth indicator. In this case, at the time of adjustment, the milling cutter must be turned off.
To obtain a smooth surface of a deep groove, the recommended immersion value is from 5 mm. But the last layer should be processed at a depth of up to 1.5 mm.
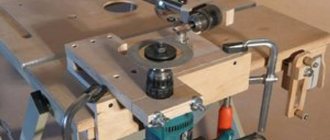
Cutting a narrow groove
To select a small-width groove in a wooden workpiece with a milling cutter, additionally use a flat base. We are talking about a plywood sheet or a thin wooden slab. This device is attached to the base of the milling machine. To ensure that the router attachment moves in a straight line, special guide rods are mounted on both sides of the base, which must be at the same distance from the cutting attachment and must be in line with it. It is also worth making sure that the rods are evenly pressed against the sides of the wooden workpiece being processed.
Help base with guide rods
Sharpen the end
To properly process the end side of a wooden product with a router, it is enough to follow two principles:
- First, a shallow cut is made. The manual milling machine is driven in the direction of movement of the cutting attachment. These actions will allow you to obtain a uniform removal of the wood layer on the end surface.
- To clean the end, the router is driven against the direction of rotation of the cutting attachment.
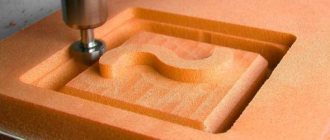
How to make decorative trim
Thanks to the good flexibility of wood, craftsmen can mill designs and patterns of varying complexity and shape on this material.
Decorative finishing
In addition to a manual wood milling machine, the work requires several auxiliary tools:
- vice;
- chisel;
- jigsaw
The work of cutting out decorative trim with a wood router consists of three main stages:
- Transferring the image to a wooden surface so that it is well printed. An option is to use a stencil, tracing the contours of the pattern with a black alcohol-free marker.
- The router is moved along these contours, achieving the desired pattern.
- Removing wood layer by layer gives the image more volume.
Lock installation work
Using a hand-held wood router, you can also cut grooves for the future lock. This procedure is performed in the following order:
- The tool needs to be fitted with a straight groove cutter with a diameter 0.5 mm larger than the lock plate.
- Set the immersion depth to 3 mm.
- Attach the parallel stop to the machine sole.
- Place the lock plate on the end side of the door and trace its outline with a pencil.
- Find the center of the door edge and draw a line through it along the door leaf.
- A wood router with a parallel stop is installed on the end of the door. The cutter is centered along the marked line, the stop is fixed in this position.
The milling machine is placed on the end of the door
- The entire length of the treated area is milled. The result will be a wide recess of small depth for the front plate of the lock.
- A lock is applied to the resulting groove and the starting and ending points of the deep recess are marked.
- Install a straight groove cutter for wood with a diameter slightly larger than the thickness of the mortise lock body. The shank of the equipment must be of such length that it is possible to select a groove with a depth of 3 mm greater than the height of the lock body.
- Clamp the cutter in the collet.
- Using the regulator, set the immersion depth, which will be sufficient to insert the lock body.
- Drill at the specified depth along the entire length of the section.
- After working, the cutting part should be slightly pulled out of the groove by 1-2 mm, and several passes with the router should be made back and forth. Then the cutter plunges deeper again and the procedure is repeated. This is done to obtain even walls and the bottom of the groove.
Ready groove for the lock
Choosing a manual router - how not to get lost in the characteristics?
When purchasing a tool for your own use, you should keep in mind some features of your choice. First of all, let's look at the technical specifications. Power is considered the most important indicator, and the more it is, the better. But in tandem with it, you should also look at the speed of the cutter; if these parameters do not correlate, then the tool will not meet your expectations. High power at low speeds makes no sense and vice versa. It is important to pay attention to the accuracy of the device; an error of about 0.5 mm is quite enough for good quality work in everyday conditions.
It is quite difficult to answer the question of how to choose a good quality hand router at a low cost. It is impossible to do this in any product category; it is better to look for the “golden mean” option, then the price will not be too high, and the material of the cutters and devices will be of good quality. Mandatory functions for high-quality and convenient operation are soft start and speed control. It wouldn’t hurt to evaluate the cutter fastening mechanism and the locking device; reliability is important here, first of all, for your own safety. And the ideal choice would be a hand router with a stop bar, an elevator regulator and a nozzle for a vacuum cleaner.
Work on sharpening edges with a wood router
One of the main techniques performed with a manual wood milling machine is processing the edges of workpieces.
Edge milling
To simplify the work, special flat templates are used. A pre-treated wooden board or plywood sheet works well. There is a requirement for the template: its length must be greater than that of the workpiece, both before and after milling. This is necessary to ensure that the edge is smooth. The thickness of the template should not exceed the size of the gap between the support bearing and the head of the straight edge attachment for wood on a milling machine.
Curved edge
For curve sharpening of an edge with a wood router, a template with a special thrust ring in the form of a round plate with sides is used. The movements of the insert along the template ensure the correct trajectory of the tool's cutting head. The thrust ring is screwed to the base of the milling machine with bolts. The template is fixed to the surface to be treated with tape or clamped with clamps. Only after this can you start milling.
Curved edge
Interesting! You can put on stream the production of wooden products with equally sharpened curved edges using special templates.
Edge and quarter
Work with a router to cut a quarter groove on the edge of a wooden workpiece is carried out in the following sequence:
- An even, smooth template is fixed on the milling table.
- The wooden blank is clamped with clamps.
- The cutter should be installed so that the cutting head moves along the workpiece and the roller follows the template.
- Place the nozzle in the working position and clamp securely.
- Turn on the manual wood milling machine and perform movements according to the template. There is an important point about the rotation speed of the cutting head. The greater the processing depth, the lower the speed required.
- After completing the first full pass along the edge being processed, it is worth turning off the router and carefully inspecting the quality of sharpening. If there are no complaints, the clamps can be unclenched and the wooden part can be removed. If the processing requires improvement, another full pass is made with a milling cutter.
Quarter notch
Processing an edge wider than the length of the cutter
Step-by-step technology for working with a manual router for the case when the length of the cutting part of the nozzle is less than the width of the edge of the wooden workpiece:
- Secure an even template.
- Make the first full pass of the cutter over the area being treated.
- Remove the template.
- For the second pass, the already sharpened edge serves as a template. The support bearing of the router bit is guided along it.
- If this length of the cutting plane is not enough for normal milling, another pass is performed.
- The workpiece should be turned upside down and pressed with clamps.
- An attachment with a bearing at the end is attached to the milling machine. It will move along the already processed surface, and the cutting blades will sharpen the remaining areas of the edge.
Working with a bearing attachment
Shaped edge milling
It is possible to sharpen the edge of a workpiece with a wood milling machine under one condition. The slightest roughness and burrs on the surface of the wood are not allowed. This will lead to poor quality processing, so all defects should be eliminated first.
If the surface of the edge is uneven, and this cannot be completely eliminated, you need to cut a rectangle from a sheet of plywood up to 10 mm thick with a jigsaw. A pattern for a curly edge is applied along its edge. This rectangle will be the template. Already using the contours drawn by the milling machine, an even shaped sharpening is achieved. Areas where a large layer of wood needs to be removed are additionally worked with a jigsaw.
Figure milling
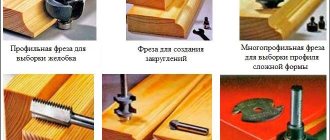
Milling cutters
Working with a stop or guide and using a special cutter, make grooves for installing furniture hinges. For precise longitudinal positioning of holes, you can use a special tire that allows you to rigidly fix the position of the router at standard length intervals.
Some tenon joints are made using one cutter (a counter profile is not needed).
Special cutters required for making binding.
Special cutters required for making binding.
One of the cutters (profile) forms the edge of the part; pair (counter-profile) “pass” the end of the mating workpiece.
One of the cutters (profile) forms the edge of the part; pair (counter-profile) “pass” the end of the mating workpiece. This equipment is easy to use and also allows you to mill curved edges.
This equipment is easy to use and also allows you to mill curved edges.
Work on milling wood blanks for tongue-and-groove joints
Another purpose of a manual milling machine is to process the edges of wooden products to connect them to each other. A groove is cut out on one workpiece, and the second is milled for the corresponding tenon.
Parts for the tongue-and-groove connection
The work takes place in the following sequence:
- The first block of wood will go under the tenon. The length of the protruding part is set off from the edge, and markings are applied. It is recommended to measure up to 40 mm for furniture legs, and 60-70 mm for doors.
- A shallow cut is made along the marked line with a hacksaw.
- Install the wood cutter in the collet of the hand-held machine. For such work, tongue-and-groove attachments are used on the router, two in one set: one for the tenon, the second for the notch.
- The workpiece is placed on the workbench. It is worth fastening another wooden beam of similar thickness perpendicular to it - it will serve as a support for the sole of the router.
- On the milling machine, the immersion depth of the cutting attachment is set. This indicator is set taking into account the fact that after turning the workpiece over and the second pass with the cutter, the result should be a tenon of the same thickness as the width of the groove. After setting the depth, the limiter is set.
- The router is turned on and tenon sampling begins. The required depth is not achieved immediately, but gradually, with an increase of 3 mm after each time.
- After the nozzle has completely passed to the specified depth, the machine is turned off, the workpiece is turned over and a sample is made on the other side using a similar method.
- Since the groove in the center of the wooden piece will have rounded edges, the tenon should be given the same shape. A well-sharpened knife or sharpening machine is suitable for this. If the groove and tenon run along the entire length or width of the wooden parts, there is no need to round the corners - the notch will be rectangular.
Tenon and notch roundings
- The groove is extracted using a groove cutting attachment according to the standard procedure already mentioned.
One of the options for a tongue-and-groove connection is the so-called. dovetail. A special groove attachment known as a dovetail is installed on a manual machine. An additional metal template with slots specifically for this type of recess is also required. To ensure that the cutting head fits into the template slots without displacement, a copy sleeve is installed on the wood router. The selection of the tenon and groove is done as standard.
Dovetail pattern
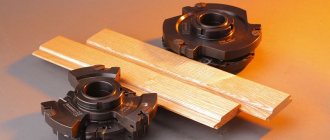
Manufacturers
Slab leveling cutters are supplied by various companies. But you should choose not so much a supplier as a specific model. CMT PRO 901.3206 has a good reputation. This product is equipped with replaceable knives. The manufacturer positions it as the best option for inexperienced milling operators.
The technical parameters are:
- outer diameter – 3.175 cm;
- the shank has a cross-section of 1.2 cm;
- height of the cutting part – 0.57 cm;
- total length – 6 cm.
The CMT PRO Z2 also deserves attention. This cutter is equipped with soldered knives. Selected tungsten carbide is used to produce them. The cutting product is suitable for leveling:
- general large-area blanks;
- slabs;
- shields
This property, which in technology is called the shaving angle, allows you to maintain smooth edges and the same bottom in any groove. The main materials processed are wood of varying strengths, particle boards and MDF.
Main parameters:
- length – 10 cm;
- height – 7 cm;
- width – 7 cm;
- weight – 0.15 kg;
- cross section – 3.175 cm;
- torsion rate – RH.
Dimar 1601045 can also be considered an attractive alternative. This leveling cutter has replaceable knives. The manufacturer positions its product as suitable for low-power milling cutters. With a cross-section of 4.2 cm, the height of the cutting part is only 0.6 cm. The cross-section of the tail is 0.8, and the total length is 7 cm. Weight is 150 grams, and there are also as many as 6 working teeth versus 2 in the previous model .
But the list of models can go on for a long time, but it is still worth approaching the matter differently: through a description of their manufacturers. Among the many companies in this area, European suppliers occupy a very good position. We are not just talking about the already mentioned CMT brand.
Many alloys for tools of this kind have been patented in Western European countries. The Bosch corporation alone holds at least 5,000 active patents alone (not counting expired and pending patents).
The production of cutters in the USA also deserves attention. We are talking about brands such as:
- Jet;
- SGS;
- Ondrud;
- Micro100 and a number of similar companies.
The American approach is to use particularly strong alloys. But even against the general background, Best Carbid milling devices stand out. Products under this brand are coated with special coatings, which allows them to work successfully with various materials. There are options for:
- non-ferrous metals of all types;
- nickel-based alloys;
- titanium;
- various grades of steel.
Japanese concerns provide solid competition to firms from the EU and the USA. We are talking about the following brands:
- XEBEC;
- Kyocera;
- NS Tool;
- Mitsubishi
- Dijet.
Japan also boasts an abundance of specific grades of metal. As for South Korean products, they are cheaper than the products of the three leading centers mentioned, but the quality is quite comparable to them. We cannot discount domestic suppliers, such as Globus, Corvette, and so on. Yes, the technology is mostly outdated, but the quality of the materials themselves is quite decent. With Chinese products everything is much more complicated.
Mostly in China, cutters are made from budget alloys with a hardness level of no higher than 55 HRC. There are also harder options, but the raw materials for them are imported. It is recommended to purchase milling equipment from major manufacturers. Firms Jtol, Djtol are distinguished by excellent production equipment. Their products are at the same price and quality level as products from Europe.
Recommendations for working with a wood milling machine
Milling work on wood will be safe and highly productive if you adhere to the basic recommendations for beginners with little experience:
- Before plugging the power cord into a power outlet, check it for damage to the insulation.
- It is worth removing all foreign objects from the workbench or milling table to prevent them from accidentally falling under the working router.
- Only well-sharpened cutters can be used. Sharpness is checked by lightly holding the thumb at a right angle to the cutting plane. If you feel a slight grip of the skin of your finger on the blade, then it is suitable for work.
The sharpness of the cutter is checked manually
- The support bearing of the router attachment is pre-lubricated with oil.
- The shank of the working attachment must fit into the collet as far as it will go.
- Do not hold the workpiece with your hand. It is fixed only with clamps.
- Correct setting of immersion depth and speed is the basis for successful milling. The harder the wood, the lower the speed you need to work.
- After starting, you should wait until the cutter reaches the desired speed. It is impossible to process at insufficient speed - the workpiece will be damaged.
- The milling machine must be held so that the working attachment is always in sight.
- Do not put too much pressure on the workpiece. The router runs smoothly, without jerking or slowing down when turning during figure processing.
Turning speed must not be reduced
- When operating for a long time at low speeds, the machine must be allowed to cool. To do this, turn on the maximum idle speed for half a minute: during this time, an air flow is formed that cools the engine.
- The deep layer of wood can only be removed in stages, with a gradual increase in the depth of immersion by 3 mm.
- You need to work on a wood milling machine without haste or loss of concentration.
- During milling, eyes must be protected with goggles, and respiratory organs with a respirator or mask.