Metal punching, or neat execution
So, to create a wide variety of details, from decorative elements and other forms, you often need not only figured cutting or bending, but also metal carving. This is mainly necessary for fastening parts of various structures, and for the most part it is needed solely for decoration.
In accordance with the requirements of appearance and the use of the source material, the extrusion method is determined. For example: for a thin fabric with a density of 0.5–4 millimeters, punching using a special machine will be more effective.
The master takes into account the method of working with the part based on the requirements of the technical design documentation standards.
There are two methods of punching metal: with full and partial diameter. In the first case, the design size of the hole is implied. For the second, it is typical that the size will be smaller than the original and will require further processing.
For the most part, mechanized presses are used for this work with metal; in theory, they are divided into hand tools. These are those that require the regular presence of a person, and those that are fully controlled by an automatic CNC system, a turret punch press.
The essence of technology
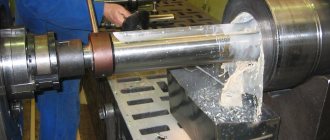
Most often, holes are punched in sheet metal 0.5–4 millimeters thick, since due to the design features of the machine used, working with pipes and thicker sheets is practically impossible.
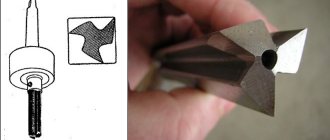
The process itself is carried out using a punch - a punch made of hard alloys, and a matrix - a perforated “substrate” on which the workpiece is placed. Punches can have a variety of shapes, which makes it possible to apply various types of perforation.
The resulting perforated sheets can be used in a wide variety of applications and act as parts of metal furniture, frames of advertising structures, protective covers and grilles.
Conventionally, manual methods of punching metal
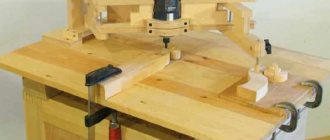
Press shears are used as the most accurate and inexpensive method of working with metal. This method is much slower, but optimal for small or private production. Often used in the absence of a mechanized CNC machine.
If we take general concepts, then this method has few differences from the automated one.
Markings are applied to a pre-prepared sheet of metal, but manually. Then the required hole is pressed out with a press.
This approach is the cheapest, but gives a large error in operation, and therefore is not suitable for use in large-scale production.
What tool do you need to use?
When answering the question of how to drill tiles, experts pay attention to the possibility of using different tools. Of course, drilling tiles is a labor-intensive job and must be done with pinpoint precision. Any tile, including porcelain stoneware, cannot boast of high ductility, so improper drilling of ceramic tiles can easily cause a crack; the tile often simply splits into several pieces. On the other hand, the material described has a high density; incorrectly selected drills become dull in a matter of seconds.
Summarizing all of the above, we can draw intermediate conclusions: making a hole in ceramic tiles is not so easy, during drilling you cannot apply excessive load, and you cannot use drilling methods that create vibration. The drills themselves must be made of high-strength materials that have the desired shape and sharpening. Various tools are suitable for similar parameters; we list those that will help drill through tiles.
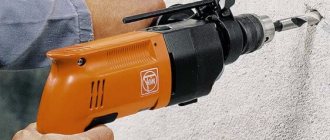
- Electric drill with smooth speed control function.
- Screwdriver with powerful power source.
- Hand Drills – These are ideal for drilling dowel holes.
- Standard drills.
- Spear drills.
- Drills with acute angle sharpening.
- Crowns with diamond or corundum coating.
- Ballerina drill.
- Conductors.
- Water pumps.
The choice of tool largely depends on the range of tasks.
Automation to help people
Revolving coordinate-punching machines with program control allow you to achieve high productivity and accuracy, eliminating the use of human resources in production. This reduces the risk of injury at work. Thus, before starting operation, a program with precise instructions for the required perforation is entered into the built-in CNC devices. It contains a careful plan for the location of the holes, their exact shapes and sizes.
Each such press is equipped with special punching mechanisms made of a harder alloy, different in diameter and shape - punches. They are automatically replaced by the system depending on the installed program, which speeds up the process. The maximum operating speed of such a machine is 1500 holes per minute.
The turret machine is capable of performing other actions:
– punching – extrusion of various shapes and production of curved edges;
– molding;
– incomplete punching.
Everything is done quite simply. The sheet of iron is firmly held together with clamps and the CNC program starts. The same clamps automatically move the workpiece in accordance with the specified coordinates.
Punchers first press the metal to half the thickness of the sheet, after which they squeeze, tearing and separating it from the solid surface.
The rotating drum included with the machine provides a number of additional capabilities for cutting a wide variety of shapes.
But such mechanical equipment is very expensive and is more suitable for large enterprises and industrial complexes.
In some cases, the use of mechanisms is very conditional, and more often it is the use of a mechanical, pneumatic, or hydraulic press. They are considered manual options because they require constant outside supervision.
Methods
Punching can be done manually or automatically.
Manual
In this case, specialized press shears are used. They may have different operating principles: mechanical, pneumatic or hydraulic, but the result will always be the same.
The process looks like this:
- The workpiece is marked - the centers of future holes are marked with a core.
- The marked sheet is manually moved along the frame of the shear press until the markings coincide with the center of the punch.
- The press is started - the punch squeezes out part of the metal from the workpiece, leaving it in the matrix.
Due to manual control, this method cannot provide the highest accuracy and productivity, so large-scale production uses automatic CNC machines.
Automated
High-performance coordinate punching presses are used for automatic punching. Previously, even before placing the workpiece on the table, a program containing information about the location and shape of all the necessary holes is entered into their memory.
Modern machines are also called revolving machines, as they have a rotating drum in which punches of various shapes and sizes are installed. Depending on the program, they automatically replace each other without human intervention and stopping work. This design allows the production of up to 1500 holes per minute.
Unlike the manual method, the workpiece sheet is fixed on the table with special clamps, which move it in the plane according to the entered program. In this case, during operation, the press head first presses the metal sheet with a special pressure ring, which ensures fixation of the working area, and then uses the corresponding punch.
Thanks to the use of a rotary tool, the machine can also be used to perform perforations of complex shapes. In addition, it has additional functionality and can perform punching, molding and partial punching, which significantly expands manufacturing capabilities.
Pros and cons of metal punching
Unlike drilling, punching holes is much more profitable. It takes less time, eliminates heating and edge defects, oxidation or crystallization of the surface.
There is also a disadvantage to such work: the metal structure may become compacted or a microcrack may appear, which will lead to corrosion. There is a risk of burr formation and the need for subsequent processing.
Punching holes in metal involves the use of high pressure, and if a smaller hole diameter is planned, then it is better to replace it with drilling. For example: the need for additional holes in the pipe to obtain a drainage system. This is not always possible using pressure; more often they use:
– drilling holes to order – if the required size is less than the density of the material itself;
– milling – when punching and drilling cannot be used;
– laser – when pinpoint precision is required. The width of the resulting hole is equal to a tenth of a millimeter.
However, despite the mentioned errors in the use of punching, they cannot be called significant. And modern CNC machines are able to provide high speeds with an accuracy of 0.05 millimeters, which makes working with metal efficient and reliable. Perforated metal sheets are a guarantee of strength and lightness, which, together with the coating used to protect the metal, makes it the best base for any endeavor. As a striking example, only a few of them can be highlighted:
– elements of architectural decor;
– some furniture parts;
– beautiful protective covers and fences;
– main details of street banners;
– gratings and filtration systems.
Drilling holes in metal. 7 tricks. This will come in handy.
You may not often have to drill into metal, but knowing these rules will greatly simplify the process and save a lot of time.
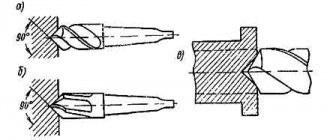
The first tip may seem trivial, but you should not neglect it.
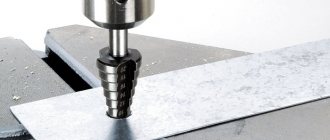
1. Punching the drilling point.
Metal must be tilted
.
This is necessary so that the drill does not go sideways. The stronger the core
, the
less the drill moves.
2. Revolutions and diameter of drills.
The
smaller the diameter of the drill
, the higher
the speed
you should drill.
This way the drill is less likely to break. This rule works almost always.
3. Cool the drill
Use coolant
– oils, emulsions.
If there are no special coolants, then you can use ordinary water - it’s better than nothing
.
Especially if the drilling depth is large and the drill gets very hot.
4.Sharpening
Make sure the drill is sharpened
If it
makes a whistling
sound when drilling, it means it is
dull
.
There is no point in continuing to drill with it - you will completely ruin the drill. Let's get on with it and continue working.
5.Mark
The label is useful
both when drilling
through
and
blind holes.
When drilling blind holes, it is easier for us to control the drilling depth.
When drilling through holes, we can see when the drill comes out
(dangerous and important point!)
You can make a mark on the drill with a marker or electrical tape.
.
Or - if the machine has a limiter
, set the desired depth.
Secure the part.
If this is not done, drilling accuracy will decrease.
, especially with a low weight of the part, and there will be a possibility that
the drill will “bite” and the part will “wrap” around it
, and this can lead to injuries and a damaged product.
How to make a small diameter hole?
In order to hang shelves or hooks in the bathroom, you need to drill a small hole in the tile, such that a dowel with a diameter of up to 12 mm can fit in it.
This operation can be carried out when the tile is already firmly seated on the wall, when the glue under it has set well. The algorithm of actions is as follows:
- We determine the drilling location and try to mark it so that it is no closer than 15 mm to the edge of the tile.
- A drill of the required diameter is inserted into the drill chuck; when choosing a drill, take into account that the hole in the wall should be a couple of millimeters wider than the diameter of the dowel plug.
- Apply strips of construction tape in a crisscross pattern to the marked area.
- We drill the tiles very slowly at low speeds. It will be difficult to get through the first, top layer of tiles, but then progress will go much faster.
- As soon as the thickness of the tile is covered with the help of a drill and a drill, and the drill reaches the wall, the drill must be stopped, the drill removed and replaced with a regular nozzle designed for perforating walls. The diameter of the nozzle must match the diameter of the dowel.
- The wall is drilled to the required depth. It is easy to control if you first mark the depth of penetration with a marker on the tip of the nozzle. It is necessary to operate the tool with extreme caution, since a long drill can form a slight “beat” during operation.
- After the drill reaches the required depth, a dowel is inserted into the hole made and carefully driven in.
- The last stage is to screw any required fastener (screw or hook) into the installed dowel.
Detailed instructions on how to drill tiles and make a small hole will help you avoid the most common mistakes.