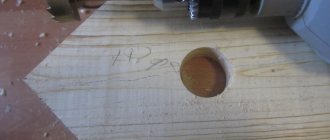
Almost everyone knows how to drill a round hole, but not everyone knows about a drill for square holes. Meanwhile, you can drill a square-shaped hole both in soft wood products and in harder metal parts. To solve this problem, special tools and devices are used, the operating principle of which is based on the properties of the simplest geometric shapes.
Watts drill
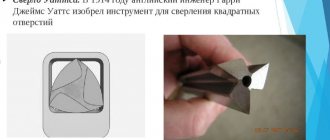
About Watts drill and Reuleaux triangle
In order to understand how the Watts drill works, you need to take a short excursion into geometry. Back in the 15th century, mathematicians became interested in the interesting properties of flat figures with equal thickness. The most famous such figure is the circle. Another simple shape from this series is a rounded triangle.
This figure turns out like this. An equilateral triangle is taken as a basis. Then a circle with a radius equal to the side of the triangle is drawn from each vertex of the triangle. The result will be a new shape with arched sides (see picture below).
A little later, the scientist L. Euler drew attention to the interesting trajectory of rotation of a rounded triangle. Then the engineer Reuleaux saw that with a certain way of rotating the figure, the trajectory of its vertices describes a shape very close to a square. To do this, it is necessary to rotate with some eccentricity. With this movement, minor roundings are formed only in the inner corners of the resulting square. Such a triangle is today known as the Reuleaux triangle.
At the beginning of the 20th century, the English scientist Watts was able to invent and patent a technical solution that would ensure such movement of a metal-cutting tool that it would ultimately result in a square hole in the workpiece. The resulting tool became known as the Watts drill.
Classification of drills for square holes
In modern metalworking, almost all cutting tools that are used to produce square holes work on the principle of rotation of the Reuleaux triangle. A Watts drill (or as it is sometimes called a Reuleaux drill) allows you to make square holes of various sizes in metal parts of various thicknesses. This tool is classified according to its size, material of manufacture, and shank design.
A Watts metal drill must be made of high-speed steel. This tool is marked HSS (High Speed Steel). For domestically produced tools, tool steel U10 or alloy steels X12 and X12MF are used. The hardness of the tool should be between 52 and 60 HRC. A square drill can have different diameters depending on the size of the side of the square.
Note that buying a Watts drill is quite difficult. Don't expect it to be available in every hardware store. You may have to purchase it to order from a large tool store or buy it from an online store.
Features of drilling square holes in wood
In furniture production, parts are often connected using a tongue-and-groove system. This connection assumes the presence of square grooves in the supplied parts. To make holes in wood, use a special square wood drill. It is a set of slotting tools. It consists of an internal wood drill and a chisel that fits onto it. Typically, the drill diameter ranges from 6 to 18 millimeters. The shank usually has a diameter of 19 millimeters. Such kits can be installed on slotting and drilling machines.
Attach the bushing holder
Once you have removed the old socket, begin installing the hardware from the kit.
First you need to install another cartridge from the kit.
- Returning the ejector head to the recessed position, smoothly push the cartridge upward so that the cone is fixed in the spindle head. To do this, insert the cone into the hole and twist until you feel the stroke become tighter. If the cartridge falls out when you remove your hand, repeat this action again.
- Once the cone chuck is in place, hit it once with a hammer. When this step is completed, the chuck should work without the slightest extraneous movement. We fix the bushing holder.
- Once the new chuck is installed, simply slide the bushing holder onto it and tighten the top knob. When you complete this step, mark at what height of the spindle head the holder is attached. If you fix it too high, you simply won't be able to insert the drill into the chuck.
The principle of operation and design of the Watts drill
Drilling square holes using a Watts drill is based on the principle of rotational movement of the Reuleaux triangle along a specific eccentric trajectory.
The shape of the drill does not exactly follow the rounded triangle, but its cutting edges fit into its shape.
The drill has such a shape of cutouts in order to remove chips from the working area, as well as to minimize the moment of inertia of the tool. In addition, reducing the weight of the tool helps reduce the load on the spindle of the metal-cutting machine, and sharpened edges increase the cutting capabilities of the drill.
In addition to the Watts drill, the work will definitely require an adapter spindle, which will provide an alternating displacement of the center of the tool and set the trajectory required for the work.
It consists of an adapter for connection to the machine spindle, a ring gear, a drive gear and an engagement gear, as well as oscillating bushings. To use a square drill with household power tools, manufacturers produce special attachment templates with a cardan drive.
Operating principle and design of the Reuleaux triangle
The Reuleaux triangle is a flat geometric figure. It is formed by connecting the vertices of an equilateral triangle with circular arcs drawn from each vertex of the same triangle.
The peculiarity of the Reuleaux triangle is that when performing a rocking motion, its vertices describe the trajectory of an almost perfect square.
The only drawback of this rotation of the Reuleaux triangle is that small roundings remain in the corners of the square.
If it is necessary to obtain a square hole with internal angles of 90 degrees, it will have to be modified. This can be done manually using files and rasps or on a slotting machine.
Methods for lengthening a tool, their features
Most ways to increase the length of a product involve attaching an extension to its shank. A specific method should be selected based on the diameter of the tool, the availability of auxiliary equipment, and the desired final length.
The most common methods:
- making a chamfer on the shank and extension followed by scalding. Next, clamping is carried out in the spindle on one side, fixing with the center on the other, and then turning;
- drilling a hole in the extension with a diameter equal to the diameter of the tool shank, then further welding the elements;
- fastening with thread. The method is similar to the previous one, however, in the hole of the extension, on the surface of the tool, a thread is made, with the help of which the components are fixed;
- dovetail connection. A groove is made at the end of the extension, and a spike of the appropriate shape is made at the end of the drill, with the help of which the elements are connected and then soldered;
- the use of a metal or wooden “chop”, which is suitable for use in household drills, but allows you to increase the length only by a small amount. To do this, the element is placed in the drill chuck, and then a drill is inserted into it, the reach of which becomes larger due to the use of a “chopper”.
When extending the tool, remember that the part used as an extension should be selected with a slightly smaller diameter than the drill. In addition, when working with a converted product, you should adjust the cutting conditions when drilling.
Alternative options for making a square hole
Although the Watts drill is the most productive and accurate tool for making square holes, there is more to be said about how to drill a square hole using other methods.
There are several good methods for this. When working with square drills, the resulting hole in the workpiece will have small radius roundings, which then need to be eliminated by other operations. In addition, there is no possibility of working with parts of significant thickness.
Let's take a closer look at these methods:
- In production conditions, the most accurate finishing method for cutting a square hole is laser cutting. But for this it is necessary to have expensive complex CNC machines in the equipment park.
- Another method is to drill a round hole in the part with the diameter of a circle circumscribed by a square. Then the corners of the hole are welded with the template inserted. This method requires a welding machine and appropriate skills.
- In mass production conditions, when working with sheet and thin-walled metal, square holes are produced by sheet stamping. In single production this is not relevant, since it requires the manufacture of cutting or punching dies.
- When working at home, if you need a square hole that is not very small in size, then you can drill it in the following way. A round hole with the diameter of a circle inscribed in a square is made in the part using an ordinary metal drill. Then the imaginary corners and edges of the square are straightened using a file and chisel.
- For working with thin metal, special square punches are also available. Their maximum size is 70 by 70 millimeters.
Work order
Large square hole
Many have already guessed what the approximate list of work will be as soon as they found out the tool required for the job.
1 The idea is as follows. A rectangular cut is formed longitudinally in the workpiece, the width corresponding to the size of the side of the square being drilled. The depth is selected taking into account the dimensions of the workpiece so that the center of the future square coincides with the axis of the cylindrical workpiece.
2 Then a metal jumper is installed over the cut, which will need to be scalded.
3 To give the product a marketable appearance, it should be processed after welding on a lathe.
So, let's start practicing.
Step No. 1 - shaping the cut
Make a cut with the width of the side of the square
1 For cutting, it is better to use a cutting disc. This will speed up the work significantly. Don't forget about oil.
The cut is milled
2 We change the disk to a milling one, since the correct geometry of the square hole is needed.
Step No. 2 - forming a jumper
Trying on a jumper
1 Place a square rod in the cut you made. We put a metal jumper on top. For the latter we use a segment of a similar rod.
Fixing the workpiece in a vice
2 Using a vice, fix the workpiece prepared for welding.
Step No. 3 - welding and primary processing
Welding work is completed
1 We grab the jumper at a couple of points and remove it from the vice. We thoroughly boil the structure.
Welding needs to be annealed
2 So as not to think, we anneal the welding seams.
Step No. 4 - machining on a lathe
Processing of the first part
1 A VK-8 cutter was used for processing. We expose the workpiece. To do this, I had to process it a little with a file.
We expose and trim
2 Turn the product over. We expose and trim the workpiece.
Clamp and process
3 Clamp and process for finishing.