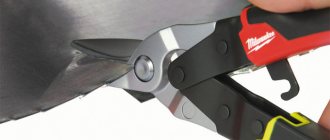
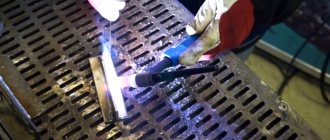
To cut thin sheet metal into strips or shaped workpieces, different tools are used: mechanical metal shears, as well as electrical devices (a jigsaw, an angle grinder with a cutting wheel), including special attachments for an electric drill or screwdriver - for example, a “cricket” type attachment.
In addition to the tools listed, you can also use roller shears for cutting sheet metal. They are easy to manufacture and very convenient to use.
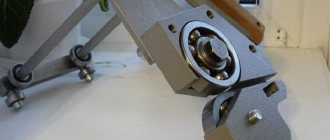
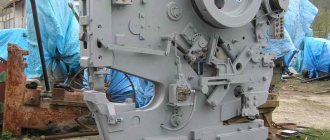
Lever shear device
The operation of manual metal shears is based on the principle of leverage. The cutting of the material is carried out by two cutting surfaces about 20 cm long. In this case, one surface is rigidly fixed to the base, and all the pressure is applied here. The movable cutter is also fixed to the frame. A groove is selected in the fixed blade to move the slider. It moves like a hinge in one plane.
The movable part of the scissors is attached to the slider. The working stroke of the slider is 15 - 32 mm. The movable panel is equipped with a long handle (about 50 cm), which increases the applied force by 20 times or more. Therefore, metal is cut quite easily.
The body of the lever scissors is metal, the cutting surfaces are made of tool steel. On average, the dimensions of the instrument are 56 x 18 x 45 cm and weighs about 30 kg. Using such equipment, you can cut a steel sheet with a thickness of 0.5 cm, aluminum or brass 0.6 mm, a profile with a section of 6x70 mm or a steel rod No. 13 with your own hands.
Principle of cutting process
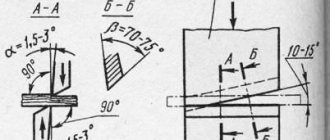
In metalworking, cutting is the cutting of metal, as well as the separation of workpieces from it piece by piece. This process can be done using scissors. A sheet of workpiece is located between the blades of the tool. Under the pressure of the upper knife lowered onto the sheet, the metal is cut . The sharpening angle of the knife blade depends on the hardness of the metal. The harder the metal, the sharper the blade should be. The sharpening angle is:
- for soft metals - 65º;
- with medium hardness - 70−75º;
- for hard metals - 80−85º.
In order to reduce friction on the knife blades, the clearance angle should be from 1.5º to 3º.
The knives of the device are made of alloy steel. The side surfaces of the blades must be hardened , sharpened and ground.
Types of lever scissors
The designs of lever cutters do not differ in variety; the main difference is in the type of drive:
- manual - the most primitive device; by pressing the lever, the cutting blade is set in motion;
- electric - they work very quickly and are highly efficient. Cutting metal on such equipment does not require any effort from the worker;
- hydraulic - powerful, driven by a hydraulic drive. Widely used when large forces are required, for example, for cutting reinforcement or rods.
Hand scissors are divided depending on their purpose and design:
- with straight blades - used only for cutting in a straight line;
- with curved cutters - they are used to cut out complex shaped elements and holes;
- chair - used for cutting thick layers of paper;
- finger - make holes with very thin incisors;
- lever - permanently mounted on a workbench.
The manual lever attachment allows for through or straight cutting on a straight line only.
In addition, the tools differ in the length of the actuators:
- with short blades for through cutting;
- with long cutting surfaces - for straight cutting;
- combined scissors for all types, including contour scissors.
Cutting small parts with lever scissors is impossible; they are convenient for large cutting or chopping work.
The tool can be stationary or portable. For work, both types are firmly fixed on a workbench or bed. This is the only way to cut metal accurately and safely. To secure portable scissors, use clamps or bolts.
Classification of tools
Metal shears are used for cutting wire, fasteners, sheet metal, corrugated sheets and other materials. They are classified according to various criteria.
Ordinary manual
Such tools are produced for cutting sheets of steel and non-ferrous metals. The thickness of steel sheets can be from 0.5 mm to 1 mm, and non-ferrous sheets up to 1.5 mm. They are manufactured:
- with cutting blades;
- with straight blades;
- with curved blades.
Depending on how the blades and cutting edge are located, they are divided:
Right-handed are models
cutting part has a bevel on the right side.
They cut along the left edge of the sheet in a clockwise direction. Left-handed is a tool that cuts along the right edge of the workpiece in a counterclockwise direction and has a bevel on the cutting part on the left side.
The length of the tool can be from 200 mm to 400 mm, and the cutting part from the hinge to the sharp ends can be from 55 mm to 130 mm. If they are well sharpened and adjusted, they should cut paper.
Most tools are manufactured in a left-handed version , which corresponds to GOST 7210–75.
Chairs
Chair shears cut sheet metal. Its thickness can be up to 3 mm. They differ from ordinary ones in their large size. Chair shears require physical effort to cut the workpiece, which reduces labor productivity. During operation, the lower part of the tool must be secured to a hard surface.
Manual small-sized power
The type of such devices is used for cutting rods up to 8 mm in diameter and sheet steel up to 2.5 mm in thickness. They are the same size as ordinary hand scissors.
The lower handle of the tool is secured in a vice, and the working handle is activated. The knives of the tool are replaceable; they are attached to the levers with secret rivets
Rules for working with lever shears
Before starting work, you must put on seals so as not to get cut by the sharp edges of the metal sheet!
- Firmly fix the hand tool on the table surface;
- place the sheet of metal perpendicular to the blades, holding it with your main hand (right hand for right-handers);
- Smoothly and carefully press the handle from top to bottom.
While working, you need to protect your feet from falling pieces of cut metal. Falls on the edge are especially dangerous, so you should not work barefoot or in open shoes. To install the scissors, choose only a solid, non-wobbly base.
Homemade lever scissors
Option 1
- The frame of this model of hand scissors is assembled with your own hands from a pair of corners 7.5 x 7.5 x 0.8 cm. The fixed knife is attached to a horizontal base using a pair of screws. To align with the movable blade, the top of the base is cut in half. Holes are made in the blades, countersunk for M8 screws 24 mm long, countersunk.
- On the upper base, with the help of hinge fasteners, the following are installed: on the lower surface, the blade and lever of the knife (dimensions 6.5 x 3 x 0.6 cm), on the upper part, the lever (24.5 x 1.8 x 0.7 cm) and the earring (6 x 1.8 x 7 cm), providing mobility.
The blanks are cut out with your own hands using a hacksaw. The blades are machined from hardened steel, the sharpening angle is 30 degrees.
First, we assemble all the parts into the finished machine and set it up. Then we take it apart and paint it. When the paint dries, we assemble it clean.
Since the presented structure is quite small, it is mounted on a workbench in a vice. You can install the tool permanently on a workbench. To do this, the base is welded to a corner, which is screwed to the workbench. Spacers are used to adjust the blade ratio.
Option 2
This model of hand scissors is complemented by a detailed drawing. Metal cutting is done with a pair of blades, each 10 cm long. The movable blade is attached to the slide on a crank mechanism. The crank eccentricity is 16 mm and gives a maximum amplitude of 3.2 cm. We attach a 50 cm long handle to its tail.
It is recommended to make a stationary version of the scissors, which will be securely attached once to the working surface with M10 bolts. For fastening, paws with holes are provided. The body of lever hand scissors must be made of high-quality steel 45 or 40, and the blades from grades P18, P9 or U10.
Scissors made according to this drawing have been working successfully for more than 2 years, coping with steel sheets up to 3.5 mm thick.
Video with a detailed description of the drawings, design and manufacture of lever metal shears:
Materials for production
In order to make metal scissors, you will need:
- long file;
- T-beam;
- Bulgarian;
- square and marker;
- drill;
- vice;
- bolts and nuts Ø 10 mm;
- sword;
- steel strip;
- welding machine;
- metal pipe;
- internal combustion engine valve.
Step 1. Prepare the base
We measure 23 cm on the T-beam and make a mark with a marker.
Use a grinder to cut off the marked area.
We smooth the edges on a sanding machine.
On the base of the beam at the four corners, we mark the places for fastenings with a marker and drill holes for bolts Ø10 mm.
The holes for the fastenings are ready.
Step 2. Making a stationary cutting part
Take a long file.
We measure on it two rectangles of equal width and length of 10 cm each. We clamp the file in a vice and use a grinder to cut out two identical pieces.
We mark with a marker and drill 2 holes Ø10 mm in each of the blanks.
How to make a guillotine for cutting metal with your own hands?
In a home workshop or small business producing products from thin sheet metal, sheet metal shears, more simply - a guillotine - will never be superfluous. The driven version can be installed, for example, in a garage, and a manual guillotine will not take up much space at all. If you have a fairly large number of manufacturing options (in drawings, videos or descriptions), as well as some adapted components from some decommissioned equipment, making homemade metal shears is an accessible reality.
Conducting a test
Screw the bottom sole of the scissors to the workbench. Scissors successfully cut metal plates of different thicknesses.
DIY metal scissors. Master Class
DIY metal scissors ✂️ | Metal mode with a slight movement of the hand
Feedback from our readers is very important to us. Leave your rating in the comments with reasons for your choice. Your opinion will be useful to other users.
The work of the simplest metal scissors
The principle of cutting with guillotine (sheet) shears is that the knife beam of the device, to which the movable part of the tool is attached, along the working end must have an angle of 1.5...3°, as a result of which metal cutting occurs non-simultaneously across the entire width. This reduces the cutting force, but requires a technique that would compensate for the shear of sheet metal (tin, thick cardboard, etc.) during cutting. Thus, a reliable clamp is required.
The main components of the saber guillotine
To drive a homemade guillotine, you can use a low-power electric motor, since the energy intensity of the process is low. But based on the results of calculating the maximum cutting force, a manual drive, for example, a lever type, is often sufficient (this is often what is offered in home-made devices). You will also need reliable guidance of moving parts during the cutting process, as well as a rigid support surface for the bed. In this case, the parts of the homemade guillotine and the product itself will not be elastically deformed.
The drawings usually indicate the limits of the thickness and width of the sheet metal or tin for which the device is designed. If the entire process of obtaining sheet shears with your own hands is carried out independently, then the design begins with clarifying the power characteristics of cutting and choosing a mechanism diagram.
The initial data for choosing a design are:
- the type of material with which operations will be performed;
- maximum sheet dimensions in terms of thickness, length and width;
- separation accuracy;
- maximum overall dimensions of scissors;
- type of drive.
Mechanical guillotine shears
The manual device is the simplest in design. It includes:
- support table on which the initial workpiece will be located;
- two or four racks that will provide the scissors with strength and stability;
- a rotary axis with plain bearings (rolling bearings are unsuitable, since the clearances during operation of such a guillotine will change significantly, which will quickly lead to jamming);
- a knife beam, which provides seats for fastening replaceable knives;
- fixed knives, which are mounted on the front end surface of the work table;
- a rotary lever that will forcefully move the beam during cutting;
- clamps for fixing metal.
Do-it-yourself production starts from the table. Its dimensions must be sufficient for convenient placement of the workpiece, taking into account the places for fixing clamps: there must be at least two of them, on each side of the sheet. The thickness should prevent deflection under deformation forces. The easiest way is to use a steel plate, which you install on the channels yourself. The joints can be bolted flush with the top surface, or welding can be used. The front end must be ground to ensure evenness of the subsequent fit of the stationary knife to it.
The next stage is to obtain support posts with your own hands. They must be made from a solid profile. Square pipes made of high-quality medium-carbon steel or a channel are suitable. The section size can be easily calculated from the maximum load on the racks, which is the sum of the self-weight of the components of manual guillotine shears for metal, and the cutting force P, kN.
The latter is calculated according to the dependence:
k is a coefficient that takes into account possible unevenness of the working gap, bluntness of cutting edges, quality of the material being cut, etc. Typically k = 1.05…1.3;
B – maximum width of the metal sheet, mm;
s – maximum metal thickness, mm;
σav – ultimate shear strength of the material, MPa.
For the materials most commonly used in everyday life, this parameter is, MPa:
- for low-carbon steel – 280…290;
- for medium carbon steel – 300...400;
- for high carbon and stainless steel – 400…500;
- for sheet metal, aluminum – 65...80;
- for copper, brass – 180...200.
When assembling the racks with your own hands, it is imperative to maintain the parallelism of the supporting surfaces and their perpendicularity to the axis of rotation of the knife beam. For these purposes, it is better to use a laser level. The floor where the scissors are installed must be made level and durable. Do-it-yourself installation of equipment on compacted soil, laminate and other options for coating concrete with polymers is not allowed.
A particularly important moment is making a knife beam with your own hands: its profile must be made such that during the turning process the movable knives gradually come into contact with the metal being cut. There are two options for this:
- profiling along the contour of the saber, with a gradual increase in the radius of curvature as it approaches the lever handle;
- pyramidal profile with a bevel angle of no more than 5...60 (at a larger angle, the metal will begin to deform and bend in the direction of the rotation axis).
The saber-shaped profile is more difficult to make, but it provides a smoother integration into the metal being cut.
For better direction of the body, it is placed either in a special groove on the table, or - with increased deformation forces - special guides are designed, which are attached to the racks with your own hands.
Handmade homemade guillotine
It is better to make the rotation axis from high-quality carbon steel, and then harden it to a hardness of at least 42…45 HRC. Bearing bushings are made of OF10-1 bronze, which has good wear resistance.
For the manufacture of tools, tool steels U10 or U12 are used, hardened to a hardness of 48...54 HRC. Hardened knives are carefully polished with your own hands, after which they are sharpened at an angle of 85...90°. The gap between the knives is taken within 3...6% of the thickness.
If you find an error, please select a piece of text and press Ctrl+Enter.
We make roller shears ourselves from bearings
Various cutting tools, both manual and electric, are used to cut sheet steel.
To cut a straight sheet of galvanized or stainless steel, you can take hand-held metal scissors, a grinder or a jigsaw. But all these devices are not always convenient to use for cutting sheet steel. For such purposes, roller shears for cutting metal are also produced.
To avoid having to buy such a tool, you can make it yourself.
Roller shears and sheet metal cutting features
In the metalworking industry, roller shears or knives are used to process sheet material. This tool is called knives because its operation is based on the use of two cutting discs.
The cutting process is based on the fact that rollers are pressed into the sheet material from two sides - top and bottom. In this case, it is cut without the use of any sharp knives.
The role of cutting and sharp knives is played by rollers, which touch the walls to each other on both sides.
Rollers not only cut sheet material, but also facilitate the process of moving the tool along the surface of the sheet. This means that cutting with a roller knife is not only convenient, but also effective. If we compare the operation of the device with hand scissors, the following advantages should be noted:
- Speed - cutting a sheet of steel with roller shears can be done in a matter of seconds, but using scissors requires a lot of time, which depends on the length of the material being cut
- Cut quality - the roller knife cuts not only quickly, but also with high quality. There are no chips, bends, bends, etc. at the site of the cut
- Physical fatigue - cutting with hand scissors requires physical effort, while using a roller tool eliminates this need. To cut, you only need to move the roller shears along the guides, thereby cutting the steel sheet
Roller shears are classified according to the types of knives into three types:
- They are located in parallel. The most popular type of cutting tool, which is intended exclusively for cutting material into strips, that is, cutting is performed in a straight direction
- They have one slope. They are intended for cutting not only even strips of sheet material, but also for cutting round and ring-type workpieces
- With several slopes. Such roller devices are intended directly for cutting workpieces of various shapes - ring, round, curved, etc.
After cutting, the edge of the material does not need additional processing, as it turns out smooth, without chips or burrs.
How to cut sheet metal at home
In industry, roller shears are used to cut factory-produced sheet metal. Their distinctive features are high accuracy, long service life, and the absence of the need to make them yourself.
Often in the household there is a need to obtain even strips of sheet steel, which are used for various purposes. If you need one strip, then there is no need to buy or make such a device, since you can use ordinary metal scissors.
If you need to cut the entire sheet or carry out cutting work regularly, then it is imperative to acquire a roller knife.
There is no justifiable sense in buying such a factory-made device, since the price ranges from 15 thousand rubles or more, which depends on the design, size and quality of the device.
Roller shears for cutting sheet metal can be made with your own hands at home, using available consumables for manufacturing.
Although this method requires time, it allows you to save money, resulting in a universal cutting tool for cutting sheets of stainless steel, galvanized steel, etc.
Features of making a tool yourself
If you are tired of cutting sheet metal with scissors or a grinder, then a roller cutter is an excellent alternative to replace these tools.
The advantages of this device include quiet operation and lack of energy consumption.
In addition, having such a device in your home arsenal, you can even make money when your neighbors need to cut sheet metal material.
The purchase of a tool is justified only in one case, when it is necessary to perform work in large quantities. And even in this case, you can make the device yourself to use it for professional purposes. There are many designs for the devices in question, so making a device yourself is not at all difficult if you understand the principle of operation of the device.
When making a homemade tool, the following properties must be taken into account:
- Cutting knives - there should be two of them, one located on top and the other on the bottom. Knives must be made of high-quality alloy, which has a strength higher than the materials being cut. Bearings that fully meet the described requirements are used as knives.
- Base - simultaneously acts as a surface on which the steel sheet is located, as well as a guide for moving the roller shears when cutting the sheet or cutting strips
- Body of the device - for manufacturing, a steel angle with a thickness of 3 mm and a wall size of 40-60 mm is usually used
- Auxiliary tools - they are designed to secure the sheet material to the table surface while cutting it
The service life of a homemade device is influenced by such an indicator as the quality of its manufacture. Moreover, this even applies to the quality of bearings, so if you get down to business, you will need an appropriate approach.
What to make a roller knife from
There are no difficulties with purchasing roller shears, since such a machine can be found in an online store and ordered.
The only difficulty is that you will have to shell out a considerable amount of money to purchase it, which will not pay off soon if you do not use such equipment often.
Making your own will not require any costs, but the biggest difficulty is choosing the necessary materials and assembling full-fledged roller shears from them.
Using a homemade machine allows you to cut the following types of materials:
- Cink Steel
- Stainless steel
- Aluminum
- Steel sheets up to 0.5 mm thick, for example, window slopes of metal-plastic windows
Bearings are used to make cutting knives. The diameter of these bearings depends on the size of the roller blade housing, but 20-30mm ball bearings are commonly used. In order for the bearings to ensure cutting of material, it is necessary to grind off their end faces, making them strictly at an angle of 90 degrees. The effectiveness of the tool depends on this.
!
The diameter of the bearings affects the cutting speed.
The larger the size of the bearings, the correspondingly higher the cutting speed. Before you make a roller-type cutting tool, you need to understand its principle of use. The application is based on the fact that a homemade knife moves along guides. The corner part of a workbench or table is used as such guides.
The sheet to be cut is placed on the surface of the table, and in order for the cut to be smooth and neat, it should be fixed in a stationary position. This can be done using two clamps and a wooden block of appropriate length.
A block is placed on the sheet, and then it is fixed on both sides with clamps, thereby ensuring immobility during processing.
Instructions on how to make roller shears from bearings with your own hands
As already mentioned, there are many options for making a homemade roller cutting tool, but which one to choose for yourself depends not only on the capabilities, but also on the availability of the necessary consumables.
If you need a simple homemade roller knife, you can make it from bearings.
The manufacturing principle is simple, and first let’s figure out what tools and materials will be needed to make it:
- Two bearings 204 or 205. You can use other bearings that are available. They don't have to be the same size
- Corner 50-60 mm up to 30 cm long
- Threaded connectors, washers, nuts and other small consumables
- Steel tube from which to make a handle for roller shears
- The tools you will need are a welding machine, as well as a drill and grinder
When all the necessary materials are ready for work, you can get down to business. Instructions for making a roller knife yourself are as follows:
- First you need to prepare a corner, since it will act as a body on which additional elements will be placed
- We grind the edge of the bearings. Moreover, this must be done in such a way that the resulting edge has an acute angle. On both bearings it is necessary to “remove” the edge, since the possibility of using the roller shears for their intended purpose depends on this
- Next, you need to drill a hole in the corner and attach one bearing to it. A bolt with a countersunk head is used for fastening. A washer is also used to secure the bearing, which will ensure reliable pressure against the wall of the angle
- The bearing is attached so that its outer race protrudes 1-2 mm from above the edge of the angle. It is important to provide for the possibility of adjusting its contact with the second bearing by placing washers on the inside
- On the reverse side, when securing the bearing, it is necessary to ensure that the head of the fastening bolt is recessed into the base of the angle. This is necessary so that the homemade tool can move freely along the edge of the workbench. If you can’t drown the hat, you can make a groove for it in the workbench design, which is also quite appropriate when using homemade scissors
- The first part of the work at this stage is considered completed, so you should proceed to the manufacture of the second part. This is the handle, the second bearing, and also the sheet bender
- Using a similar corner that is 2 times shorter in length, you need to attach the second bearing to it. First, using a grinder, you need to cut the corner into the shape shown in the photo below.
- It is necessary to attach the bearing to the end part of the resulting workpiece by first drilling a hole
- Weld the corner piece to the main part as shown in the photo. It is important to take into account that the upper bearing must be in close contact with the lower bearing, and its outer race must be located at a distance of up to 1 mm from the base of the angle
- Finally, you need to attach the handle to the resulting installation so that it is convenient to work
The result is a homemade cutting tool for cutting metal sheets up to 0.5 mm thick. When using the device, it must be taken into account that it is intended exclusively for working with sheet materials.
During operation, the edge of the bearings will wear out, so it is advisable to provide during manufacturing the possibility of adjusting the contact of the bearings.
All the details of the manufacture and use of such a tool are in the video below.
!When you rotate one bearing by hand, the second should also rotate, which indicates that the homemade product was manufactured correctly. The greater the distance between the end parts of the bearings, the lower the quality of the tool.
In conclusion, as an example, it is worth giving an example of how much a factory roller blade costs, as well as what technical parameters it has. For example, consider a Trim Cutter 3017 brand machine and its technical parameters:
- Maximum sheet metal thickness - 0.7 mm
- The weight of the device is 4 kg
- Overall dimensions - 220x180x260 mm
- Cost from 25,000 rubles
Based on the above, it can be noted that making roller shears for cutting thin sheet metal with your own hands is not at all difficult. This does not require a lot of effort and consumables.
With just 3-4 hours of free time, you can make a highly effective cutting tool at home.
With roller shears, you don’t need to think about how to cut a metal sheet when installing window slopes or how to cut galvanized sheets into strips, since with it any similar work is carried out easily, quickly and efficiently.
Lever shear device
The operation of manual metal shears is based on the principle of leverage. The cutting of the material is carried out by two cutting surfaces about 20 cm long. In this case, one surface is rigidly fixed to the base, and all the pressure is applied here. The movable cutter is also fixed to the frame. A groove is selected in the fixed blade to move the slider. It moves like a hinge in one plane.
The movable part of the scissors is attached to the slider. The working stroke of the slider is 15 - 32 mm. The movable panel is equipped with a long handle (about 50 cm), which increases the applied force by 20 times or more. Therefore, metal is cut quite easily.
The body of the lever scissors is metal, the cutting surfaces are made of tool steel. On average, the dimensions of the instrument are 56 x 18 x 45 cm and weighs about 30 kg. Using such equipment, you can cut a steel sheet with a thickness of 0.5 cm, aluminum or brass 0.6 mm, a profile with a section of 6x70 mm or a steel rod No. 13 with your own hands.
Types of lever scissors
The designs of lever cutters do not differ in variety; the main difference is in the type of drive:
- manual - the most primitive device; by pressing the lever, the cutting blade is set in motion;
- electric - they work very quickly and are highly efficient. Cutting metal on such equipment does not require any effort from the worker;
- hydraulic - powerful, driven by a hydraulic drive. Widely used when large forces are required, for example, for cutting reinforcement or rods.
Hand scissors are divided depending on their purpose and design:
- with straight blades - used only for cutting in a straight line;
- with curved cutters - they are used to cut out complex shaped elements and holes;
- chair - used for cutting thick layers of paper;
- finger - make holes with very thin incisors;
- lever - permanently mounted on a workbench.
The manual lever attachment allows for through or straight cutting on a straight line only.
In addition, the tools differ in the length of the actuators:
- with short blades for through cutting;
- with long cutting surfaces - for straight cutting;
- combined scissors for all types, including contour scissors.
Cutting small parts with lever scissors is impossible; they are convenient for large cutting or chopping work.
The tool can be stationary or portable. For work, both types are firmly fixed on a workbench or bed. This is the only way to cut metal accurately and safely. To secure portable scissors, use clamps or bolts.
Cutting rules
Basic rules that must be applied when cutting sheet metal with hand scissors:
- When marking a part that needs to be cut, you need to provide an allowance for subsequent processing.
- Position the sheet to be cut strictly perpendicular to the blades of the tool.
- Cutting should be done in mittens with sharpened scissors.
- To avoid tearing the metal, you do not need to bring the device completely together at the end of the cut.
- It is necessary to tighten the screw axis if the tool begins to crush the workpiece material.
- If it is difficult to press the handles of the device or the thickness of the metal is 0.5 mm or more, you need to secure one of the handles in a vice.
- The size of the “cut” in the corners should not be more than 0.5 mm.
- If you need to cut a part with a curved shape, first cut the workpiece with a straight cut with an allowance of five to six millimeters, then cut the part clockwise according to the markings.
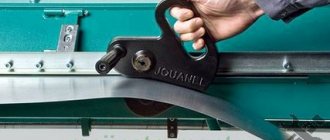
Rules for working with lever shears
Before starting work, you must put on seals so as not to get cut by the sharp edges of the metal sheet!
- Firmly fix the hand tool on the table surface;
- place the sheet of metal perpendicular to the blades, holding it with your main hand (right hand for right-handers);
- Smoothly and carefully press the handle from top to bottom.
While working, you need to protect your feet from falling pieces of cut metal. Falls on the edge are especially dangerous, so you should not work barefoot or in open shoes. To install the scissors, choose only a solid, non-wobbly base.
Homemade lever scissors
Option 1
- The frame of this model of hand scissors is assembled with your own hands from a pair of corners 7.5 x 7.5 x 0.8 cm. The fixed knife is attached to a horizontal base using a pair of screws. To align with the movable blade, the top of the base is cut in half. Holes are made in the blades, countersunk for M8 screws 24 mm long, countersunk.
- On the upper base, with the help of hinge fasteners, the following are installed: on the lower surface, the blade and lever of the knife (dimensions 6.5 x 3 x 0.6 cm), on the upper part, the lever (24.5 x 1.8 x 0.7 cm) and the earring (6 x 1.8 x 7 cm), providing mobility.
The blanks are cut out with your own hands using a hacksaw. The blades are machined from hardened steel, the sharpening angle is 30 degrees.
First, we assemble all the parts into the finished machine and set it up. Then we take it apart and paint it. When the paint dries, we assemble it clean.
Since the presented structure is quite small, it is mounted on a workbench in a vice. You can install the tool permanently on a workbench. To do this, the base is welded to a corner, which is screwed to the workbench. Spacers are used to adjust the blade ratio.
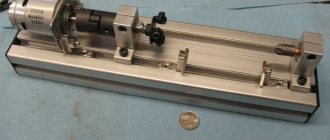
Option 2
This model of hand scissors is complemented by a detailed drawing. Metal cutting is done with a pair of blades, each 10 cm long. The movable blade is attached to the slide on a crank mechanism. The crank eccentricity is 16 mm and gives a maximum amplitude of 3.2 cm. We attach a 50 cm long handle to its tail.
It is recommended to make a stationary version of the scissors, which will be securely attached once to the working surface with M10 bolts. For fastening, paws with holes are provided. The body of lever hand scissors must be made of high-quality steel 45 or 40, and the blades from grades P18, P9 or U10.
Scissors made according to this drawing have been working successfully for more than 2 years, coping with steel sheets up to 3.5 mm thick.
Video with a detailed description of the drawings, design and manufacture of lever metal shears:
Exploitation
For safe use, you need to learn the rules for working with the equipment:
- Work using protective gloves and goggles.
- Secure the workpiece with an additional vice so that it does not move during work.
- Lubricate moving mechanisms with motor oil 1-2 times a month.
- If metal is chewed on electric shears, you need to unplug them and try to pull out the material yourself, without turning on the electric motor.
- Lower the lever smoothly, slowing down towards the end of the cuts.
- Keep your hand no closer than 10 cm from the sharp edge.
- Check how securely the parts being separated are held.
- Start electric models using an additional pedal, keep your hands further away from the blade.
The operating rules apply to both purchased and homemade machines.
Lever shears are used to separate different metal parts. Depending on the thickness of the workpiece that needs to be separated, you need to select a tool drive. If you wish, you can assemble them yourself and use them to help during construction or improvement of your home or site.
How to make a guillotine for cutting metal with your own hands?
In a home workshop or small business producing products from thin sheet metal, sheet metal shears, more simply - a guillotine - will never be superfluous. The driven version can be installed, for example, in a garage, and a manual guillotine will not take up much space at all. If you have a fairly large number of manufacturing options (in drawings, videos or descriptions), as well as some adapted components from some decommissioned equipment, making homemade metal shears is an accessible reality.
The work of the simplest metal scissors
The principle of cutting with guillotine (sheet) shears is that the knife beam of the device, to which the movable part of the tool is attached, along the working end must have an angle of 1.5...3°, as a result of which metal cutting occurs non-simultaneously across the entire width. This reduces the cutting force, but requires a technique that would compensate for the shear of sheet metal (tin, thick cardboard, etc.) during cutting. Thus, a reliable clamp is required.
The main components of the saber guillotine
To drive a homemade guillotine, you can use a low-power electric motor, since the energy intensity of the process is low. But based on the results of calculating the maximum cutting force, a manual drive, for example, a lever type, is often sufficient (this is often what is offered in home-made devices). You will also need reliable guidance of moving parts during the cutting process, as well as a rigid support surface for the bed. In this case, the parts of the homemade guillotine and the product itself will not be elastically deformed.
The drawings usually indicate the limits of the thickness and width of the sheet metal or tin for which the device is designed. If the entire process of obtaining sheet shears with your own hands is carried out independently, then the design begins with clarifying the power characteristics of cutting and choosing a mechanism diagram.
The initial data for choosing a design are:
- the type of material with which operations will be performed;
- maximum sheet dimensions in terms of thickness, length and width;
- separation accuracy;
- maximum overall dimensions of scissors;
- type of drive.
Operating principle and design features
Unlike sheet metal shears with an inclined knife (guillotine), the movement of the knife in lever shears most often occurs not along a translational path, but along a rotational path. In addition, the main actuator is not a crank-slider, but a lever.
Lever scissors, assembled according to the single-arm lever design, have become most widespread. When cutting thin metal, with a thickness of no more than 0.7...0.8 mm, hand-held shears are used, and when cutting thicker metal, chair scissors are used, the lever of which is much longer. In addition, the chair scissors designs provide for the possibility of integrating an intermediate gear drive. This increases the length of the moving knife path, but reduces the resulting force, which is important if the unit is manually driven.
The largest versions of chair scissors allow cutting rolled steel sheets with a thickness of up to 8...10 mm, and long products with a diameter of no more than 22 mm.
Manually operated chair lever scissors are designed so that the driving arm is shaped like a saber. This makes it possible to bring the trajectory of movement closer to the operation of guillotine shears: the introduction of the moving part of the working tool into the metal being cut also occurs gradually. As a result, the current cutting force value is reduced. Non-powered (manual) chair-type scissors can cut steel up to 2…2.5 mm thick.
The typical design of desktop lever scissors is a combination of the following components:
- beds;
- eccentric or screw clamps, by means of which equipment can be permanently attached to a bench;
- lower support frame on which the fixed part of the equipment is installed;
- saber-shaped rotary lever with handle (for manual models). a movable part of the equipment is installed on it;
- axles with plain bearings.
In the drive lever shears, in addition to the above components, there is also an electric motor, a V-belt drive, as well as a crank mechanism, which converts the rotational movement of the motor shaft into the rocking movement of the lever. Sometimes such equipment is equipped with an activation mechanism (clutch and brake), and in this form they are not much different from stationary alligator-type scissors. Their only advantage in this case is the absence of a balancer to compensate for the inertia of massive parts.