Electrician in the house
Encyclopedia about electricity from A to Z
Masters catalog
Find the best master or company in your city
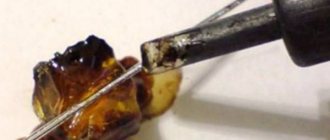
Soldering example
A soldering iron is a must-have for every home DIYer. With its help, with minimal knowledge of electrical engineering, you can independently eliminate most minor and visually visible breakdowns of household electrical appliances.
We'll tell you how to solder wires. In addition, we will describe how to restore functionality if cables are damaged, using the most common connector standards.
- The progress of soldering from start to finish What is needed for work
- Getting the soldering iron ready
- Soldering wires
- Connection of wire, contact or terminal
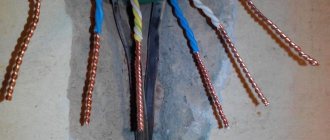
- Stranded wires
- Wires in insulation
- Enameled wires
- Cables made of several insulated wires
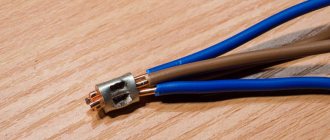
- Cables with RJ 45 connectors
Advantages and disadvantages of soldering electrical wiring
A soldered connection is considered one of the best in terms of reliability.
In order to properly solder wires, you need to familiarize yourself with the advantages and disadvantages of the method. Despite existing analogues, this method is considered the most widespread and in demand, especially in electronics.
Advantages:
- Reliability. An important parameter is the presence and magnitude of the contact resistance. The lower it is, the better. For soldering, this parameter is extremely small. In terms of reliability, soldering is inferior to welding only in one case - if the work had to be performed in extreme conditions, for example, in an environment with extremely high or low temperatures, or exposure to aggressive environments. If we are talking about apartment wiring or a country house, such factors are excluded.
- The connection does not require maintenance.
- Versatility of use. With the help of soldering, it is possible to connect single-core and stranded wires with different cross-sectional areas, in any combination. This versatility allows you to solve many non-standard and difficult tasks. In addition, the use of fluxes ensures a reliable connection of copper and aluminum conductors.
- Low connection cost. To carry out the work you will need a soldering iron, solder and flux. The cost is low and the consumption is economical.
Flaws:
- Low technology. To carry out the work, it is necessary to carry out many preparatory measures, hence the high labor intensity.
- The need for performer qualifications.
When soldering, changes in materials occur at the molecular level, so the pre-soldered parts undergo thorough preparation.
Additional materials
Additional materials that simplify working with a soldering iron include:
- Stand. Provides convenience and safety of work. It is made from a thin metal sheet.
- Braid to remove excess solder. Consists of flux-treated thin copper strands.
- Device with clamps and magnifying glass. Provides convenience for working with small parts and a soldering iron.
- Clamps, tweezers, pliers. Makes it easier to work with heated parts.
What you need to solder electrical wiring
Electric soldering iron
Before soldering the wire, prepare the working tool and consumables. To complete the work you will need the following list of tools:
- An ordinary household soldering iron, the power of which ranges from 40-100 W. As an analogue, a welding machine is used, on which it is possible to control the temperature of the tip, which simplifies the soldering process.
- A small file for cleaning the soldering iron tip.
- Knife for removing the insulating layer.
- Twisting pliers.
- Rosin intended for tinning surfaces.
- Solder for soldering different materials; acid-free fluxes are used as an analogue.
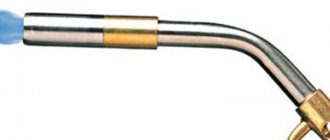
Gas torch Solder
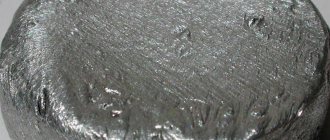
Pine rosin for soldering
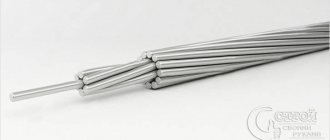
Soldering aluminum and copper wires differs somewhat in the types of solders used.
| Copper | Aluminum |
Tin and lead compounds are used. The markings are as follows:
|
|
Basic properties of solders
When choosing a specific brand of solder for soldering copper wires or aluminum alloys, you must be guided by their technical characteristics.
However, for all compositions a list of basic properties can be identified:
- wettability - shows how well the solder envelops and sticks to the parts being soldered;
- strength - determines the ability to withstand mechanical forces and loads; for this, boron, iron, nickel, zinc or cobalt can be added to the composition;
- plasticity - the ability to deform, achieved through additives from manganese, bismuth, lithium, etc.;
- resistance to high temperatures - important for soldering with hard alloys that are found in boiler rooms, furnaces, pipelines, heating devices, the property is achieved by adding tungsten, zirconium, vanadium, hafnium, niobium, etc.
- resistance to corrosion destruction - increases by alloying with copper or nickel.
How to solder wires correctly
An example of universal sharpening of a soldering iron tip and proper maintenance of its working area.
The soldering process may differ slightly depending on the materials used. Different methods involve the use of different soldering compounds and fluxes. Most often, soldering of wires is carried out when connecting copper wires with a cross-sectional area of up to 6 mm2.
When performing work, follow the following algorithm:
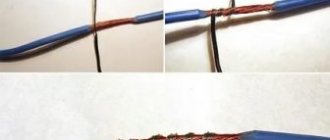
- An insulating layer of approximately 5-6 cm in length is removed from the wires.
- Heat up the working tool and cover the surface with a layer of rosin or flux. The first one does not work well on oxidized surfaces; when penetrating deeply into the twist, it is important to thoroughly pre-treat the materials.
- When heating the wire using a heated tool with solder on the tip, it is important to achieve uniform distribution of solder over the entire surface being processed.
- When soldering twists, specialists must fill all irregularities with solder.
- Upon completion of the work, all twists are carefully insulated using special nozzles, electrical tape and heat-shrink tubing.
If you need to work with aluminum, it is important to take into account its high oxidation rate when in contact with oxygen. The resulting film does not allow for reliable adhesion of the metal to the solder.
Stripping wires of insulation
The oxide is removed mechanically, then the surface is serviced. The algorithm for connecting aluminum cores depends on the type of flux used and the cross-sectional area. A gas burner is usually used for heating.
The procedure for soldering cores with an area of 4-10 mm2:
- At the ends of cores 5-6 cm long, the insulating layer is removed.
- To obtain a metallic shine, the wires are cleaned with a file, sandpaper or a knife. Tinning of stranded wires
- The cores are connected to each other overlapping using a double twist method, and a groove is made at the point of contact in the middle.
- The joint is heated to a temperature that is close to the melting point of the solder joint.
- Each side of the twist is processed in a similar way, all cavities are filled with tin.
- At the end of the work, clean the connection area with gasoline.
- The cleaned surface is covered with asphalt varnish and carefully insulated.
The work is not fast, but the high quality and durability of the connections is worth the time and effort.
Common Problems
Beginners often encounter the following difficulties when soldering:
- Insufficient heating of components. Due to lack of temperature, “cold” soldering occurs. It can be identified by the dull color of the solder at the soldering site and its easy destructibility under mechanical stress.
- Overheating of parts. In this case, the surface is not covered with solder at all.
- Displacement of parts before the solder hardens, which often leads to broken contact.
To eliminate these problems, it is necessary to re-solder.
If overheating occurs, you need to reduce the soldering time or use a less powerful soldering iron. When cold soldering, on the contrary, you need to use a higher power soldering iron.
How to solder copper and aluminum wires
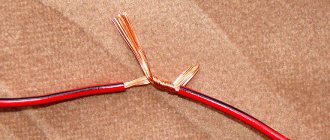
Soldering wires using the twisting method.
The copper wire is thoroughly cleaned, then immersed in rosin. A specialist melts a few drops of solder and, for tinning, the wire is immersed in the molten mass. The procedure is performed with careful and uniform movements.
Solder for soldering should cover the surface of the wire as little as possible. Excess is removed with a hot soldering iron. As the work progresses, the red tint of the copper wire should change to silver.
If the work is to be done with multi-core soldering irons, each wire should be untwisted and only then tinned. Then everything returns to its original position.
Before soldering electrical wires, the aluminum wire must be cleaned, and then the previously prepared flux must be evenly distributed over its surface. Next, the aluminum wire is thoroughly rubbed with a small piece of tinol and heated with the flame of a gas burner. Such manipulations will allow you to effectively get rid of the oxide film.
To increase the quality of connection of single-wire wires, twisting of tinned wires of small sizes is used. All resulting cavities are filled with tinol.
The next stage is connecting copper and aluminum wires. To do this, restore the insulating layer. For dry rooms, only cotton tape can be used.
Recommendations, precautions
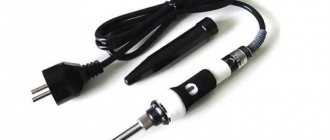
Professional soldering iron DANIU 110V/220V 60W with temperature control and a set of tools.
You should familiarize yourself with the recommendations that will allow you to perform the assigned tasks efficiently:
- When choosing a soldering iron, you need to pay attention to models equipped with additional cones, needles and a set of replaceable tips.
- Before you begin soldering, you need to pay special attention to cleaning the tip. If the tip is too dirty, remove all dirt using a soldering iron. You can use pieces of wood or cardboard as an aid.
- When changing the length of the soldering iron, the heating temperature of the tool also changes.
- It is not recommended to leave the soldering iron “dry” while heating the working element. The tip needs to be dipped into rosin regularly.
It is important to take precautions. You need to work in personal protective equipment: special clothing (overalls), goggles and gloves. Do not leave exposed areas of the body, otherwise severe burns may occur.
Plug in the soldering iron
The heating element is a nichrome wire wound around a tube, hidden under a casing. There is a sting at the end of the tube. Nichrome, heating up under the influence of the current passing through it, heats up the sharpened working edges.
To check the readiness of the soldering iron, touch it to a piece of rosin. If there is a small stream of smoke, you can start working. Thick smoke will pour out - the soldering iron has overheated. You'll have to cool it down a bit. Disconnect from the network.
It is best to use a thermostat so as not to constantly pull the plug back and forth from the socket.