How to make rivets on metal
In industry, one of the main operations is the connection of structural elements and parts.
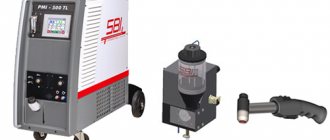
One way is to connect using rivets. It is used when it is not possible to weld structural elements, and has many advantages over it. To perform this technology, there is a special tool for riveting rivets.
What is a riveter and its types
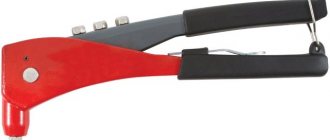
A riveter is a special tool (pliers) that works on the principle of a gun, which is designed to connect structural elements and their individual parts when their thickness during connection does not exceed 10 mm.
Basically, with the help of such a mechanical gun, parts are fixed from the inside. The manual riveter is a lever tool in the form of a pistol, consisting of 2 parts:
- a spring mechanism designed to pull the rivet inward;
- lever system used to create force.
There are two types of rivet tools on the market today: threaded and pull-out.
Pull tool
Threading tool
A manual pull-type riveter works by using a pulling force to secure the rivet. Under the action of the lever force, the rivet rod is drawn into its tubular part and is pushed apart by the head of the rod. On the outside, the rivet head is also flattened and creates a strong fixation of the parts.
The principle of operation of a manual threaded riveter is the same, only the retraction of the ball in the working part occurs not due to force, but by rotating the thread in the tubular part of the rivet. That is, it uses a method of fixing the head by twisting the handle. This method is not used often and is mainly necessary for fixing parts that have a small thickness.
Nozzles of different diameters and tail lengths are usually sold complete with the gun.
:
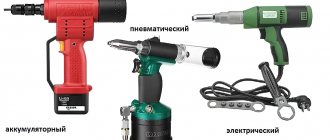
Types of drive for riveters and their cost
Based on the type of drive device, riveters are divided into:
- pneumatic;
- mechanical (manual);
- electrical;
- battery;
- pneumohydraulic.
The most popular devices in everyday life are those with a mechanical drive. Such instruments have two modifications. One involves working with one hand, and the other with the power of using two hands.
“One-armed” devices also include a model of an instrument called an “accordion.”
The cost of riveters depends on the manufacturer, connection method, model, and drive device. Promoted brands of tools are more expensive than products from unknown manufacturers.
Also, pneumatic, electric, pneumohydraulic and battery devices are much more expensive than manual ones, because they have a more complex design. They are mainly used on an industrial scale.
:
Blind rivet device
To understand how to use a manual pull-type riveter, you need to know the structure of fasteners, which are rivets specially designed for this method of fastening.
Such a rivet is a fastener consisting of two elements: a hollow cylindrical tube with a head at the end and a metal rod. The hollow cylinder is called a rivet body (bushing). The diameter of this cylinder indicates the size of the rivet hardware.
The hollow hole inside the cylinder extends through the entire body, including its head. The metal rod looks like a nail with a rounded head. It is inserted into a cylindrical hole and retracted until the head stops using a latch.
Threaded rivets , intended for a manual pull riveter, have a thread inside a cylindrical body. The rod is also threaded and is inserted into the cylinder by screwing.
To create a strong connection, a bolt or screw is most often screwed inside. Sometimes such a rivet is called a blind rivet. It is considered more durable than just exhaust.
Blind rivets are made from different materials. Steel, aluminum or copper alloys are used for the sleeve. It is very important that the sleeve material does not cause corrosion of the metal from which the parts being connected are made. This means that when they come into contact, they should not form a cathode-anode pair.
The rod must be made of steel, the strength of which far exceeds the strength of the body. The rivet body cylinder can have different diameters and lengths. These dimensions are the main characteristics of such products. They are paid attention to first of all when choosing. The diameter of the cylindrical body must correspond to the holes for fasteners.
In order for the cylinder to fit freely into the hole, it must be slightly larger than the diameter of the rivet body. Typically the error is 0.1 – 0.2 mm. The length of the body should consist of the total thickness of the parts being connected and an allowance for the amount of riveting. An allowance of up to 1 mm must be provided for this.
Connection stages using a riveter
How to use a riveter can be seen using the example of manual fastening of parts. The connection process must be carried out in the following order:
- surface preparation;
- marking and drilling holes;
- installation of fasteners.
Preparation of surfaces includes their careful leveling so that the parts rub together as much as possible.
In order to accurately drill holes without displacement, they need to be placed on a flat plane, it is better to take a piece of wood, and securely fix it on it. Then mark the locations of the holes. After this, they are drilled using a drill, maintaining maximum positional accuracy on all connected parts.
To ensure that the hole size meets the required parameters, you need to take a drill with a slightly larger diameter. For example, to produce a hole with a diameter of 3.8 mm, the drill must have a diameter of 4 mm.
After drilling the holes, you need to “try on” the selected fasteners. The head of the rivet should fit snugly against the surface around the edge of the hole and completely cover it.
Installation of rivets
Installation of rivets is carried out as follows:
- the cylindrical body of the rivet is inserted into the drilled holes of the parts being connected;
- the rod passing through the entire body is grasped by the lips or the riveting head of the rivet tool at the base of the cylinder head;
- with the help of force, the rod is gradually pulled through the body of the rivet, expanding it with its cap (head) and deforming the end of the cylinder. In this way, the reverse wide part of the rivet is formed on the inner surface of the connected parts.
- When the force of the riveter reaches a certain value and the connection of the parts is strong enough, the remains of the elongated rod are broken off.
When working with a manual riveter, as a rule, several pressings of the lever are required to achieve the desired result. After the process is completed, one side of the joint will have the head of the rivet body, and the other will have the flattened end of the cylinder in the form of petals.
:
PS Now you can easily connect workpieces using mechanical pliers.
Types of rivets, characteristics, installation, applications
In the general family of fasteners, the rivet is considered one of the most reliable fastening options. It is distinguished by the possibility of forming a closed fastening bond, which determines the strength and durability of the connected structure. Another thing is that using the through fastening principle is not always technically permissible. However, there are different types of rivets, differing in design and other characteristics, which allows them to be used effectively in a variety of fields.
Main characteristics of fasteners
From the point of view of choosing this hardware, the main characteristic is size. Several parameters are taken into account, including the diameter of the rod. It can range from 1 to 36 mm with a length from 2 to 180 mm. However, you should not think that greater thickness is directly related to the strength of the rivet. Steel rod parts with a thickness of 10 mm can be much stronger than copper tubular elements, the diameter of which exceeds 20 mm. However, much depends on the nature of the loads applied - sometimes it is more profitable to use thin-walled tubular parts.
Models of rivets with a low semicircular head have a small range of thickness indicators - from 1 to 10 mm, and the length in this case varies from 4 to 80 mm. Products with a flat head have a thickness ranging from 2-36 mm with a length of 4-180 mm. The longest parts are semi-secret types of rivets that can be used in niches with a depth of about 200 mm.
Classification by design
There are many versions and modifications of this hardware. The standard is a spacer element, which is used in connecting loose, soft and brittle building materials. The reverse head of this rivet folds during installation, which allows the load to be distributed over a large area on the reverse side. To work with wood, petal models are used. At the time of installation, the rod opens and forms petal folds, which, in turn, provide a backstop and fixation of the material.
As a rule, these are aluminum rivets that can handle lightweight panels. Multi-clamp products designed for joining materials of different thicknesses are also interesting. The formed unit in this case is universal, so it is often used where there is no clear idea of the size of the workpiece. The most technologically advanced option is offered by the developers of cassette models. In this design, the fixing thrust elements can be represented by dozens of levels.
In this case, only one rod will act as the load-bearing basis.
Most rivets are made of metal. In particular, aluminum, steel, brass and copper are used. Almost all models of this type have high requirements in terms of corrosion protection. Aluminum and copper rivets are also characterized by ductility and low weight. Steel fasteners are more often used in structures where it is necessary to ensure sufficient strength.
The use of plastic rivets is also common. They are mainly made of polyamide, which is also capable of providing strong connections. Of course, in terms of strength, this option will be inferior to metal.
But if stainless steel galvanic rivets in the long term are not able to guarantee consistently high protection from moisture, then plastic is not initially involved in destructive reactions during such contacts. In addition, polyamide does not conduct electricity and interacts optimally with materials made from composites and fiberglass.
How to work with a riveter correctly?
September 29, 2020
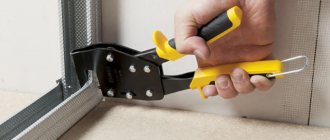
In this article we will talk about a tool that is comfortable to work with in limited space.
A riveter is a hand tool that can be used to secure the required material. For example, sheets of metal.
In this article we will look at the types of this tool and note a couple of points that will be useful when working with it.
As a result, we will receive a short instruction for those who have not yet had to deal with a riveter.
Let's begin.
From the brief description it becomes clear that we will need this tool when we need to fasten something. In this case, the material should not exceed a thickness of 10 mm. This is one of the basic rules.
Why not use welding?
There are times when this is not possible.
You can’t use welding at home, and there’s a chance that you won’t have the necessary equipment at hand.
But the tool, shaped like pliers, is perfect for quickly implementing your project.
What does it consist of?
It does not have many components, but this does not prevent the riveter from performing all the necessary functions. You need to allocate a separate place for it in your tool organizer.
Head, handle and clamping mechanism.
That's the whole structure.
There are only three elements that provide quick fastening of the metal sheets we need.
The mechanism, by the way, is divided into two types: exhaust and threaded.
What types are there?
Electric, battery, pneumatic.
However, they are not as popular as manual ones. The point is that it's overpriced. And although they essentially do all the work for you, buyers are still not ready to go completely electric.
The manual riveter is more understandable to people. It is easy to use and affordable.
The first three types are more suitable for avid specialists.
Or in the case when large diameter rivets are used.
Exhaust riveter.
Cylindrical stud with rivets. That's the difference.
It is worth noting that this division is based on the type of rivets used, the mechanism of operation, and not on the distinctive characteristics.
With it, the holes will be completely closed. It should also be noted the low cost.
Fastening occurs through traction force.
First the holes are made and then the rivet is fixed.
Threaded riveter.
Rivet in the form of hollow tubes.
It allows for safe installation.
High quality fixation. You can also create fastening points. It's comfortable.
There are two more types.
This tool can be distinguished by the number of handles. It can be one-handed or two-handed.
In the first case, one of the handles always remains motionless. This riveter can be used for connections with a diameter of no more than 6 mm.
In a two-handed one, as we see, both handles remain movable.
So how to use a riveter?
Different types of this tool work approximately the same. The principle is similar, but there are still differences.
Let's start our instructions with the main (general) principle of operation.
- You need to direct the force to the lever mechanism, after which it will go to the head.
- We prepare in advance. hole for element. And then we insert the rivet using the clamping mechanism.
This ensures that the sheet metal is held together.
All forces must be directed to making holes. The tool will do the rest for you.
Let us designate all types of work that a riveter performs.
It can fix corners, pipes, and fasten profiled sheets.
Such fastenings will never question their reliability. And they won’t burst when you don’t expect it. This is a fairly pressing problem for welding.
The main principle has been discussed, and now about the stages of work.
- We take the materials (metal sheets) that we need and fix them prematurely. This will make the job easier.
- We make a hole that should be 1-2 cm larger than the rivet.
- We insert the consumable.
- We tighten the rivet head.
- We place the tool tightly against the base of the material, and then squeeze the handles.
- Repeat several times if it doesn’t work.
- For complete tightness we use additional special materials. Most often, putty is used.
You need to pay attention to the characteristics of the tool, materials and appearance. Even weight can tell a lot.
If you are buying through an online store and there is no way to see and touch everything in detail, then pay attention to the body of the riveter. The product characteristics will indicate the material from which it is made. Plastic is not the best option here.
We conclude that working with a manual riveter is not so difficult. This is a simple option that can be easily stored around the house.
But if you are engaged in repair and installation work, as well as plumbing work, then it would be better to purchase a threaded type tool.
A riveter is not a hammer. What is it for?
Don't underestimate this little tool. Here are a couple of ideas that you can use if you have a threaded riveter lying around.
- Installing doors, windows, shelves, whatever.
- Attaching decorative items: paintings, signs on the door, whatever.
- Installing handles for furniture, such as drawers and cabinets.
- Installation of window blinds, hanging hooks, etc.
- Auto repair, of course.
In this article, we got acquainted with different types of riveters, analyzed their differences and compiled brief instructions for using hand tools.
If you still have questions, we recommend watching a couple of videos on using a riveter for clarity.
Using rivets for riveting metal and other materials
Welding is, of course, good, but it cannot be used everywhere. In this case, riveting is used - this is a mechanical connection of parts using special fasteners. These fasteners are called rivets; they are made from different materials and come in different types.
What is riveting
The mechanical connection of parts using a series of rivets is called riveting, and the connection itself is called a riveted seam. It is used where it is inconvenient to weld parts or where non-weldable materials are joined.
Not only metals are riveted, but also parts in clothing, accessories, etc. are connected in this way. But there it is more of a finishing touch than a loaded connection. So next we will talk about riveting in construction or home improvement.
In principle, you can use a screw connection instead of riveting, but bolts and nuts are more expensive, and their installation takes longer.
This is what a rivet joint looks like
If we talk about installing fences made of corrugated sheets, rivets are more reliable, since they can only be removed by drilling out the fasteners. When installing screws or self-tapping screws, they can be unscrewed and both metal and hardware can be removed.
In some cases, riveting is more convenient when installing a roof made of corrugated sheets or metal tiles. On the roof, installing screw connections is problematic and time consuming.
But rivets, and with a good tool, can be done in an hour or even less.
Most common use in private households
How are parts connected using rivets? The rivet is installed in the prepared through hole. It has a head that rests on the material and the rod. During the riveting process, the end of the rod is flattened, changing shape under the influence of force. Therefore, ductile metals are used for these hardware.
Types of rivet seams
If we talk about the method of joining sheets, then riveted seams can be overlapped (one sheet overlaps another) and end-to-end. Joint seams can have one or two overlays. With overlays they are more reliable and are used in critical and loaded places.
Types of rivet seams: overlapped and butted with overlays
According to the location of the rivets:
- single row;
- double row;
- multi-row.
They can be located opposite each other or in a checkerboard pattern. Seams can be strong, tight (sealed) or durable-tight. Dense ones are made using elastic gaskets placed between the parts to be connected. Durable and dense ones are used mainly in boilers. Now they are more often replaced by welding.
Types of rivets
What is a rivet? It is a cylindrical rod of ductile metal (may or may not be hollow) with a shaped head at one end. This head is called a mortgage. During the installation process, due to the flattening of the metal of the rod on the second side, a second head is formed. It is called closing (closing).
Types of rivets
There may be composite rivets (such as the popular blind or screw rivets), which consist of a body and a shank. But this does not change the essence: the embedded head rests on the material, and at the other end, due to the plasticity of the metal, a second head is formed. It is simply formed due to the fact that the rod is extended and the expanded part crushes the second part.
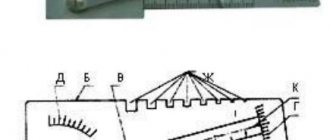
Types of cores and embedded heads
Rivets differ in the shape of the head and the shank. According to the type of rod they are:
- with a solid rod (high load capacity, but difficult to install);
- semi-hollow (part of the rod near the embedded head is solid, part is hollow);
- hollow (the head and the rod have a cylindrical solid hole, they are easily riveted, but cannot withstand high loads). Types of rivets by type of rod and embedded head
Rivets have the following types of heads (pictured above):
- Semicircular (high and low). Sometimes also called spherical. The most reliable, create a strong seam.
- Cylindrical and conical (flat). Used if the connection is in an aggressive environment.
- Secret and semi-secret. Installed when fasteners should not protrude above the surface. The most unreliable connection, used only when necessary.
Different rivets can be installed nearby
Each type of embedded head is found with each type of core. They are selected depending on the planned load. For maximum loads, hardware with a solid rod and a semicircular head is needed. Hollow seams can also be used for seams that are not too loaded, but they do not provide tightness. If such a characteristic is important, then semi-hollow ones are installed.
Types of rivets
Despite the fact that welding has become accessible even to a layman, riveting does not lose popularity. After all, not all metals can be welded, and the welded seam is susceptible to corrosion. Therefore, new varieties of rivets are constantly appearing, so there is definitely no complete list. Let's look at the main and more popular ones.
- Classic or ordinary. Universal, used for all types of seams. They can be distinguished externally - they resemble fungi.
- Semi-tubular (the rod is half hollow). They require less effort during installation, but their strength is low. Used in connections with low mechanical load. Classic and threaded rivets
- Embedded, pull-out, tear-off or traction. Composite (two-part) hardware. They are good because when installing they do not need to be held on the other side of the seam. They are used to install fences or install roofing materials.
- Piston. Used for connections with low loads, made mainly from soft metals (aluminum and alloys, copper). Nuts and rivets
- Threaded (nut). For connecting parts with thin walls (up to 0.3 mm). They differ in that the inner part has a cut thread, the outer part has a vertical notch that prevents rotation around its axis. The screw is screwed inward, pulling the free part of the housing to the connection point. This is exactly how it turns out - due to creasing - the closing head.
These are the main types of rivets that are used in construction, mechanical engineering and other fields. Each species has its own subspecies that differ in nuances.
Blind rivets
Let's say a few words separately about blind rivets. They are used for fastening corrugated sheets and metal tiles. These are the ones you most often encounter when arranging a site.
The blind rivet consists of a tubular body and a solid rod inserted inside. They are called composite because they have two independent parts.
Also, this fastener is reinforced - after installation, part of the rod remains inside, which increases the strength of the connection.
How does a blind rivet work?
The length of the blind rivet body must be greater than the thickness of the parts being connected. It is inserted into a hole made in advance, after which the riveter grabs the rod and pulls it through the hollow body.
At the far end of the rod there is a ball that forms the closing head from the flared edge of the body.
The excess rod is removed with a tool, but some of it remains inside, which makes this connection quite strong.
As is clear from the description, it is important to choose the correct rivet size. Too short will not allow a normal bead to form, which will weaken the connection. A body that is too long will give a lot of play, which is also not good. So when selecting this type of fastener, carefully look at the recommended thickness. Ideally, your connection is in the middle of the range.
Rivets for joining loose and soft materials
The hardware listed above is not suitable for joining soft and plastic materials - plastic, chipboard. There is another type of similar fastener for them. It is not as large in size and less durable. But, during installation, less force is created so as not to destroy the materials.
There are the following types of rivets for joining plastic or soft materials:
- Petalaceae. When installed, the rivet body opens into several petals. The large contact area of such a closing head allows you to redistribute the load. Such rivets can be placed on plastic, fiberboard and other “non-metals”
- Spacer. This is an exhaust subspecies, but with cuts along the body. When installed, they fold, also forming a kind of petals, but double. In this case, the head of the hardware remains on the surface of the part without going deeper into the material.
There are also plastic rivets. They are usually made for furniture, sometimes for fixing decorative panels. These rivets are more like screw rivets. The lower part is cut into several petals; inside there is a thread through which the rod is screwed. As it twists, the rod pushes the body apart, which is held in place by friction.
Metal riveting
The process of riveting metals consists of two stages: preparatory and the actual installation of hardware. Preparation - drilling holes, countersinking for countersunk heads if necessary. Please note that countersunk heads can be on one (either) side or on both.
The riveting process itself is as follows:
- insert the rivet;
- tighten the parts to be connected;
- form a closing head using a tool;
- check and clean the connection. This is how blind rivets are installed
With a good tool, work goes quickly. For private use and one-time work, manual riveters are usually used. And even with them, the process itself (without drilling holes) takes a matter of seconds.
If we talk about installing corrugated sheets or metal tiles, it is recommended to coat each hole made with paint to prevent corrosion.
It is these processes - drilling and painting - that take a lot of time.
In general, there are two ways to install rivets: cold and hot. When hot, the joint is preheated to a certain temperature (determined by the metal and the thickness of the parts). In practice, it is used when installing rivets of large diameter - 12 mm or more.
The rivets are placed in rows. The minimum distance between adjacent ones is 4 diameters; from the edge of the sheet to the center of the hardware is no less than 1.5 times the diameter of the rivet. When attaching a profiled sheet, place it in a recess, not in a wave.
Selection of rivet sizes
Rivets are selected based on the thickness of the metals being connected. The following are important: the parameters of the embedded head and the diameter of the rod.
The diameter of the rod determines the diameter of the drill, which is used to prepare a hole in the parts to be joined. You can approximately determine the diameter of the rivet by doubling the thickness of the parts being connected.
The length of the rod is at least 2 times the diameter of the rivet, and the protruding part must be at least 1.25-1.5 times the diameter.
Rivet diameter2.0mm2.3mm2.6mm3.0mm3.5mm4.0mm5.0mm6.0mm7.0mm8.0mm
| Hole diameter for precision assembly | 2.1 mm | 2.4 mm | 2.7 mm | 3.1 mm | 3.6 mm | 4.1 mm | 5.2 mm | 6.2 mm | 7.2 mm | 8.2 mm |
| Rough hole diameter | 2.3 mm | 2.6 mm | 3.1 mm | 3.5 mm | 4.0 mm | 4.5 mm | 5.7 mm | 6.7 mm | 7.7 mm | 8.7 mm |
In general, the diameter of the rivet rod can be from 1 mm to 36 mm, and its length can be from 2 mm to 180 mm. Moreover, a larger diameter does not equate to greater joint strength. Here, both the material from which it is made and its type (hollow or solid) play a role.
How to choose? According to the characteristics of the rivets. After all, you choose them to connect certain materials of a certain thickness. You also know approximately the load that will be applied to the connection.
Therefore, when selecting, pay attention to what the manufacturer recommends.
How to select a rivet according to the thickness of the material being fastened? According to the manufacturer's instructions, but in general, the diameter of the rod should be at least twice the thickness of the materials
Must be indicated:
- Recommended diameter for connection. All you have to do is select a drill and make a smooth hole without burrs.
- Minimum and maximum thickness of the connected package. It is important that your connection is within the specified range.
- Shear force. This is the load applied perpendicular to the connection that the rivet can withstand without destruction.
- Breaking force. Under what load along the rivet will it fail?
It is the tensile and shear forces that determine the strength of the future seam. The higher these values, the greater the load it will withstand.
What material should the rivet be made of?
Rivets are usually taken from the same material as the parts being connected - this avoids electrochemical corrosion. Pay attention to strength characteristics. But, as a rule, when connecting aluminum parts, the strength of aluminum hardware is sufficient.
In general, rivets are made from the following metals:
- steel: ordinary - grades St2, St3, St10;
- corrosion-resistant X18N9T;
- galvanized; You can get confused))
- alloyed (stainless) - 9G2, 304, 316.
When connecting copper parts, it is permissible to install brass and copper. Aluminum is joined with aluminum alloys. Steel sheets - corresponding grades of steel rivets. There are also mixed hardware - from two different metals (chemically non-conflicting). The most common are aluminum-steel.
To install facade elements, slopes, ebbs, metal tiles and corrugated sheets, rivets made of galvanized painted steel are usually used. Painting - matching with details.
Riveting
Riveting is the production of permanent connections using rivets used in the manufacture of metal structures (trusses, beams, various types of containers and frame structures). A rivet is a cylindrical rod made of ductile metal, at one end of which there is a head, called an embed. During the riveting operation, a second rivet head is formed on the second side of the rod installed in the holes of the workpieces being connected, which is called the closing head. The mortgage and closing heads are mainly semicircular and countersunk (Fig. 5.14). The need to use ductile metal for the manufacture of rivets is due to the fact that its heads are formed as a result of plastic deformation of the rivet rod. When making riveted joints, the rivets should be selected from the same material from which the parts to be joined are made. This prevents the appearance of galvanic couples, leading to corrosion at the point of contact between the rivet and the part. The riveting process consists of two stages - preparatory and riveting itself.
The riveting preparation process involves drilling or punching a hole for the rivet and forming a recess in it using countersinking for the rivet and closing heads, if necessary. The actual riveting includes installing the rivet into the prepared hole, tensioning the riveted workpieces, forming the closing head, and cleaning up after riveting. Depending on the nature of the rivet joint, riveting is performed in a cold (without heating) and hot (with preheating of the rivet to a temperature of 1000 ... 1,100 ° C) method. In practice, hot riveting is used in cases where steel rivets with a diameter greater than 12 mm are used.
Features and types of metal riveting in plumbing
Metal riveting and plumbing are two inseparable concepts. Using a riveter, you can connect metal parts of different thicknesses. Depending on the type of fasteners, different technical parameters can be achieved from the finished connection.
Master riveting metal
Metal riveting is a technological process that involves joining parts using rivets. The tool can be manual or pneumatic. Used when parts cannot be welded.
Types of jobs
Experts distinguish two riveting technologies - hot and cold. Each of them is used in different situations.
Hot riveting
Before connecting the parts, the rod of the fastener is heated. The craftsman determines the heating temperature by color - the metal must be red-hot. Rods with a thickness of 8 mm or more are suitable for hot riveting.
Cold riveting
Standard technology used in different situations. More often, cold riveting is carried out at home, in small workshops for the manufacture of products that will not be subject to heavy loads. To perform this, rods with a thickness of no more than 8 mm are used.
Sheet of metal with rivets
Types of cores and filling heads
Based on the type of shank, rivets are:
- Hollow. Inside the rod there is a free cylindrical cavity. They do not withstand high loads, but are easily riveted.
- Semi-hollow. In the area of the mounting head the rod is solid.
- Solid rod. Rivets are difficult to install, but they can withstand high loads.
Possible types of heads are conical, cylindrical, semicircular.
Rivets for metal (Instagram / stroimarket_erme)
Types of seams
Types of riveting seams:
- Lasting. It is used if you need to obtain a high-strength connection. The finished part will be subject to heavy loads during operation.
- Dense. They are used in the manufacture of sealed containers for storing or pumping liquids. Withstands slight pressure.
- Durably dense. They are used in the assembly of metal structures and products that will be subject to high pressure.
Depending on the location of the fasteners, the seams can be multi-row, double-row, or single-row.
Principles for choosing rivet sizes
You need to choose rivets for connecting metal parts depending on the thickness of the sheets being joined. In this case, you need to take into account the diameter of the rod.
To determine the required diameter of the fastener, you need to double the thickness of the metal blanks that will be connected. The length of the rod should not be less than 2 diameters.
Standard size ranges:
- diameter - 1–36 mm;
- length - 2–180 mm.
The opinion that the larger the diameter, the higher the strength, is erroneous. The strength indicator depends on the material of the rivet.
Riveters and riveter (Instagram / suburbblues)
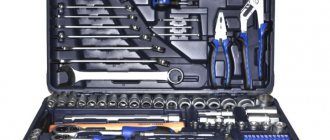
Tool for work
Tools:
- Set of mechanic's hammers. It must be selected depending on the diameter of the rivets. It is better to use a hammer with a square head.
- Minting. A mechanic's chisel, which has a flat working part on one side.
- It's a stretch. A beard that has a hole in the working part.
- Crimping. Tool for shaping the closing head.
Additionally, you will need a vice, a drilling tool, and a hand riveter.
Stages of work
Stages:
- Preparation of parts to be joined.
- Marking holes.
- Drilling holes.
- Countersinking of finished nests.
- Installation of fasteners.
- Crimping
Before starting the main stages of work, you must:
- Clean surfaces from plaque, dirt, and rust.
- Mark the locations of future holes. Before drilling, they need to be marked so that the drill does not go to the side.
Preparation of metal structures (Instagram / start_blasting)
Drilling holes
You can drill holes in metal surfaces using a drill press or hand-held power tool. It is better to use a drill press because it can drill holes in thicker parts.
When using a hand-held power tool, it is important to accurately control its position when drilling so that it does not deviate to the sides. When drilling, it is necessary to use special coolants. You can only work with a sharpened drill.
Inserting rivets
Stages:
- The fastening element is inserted into the hole with the rod from bottom to top.
- A support is installed under the embedding head. If it is hidden, it is necessary to use flat support.
- The parts are compacted. They are seated at the riveting site. Gaps between metal sheets are eliminated with a hammer.
Formation of the closing head
How to do it:
- Direct method. Hammer blows are applied to the rivet shaft from the side where the closing head is formed.
- Reverse method. The hammer blows are applied to the mortgage head.
Bench hammers (Instagram/inforce_tools)
Recommendations
If the installation of rivets on metal is performed by a beginner, a person without practical experience, he may make various mistakes. Defects and their causes:
- The closing head does not adhere tightly to the metal surface. Distortion during crimping.
- The heads are shifted in one or different directions. The holes were drilled with a slight slope.
- The closing head has ragged edges. Low-quality material was used to manufacture the fastening element.
- The head is shifted to the side. The rod is uneven or longer than required.
When carrying out work, you must adhere to safety rules:
- The pneumatic tool cannot be used until the adjustment is completed. It will be difficult to hold the crimp with your hands due to the powerful pneumatic shock. This may cause hand injuries.
- When riveting, sharp, loud sounds are heard that negatively affect the nervous system and hearing. You need to use thick headphones.
- The tool must be checked before starting work. It must be in good working order. The desktop should not be cluttered with unnecessary objects or tools.
- The parts to be fastened should be fixed in a vice.
There are often situations when it is necessary to first remove old fasteners and then reattach the part to the same place. A sharp chisel can be used to remove the round head of the rivet. The remaining fasteners must be knocked out with a punch.
When riveting metal, you must use protective gloves and goggles. The parts should be secured in a vice or console so that they do not move. When working, do not touch the crimp with your hands. Compliance with safety precautions will help to protect yourself from injuries and perform better work.
Pereosnastka.ru
Manual and mechanized riveting techniques
TO
category:
Riveting
Manual and mechanized riveting techniques
Depending on the conditions for the formation of the closing head, two riveting methods are distinguished: direct and reverse. With a free approach to the rivet from both sides, a direct (or open) riveting method is used, in which blows are applied from the side of the rod; The mounting head rests against the support (Fig. 1,a).