I hope, dear reader, the information presented in this article has helped you at least a little understand the problem you have.
I also hope that you will help me get out of the difficult situation I recently found myself in. Even 10 rubles of help will be of great help to me now. I don’t want to burden you with the details of my problems, especially since they are enough for a whole novel (at least it seems so to me, and I even started writing it under the working title “Tee”, there is a link on the main page), but if I’m not mistaken in your conclusions, then there will be a novel and you may well become one of its sponsors, and possibly heroes.
Once the transfer is successfully completed, a thank you page with an email address will open.
If you would like to ask a question, please use this address. Thank you. If the page does not open, then most likely you made a transfer from another Yandex wallet, but in any case, there is no need to worry.
The main thing is to accurately indicate your e-mail when making a transfer and I will definitely contact you. In addition, you can always add your comment. More details in the article “Make an appointment with a doctor”
For terminals, Yandex Wallet number 410012390761783
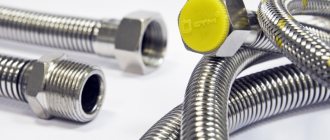
For Ukraine – hryvnia card number (Privatbank) 5168 7422 0121 5641
Webmoney wallet: R158114101090
Or: Z166164591614
Oleg, Yekaterinburg asks a question: Please help me solve this problem. At the dacha, the water pipe began to leak. A major overhaul with replacement of pipes is planned for the spring.
We need to temporarily fix the leak somehow. We need detailed instructions on how to make a pipe clamp. I would be very grateful for your practical advice. The expert answers: Repairing various breaks in pipes with clamps began a very long time ago.
The technology for this type of work is proven, simple and reliable. To perform this, you will need the following materials: a piece of tin; a piece of rubber; bolts; nuts; washers. The clamp consists of a metal crimp - a bandage, as well as an internal rubber seal - a cuff. Absolutely any tin will do, but it’s better to try to choose galvanized one.
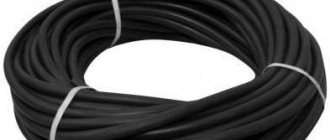
Such a bandage will be more resistant to corrosion. The thickness should not be less than 0.5 mm. The cuff can be cut from an old boot, a piece of a car or bicycle tube, or a thick mitten.
Any tire will do. The number of bolts depends on the width of the clamp. If it is narrow, then one is enough.
For a wide one you will need 2 or 3. Diameter from 6 to 10 mm. Nuts and washers are selected using them. First, prepare the tools: Hammer. Pliers.
A vise will also work. A caliper will do the trick. You can replace it with a piece of some kind of lace. Scissors for cutting metal. A jigsaw or grinder will do. A hand or electric drill. Drills to match the size of the bolts. Wrenches. Sandpaper. Installing the clamp. Using a caliper, measure the diameter of the pipe.
This way you will know how long to cut a strip of tin. To do this, multiply the number “pi” by the value of the diameter. The result is the circumference.
Those who don't like geometry or don't have calipers can use a string or something similar. Wrap this string around your pipe and make marks on it, for example with a felt-tip pen or chalk. By measuring the distance between the marks, get the same circumference. Add 3-4 cm to the “ears”.
The width depends on the damage to the pipe. The rubber patch is also cut out. Only its size should be without “ears”. Tapping with a hammer, bend the cut strip around the pipe, and bend the “ears” at a right angle with pliers.
Having placed them together, drill a hole for the existing bolt. If the width is more than 4 cm, then drill 2 holes, or even 3. Clean the area under the clamp with sandpaper. Place the middle of the cuff on the leak site, put a bandage on top of it and tighten it with a bolt and nut.
Now you have detailed instructions on how to make pipe clamps yourself. Such clamps are very reliable and durable, and can last no less than the pipe itself. So your temporary repair may well become permanent. Share a useful article: Similar articles:
At the first signs of depressurization of the pipeline, it is necessary to quickly find the damaged area and eliminate the identified defect.
When performing emergency emergency work, you can use homemade clamps to stop the flow in the pipeline for a while. Ready-made clamps for fastening pipes, made in the factory from stainless steel or fire-resistant plastic, are used when performing installation work on the installation of heating, sewerage, water supply, and gas supply systems. These fasteners allow you to reliably fix the position of pipes running along horizontal and vertical surfaces (ceilings, walls), as well as those installed on special racks.
In this video, an experienced craftsman shows how to make a wire clamp:
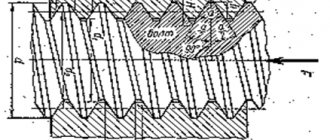
Design of a simple clamp
Without exception, all pipe clamps consist of a bandage - a crimping material made by manufacturers from steel, and an internal seal called a cuff. As a sealing material that ensures sealing of the damaged area, special corrugated rubber is usually used, which helps prevent deformation of the pipe when the fastening screws are tightly tightened. The presence of a rubber gasket in the design of the product also helps reduce vibration and noise.
When choosing clamps, pay attention to such product characteristics as:
- internal diameter; width of bandage; thickness of steel strip.
The tightening range of the clamp varies depending on the size of the fastener. The main indicators that determine the scope of its application are the strength of the connection and the level of permissible load.
Metal clamps for fastening and repairing pipes of different diameters consist of a steel frame and a seal made of corrugated rubber
Varieties
Clamps are presented on the construction market in a wide range. Models are produced in a wide variety of standard sizes and are divided according to such characteristics as the method of fixation, the presence of a seal, shape, material of manufacture and purpose.
Based on the material used, products are divided into plastic and steel. Moreover, steel elements can be made either with or without galvanization. Compared to plastic models, steel clamps are considered more in demand and popular. This is due to the low cost of the products, good tensile strength of the metal and high strength. The disadvantage of metal clamps is the low resistance of non-galvanized models to corrosion processes. Therefore, in cases where the installation of clamps is planned in extremely humid rooms, you should choose models made of stainless steel or clamps coated with zinc.
Plastic options are characterized by increased elasticity, high resistance to vibration and the ability to create movable fixation. Models can be used for fastening pipelines with a diameter of no more than 10 cm.
Depending on the tasks assigned to them, clamps are divided into spiral, power, wire, worm, pipe and mortise options.
A spiral clamp is a fairly common device and is intended for rigid fixation of pipes in the system.
The power one has the shape of a tape with holes for bolts and is indispensable when working on lines with increased operating pressure, at pumping stations, pneumatic and hydraulic systems.
Wire clamps are presented in the form of one or several steel rings equipped with tightening fasteners. The model is designed for corrugated pipes and is indispensable for fixing them during strong movements.
The worm model is a steel strip with a track, equipped with teeth and screws for tightening. The model is used in the construction of heating systems, as well as as a fixing mechanism for pipelines exposed to severe vibrations.
Pipe clamps are presented in the form of rings with brackets and are installed to secure the pipeline in cases where it is necessary to reduce the internal stress in the system during repairs.
The spring clamp has a fairly narrow specialization and is used on pipes subject to linear expansion.
A mortise, or saddle, clamp with a branch is a more complex mechanism and is designed for installation in places where the pipeline branches. Its main difference from traditional models is the presence of a coupling equipped with threaded pipes, which allows you to insert the clamp into the system and quickly connect an additional branch. The tightness of such a connection is ensured by a gasket located inside the clamp and made of profiled rubber.
Pivot models, also known as hinge locks, are used to install scaffolding and are used when attaching diagonal type braces. Thanks to the rotary clamps, all elements can be fixed at any angle, which gives additional strength to the structure and ensures its stability.
According to the type of fixation, all clamps are divided into two types:
- The first include models that form a rigid type of fastening, in which the pipe becomes completely motionless. The crimping brackets of such products are securely tightened with bolts, and the clamp itself is firmly attached to the wall. This type of fastening is used in areas where the pipeline bends and in the presence of branches.
- The second type includes models with movable fastenings, used for fixing heating and hot water pipes. The specificity of the fastening does not create obstacles to the elongation and compression of the pipeline and ensures its longitudinal mobility. As a result, an optimal line voltage is created, significantly extending the life of the networks.
Structurally, clamps are available in several types:
- a split ring, formed in the form of a circle and having one fastening mechanism, fixed with a bolt;
- a ring consisting of two semicircular plates and having fastening ears on both sides;
- a tape folded into a ring and having several positions for fixation;
- A U-shaped model, often made of plastic, equipped with a locking latch and capable of being attached in a rigid and movable manner at the same time.
Making a clamp from scrap materials
Find a strip of galvanized sheet metal, the thickness of which does not exceed one millimeter, and a piece of three-millimeter rubber. Look in your supplies for a couple of bolts (M6, M8 or M10), as well as matching nuts and washers. Tools that will be useful:
- hammer; calipers; wrenches; vice or pliers; metal scissors, which can be replaced if available with a jigsaw or grinder equipped with appropriate cutting elements; drill and bits (M7, M9 or M10, M12).
Use a caliper to determine the pipe diameter. If the pipe diameter is large, then take the necessary measurements using an angle and a ruler.
Next, cut out the tin frame of the clamp in the form of a strip, the width of which should be 4-8 cm, and the length will have to be calculated. To do this, determine the circumference of the pipe by multiplying its diameter by 3.14 (the number Pi, familiar to everyone from a school geometry course). 3-4 cm are added to the result obtained, from which “ears” are subsequently made with drilled holes for fastening bolts.
The size of the holes in the “ears” depends on the diameter of the bolts, and if the washers are wide, then you can add an extra 2-3 mm to simplify the installation of the clamp in the future. If the width of the bandage exceeds 6 cm, then it is recommended to drill holes not for two bolts, but for three.
Mark with a marker a line along which to bend the “ears” at a right angle to the tin strip. This operation can be done manually if the strip is thin. Thicker material is worked with a vice or pliers.
Next, the tin is bent around the pipe on which it is planned to put the clamp, and they try to connect the ears so that the holes drilled in them coincide. If the tin does not bend well, then tap the strip with a hammer. A pre-cut rubber gasket, cut to fit the width of the bandage, is inserted into the clamp.
How to quickly fix a leak?
A leaking water pipe can cause flooding of your home and damage to your property and that of your neighbors. You need to act quickly in such a situation:
- If possible, turn off the water supply to the system (area being repaired).
- Clear the repair area. Move the furniture aside and put down dry rags.
- Prepare tools: pliers, screwdriver, flexible wire or clamps, thin rubber.
- Cut out the desired piece of rubber sheet. It should cover the leak site with a margin of 2–3 cm in each direction.
- Press the pad firmly onto the fistula (crack). If it is too thin, wrap it in 2-3 layers.
- Holding the overlay with your hand, place the wire on top. Tighten it by making tight turns with pliers.
- Cut off the excess wire, leaving 5mm ends.
- Bend them so they don't protrude.
Pipes leak especially often in houses with old plumbing. In bathrooms and toilets where humidity levels are high, metal is at high risk of corrosion. Salts and various impurities in the water contribute. To prevent leaks, anti-corrosion paints and primers are used. Some of them can be applied directly to the rust.
If water comes out of the fistula under pressure, find something to plug the hole with. The easiest way is to block the flow with a chopper. Sharpen the end of the piece of wood to fit into the hole. Lightly tap the chop with a hammer.
Algorithm for installing a clamp on a pipe
Before installing the clamp, the ears are moved apart so that they can easily wrap around the pipe.
In this case, the rubber gasket should well cover the area of the pipe defect. If everything was measured correctly, then there should be no more than three centimeters between the ears. This distance will necessarily decrease as the clamp is tightened with bolts, and this process continues until the rubber seal can be pressed as tightly as possible to the pipe.
A clamp for eliminating a leak in a pipe of a water supply or heating system at home can be installed at the site of damage with your own hands within a few minutes
In most cases, clamps are installed on a leaking pipe. The supply of water, coolant or wastewater is not shut off.
Therefore, the effectiveness of the repairs performed will be immediately visible. After wiping the pipe and bandage dry, wait about five minutes and make sure that the leak has been fixed. If necessary, bolts that are too long can be easily cut with a grinder or a hacksaw.
A properly installed clamp can last for several years, protecting the facility from flooding. However, it is advisable to weld breaks in water supply and heating systems or replace defective areas with new pipes.
Summarize
It is safe to say that clamps, regardless of their purpose, are truly irreplaceable. If desired, a plumbing fastener can be turned into a repair product and save the neighbors below from flooding. In addition, the home handyman will be spared the costs associated with repairing the lower apartment. If it is necessary to replace sewerage or water supply lines, there is no alternative to fastening clamps. In addition, the price of such plumbing products is low, and you can buy them at any hardware store, which makes them accessible to all segments of the population.
We hope that the information presented in today's article was useful to our dear reader. While reading, you might have some questions on the topic. Feel free to ask them in the discussions below. The editors of Seti.guru will be happy to answer them as soon as possible. If you have experience using various clamps professionally or for DIY repairs, please share it with other readers. This will be useful for beginning home craftsmen. Write, ask, communicate. And finally, we bring to your attention a short but quite informative video on today's topic.
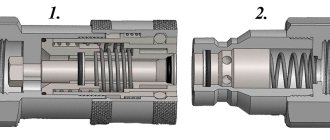
Insertion into the main water supply
When connecting the water supply of a private house to the central water supply system, a mortise pipe clamp is used, which allows work to be carried out under pressure in a short time using specialized professional equipment.
A clamp for tapping into a pipe without pressure is installed by a simple mechanic using a milling cutter and a pair of wrenches. This does not involve the use of a welding machine. In any case, this work is carried out by employees of services servicing the main water supply in a populated area, provided that the client has all the permits.
Stages of installing a mortise pipe clamp in a main pipeline. Clamps for inserting into pipes simplify work on connecting the facility to central water supply systems
Now you know how to make and install a clamp on a water pipe. If the pipeline is damaged, you will be able to fix the problem yourself, at least for a while before professional plumbers arrive.
- Author: MarinaPrint
The proper functioning of heating and water supply systems is one of the primary tasks that every home owner must ensure.
In the case of laying new communication lines and high-quality work, this issue may not worry for a long time. However, time is inexorable, and sooner or later, under the influence of external factors or the influence of water, the pipes will begin to leak. In this regard, let's find out how to install a clamp on a pipe. The technology for carrying out the mentioned work will be discussed further.
Main technical characteristics of repair devices
Crimping repair clamps for pipes consist of the following parts:
- Bandage. This is a crimp element (stainless steel or galvanized), which has a thickness of one or two millimeters. Carbon steel (one and a half to three millimeters thick) is also used to manufacture this structural element. And often cast iron parts are used for this task.
- Cuff. It serves as a sealant on crimping devices. It is made from cellular rubber 6429 - from 8 to 13 SHAFT.
- Fastening elements of crimping mechanisms are made of stainless steel or galvanized.
Acceptable standards for the operating pressure that crimping devices can tolerate are from 6 to 10 atm. The working medium for them is water, air, or any inert gas.
The temperature standard for crimping devices is from -20 to +600C. And their diameters range from 1.5 to 120 cm.
Definition and applications
Before moving on to directly considering the issue of installing a clamp on a pipe, it is necessary to understand what this auxiliary element of plumbing is.
A clamp is usually called a special device designed to seal holes in pipes and eliminate leaks. Clamps can also be additionally equipped at the joints of pipeline segments for additional sealing. As for application cases, we can note: The appearance of fistulas in the pipe wall. This can occur as a result of the effects of corrosion on the walls. The appearance of cracks in pipes. They occur both when installation rules are violated and as a result of manufacturing defects. The appearance of fractures in pipes.
This can occur if the pipe installation technology is violated. Leaks occur at the joints. It can occur as a result of improper installation or natural wear of the seal. As for the structure of the element, the clamp consists of two metal half-rings connected to each other with bolts and nuts. A rubber seal is usually attached along the inner radius of the clamp, having a width slightly larger than the metal part.
Benefits from OPM
The OPM company catalog widely presents fasteners not only for industry, construction or everyday life. Also here you will find ties, clamps for connecting a wide variety of types and types of pipes - plumbing, water supply, gas, heating, etc.
If necessary, you can be advised on all issues related to the use of one or another type of fastener in this section, be it a tie or a clamp. For each specific task, the necessary and most suitable fasteners for each individual case will be selected. All products are only from leading global and domestic manufacturers, which guarantees their high quality. We offer ties, clamps, clamps and much more. More details can be found here:
Goods
1 - 44 of 44
Home | Prev. |
1
|
Track. | End
|
Installation process
As for the process of installing a clamp, for example, on a heating pipe, everything is quite simple. For maximum efficiency, it is best to carry out actions in stages: First, it is necessary to shut off the flow of water (in this case, acting as a coolant) into the pipe. Next, the installation site of the clamp must be cleaned and leveled for maximum sealing in the future.
For these purposes, sandpaper is suitable, with which you need to remove the top layer of paint. Thus, not only will the surface be leveled, but the location of the damage will become more clearly visible. After this, a clamp is installed. To do this, the fastener is untwisted on one side, and the half rings are moved slightly in different directions so that the element can be put on the pipe. In this case, the rubber seal should be positioned so that the place where the leak occurs is located in the middle of the rubber part. Next, the fastening elements of the clamp are inserted into the ear holes, and the element is tightened using keys.
If all stages of work were carried out correctly, the leak will be eliminated. This will be most clearly noticeable if the water was not shut off. In addition, it should be added that for additional sealing of the joint, the inner surface of the rubber seal of the clamp can be treated with silicone sealant, which, after polymerization, will give almost complete confidence in the tightness of the joint.
Procedure for replacing the outer CV joint boot
The procedure for replacing the outer CV joint boot, which has a unified design, is identical for most cars with front-wheel drive. The work is carried out on an overpass or inspection pit.
Required Tools
Minimum set of tools required to perform repairs:
- mechanical or hydraulic jack;
- wheel stops and auxiliary stands for holding the body;
- a metal brush to clean the surface from dried dirt;
- hammer and chisel;
- rags for wiping;
- set of wrenches and sockets;
- torque wrench;
- flathead screwdriver and pliers;
- a spatula for applying lubricant to the cavity of the cover.
Progress
Sequence of actions when replacing the external boot:
- Place the car in the pit, apply the handbrake and place chocks under the rear wheels.
- Loosen the nuts or bolts securing the wheel rim to the hub, and then jack up the body.
- Install safety stops under the threshold (if they are missing, it is allowed to use a spare wheel with a board).
- Dismantle the wheel, and then remove the clamps of the central nut (a cotter pin or a bevel of the nut bent into the grooves is used to hold it in place).
- Unscrew the nut; to complete the procedure, you will need the help of a second person to press the brake pedal.
- Remove the brake pads and caliper, which is moved to the side (removing the hose is not required). The caliper is bolted to the steering knuckle, the size and location of the heads depends on the car model.
- Pull off the brake disc. If the part is stuck to the hub, then you need to use a hammer. The blows are applied through a wooden spacer that prevents damage to the disc surface.
- Remove the bolts connecting the hub and the shock absorber housing. Before disassembling, it is necessary to remove the layer of dirt with a brush and wipe the surface with a rag.
- Pull the hub towards you, moving the shaft splines out of the hole.
- Remove the old cover using a knife or screwdriver. At the same time, the old clamps are removed; reusing the fasteners is not recommended.
- Carefully remove old grease with traces of water or dirt from the hinge surface. Grease is removed with a wooden spatula and clean rags or rags.
- Remove the outer hinge together with the housing. To complete the task, you will need the help of a partner, who does not allow you to disconnect the shaft joint near the gearbox housing. The hinge is removed from the axle using a chisel and hammer (the design uses an internal retaining ring that is compressed upon impact).
- Wipe the shaft and CV joint from any remaining lubricant; you can disassemble the unit and wash the parts with gasoline.
- Assemble the assembly and apply a layer of lubricant to the parts; the substance is tightly packed into all cavities and grooves.
- Place a new boot on the shaft; a portion of lubricant is first added to the cavity of the boot.
- Connect the hinge and the axle shaft, first aligning the seating teeth.
- Place the clamps in their original places, and then install the removed parts. When tightening threads, use the tightening recommended by the manufacturer.
Option without removal
The procedure for removing and installing the cover without separating the shaft and the hinge involves the use of a special device that stretches the rubber boot. The method is used in cases where it is impossible to separate parts without destroying the metal elements (due to corrosion or design features).
Possible problems
A common problem is the joint sticking to the shaft. If the hub is secured with a bolt, then to separate the parts it is necessary to screw the bolt into the hole until it stops. After the part rests against the end of the axle, you should make another 2-3 turns with a wrench, which will allow you to remove the hinge. If fastening is carried out with a nut, you will need to completely remove the axle shaft and then clamp the drive in a vice. Tightly fixing the part will allow you to knock down the hinge with a chisel, but if the contact cannot be separated, you will have to cut the inner ring of the CV joint with a grinder.
Making a clamp
If for some reason it is impossible to purchase a clamp in a specialized store, the issue can be resolved by making the element yourself.
To do this, do the following: You need to take a strip of galvanized sheet of the required width and thickness of about 1 mm. Using a flexible tape measure, measure the circumference of the pipe and add 3-4 cm to this indicator on each side of the strip necessary for making the ears for fastening. The strip obtained Previously, the length is cut off from the sheet and divided into two parts (you can make a one-piece clamp from one strip). The blanks are bent to the required shape. The work can be carried out either directly on site or using a piece of pipe of the same diameter as a model. On each side of the resulting half-rings, the ears necessary for fastening are bent using pliers. Holes are drilled into them. Simple rubber with a thickness of 3 mm or more can be used as a seal. The resulting clamp and seal are mounted in place similarly to the factory version. It is worth noting that this option, if manufactured and installed correctly and with high quality, will differ little from the factory analogue, and therefore can be successfully used for installation, for example, on a water pipe. Sometimes a type of clamp can be used to seal the connection of pipes used in gardening work.
For example, the use of irrigation systems of varying complexity is impossible without a tight connection of the elements. Such clamps are generally similar in design to the parts mentioned above, but lack a sealing element. Regarding how much a water clamp costs, it should be said that the price can vary quite a lot depending on the complexity of the design, material of manufacture, manufacturer and many other factors. As you can see From the above, installing a clamp on a water pipe is too difficult a task to do on your own. It is important to understand that this is a temporary measure, which is not a panacea, but is quite suitable as a measure to quickly solve the problem.
Clamp types
Power
A power clamp is installed on a pipe if the transported medium has high pressure, and the pipeline route itself is characterized by a complex configuration and the presence of a significant number of hydraulic resistances. In this case, not only breaking loads are taken into account, but also bending loads: then the part is used both as a pipe tie and as a seal.
Depending on the installation location, power pipe clamps may have a compensating rubber lining, which absorbs some of the vibrations and vibrations that occur during operation of the pipeline system. It also serves as a temporary gasket where residual condensate can flow.
Such products are made from strip or strip steel. In order to increase rigidity, a rib is made along the entire length, increasing the moment of resistance of the section (while maintaining the same weight value).
Spiral
They are not intended for fixing high-pressure pipelines, but are convenient at home. Considering that the profile is clamped simultaneously along two coordinates, the stability of the connection increases. High-carbon structural steel type 60S2 or 65G is used as a spiral steel element.
With the help of such products it is possible to eliminate possible pipeline distortions.
Such parts operate more smoothly and eliminate possible damage to the outer surface of the pipe or hose.
Spring
Structurally, they are similar to spiral ones, but differ in the method of tightening the connection/fastening - it occurs as a result of tightening the spring using a special device, most often a crank mechanism.
They are recommended for pipelines with reduced alignment requirements, since they are not able to provide fixation of a route fragment in two planes simultaneously.
Spring structures also require increased installation space, so they are more often found as an element for securing road signs, restrictive barriers and other parts on highways.
Pipe
The most common type of clamp, which, in turn, differs in the installation location and the length of the outer diameter of the pipe being fixed.
The standard size is determined by the shape of the clamping surface. The championship here is firmly held by clamps made in the shape of the Greek letter Ω, however, eyelet-shaped clamps are also quite common.
Increasing the length of the legs increases the stability of the assembled part.
Pipe-type products are ideal for assembling simple hoses that transport only air and liquid. They are more flexible in use than other types, and are also well protected from self-unscrewing - for this, a locking connection in the form of a castle nut or two ordinary nuts is used.
Wide pipe clamps, the length of which is more than twice the outer diameter of the pipe, are characterized by particular rigidity: in addition to more reliable retention, they often include a threaded hole for installing a fixing screw.
Worm
They differ in the direction of clamping: it is done in a direction parallel to the axis of the pipeline. The greatest efficiency is achieved where the laying route changes its axis several times.
They require periodic maintenance – lubrication and cleaning from dust and external contaminants.
Wire fastenings
The classic method of homemade clamping is usually made from two or three ductile low-carbon steel wires of grades up to 10kp steel inclusive. The mount is disposable, non-adjustable. They are used in households, as well as for pipes intended for drainage.
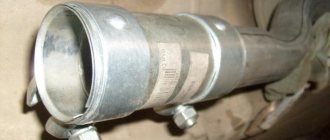
Sewer pipe clamp
Although the liquid pressure in sewer pipes is much less, a leak that occurs can also cause a lot of trouble. In this case, you can purchase and install clamps for sewer pipes.
For thin-walled plastic sewer pipes, it is better not to use homemade clamps, since they do not have the correct shape and, instead of solving the problem of elimination, leaks will bring even bigger problems, in the form of a crack or complete failure of the pipeline.
Latest updates
My subscriptions:
© 1996-2019, Channel One. All rights reserved. Full or partial copying of materials is prohibited. When using site materials in an agreed manner, a link to the resource is required. Embed code for blogs and other resources posted on our website can be used without permission.
Online broadcasting of a broadcast stream on the Internet without approval is strictly prohibited. Broadcasting is possible only using the player and online broadcasting system of Channel One. Application for organizing a broadcast.
Information desk of Channel One tel.
People who at least sometimes do repair and installation work know that a clamp may be needed at the most unexpected moment. This is the first device that comes to mind when you need to quickly fix a pipe leak. Indeed, applying a clamp is a temporary measure, but sometimes necessary. It is possible that, due to circumstances, it cannot be purchased right now; besides, even a simple wire clamp will do to solve the problem. Therefore, you need to do it yourself.