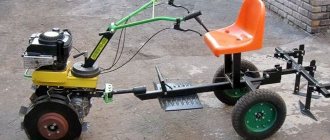
The bulk of Russians' garden space is traditionally allocated to potatoes, because our people also call it the second bread. Many have transferred part of the labor of growing potatoes onto their shoulders, or rather onto trailed small-scale mechanization equipment: walk-behind tractors and mini tractors.
And if planting potatoes is not a big job, then hilling them, and most importantly, digging them up is not an easy task. For hilling and weeding, the hiller included with walk-behind tractors is most often used, but for digging in its pure form it is not entirely suitable. Let's figure out what to dig and how to make a potato digger for a walk-behind tractor with your own hands.
There are several known designs of potato diggers for walk-behind tractors and mini tractors. Let's look at them: from the simplest to the most technologically advanced.
Fan potato diggers
The simplest ones to manufacture are also produced industrially, but most require some modifications.
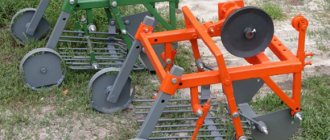
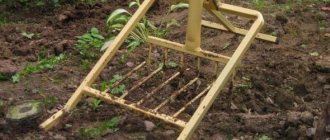
It is immediately clear that they are based on the same hiller; it is this hiller, buried below the level of the tubers, that loosens and turns the soil. But he brings up the dug potatoes - a fan welded to the back of the hiller. Its role is played by metal rods, welded at a distance of 3–4 cm from each other, diverging and curved in the upper part.
The amount of depth is regulated by thrust wheels, and the transverse bar serves as a footrest, upon which a person, with his weight, provides the required depth to the device.
It is this type of fan potato digger that seems to us to be the most productive. The digging process itself can be seen here:
You will have to modify the shape, angle of attack and other nuances yourself, taking into account your soil, the power and driving performance of the walk-behind tractor on which you plan to install the potato digger, and even the varieties of potatoes that form tubers at different depths.
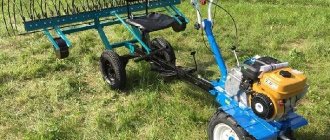
A type of similar digger without a fan, designed for two people:
Potato diggers with a roar
This is the most common type of potato digger, produced by various machine-building plants in Russia and abroad. It has slight design differences, primarily in the design of the screen drive - oscillating during operation of the pan, which allows the potatoes to be partially cleared of the soil while the potato digger is moving.
The knife of such a digger can have different configurations. It can be fixed motionless, or it can be hinged and oscillate slightly during movement, simplifying the process of digging up tubers. The width of the knife is 35 – 40 cm.
Drawings, diagrams and dimensions of a potato digger for the Neva walk-behind tractor. Farmer, MTZ, mini tractor
There are several options for drawings of a screening potato digger - for example, for a heavy walk-behind tractor, mini tractor and others. The most common schemes:
- Basic model.
- Potato digger for mini tractor with hydraulic drive.
- Another drawing provides for the following dimensions of a potato digger:
- Trailed digger for walk-behind tractor.
- You can draw up a drawing of a 2-row, screen-type potato digger yourself based on the finished model.
DIY drawings
It is this type of potato digger, despite being quite difficult to manufacture, that is made by home craftsmen with their own hands more often than others. We offer approximate drawings with the main dimensions of such a potato digger for a walk-behind tractor.
A large number of joints of moving parts makes this device regularly serviced, but the result of its work is of better quality than that of fan-shaped potato diggers:
Potatoes are peeled better from the ground and are located on its surface.
The magnitude and frequency of oscillations of the screen may vary and depend on the design of the drive, but even with minor oscillations, cleaning occurs quite well:
Types of potato diggers for walk-behind tractors and which one is better to choose
Different types of potato diggers for walk-behind tractors may differ in a number of ways. Usually there are five main devices: fan, screen, drum, conveyor, conveyor.
Fan
A fan potato digger is the simplest and most versatile unit. The name of this device is explained by the arrangement of the teeth. They are made of equal-length pieces of reinforcement connected in a fan shape.
The structure of a fan potato digger is similar to an agricultural plow
The principle of operation does not have significant differences with other types of potato diggers: the device is immersed in the ground and catches tubers, which, in turn, are sifted from the ground due to the large distance between the teeth. Finally, the fruits dug up and cleared of soil end up on the surface of the beds, where they can be conveniently collected by hand.
Grohotnaya
The main difference between a screening potato digger and other types of devices is the presence of a lattice compartment. It is located at an angle relative to the ground, which allows the teeth to be driven into the soil with less effort. Also, due to the additional support point and a pair of wheels, the screening unit has a more stable design than a fan potato digger.
The potato digger got its name due to the noise and vibrations produced during operation.
The advantage of the screening device lies precisely in the grid. Due to the constant oscillatory movements of the compartment, the collected tubers are cleared from the soil more efficiently and quickly.
In the video about potato diggers for walk-behind tractors, it is the screening version of the device that most often appears in work, since it is most applicable when cultivating both small and large plots of land.
Drum
A potato drum digger is a fully mechanized device that can make the harvesting process as easy as possible. Thanks to this unit, the fruits are not only dug up and cleared of soil, but also transported to a separate box.
The design of the device implies the presence of a lattice drum. The fruits fall into it directly after being dug up by the plow. Due to continuous rotation, the tubers are cleared of excess soil and then sent to a pre-prepared container.
Most often, they resort to making a potato digger for a walk-behind tractor with a drum with their own hands in order to facilitate harvesting, but this condition is not always feasible.
The drum unit can only be used on soft, loose soil.
Conveyor
The conveyor potato digger is used less frequently than other types of devices. The operating principle of this unit is to move a layer of earth with root crops along a conveyor. The process of clearing fruits from soil in this way is slower than in a drum or screen potato digger, so it may take more time to cultivate the soil.
When working with a conveyor potato digger, the type of soil is important; the device is not applicable in areas with wet or sticky soil
Attention! The use of a conveyor potato digger is not recommended in areas where weeds grow. Long plant stems get wrapped around the partitions, which can lead to device failure.
Conveyor
Another type of device that is rarely found in the personal use of landowners is a conveyor potato digger. It is a structure consisting of a bucket and a belt. Together with a piece of soil, the fruits are placed in a container and then move along a conveyor. During the process, the tubers are cleared of soil and placed on the surface of the soil, where they are subsequently collected by hand.
Using a conveyor potato digger, it is possible to process several beds at once
Despite the variety of units, fan and screen potato diggers are considered the most universal devices. They are suitable for all types of soil and do the job well. You can also often find a drum potato digger in use by farmers, but for its operation it is necessary to take into account the operating requirements.
Conveyor potato diggers
They are much easier to make yourself, but in our opinion they are no worse at peeling potatoes from soil.
Their knives are the same as those of the screening ones, and the potatoes are peeled while they move along the conveyor belt. It is clear that the longer it is, the better the potatoes will be peeled, but long conveyor belts can only be installed on potato diggers used with tractors. On walk-behind tractors, they will interfere with the person walking behind him.
The conveyor belt drive may be different. If it is taken from the wheels of the digger itself, then they must have good lugs so that they do not lock on wet or very loose soil.
Also interesting in this design are the rear guides, which more compactly place the potatoes behind the belt.
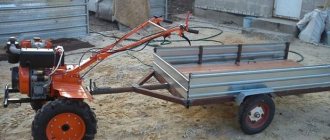
In this self-assembled conveyor potato digger, the belt drive is carried out from the power take-off shaft of a homemade walk-behind tractor and is transmitted by a motorcycle chain.
To view a picture, click on its thumbnail on the right
When manufacturing a potato digger of this type, the main problem will be selecting the rotation speed of the conveyor drive gear and matching it with the speed of the power take-off shaft. In this model, the power take-off shaft rotates at a speed of 500 - 800 rpm, and the gearbox is taken from a motor boat with a gear ratio of approximately 1:2. The rest is selected by the size of the stars for an approximate walking speed when digging 2-3 km/h.
And yet, the connection between the speed of the conveyor belt and the wheel speed seems more appropriate to us.
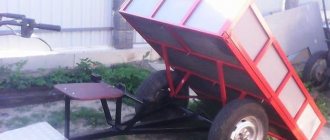
There are models designed for specific walk-behind tractors and mini tractors, like this one for mechanisms with a side power take-off shaft:
Equipment with conveyor
The conveyor potato digger has a standard appearance, in which the main elements are a ploughshare and a platform with a conveyor. Peculiarities:
- a conveyor is installed on the platform, the type of which is regulated by the requirements;
- a simple device allows installation on almost any version of walk-behind tractors, including domestic ones;
- often used in areas with hard or loamy soil;
- A potato digger for a walk-behind tractor is created strictly according to the specified parameters of the conveyor and platform, as this is necessary for normal digging of tubers.
When creating it yourself, it is worth considering two factors that will affect installation and operation. The first factor is the size of the device, which allows you to mount the mechanism on the walk-behind tractor. The calculation should always be made taking into account the technical parameters. Another factor is the manifestation of versatility. Most homemade conveyor-type devices can be supplemented with secondary elements.
Drum potato diggers
This is a rather rare type of equipment for mini-equipment, so it is mostly homemade. Peeling potatoes from soil in such devices occurs quite efficiently, as does laying them on the ground, but the design itself is quite controversial, and the tubers are more damaged than when digging with the above-mentioned potato diggers, and therefore are worse preserved.
What is simpler about them is the direct drive of rotation from the power take-off shaft. Everything else: making the drum, thrust rollers and bearings is clearly more complicated. The design of the knife does not have any special features, except that it is preferable for it to have a more rounded shape in the back so that the potatoes are not further damaged when they get into the drum.
How to install a potato digger on a walk-behind tractor
So, the digger is ready, but it’s too early to start work. First you need to configure and install it correctly. The goal is not only to harvest the potatoes, but also not to damage the tubers.
Digger adjustment:
- Loosen the bolts that are located between the post and the lock.
- Move the plowshare while adjusting the penetration into the ground. Optimally - 30 cm. If the depth is less, the crop can be damaged.
- Tighten the mounting bolts.
- Now you need to adjust the slope of the pitched board. To do this, just turn the handle until the board hits the ground, then in the other direction. The back of the board should be raised above the ground by about 5cm.
Horse-mounted potato digger
There are still quite a lot of them for sale on the Internet. They are imported mainly from Poland and converted into mini tractors and walk-behind tractors.
At the same time, taking into account the higher speed of movement of this equipment in comparison with a horse, in addition to modifying the towing device, a limiter-shield is placed on it on the side on which the dug potatoes are thrown. Otherwise, it will have to be collected in neighboring areas. A wedge-shaped paw digs up the potatoes, as in fan diggers, and the drive of the device that removes the tubers from the ground is carried out by wheels with lugs. The higher the travel speed, the faster this potato extractor rotates.
Dear readers, if you have any questions, please ask them using the form below. We will be glad to communicate with you;)
Attachments for different types of equipment cost an impressive amount of money.
That is why one of the options to save money is to make it yourself, from scrap and purchased materials.
One of the most popular additional devices for a mini-tractor or walk-behind tractor is a homemade potato digger.
It allows you to fully automate the process of harvesting potatoes, which is extremely labor-intensive if done manually.
Types of potato diggers
- Screening or vibrating mechanism - it consists mainly of a ploughshare and a vibrating sieve. The operating principle of this type of potato digger, operating using a walk-behind tractor, is simple. The soil along with the potatoes is undermined by a ploughshare. Then the immovable conveyor grid leaves the tubers on its surface, and shakes the soil back, as if through a sieve. This model is effective in operation, but quite difficult to manufacture.
Vibrating potato digger
- A conveyor installation for digging potatoes - it can work freely, for example, on the basis of a walk-behind tractor such as the Neva. By design, a conveyor digger consists of a ploughshare and a driving conveyor, which has a special hooking device for maintaining tubers on the platform and clearing soil. The conveyor design for digging potatoes is more practical than the vibrating type of potato digger. But on soil with a slight degree of density, it is not advisable to use this type of device.
Conveyor potato digger
- Lancet type - in terms of design, this is the simplest mechanism that can easily be adapted to any model of mini tractor, for example, such as the Neva. It does not contain movable components. As shown in the video, the soil with tubers is trimmed with a knife. Next, the cut falls on the surface of special rods, where the earth is poured back, and the fruits in their pure form lie on top of the soil. This digger is effective on soil with a low degree of density, where it is not practical to use other types of devices. Before you start constructing such a device, first of all, you need to accurately determine the density of the soil on which it will be used. It is worth remembering that where a conveyor structure with a lancet appearance could be ideally used, it will be difficult to work.
Where to begin?
Do not rush headlong into tools and pieces of metal. First of all, you should decide on some very important points.
- What type of equipment will the potato digger be used with?
- How much can be spent on this event?
- What type of potato digger and according to what drawings will it be assembled?
- How will the individual parts be connected?
- Where and how will materials for construction be selected?
Voting for the best potato digger for a walk-behind tractor
Which potato digger would you choose or recommend for a walk-behind tractor?
Bomet Z-655
0.00 % ( 0 )
KTN-2V
3.03 % ( 1 )
Garden Scout
6.06 % ( 2 )
Yarilo
18.18 % ( 6 )
KM-4
9.09 % ( 3 )
Neva
18.18 % ( 6 )
KM-1P
9.09 % ( 3 )
"Poltava"
6.06 % ( 2 )
KVM-3
9.09 % ( 3 )
KKM-1
9.09 % ( 3 )
KK-1
3.03 % ( 1 )
4UD-1
3.03 % ( 1 )
Connection method - welding or bolt-nut?
There are two ways to connect individual parts of metal structures (sheets, corners and others) that you will have to use when constructing a potato digger.
Contact welding method using electricity or gas
– more aesthetically pleasing, but less reliable in most cases.
If there is a large load on the structure, which may occur when used on hard and rocky soil, there is a possibility of the seam between the metal structures breaking.
Another way is using a bolt, locknuts and nuts.
Using such fasteners, you can connect the metal structure quite firmly.
A bolted connection has other advantages over a welded seam.
If necessary, the structure can be easily disassembled - for example, if you need to transport a potato digger over a long distance.
To connect individual parts you do not need special equipment: a drill, a drill bit and a pair of keys are enough.
Potato Digger
This potato digging unit is also called a vibrating potato digger or shaking digger. A potato peeler consists of three parts: a knife, a moving grid with mechanisms that ensure its vibration, and a metal frame (frame).
A potato digger can be manufactured within a few hours; the work requires experience and skill in working with agricultural machinery. To make the unit you will need:
- Bulgarian;
- welding machine;
- drill, metal drills;
- metal profile with a square side of 2.5 cm;
- steel sheet 3-5 mm thick;
- steel wire with a diameter of 8 mm (or non-corrugated reinforcement of the same diameter);
- wheels;
- bolts, hinges, levers, eccentric, measuring tape, consumables.
What is needed to assemble a homemade potato digger?
The basis of this type of attachment is usually a welded frame made of metal corners. The thickness of the metal is selected taking into account the load it will experience.
The larger it is, the thicker the sheet of metal should be. The most commonly used corners are those with overall dimensions of 63×40 mm. You will also need an iron channel made of durable metal.
Ideally for this case, a part marked with number 8 is suitable. In addition, sheets of metal of various sizes, with a thickness of at least 8 mm, are required.
If everything will be connected with bolts, you should purchase the required amount of hardware.
You will also need:
- a chain that will transmit torque;
- wheels - metal or rubber, depending on the type of soil on which you will have to work;
- metal drum;
- gas pipe with a diameter of ¼.
How to dig potatoes with a walk-behind tractor
When choosing a walk-behind tractor for personal farming, preference should be given to those models that are designed for operation with additional equipment of various types. And the trailed units themselves (plow, hiller, potato digger, mower) can be made in a home workshop.
Harvesting potatoes with a walk-behind tractor is carried out not only on large areas; a mechanized assistant will also be in demand at a summer cottage. You just need to equip it with attachments (purchased or made yourself). The operating principle of all units is similar. The ploughshare plunges into the bed, lifts a layer of earth along with root crops, leaving them on the surface. A person can only collect the uprooted potatoes into bags.
When choosing a walk-behind tractor, take into account the power of the unit and the type of soil on which it will be used. Using a medium-power walk-behind tractor, you can harvest 20 acres of land in an hour. For harvesting a large potato plot, a walk-behind tractor with a power of more than 5 liters is suitable. pp., for smaller areas you can choose a lighter unit with less power.
In addition, potato weeding with a walk-behind tractor and hilling can be mechanized.
Operating principle and assembly of a homemade potato digger
The operating principle of a potato digger is quite simple.
The design contains two steel knives that cut the ground. Afterwards, they collect the tubers along with the soil and feed it all along a special transport grid into a collection bunker.
The lattice moves and vibrates, as a result of which the stuck clods of earth are easily separated from the potato tubers.
If there is a lack of material, the bunker can not be made, and the potatoes, cleared of adhering soil, can be dumped directly on the field. Then it is simply assembled by hand.
Assembling the potato digger is carried out in several stages. They are all equally important, each detail performs its function.
The stronger all connections are made, the longer the assembled device will last.
First of all, the frame is assembled from corners and metal channels. It is the supporting basis of the entire structure. After its assembly, all other components are attached to the frame.
One of the largest and most important parts of a potato digger is the elevator.
It consists of a vibrating grid on which the potatoes are fed, and high metal sides made of thick sheet metal.
The entire elevator structure is welded or bolted from metal angles.
The elevator is equipped with special shafts, which transmit the force from the rotating wheels - it causes the grate to vibrate.
After the elevator is completely assembled and fixed to the supporting frame of the potato digger, a ploughshare is attached to it. This is a plow, which is the direct working part that turns potato tubers out of the ground.
It can be made from a variety of metal objects. Both from a real, most ordinary plow, and from a specially sharpened and curved piece of pipe with a diameter of 200 mm.
It is advisable to attach the ploughshare to the elevator using bolts, since this part of the potato digger experiences the greatest load during operation. 10mm bolts are exactly what is needed in this case.
The penultimate stage is the design and assembly of the support and transport unit. It consists of wheels, discs to which they will be attached, two roller chains and a metal rod. There are also sprockets and bearings.
All these assembled parts will make moving the potato digger during operation extremely simple and easy. Roller chains are used to transmit rotation to special shafts that create vibration on the elevator grate.
The sprockets are mounted on a metal rod, which acts as a bridge and rotates as it moves. Metal disks are welded to the rod, and wheels are subsequently attached to them.
Special attention should be paid to the method of connecting the equipment to the agricultural machinery that will set it in motion.
The construction of this device is the last stage in assembling a potato digger with your own hands.
If you have any attachments for a tractor or walk-behind tractor, you should simply make a structurally similar mount.
Although some well-known manufacturers of mini tractors create an individual and rather complex system for connecting attachments.
In this case, you should show engineering thought and find an approach to solve this problem. Perhaps a way out of the situation could be to make changes to the design of the tractor itself.
Manufacturing Guide for Screen Harvest Separator
This design is much more difficult to manufacture, but its performance is several times greater than the previous model. If the area of the vegetable garden planted with potatoes is two or more hundred square meters, there is a reason to spend time and effort on creating an effective device. When harvesting, it will completely pay for itself.
For production we cannot do without:
- the frame for which the corrugated pipe will serve;
- steel sheet for the bucket, 3-4 mm thick;
- circle or steel reinforcement;
- 30-32 mm channel for vertical rods;
- front hub from any rear-wheel drive passenger car (“Zhiguli”, for example);
- gearbox from the rear axle of a VAZ classic;
- cardan shaft (when connected to the power take-off shaft);
- splined connection from a failed gearbox;
- wheels from old agricultural machinery (you can completely buy ready-made ones);
- welding machine, grinder and drill;
- fasteners.
The digger for the walk-behind tractor of the design in question has independent support on the ground through one or more wheels. The supporting frame has two support points. The traction device is a suspension for a walk-behind tractor. The support wheels adjust the height of the device above the field. The power take-off shaft of the walk-behind tractor drives the gearbox, or it is combined with the wheels of the potato digger. The rod, which is connected at one end to the crank device, produces oscillatory movements.
Using a spline connection, the ploughshare is launched (rotates back and forth like an excavator bucket) and the rumble (like a dog's tail, moves to the sides). Subsequently, the entire dug crop is separated from the soil and accumulated in a lattice storage tank. If you make a storage bin with a positive inclination angle, then you can stop from time to time and unload the potatoes, peeled from soil, directly into the bags. When setting a negative angle, the tubers will be uniformly unloaded on top of the soil, so that they can then dry and be collected in containers.
If such a device is difficult for you to implement, you can start making a more primitive one, with a vibration separator. Making a potato digger yourself means giving free rein to your creative thoughts and imagination. With this design, the crop is sifted along the movement of the mini-tractor. Using a plowshare, the potatoes are raked into the grid, which makes back-and-forth reciprocating movements. To do this, you need to place the suspension on swinging hinges.
The vibrator drive is based on a pipe and an eccentric connected by a shaft and a pulley. The connection of the pulley to the wheel is possible using a belt drive. Or, using an angular gearbox, it can be connected to the power take-off shaft of the walk-behind tractor. The sifted potatoes are loaded behind the device. Or, as it accumulates, you can stop and ship the crop into boxes, bags or any other container.
All of the above structures can be made essentially from junk, which is available in abundance in any household. If there is a need to buy some missing parts, this will not greatly affect the cost of the device, especially if you compare the prices of factory copies.
But pay attention! Do-it-yourself potato digging can cause injury
Therefore, observing basic precautions when using it is mandatory! Photo
Photo
Thickness of the metal used to assemble the potato digger
The optimal metal thickness that should be used for this type of homemade equipment is 5-7 mm. It is this size that guarantees fairly high strength and not excessive weight.
If the work of harvesting potatoes will have to be done on land that has excess moisture, then the lighter the machine, the better. In this case, you can use material of smaller thickness.
If the soil is hard and rocky, then the greater the weight of the potato digger, the better. With its weight it will create the force necessary for work.
It will be easier for the ploughshare to cut into the ground and turn the layers of earth outward along with the potato tubers.
General requirements for a potato digger
The principle of operation of the device is quite simple - extracting a clod of earth along with root crops. The potatoes either remain on the surface or are collected in a special container.
Optimal metal thickness
This parameter directly depends on the load that the unit is expected to experience. The structure is made of sheet steel. Its thickness is extremely important; the minimum acceptable value is 8 mm.
Wheels for digging
For more comfortable movement, the design includes wheels. If you do digging at home, then wheels from an old wheelbarrow will come in handy. Ideally, they will be mounted on an axle and have thick tires. If you plan to use the digger on hard ground, it is better to install metal wheels.
Connection methods
There are two options here. The first is to use welding. Its undoubted advantage is its structural strength. The second is to connect the parts using bolts and nuts. The advantage of this method is the convenient assembly and disassembly of the device.
For a walk-behind tractor or mini tractor, single-row potato diggers are used. There are also two-row ones, but they are suitable for working on a heavy-duty tractor. The difference between these potato diggers is shown in the photo below.
Single row potato digger Double row potato digger
What wheels to use to construct a homemade potato digger
For the type of equipment under consideration, three types of wheels can be used:
- rubber with regular tread;
- rubber with tractor tread;
- metal.
Each type has both its advantages and disadvantages. The use of any of them is fully justified in different cases.
If the soil is wet and loose and easily collapses under heavy weight, you should focus on rubber wheels.
They are quite light, and the tractor tread of the rubber tires will easily rake the ground, which will allow the equipment to move off without difficulty, without slipping or getting stuck.
Also, when designing a potato digger, you should choose the widest possible wheels, otherwise movement will be somewhat difficult.
Metal wheels are perfect for working on hard ground.
They will significantly increase the overall weight of the structure, which in this case is only beneficial: it will be easier for the plow to stick into the ground and perform its function.
It is also advisable to choose a tractor tread for all-metal wheels in order to avoid getting stuck and skidding when driving on loose and marshy soil.
The principle of potato diggers
Almost the same simple principle is used to dig up potatoes. The ploughshare plunges into the ground and digs up root crops mixed with stones (if there are any on the site) and earth.
As it moves, the mixture hits the digging machine, which clears the soil and gradually moves it back until it falls to the ground. After this, it can be collected from the ground surface.
The following describes how the basic structures that make up a homemade potato digger can be made.
Some people make a potato digger from a hiller with their own hands.
Finger drum
If possible, a finger drum can be installed on the elevator. It is a piece of pipe onto which fingers of the required length are welded.
The part should be of such a size that it does not reach the grill by just a couple of centimeters. The drum is mounted on a special axis, which has a welded sprocket.
Using a chain drive, the drum axis is connected to the wheel shaft.
If everything is done correctly and the calculations are correct, your fingers will break up the hard, dried soil, which falls along with the tubers onto the elevator grate. As a result, the potatoes will be as free as possible from adhering soil.
To make this option you will need:
large diameter pipe cut- round sheets of metal
, which will subsequently cover both holes in the pipe; - steel rod
, which will serve as an axis of rotation; - long cylindrical metal fingers
(you can use reinforcement used to reinforce concrete).
The entire structure is manufactured using resistance welding.
Buying a factory potato digger is a very expensive undertaking. Therefore, if you don’t have extra money and have a lot of time, as well as a well-working head and hands, you can easily save a decent amount.
After watching the video, we can conclude that it is important to be careful and conscientious about your work, then a homemade potato digger will be able to serve you without breakdowns or downtime for a very long time:
Probably, every owner of a large personal plot or vegetable garden wants to minimize the labor intensity of land work and reduce the time of tillage to a minimum, which is why gardeners strive to acquire a walk-behind tractor and various equipment for it. If you are the happy owner of this useful equipment and like to grow a lot of potatoes on your plot, then it makes sense to think about the need for a potato digger for mechanical harvesting. Now you can buy various designs and improved equipment for all types of walk-behind tractors, or you can put in a little effort and make a digger for a walk-behind tractor with your own hands. In this article we will introduce you to the varieties of this device and tell you how to make a potato digger yourself.
Rating of the best models and their features
Depending on performance and cost, the best models of potato diggers attached to walk-behind tractors are the following.
"Neva"
The unit is ideal for use in gardens, as it is designed for processing small areas. It has a relatively light weight (34 kg) with a width of 36 cm and a working depth of about 20 cm. With an average walk-behind tractor movement of 2 km per hour, the productivity is 0.2 hectares per hour.
The potato digger is designed specifically for the walk-behind tractor of the same brand. However, if there are belts and additional fastenings, it can also be used with other models of walk-behind tractors.
| Advantages | Flaws |
| Availability of additional wheels | Deep planted potatoes are missing |
| Relatively low cost: 8-9 thousand rubles. | Not for use on hard ground |
| Affordable maintenance (no problems with purchasing components) | |
| Can be used when there are weeds on the field, which does not affect the quality of harvesting |
"KKM-1"
A potato digger of a screening type, which is equipped with powerful wheels, which significantly reduces the load on the walk-behind tractor. The soil is grabbed at a depth of about 20 cm. The working width is 37 cm with a unit weight of 40 kg.
Users note this model as one of the easiest to use, but reliable in terms of operation. The thickness of the metal in some places makes this model almost eternal. The unit is equipped with a lot of additional seeders, which can also be used in sowing.
| Advantages | Flaws |
| Possibility of harvesting onions, beets and carrots without damaging the tubers | Used only on light to medium soils |
| Relatively low cost (up to 12,000 rubles) | |
| Easy to use | |
| Suitable for most walk-behind tractors, has a convenient removable mount |
"KT-51"
Designed for connection to medium walk-behind tractors that have a keyed power take-off shaft. The conveyor-type device has a mass of about 50 kg with a width of the processed strip of 45 cm. The depth is adjusted manually (maximum - 30 cm).
| Advantages | Flaws |
| Made from high strength metal | Quite a high cost - about 28,000 rubles. |
| Has a long service life | Not suitable for hard and waterlogged soils |
| Root crops are not damaged during harvesting | |
| There is the possibility of manual control via |
"KVM-3"
The vibration-type potato digger is designed for use in hard and loamy soils. It has an additional knife, which is used to cut the layer of soil in which the potatoes are located. At a relatively low price, this model is loved by gardeners for the speed and quality of the work done.
| Advantages | Flaws |
| Cost about 8000 rubles | Sometimes root vegetables spoil when caught in knives |
| High productivity and can be used on any soil | |
| Ease of use |
"Soyuzmash KKBS reinforced"
The most primitive, but no less popular version of potato diggers. The unit is a small plow from which rods extend in rays. The plow goes 20 cm deep into the soil, loosens it and brings the potatoes to the surface, where they are retained in the twigs, cleared of soil and laid out on the surface.
| Advantages | Flaws |
| Affordable price - about 1000 rubles | No mounting included |
| Durable, but more suitable for black soils | Processes only 1 lane at a time |
Do-it-yourself potato digger - design features
There are two types of household potato diggers:
simple and vibration. The principle of operation of potato diggers of all types is the same - the rawl, ploughshare or tines are immersed in the soil and extract potato tubers onto its surface. Thus, the gardener will not need to manually dig out potatoes from each hole - the gardening unit will do it for him. Both types of diggers can be made independently from available materials or you can buy some components, the cost of which is low, and save your budget.
Simple digger
is an attachment in the form of a pointed curved iron sheet to which rods are welded in a fan-shaped manner. This mini-ploughshare cuts the soil and lifts the tubers along an expanding fan of twigs, while sifting out excess soil. A simple digger, which is attached to a walk-behind tractor, mechanizes potato harvesting.
The vibrating digger
is a conveyor potato digger for use when working with a walk-behind tractor. Complete with screening grid and wheels. The harvesting mechanism with such a digger is simple: the soil is cut with a rake, which goes along with the potato tubers onto a grid, where the root crops are sifted from the clods of earth and then rolled along the screening grid to the soil surface.
Important! It makes sense to make a potato digger yourself for cultivating areas with light and medium-heavy soils.
Lancet potato diggers
Lancet structures are the easiest option to create yourself. Main nuances:
- not used for hard soil;
- consists only of a knife, a soil blaster and a grid of twigs;
- the shape of the rods is a fan.
Due to the arrangement of the rods on the mechanism, this option is also called a fan option. Digging potatoes with a walk-behind tractor with a fan attachment is a simple process. After the knife cuts the soil, it goes up along the rods, which allows you to partially sift and capture the tubers.
Important! The size of the gaps between the rods is strictly regulated, since if the structure is incorrect, the potatoes will sift through the device.
The potato planter on the walk-behind tractor must be durable and resistant to loads. If this condition is not met, the fan will deform.
This unit has its pros and cons
How to make a potato digger with your own hands: choosing material and tools
In order to make a regular homemade potato digger for a walk-behind tractor, you will need the following materials:
- frame made of welded corners, the size of which is 40 by 40 mm;
- sections of pipe or channel 1.3 m long;
- fittings with a diameter of 10 mm;
- metal sheet with a thickness of 7 mm or more for the sides of the fence and ploughshare;
- pieces of square pipes or channels for metal racks - 8-10 pieces;
- rotary metal drum and chain for transmitting rotation;
- wheels, bolts and hardware.
Did you know?
A vibrating potato digger for a walk-behind tractor ensures harvesting up to 95% of the entire potato harvest, and a simple fan one – up to 85%.
Equipment and tools needed to create a potato digger with your own hands:
- welding machine;
- drill and drill bits;
- metal scissors;
- hammer, wrenches;
- Bulgarian.
A homemade design should consist of several basic elements
Any homemade version has a basic set of elements that will be required during manufacture. List:
- a metal channel, preferably a stainless steel type, with a thickness of about 1 cm;
- metal-type corners of 3 and 4 cm in cross-section;
- steel reinforcement with a diametrical cross-section of 1 cm;
- sheet metal 0.5 cm;
- set of nuts and bolts.
Additionally, you always need tools, including standard ones, for example, a wrench for the size of bolts and nuts.
You also need a tape measure and a grinder. Any type of welding machine is often used. This can be either a gas-electric welding machine or a portable electric welding machine. To create fasteners and holes you will need not only a drill, but also a set of drills that are suitable in size.
All materials must be prepared before work begins. The list is compiled on the basis of the created project, that is, if the drawing is drawn up according to an individual plan, then the set of materials will also be specific.
The specified standard set of materials will be needed to create a standard device.
Features of making a simple potato digger
A simple potato digger is an improved curved shovel that plunges into the ground below the level of potato tubers and pushes them to the surface. By correctly calculating the width of the digger and the angle of inclination of the cutting tool, during harvesting you can loosen the soil, which will not need digging. Making a simple potato digger is simple - three sheets of iron are welded together and attached to the walk-behind tractor with a special fastener. The simplicity of the design and the small number of component parts allow it to be manufactured by a novice agricultural machine operator who knows how to work with a welding machine.
How to make a hiller
The simplest hiller is the lister type, which consists of two peak-shaped welded wings made of sheet iron with a thickness of at least 2-3 mm. This device has a fixed grip length due to fixed elements, the tip of which pierces and loosens the ground, so every gardener planning to make a simple potato digger with his own hands must first make drawings of the device, taking into account the row spacing that is acceptable for him, which he usually maintains when planting potatoes. As a rule, this is about 60 cm, and industrial hillers are only 30 cm wide. To make a hiller, you need to take a sheet of metal at least 3 mm thick, triangular in shape, the base length of which is from 30 to 60 cm, and the height is about 30 cm. This element The hiller is bent along the height of the triangle, thereby creating a point that pierces the ground; small rectangles in the form of wings are welded to it, the span of which will be equal to the width of the rows. 7-10 rods approximately 30 cm long are welded to the main triangle in a fan-shaped manner. For better rigidity, the tip of the triangle is reinforced with an iron strip no less than 3 mm thick.
Important!
A rigid stand-mount will prevent overloading the walk-behind tractor engine during operation.
Attaching the potato digger
To attach the potato digger to the walk-behind tractor, you will need a metal rectangle 50*520 mm, the metal thickness of which is at least 10 mm. Holes are drilled on it to regulate the depth of immersion of the digging tip into the ground to avoid cutting the tubers. It makes sense to strengthen the rigidity of the tip and wings by connecting the edges of the wings with an iron plate, to which a structural post will be welded, bearing the entire load of earthworks when harvesting potatoes; if possible, this metal part can be pre-hardened.
What is a potato digger and its types
A potato digger is an agricultural technique used by farmers and private farmers to simplify the process of harvesting potatoes.
Main parts of a potato digger for a walk-behind tractor
with your own hands:
- base - the metal base of the potato digger: this is a frame made of heavy-duty thick metal;
- the traction mount is responsible for fastening the mechanism's rods;
- vertical stands - needed to secure the knife-ploughshare on them;
- ploughshare - the main element of a potato digger, is a knife that goes deep into the ground, loosening the soil;
- adjusting rods – designed to adjust the angle of attack of the ploughshare;
- support wheels - necessary for moving the potato digger across the cultivated area.
Potato diggers for mini tractors are used on loose, medium-compacted soil.
There are the following potato diggers for the walk-behind tractor:
- fan-shaped (lancet);
- conveyor;
- vibrodynamic (screening).
How to make a screen-type potato digger with your own hands
Making a potato screening type digger with your own hands is a little more complicated, but very realistic to implement. First, you need to make the individual components of this useful unit, connect them together, check the operation of the mechanism, and the do-it-yourself vibrating potato digger for a walk-behind tractor is ready for harvesting potatoes. Let's study all the stages of making a potato digger for a walk-behind tractor. Before manufacturing this mechanism, it is recommended to make a schematic drawing of a potato digger for a walk-behind tractor, indicating the dimensions of the parts for clarity when measuring the material and further welding work.
To begin with, it is recommended to make a frame for the screen digger. To do this, you should weld a rectangle measuring 120*80 cm from a square pipe of 40*40 mm (or corners), which needs to be well sanded with a grinder. Then a section of 40*40 mm square pipe is welded to a quarter of the length of this frame rectangle for a jumper and further installation of rods. In another part of the frame we make a mount for the wheel axle; to do this, from the outside in the corners, we need to vertically position and weld two 15 cm long pipes with a diameter of 30 mm, and use a drill to drill a hole with a diameter of 10 mm in each pipe.
Then you should install several vertical posts - to do this, you need to step back 5 cm from the built-in jumpers on both sides and weld them in a square measuring 3*3 cm and 50 cm long, then step back another 20 cm and weld 40 cm posts, after which step back 40 cm and weld 30 cm posts, the result will be a kind of ladder. Now you need to connect the racks with a metal strip, the thickness of which is 0.4 mm, at an angle of 45 degrees, the result is a triangular structure.
Did you know?
The first horse-drawn potato digger was created by a Russian blacksmith in 1847.
How to make a pitched board and ralo
The next stage of making a potato digger with your own hands is welding the working part of our device - the raal and the pitched board. Ralo is necessary for digging potato tubers from the soil and then feeding them onto a ramp made of iron rods. For the construction of the rahl, two metal sheets measuring 400 * 400 mm, 0.3 mm thick, are needed, in each of which you need to make a hole for a bolt, and also drill a hole in the racks, stepping back 5 cm from the edge, and firmly screw these metal plates to frame with bolts. Then a metal plate measuring 30*70 cm is bent cone-shaped in the central part using hammer blows and butt-welded to the side sheets - it turns out to be a rawl, the edge of which needs to be sharpened for better penetration into the ground.
The pitched board is welded from 8-10 metal rods or pieces of reinforcement approximately 1.2 m long, one end of which is welded below to the raft, and the second extends beyond the boundaries of the digger and moves quite freely.
The rods are welded parallel at a distance of about 40 mm. To strengthen the structure, a channel about 30 cm long can be welded at the end of the frame on both sides - these will be risers to which the bar is welded.
Rods will then be welded to it at a distance of two-thirds of their length to strengthen the pitched board. During the harvesting process, the free edges of the rods will vibrate and break the soil adhering to the root crops. It is also recommended to weld metal plates on the side of the bars of the pitched board to prevent potato tubers from falling out of the lattice structure.
Selection of wheels for the design
We have already familiarized ourselves with the main steps of how to make a potato digger with our own hands; now we need to choose wheels for the design from the following options:
- metal – suitable for use on hard soil, their weight makes the digger heavier and improves the work of the rake;
- simple rubber ones - used for working on loose soil; on wet soil they will not make it possible to transport garden equipment;
- rubber ones with a tractor tread - will make it possible to use the structure in wet soil without slipping; they are bulky and heavy.
Rubber wheels with tractor tread are the best option for making a potato digger. The wheel is equipped with a mount shaped like the letter “G”, which is attached to an axle mounted on the frame of the digger. The wheel can be fixed with a “pin” by analogy with a garden wheelbarrow.
Important!
Wider wheels will make it easier to move the potato digger around garden beds.
Making fasteners
And here we are at the final stage of making a potato digger with our own hands - making the mount and final assembly of the mechanism. The gearbox unit is attached to the axle using bearings, and the transport mechanism is assembled from wheels, roller chains, and metal disks. The axle, as a connecting bridge, should be attached with sprockets; discs are welded to it, to which the wheels are attached. The chain will transmit energy and rotate the shafts, driving the potato digger mechanism.
Then a holder is made with the letter “G”. The long end is attached to a radial part connected to the walk-behind tractor, and the short end is welded to the tip of the rahl. To control the angle of the rafter, the best option would be to connect the beam to the potato digger with two or more bolts.
As a result of all the work done, you will have a potato digger for a walk-behind tractor, very easy to use, in addition, it will be partially dismountable and transportable due to the mechanism being bolted together. This potato digger will help remove potato tubers from the soil, clear a little of the soil and carefully place them on the surface of the furrows. The owner of a personal plot will only have to harvest the crop and provide it with optimal conditions for storage.
Was this article helpful? Not really
For those who know first-hand what it is to work in the field, grow your own potato crop, and even more so harvest it, understand what a difficult task it is. It’s good that after a long time of this practice, a person came up with a simple invention to facilitate potato harvesting - a do-it-yourself potato digger
. In this case, our grandfathers used an ordinary shovel, and this mechanical device was created specifically to automate the collection of potatoes. The function of a potato digger is to separate tubers from the soil and place them on the surface of the field.
Of course, there are factory versions of this device, but for a more or less experienced gardener it will not be difficult to assemble a potato digger yourself, which will be little inferior to these samples.
Potato digger design
The simple design makes it much easier. It is based on a welded frame, which is assembled from a special corner measuring 63x40 mm, an iron channel number 8, and 8 mm metal plates. A ploughshare is made from the plates, which in principle can be made from an ordinary circular saw. The ploughshare is attached to the elevator casing with 4 bolts tightened with nuts. Thanks to the round sharpening of the part, potato tubers are almost impossible to cut.
The tilt of the elevator can be changed by changing the fastening of the casing to the frame, and at the same time the angle at which the opener digs also changes. The editorial unit is made from two cylindrical metal bodies. They have the form of a glass and a bushing and connect two shafts made of steel - the drive and the driven. These shafts should rotate without difficulty, and special sprockets with welded hubs are mounted on prismatic keys. As a rule, they are made from a piece of gas pipeline measuring approximately 25 mm.
potato digger for a mini tractor can do without a cleaning drum.
, however, creating it is the most difficult part in making a potato digger. Its design includes two roller chains with 94 links, mounted on rods. This design, due to its shape, was called the “squirrel wheel”. This wheel is mounted on two bent disks for strength. In some cases, a bicycle wheel rim is used instead of disks. The “squirrel wheel” is welded to the disks and fixed on two fixed welded axles, on which it then rotates. The shaft rotates on the bearings, and with it the driven sprockets rotate, on which the rotation of the drum itself depends.
The best material for a slider so that the chain-bar tape can easily slide over it is fluoroplastic. The tape itself looks like a “squirrel wheel”, but the rods on it are shorter and there are fewer of them. Sliders are also needed to protect the chain from damage and act as a support.
The easiest part of making a potato digger is its support and transport unit. Each person makes it according to his own calculations. Usually there are no special difficulties in creating it. By the way, similar mechanisms are used in
It is worth making a manual potato digger for compact areas. It is better to buy industrial types of equipment for large areas from manufacturers.
Simple vibration equipment can be easily made from the following materials:
- Iron channel.
- The pieces of steel were no thinner than 5 millimeters. Strong steel will be required for the plowshare. A used blade from a circular saw or any other high-speed steel is perfect.
- Iron corners from rolled metal.
- Steel or iron rods. It is better to use fittings of small diameter.
The vibration model must be made from a base or frame. The design must include:
- base (the above-mentioned frame);
- suspension system;
- rods for adjustment;
- moving elements (wheels or lugs).
Drawing of a vibrating potato digger for a walk-behind tractor:
How to hill potatoes with a walk-behind tractor
Hilling up potatoes is an important process for the development of tubers. If you do not cover the bushes with earth, roots will grow and the potatoes will be small and deformed. Under the thickness of the soil, the fruits will be protected from pests, and in addition, in the process, the land is cleared of weeds. Carrying out such work requires considerable physical effort, and if the area is large, then time.
Processing potatoes with a walk-behind tractor has a number of advantages over manual hilling. The rules for tilling the soil using a mechanized method are mandatory. You need to hill up potatoes with a walk-behind tractor after it rains, when the ground absorbs moisture. Ridges of dry soil can lead to detrimental consequences, while wet soil will produce sticky lumps.
To work, you will need a lister or disk homemade potato hiller. If you equip the hiller with an adjustment mechanism, you can adjust the tool to the row spacing by changing the position of the wings. Disc hillers that are simple in design are popular.
A mounted disk device with an attachment point to a motor cultivator can have 1 pair of disks or several pairs (the number depends on the power of the machine). Concave-shaped disks are the main structural element; they are made from a sheet of steel 2 mm thick and fastened together at an angle. The discs rotate by sliding in the bushings.
Before starting to work with a walk-behind tractor, you need to adjust the angle of inclination and depth of the backlog. Potatoes are hilled at low speed, moving the walk-behind tractor and trailer row by row. Experienced farmers recommend carrying out the first hilling when sprouts appear. The potatoes will produce underground shoots, and the bush will be powerful, with large tubers. When the bushes grow to 30-40 cm, spud the potatoes a second time. If the soil on the site is heavy and dense, then you can loosen it again.
Work on creating a vibration model
Rules for manufacturing each part separately and assembling the entire mechanism.
The basis
It is optimal to use a square profile pipe 40 by 40 mm. It is better to take a 4-meter piece of rolled metal and divide it into segments of 120 and 80 centimeters. We get four support beams.
From them you need to weld a base in the form of a rectangle at a right angle. Its dimensions will be 120 by 80 centimeters.
Rod mount
It is necessary to weld the jumpers not in the middle of the frame (rectangle), but at a quarter of its length.
On the back side of the base, we fix the square tubes in a vertical position by welding. They are placed outside the base to install the axle. Wheels are then installed on the axle.
Or an engraver makes a 1 centimeter hole in a place convenient for fastening.
Vertical racks
We retreat 5 centimeters from the edge of the frame and secure the square profile by welding. Its length is no more than 50 centimeters. After 15-20 cm, we also fix the square profile by welding, but already 40 centimeters long. After the second rack, we measure 40 centimeters and secure the 30 centimeter profile with welding.
As a result, the design is similar to a metal pair of descending stairs.
Rigidity for racks
It is necessary to secure the racks at the bottom of the structure. To do this, use a strip of metal 0.4 - 0.5 mm. The racks should be connected by welding at 45 degrees, additionally welding the strips together.
Plowshare or ralo
Creating the working part of a potato digger.
A homemade ploughshare must sink into the soil, digging through potato rows for harvesting. To make a ralo, you need metal from 0.3 mm thick. Two “working” blades are cut out according to the drawing and a homemade plow is welded. To give it a three-dimensional shape convenient for gripping the soil, you need to tap the center of the blades with a hammer, after securing the entire structure with a fastening rod.
Making pitched boards
The pitched board is a continuation of the design of the potato digger, or rather steel rods welded to the base. The easiest way is to use reinforcing bars with a diameter of no more than 10 mm and a length of up to 120 centimeters. Every 4-5 centimeters you need to weld the reinforcement, as shown in the photo.
Adjustment rods
An optional element, because adjustment is only needed on problematic (watery) soil.
The rods will easily adjust the desired angle for tilting the reinforcement (pitched) board. The easiest way is to make a movable structure in the form of a frame on which the pitched board is located. The frame is tightened with ordinary bolts.
Support wheels
The design of a digger for a walk-behind tractor, created by yourself, must be equipped with movable wheels for ease of operation and movement.
It is most profitable to equip the digger with wheels from a garden wheelbarrow with wide tires. We purchase axles, attach them to the frame and install the wheels. It is easier to secure the wheels with a pin (as in a garden wheelbarrow).
Making your own lancet digger
A homemade potato digger for a lancet-type walk-behind tractor is a simple type of attachment. In some ways it is similar to a cultivator. To construct it, you do not need a lot of material and complex tools. The assembly operations are simple and, with minimal skills, can be done by any gardener.
Necessary materials:
- steel channel;
- plow - it can be cut from an old shovel or a circular saw, but it is better to take high-quality steel with a thickness of at least 5 mm;
- metal corners 40 and 63 cm;
- steel rods in the amount of 8 pieces - can be removed from used forks or broken garden tools and replaced with fittings.
The device should ultimately be small in size. It needs to be made so that it is easy to attach to the Neva walk-behind tractor. There are no moving parts in the lancet digger, so there is nothing to break. The main thing is that the structure itself can withstand and not crack.
Manufacturing procedure:
- The channel is used as a base. A tow hitch is mounted on it.
- A plow is placed on the base.
- Rods are welded to the plow, which separate the tubers from the sand.
Disadvantages of the device:
- The small width of the strip is about 25 cm, because of this, crop losses increase by about 15-20%.
- There is a high risk of damage to the tubers from the knife.
The simplest potato digger for a walk-behind tractor with your own hands
A lancet-type potato digger is the simplest type of attachment for.
Manufacturing does not require special materials, complex drawings or measurements. You will need a bipod, but it can be easily cut, for example, from an old shovel. Make rods from reinforcement or adapt teeth from old forks. A thrifty owner will always find a use for even old broken garden tools.
To successfully use homemade equipment, you need to know the degree of soil density on the site. Otherwise, using such a potato digger will become inconvenient.
Easy to attach to any model of cultivator or mini-tractor. There are no moving parts in the design, so there is nothing to break.
How to attach to a walk-behind tractor?
Different units may be suitable for different walk-behind tractors. If the walk-behind tractor weighs up to 150 kg, then it can be used on a par with conventional potato diggers. The potato digger moves around the site at a minimum speed, so the unit must have sufficient traction force.
Not every engine will be able to “hold” the minimum speed - gasoline power plants often stall at a speed of 1-2 kilometers per hour. Diesel walk-behind tractors cope better with such tasks - such devices are suitable for vibration units of medium parameters. Heavy walk-behind tractors can work with any type of unit. Based on the parameters of the walk-behind tractor, you can select the desired unit.
The walk-behind tractor can have either a universal mount or be attached only to a certain type of mechanism. Vibrating diggers are usually used.
When creating a potato digger (or purchasing one), you should take into account the width of the strip of cultivated soil and the depth. The speed of the device usually does not exceed two kilometers per hour - this is the maximum value.
It is also worth considering the quality and nature of the soil on the site. For example, a KKM potato digger can only work with soils whose moisture content does not exceed 30%. Typically, the productivity of a potato digger is no more than 0.21 hectares per hour.
To learn how to make a potato digger with your own hands, see the following video.