Formation of pores in welds and ways to prevent them
Home / Library / Welding quality / Formation of pores in welds and methods for their prevention
Pores observed in welds are associated with the processes of gas evolution in macro- and microvolumes.
When the metal of the weld pool is volumetrically supersaturated with gases, caused by a decrease in solubility due to a decrease in the temperature of the metal, macropores are mainly formed. The growth of gas bubbles in this case occurs mainly as a result of convective diffusion of gas from the surrounding volumes of metal. The rate of bubble growth is determined by the degree of supersaturation of the bath with gases and the rate of desorption of gases into the nucleus.
With local supersaturation of the liquid metal at the crystallization front, the nucleation and development of bubbles is most likely at the stage of stopping the growth of crystals. Bubbles in this case mainly develop due to the diffusion of gas atoms (ions) from adjacent microvolumes of metal. The size of the bubbles is determined mainly by the duration of stops in crystal growth. During the crystallization of the first layers and the duration of stops of 0.1...0.2 s, characteristic of the most commonly used welding modes, the formation of small pores is likely at the fusion line. The role of nitrogen in the formation of large pores in the absence of convective gas mass transfer is small.
Obtaining tight welds when welding with coated electrodes and flux-cored wires can be achieved by reducing the gas content in the weld pool below the solubility limit in the solid metal at the melting temperature. In this case, the formation of gas bubbles at the moment of crystallization does not occur. This method of ensuring tight seams is implemented in electrodes with a basic type of coating.
When the electrode coating of the main type is moistened, the hydrogen content in the weld pool increases above its solubility limit in solid iron at the melting temperature and falls into the most dangerous concentration zone of the solubility jump (12... 27 cm3/100 g) from the point of view of pore formation. At such hydrogen concentrations, the process of formation and removal of gas bubbles from the weld pool proceeds sluggishly, which leads to the formation of pores.
The pores found in welds when welding with long arc electrodes coated with carbonate-fluorite are caused by the release of nitrogen. Poor wetting of electrode metal droplets and the bath with slag from electrodes of this type creates conditions for direct contact of the metal with the gas phase and increased nitrogen absorption.
The gas that causes porosity in welds when welding with rutile and ore coated electrodes is mainly hydrogen. The release of carbon monoxide and nitrogen plays a minor role.
Obtaining dense seams when welding with these electrodes is achieved by creating favorable conditions for increased absorption of hydrogen at the droplet stage and intensive growth and rapid removal of formed gas bubbles from the weld pool until it crystallizes. This situation is realized when the hydrogen content in the weld pool is ensured, significantly exceeding the limit of its solubility in liquid iron at the melting temperature, i.e. much more than 27 cm3/100 g.
The introduction of materials containing crystallization moisture into rutile and ore-acid coatings promotes intense absorption of hydrogen by drops of the electrode metal and the high-temperature region of the weld pool, which subsequently creates favorable conditions for the nucleation, growth and removal of gas bubbles until the crystallization of the weld pool.
An increase in current strength when welding with electrodes with rutile and ore-acid coatings increases the likelihood of pores forming in the weld metal, which is caused by overheating of the second half of the electrode, a decrease in the moisture content in the overheated coating and the hydrogen content in the weld metal made by the overheated part of the electrode to a dangerous concentration level (12... 27 cm3/100 g).
When significant amounts of aluminum, titanium, and silicon are introduced into the coatings of rutile and ore acid electrodes, the probability of pore formation increases, due to an increase in the concentration of silicon in the metal of the weld pool.
Being a surface-active element, silicon inhibits the desorption of hydrogen, degassing of the bath is sluggish, and pores form in the metal. Sulfur and other surfactants can have a similar effect.
Deoxidation of coatings of rutile or ore acid electrodes with silicon, titanium, aluminum, carbon, a high content of these elements in the base metal, an increase in the calcination temperature, a decrease in the oxidation potential of the coating, etc. lead to a decrease in the rate of gas evolution and the formation of porosity.
Suppressing the silicon reduction process by increasing the basicity of the slag, introducing carbonates into the coating and oxidizing silicon with water vapor helps to increase the rate of hydrogen evolution. The proposed method for intensifying hydrogen evolution was used to create industrial grades of rutile-carbonate electrodes of the ANO series.
Less protection of the metal from air when welding with open arc flux-cored wires leads to greater (compared to electrodes) absorption of nitrogen by the metal, therefore the release of nitrogen from the bath has a significant, and in some cases decisive, effect on porosity. In wires of the carbonate-fluorite type, preventing the release of nitrogen in the form of a gas phase is achieved by alloying the metal with titanium and aluminum. Nitrogen absorption can be effectively reduced by covering the welding zone with carbon dioxide, argon-based gas mixtures, or using double-layer wire.
| ← Formation of hot cracks during welding | Methods for assessing the weldability of metals and their alloys → |
Share link:
Welding errors and defects that a novice welder needs to know about
Root weld defects - lack of penetration or insufficient penetration of metal along the root of the weld. Most often, this problem occurs as a result of low current for welding or a large diameter of the selected electrode. It is necessary to increase the welding current, but do not overdo it, since you can burn through the root weld.
Fusion defects are a familiar situation to many novice welders, when a seemingly normally welded workpiece falls apart at the seams. This problem occurs due to non-fusion of the base metal with the deposited metal. It's all about the wrong selection of electrodes; they are of insufficient diameter and cannot cope with heating the cold metal. It is necessary to select electrodes of a larger diameter or consider the possibility of heating the metal.
Weld Edge Defects – Another common welding problem is weld edge defects. Melted and uneven, they make the weld joint unsightly. As a rule, the problem lies in excessive welding current parameters, but not always. Often, defects in the seam edges are formed due to the arc being too long, and also when the electrode does not move correctly along the joint.
Poor preparation of metals when welding with argon
A large proportion of errors in argon arc welding also occur due to poor preparation of the metal before welding. For example, if, when welding with argon, oxides are not first removed from the surface of aluminum, then the weld will turn out dirty and with a large number of deep pores.
Therefore, before TIG welding in an argon environment, it is imperative to properly prepare the metals. There should be no dirt or oxide film on the surfaces to be welded.
Causes of defects
There are two types of factors affecting the quality of welding work:
- Objective - related to the properties of the materials being welded, the behavior of metals under conditions dictated by the technological process. It is not without reason that one of the important characteristics of any alloy is weldability. Sometimes it becomes necessary to weld materials with poor weldability. Such tasks are sometimes posed in small-scale or single-piece production. Even with full compliance with the requirements of the technological process, a certain percentage of defects may remain, which has to be officially considered acceptable.
- Subjective - depending on the performers. Moreover, the performers should include not only the workers performing welding, but also the technologists who are responsible for the correctness of the technological process parameters, the correct choice of equipment and welding modes.
The main subjective reasons for the occurrence of welding seam defects are:
- errors in preparing welded surfaces;
- use of a tool different from that specified by the technologist;
- welding tool malfunction;
- little work experience and low qualifications of the welder;
- deviation from the required welding conditions.
Reasons for appearance
Welding spatter usually occurs at the moment the arc is ignited, while the current is at its highest. When the electrode touches the connected parts at the moment of a short circuit, the metal of the electrode, subjected to an electrodynamic shock, scatters and settles in drops in the form of balls on the surface.
In some cases, welding the droplets to the base metal can be very strong. The defect is clearly visible. It can be removed by cutting off frozen drops or grinding with special tools.
In addition to this case, welding spatter most often occurs when welding semi-automatically using single-phase current during power surges.
The amount of spatter increases greatly if welding is performed on a rusty and dirty metal surface.
Thus, the main causes of welding spatter are:
- poor quality electrodes;
- incorrect choice of welding mode and parameters;
- low quality of preparation of products for welding;
- lack of protection of the product from sticking.
By eliminating all or part of these problems, you can ensure high quality work with a minimum amount of welding spatter.
Weld defects (diagram)
All types of seam defects are divided into three groups:
- external, the main ones of which include: cracks, undercuts, sagging, craters;
- internal, among which the most common are: porosity, lack of penetration and foreign inclusions;
- through - cracks, burns.
Main welding defects, their characteristics, causes and methods of correction
Cracks
. These are the most dangerous welding defects that can lead to almost instantaneous destruction of welded structures with the most tragic consequences. Cracks vary in size (micro- and macrocracks) and time of occurrence (during the welding process or after it).
Most often, the reason for the formation of cracks is non-compliance with welding technology (for example, incorrect placement of seams, leading to stress concentration), incorrect choice of welding materials, sudden cooling of the structure. Their occurrence is also facilitated by the increased content of carbon and various impurities in the weld - silicon, nickel, sulfur, hydrogen, phosphorus.
Correcting a crack consists of drilling out its beginning and end in order to prevent further spread, removing the seam (cutting out or cutting out) and welding.
Undercuts
.
Undercuts are depressions (grooves) at the transition point between the base metal and the weld. Undercuts are quite common. Their negative effect is expressed in a reduction in the cross-section of the seam and the appearance of a source of stress concentration. Both weaken the seam. Undercuts occur due to increased welding current. Most often, this defect occurs in horizontal seams. It is eliminated by surfacing a thin weld along the undercut line. Weld undercuts
Beads
. Sagging occurs when molten metal flows onto the base metal, but does not form a homogeneous connection with it. A weld defect occurs for various reasons - due to insufficient heating of the base metal due to low current, due to the presence of scale on the edges being welded, which prevents fusion, and an excessive amount of filler material. Sagging is eliminated by cutting and checking for lack of penetration in this place.
Weld bead
Burns
. Burn-throughs are welding defects that manifest themselves in through penetration and leakage of liquid metal through a through hole in the seam. In this case, a sag usually forms on the other side. Burn-throughs occur due to excessively high welding current, insufficient speed of movement of the electrode, a large gap between the edges of the metal, too small a thickness of the backing or its loose fit to the base metal. The defect is corrected by stripping and subsequent welding.
Burn through of welded joint
Lack of penetration
. Lack of penetration is a local lack of fusion of the deposited metal with the base metal, or between the weld layers. This defect also includes non-filling of the seam section. Lack of penetration significantly reduces the strength of the seam and can cause structural failure.
Failure to fill and lack of penetration of the seam
The defect occurs due to low welding current, improper edge preparation, excessively high welding speed, the presence of foreign substances (scale, rust, slag) and contamination on the edges of the parts being welded. When correcting, you need to cut out the area of lack of penetration and weld it.
Craters
. These are defects in the form of a depression resulting from a break in the welding arc. Craters reduce the strength of the weld due to a decrease in its cross-section. They may contain shrinkage looseness that contributes to the formation of cracks. Craters must be cut down to the base metal and welded.
Weld crater
Fistulas
. Fistulas are suture defects in the form of a cavity. Like craters, they reduce the strength of the weld and promote the development of cracks. The usual method of correction is cutting out the defective area and welding it.
Fistula welds
Foreign inclusions
. Inclusions can consist of various substances - slag, tungsten, metal oxides, etc. Slag inclusions are formed when the slag does not have time to float to the surface of the metal and remains inside it. This happens when the welding mode is incorrect (excessive speed, for example), poor stripping of the metal being welded or the previous layer during multilayer welding.
Foreign inclusions in the welded joint
Tungsten inclusions occur during welding with a tungsten electrode, while oxide inclusions occur due to poor solubility of oxides and excessively rapid cooling.
All types of inclusions reduce the cross-section of the seam and form a focus of stress concentration, thereby reducing the strength of the joint. The defect is eliminated by cutting and brewing.
Porosity
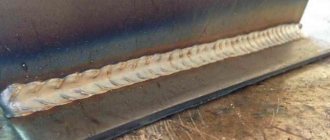
. Porosity is cavities filled with gases. They arise due to intense gas formation inside the metal, in which gas bubbles remain in the metal after it has solidified. Pore sizes can be microscopic or reach several millimeters. Often a whole cluster of pores appears in combination with fistulas and conchas.
Porosity in the weld
The occurrence of pores is facilitated by the presence of contaminants and foreign substances on the surface of the metal being welded, high carbon content in the filler material and base metal, too high welding speed, due to which the gases do not have time to escape, and increased humidity of the electrodes. Like other defects, porosity will reduce the strength of the weld. The area with it must be cut down to the base metal and welded.
Overheating and burning of metal
. Burnout and overheating occur due to excessively high welding current or low welding speed. When overheated, the size of the metal grains in the weld and heat-affected zone increases, as a result of which the strength characteristics of the welded joint, mainly impact strength, decrease. Overheating is eliminated by heat treatment of the product.
Overburning is a more dangerous defect than overheating. Burnt metal becomes brittle due to the presence of oxidized grains that have little mutual adhesion. The reasons for burnout are the same as overheating, and in addition there is also insufficient protection of the molten metal from nitrogen and oxygen in the air. The burnt metal must be completely cut out and the area welded again.
Burnt weld metal
Content
- Porosity in aluminum welding
- Hot and cold cracks when welding aluminum
- Hot cracks
- Cold cracks
- Lack of fusion at the root of the weld when welding aluminum
We have already talked about some of the features of aluminum welding on this page. The oxide film that appears on the surface of aluminum is not the only obstacle when welding aluminum structures. When welding them, defects characteristic of aluminum welded joints may also occur.
Control methods
To prevent the occurrence of defects, systematic monitoring must be carried out at all stages of production: before, during the welding process, and after completion.
- Before welding, the preparation of the joining surfaces and their geometry are checked.
- During the process, compliance with all parameters of the technological process, including welding modes, is carefully monitored.
- After welding, the finished product is inspected.
The main methods for identifying weld defects:
- Visual inspection and geometry check. It is suggested that a magnifying glass be used to detect small surface cracks and pores. The metal area is cleaned with sandpaper and etched with a solution of nitric acid. A matte surface is formed, on which cracks are more noticeable. After inspection, the remaining acid is removed.
- Mechanical properties testing. Together with the product, samples are welded and sent to the laboratory to determine tensile strength, relative elongation, and impact strength.
- Macrostructure control. It is carried out on samples that have undergone grinding and etching.
- Microstructure control. Conducted on samples using a microscope. This research method makes it possible to detect burnout, grain boundary oxides, changes in metal structure, and microcracks.
- Hydraulic and pneumatic tests. Used for monitoring vessels and pipelines.
- X-ray control. X-ray scanning makes it possible to identify pores, lack of penetration, cracks, and slag inclusions.
- Ultrasonic testing. Produced using an ultrasonic flaw detector. High-frequency vibrations penetrate the metal and are reflected from cracks, pores and other defects.
- Monitoring for the presence of intergranular corrosion. Carry out only for products exposed to aggressive environments.
Read also: How to cut a cast iron pipe with an angle grinder video
