Construction and repair activities are inextricably linked with measuring work. Many complex measuring operations are carried out on construction sites and renovation projects. And when it comes to accuracy, there cannot be the slightest compromise. All measurements must be extremely accurate. Not only the performance characteristics and appearance, but also the safety of the facility depend on this.
Ideal measurement accuracy can only be achieved using specialized equipment. To carry out various measurements, professionals in the construction and repair industry use modern equipment: levels, laser levels, rangefinders, plane builders, geodetic measuring instruments. Even a minimal deviation when using such instruments can lead to data distortions and serious errors in calculations.
Only a securely fixed and installed device in the correct position can provide accurate data. To install, fix and adjust the position of measuring instruments, professionals use special devices - tripods, rods and holders.
Level tripods, rods and holders are support, adjustment and fastening devices that allow you to fix a level or other measuring instrument in the desired position.
Fastening and supporting devices are very rarely included with the measuring device. As a rule, they need to be selected and purchased separately. If you need to buy a tripod for a level or other equipment for fixing measuring equipment, use our useful information. She will help you make the right choice and find the best option for your purposes.
Tripods for levels and other measuring instruments
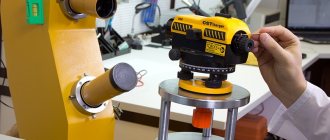
A tripod for measuring equipment is a classic tripod with a platform for installing the device. They are often called that - simply “tripod”. In most cases, the device is attached to the platform using mounting screws. There are multifunctional tripods with interchangeable heads that can be used to fix a wide variety of equipment. They belong to the group of professional equipment. The design of the tripod legs is telescopic. Their height and position can be adjusted using screws or special clips. To strengthen the structure, many tripods have crossbars between the legs. Professional elevation tripods have a central retractable rod with a crank lift mechanism for height adjustment with millimeter precision.
DIY laser level mount - Metals, equipment, instructions
| Dear friends and site visitors! Thank you for your viewing of the content, I hope you find useful information on the site about tools. Today I want to ask you for help for my friend Mikhail Pogorelov, who was in trouble. His two-year-old daughter Snezhana was diagnosed with the disease “Sensorineural hearing loss.” The degree of the disease is quite high, and the baby is losing her hearing every day. The parents are saving for a hearing aid, but besides that, the baby will need surgery on both ears, the cost of which is simply exorbitant - 30 thousand euros for one ear. Parents are raising funds to undergo an operation in the near future, since the older the baby gets, the more she loses contact with the outside world. I ask for help from everyone who can and possibly knows Mikhail. The baby wants to hear this beautiful World, so let's help her. You can provide assistance by transferring any amount of funds to Mikhail’s bank account: PrivatBank card: 4149-4978-5183-0598 Pogorelov Mikhail Andreevich Thank you all personally from me. |
Carrying out construction work without such an important tool as a laser level or level is unacceptable.
The laser level is intended for prompt and most accurate marking. To use this tool, you do not need to read the instructions or undergo additional training.
To use the level correctly, you need to place it on the surface of the floor or wall, then turn it on and get ready-made projections. This device is good for everyone, with the exception of only one drawback - high cost.
If you plan to carry out construction activities at home, then you can make a laser level with your own hands, eliminating the need to spend money.
The tool in question is a small device that is fixed on any surface, for which the following elements are used:
- Magnet
- Tripod stand
- Fastening straps
The main distinguishing feature of laser levels is the shape of the projecting beam and its direction. To create the beam, powerful LEDs are used, as well as a system of prismatic lenses. The range of the instrument depends on the power of the LEDs and the number of lenses.
Internal structure of the laser level
There are three types of laser levels:
- Devices that reflect a point projection on a surface. With their help, points on the wall are marked, after which they are connected using a ruler, thereby obtaining a flat plane
- Products that project a plane in the form of a line. These lines can be horizontal or vertical, depending on the model of the tool. Such devices are popular among builders when carrying out interior finishing work.
- Rotary type tools that have a long range. These are some of the most expensive products that are often used in outdoor construction work.
Some of the main structural elements of laser levels include:
- Light source in the form of a powerful LED
- Lenses, with the help of which not only the shape of the beam is created, but also the range of action
- Power source in the form of batteries or accumulators
- The housing in which all the components of the device are assembled
- Clamp for leveling the tool body
Design of a rotary laser level
The operating principle of a laser level is simple and is as follows:
- The instrument projects a laser beam as a line or point onto one or more planes. Based on these projections, appropriate work is carried out
- The accuracy of the resulting projection depends on the quality of the device alignment. Leveling can be manual or automatic. For manual leveling, a system of bubble flasks is used, and for automatic leveling, pendulum mechanisms are used.
- To obtain a projection, just level the device and then turn it on
Based on factory products, you can make a homemade laser level. In fact, to build such a tool you will need very little effort and investment.
Making a level from a laser pointer yourself, step-by-step instructions
Making a level from a laser pointer is a quick and easy way to get a homemade laser level for construction work. To make such a device you will need the following materials:
- Laser pointer that can be purchased for pennies
- Construction cord
- A wooden block, the length of which is up to 0.5 meters and the size of 25x25 mm
Components for making a laser level with your own hands
When all the components for constructing a homemade product are ready, you can resort to constructing a tool. To do this, follow these steps:
- From both edges of the block you need to drill holes parallel to one to one. One of these holes is needed to secure the laser pointer, and the second is needed to secure the cord.
- After this, you need to fix the laser pointer, and then proceed to secure the rope. This rope will act as a fastening and leveler, with the help of which the device will be suspended from the ceiling or other surfaces
- The hole for attaching the rope should be through, which will allow it to be level when hanging. The result is a self-leveling laser level, designed by yourself
The main rule when creating a homemade laser level is to securely and firmly fix the tool support. To use the tool, you need to hang it by a rope in the center of the room, then turn it in the desired direction, and then mark the points along the radial projection on the wall.
Making a laser level from foam plastic and water step by step instructions
To make a laser level from a laser pointer, foam plastic and a container of water, you will need to prepare the following materials:
- Scotch
- Laser pointer
- Small capacity
- Expanded polystyrene or polystyrene foam
The action plan for building a level with a laser pointer is as follows:
- You need to fill a small container with water to the top. A saucepan or small bucket is suitable for such purposes. Instead of water, you can use oil (waste oil) if you plan to work outside during windy weather.
- You need to attach a laser pointer to a piece of polystyrene foam. To attach the pointer to the foam, use tape or other similar materials. The location of this device on polystyrene foam should be uniform, since the accuracy of the readings depends on this
- A water tank is installed at the required height to obtain markings, after which the pointer is turned on
- The constructed device is placed in the container, after which points on the wall are marked based on the projected rays
Despite the simplicity of this design, the result is accurate projection indicators. This version of the invention is suitable for those cases when you need to cut out a plane for laying tiles. Watch this video, which shows in detail the principle of making laser levels with your own hands.
Laser level from a pointer and a water level step by step instructions
If the need arises to make a more or less high-quality device, and at the same time not invest a lot of money in it, then we will consider another version of the product. If you need to make a laser device for projecting lines with your own hands, then for this you will need:
- Laser pointer
- Water level
- Rails for making a tripod
Ready tripod for laser level
If you have a ready-made tripod from a camera or microphone, this will greatly simplify the manufacturing process. If you don’t have a tripod, you can make one from slats. To do this, a tripod is made, from which a beam 25x25 mm thick extends in the central part. A water level is fixed at the top of the beam, at which the laser pointer is fixed. This completes the manufacturing process.
How to do it?
As noted above, high-quality devices from famous brands will not be affordable for everyone. You can reduce costs by purchasing Chinese models, which are significantly inferior in quality and basic characteristics. But do not forget about the possibility of making the necessary structure with your own hands. A homemade tripod can be assembled in several ways, namely:
- equipped with fastening elements in the form of magnets;
- using so-called cross tripods;
- using belts to secure devices.
One of the simplest options, involving minimal costs, is to use a regular tripod for a camera or camera. If you have such a device, all that remains is to adapt it to install a laser level. An equally simple way would be to make your own tripod with a platform for a level from any materials. The main requirement will be the stability of the entire structure.
You can make a telescopic rod yourself and at relatively low cost. To do this, you will need two tubes, the diameters of which are selected so that one fits into the other. One of them should be twice as long as the other. The manufacturing process includes the following steps:
- cut the larger tube in half;
- We put a larger one on both ends of the smaller pipe to achieve a telescopic effect;
- holes are drilled in the tubes onto which nuts are welded;
- To fix the components, wings with appropriate threads are used.
It is important to remember that the total length of the rod must be commensurate with the height of the room. In addition, it is necessary to take into account a small margin so that you can install the stand apart between the ceiling and the floor.
The most budget option would be to build any stable stand. It could even be a shovel handle with a stand made of plywood or OSB board. It is important to set this structure strictly vertically, using a regular level or plumb line.
Review of manufacturers
Nowadays, many manufacturing companies present their products on the market of tools, measuring equipment and additional devices. Naturally, the leaders of the segment are such giants as Bosch . And in this case we are talking about the largest developer of power tools and electronic devices. For many, this brand is associated with traditional German quality.
On the market, the company offers high-quality tripods of various types, as well as rods and holders for laser levels.
In addition to the German giant, other manufacturers also present their developments.
- ADA Instruments is a company that started its activities more than 10 years ago. Initially, it was positioned as a brand of diagnostic and measurement equipment developed for a variety of industries. By the way, ADA stands for ADditional Accuracy, which means “additional accuracy.” The manufacturer offers potential buyers models of geodetic and telescopic tripods and rods.
Tips for choosing
The higher the class of measurements performed, the stricter the requirements for the sets of equipment used. Based on this, special attention should be paid to the main selection criteria, including tripods for laser levels. One of the key points will be the material from which the device is made. Most often used:
- metal (in the vast majority of cases it is aluminum, one of the main characteristics of which is lightness);
- tree;
- fiberglass (fiberglass).
Each of these materials has its own characteristics that should be taken into account when choosing a specific tripod model. First of all, you should pay attention to deformation under temperature influence. By the way, metal has the highest coefficient of expansion, and therefore it will deform when exposed to sunlight.
The result of this phenomenon can be significant deviations of the sighting axis of the level from the horizon.
Wooden and fiberglass fixtures have almost identical coefficients of thermal expansion. Based on this, it is difficult to give one of the options a clear advantage. In this case, they most often rely on personal preferences.
When choosing tripods, their weight plays an important role. Heavier structures provide maximum stability. But at the same time, transportation becomes significantly more difficult and the mobility of the equipment is greatly reduced. Another important criterion is the features of the “legs” fixation mechanism. Currently available models are equipped with:
- clamping screws;
- fastening elements in the form of special clips;
- combined elements.
The use of models with fastening clips allows you to maximize the speed of work. In situations where rigid fixation of a level or level is paramount, preference should be given to tripods with screws or combined mechanisms.
Taking into account all the existing nuances, the following basic rules for selecting the most suitable device can be identified:
- with increased requirements for accuracy, priority will be given to heavy models made of fiberglass or wood;
- if maximum mobility of the entire structure is required, then it would be wiser to choose aluminum tripods equipped with clips;
- If you have a level with a compensator, you can be guided solely by preferences, taking into account financial capabilities.