Among non-destructive methods for checking the reliability of welded joints, magnetic particle testing occupies a leading position. This is due to the fact that magnetic particle flaw detection does not require expensive and complex equipment, which requires serious training to operate. This inspection method detects surface and hidden defects. Using a flaw detector, the condition of seams in hard-to-reach places and at heights is assessed. The prevalence of magnetic particle testing of joints formed by welding is explained by the clarity of the results. Flaw detectors have a high degree of detection of defects that reduce the strength of supporting metal structures, high-pressure vessels, process tanks, and pipelines.
Why is weld inspection necessary?
Along with the development of welding technologies for metal structures, the requirements for product quality are increasing. Also, business managers and investors strive to reduce losses due to unscheduled repairs and preventive maintenance. Industry and business require compliance with operational characteristics - both economic and time parameters included in the design of an object, structure or product.
Structural strength is a technological parameter on which not only the operability and productivity of an object depends, but also the safety of people and the environment. A “subsurface flaw” in a weld seam or a discontinuity in welding that was missed during visual inspection will begin to grow under load during the operation of the object. One day the seam will burst, which will entail a series of increasing breakdowns followed by an accident or catastrophe.
Therefore, not only customers and contractors pay increased attention to the indicators and methods of flaw detection and monitoring the accuracy of parameters of welded joints. Scientists from various industries are attracted to develop regulations and new measurement methods. And state services for technical regulation, standardization, metrology and certification are creating unified measurement systems.
Due to its ease of use and sufficient accuracy of the measured parameters, magnetic particle flaw detection of welds has become recognized and widespread. This will be discussed in this article. To understand the advantages of this control method, we will compare it with other options for checking the quality of welded joints.
What methods of checking welded joints are used
The methods are divided into two groups:
- Non-destructive testing (hereinafter referred to as NDT).
- Destructive testing methods.
Of the second group, mechanical tests are most often used.
In industrial use, transport, construction and the national economy, non-destructive methods have become recognized and widespread. The development of measurement technologies occurs precisely in this area of control. Let's look at the NDT methods in more detail.
- Visual and measuring control. This is the initial way to check the quality of work performed. Includes external inspection of seams and measurement of geometric parameters. For this, simple measuring instruments are used. The obtained figures are checked against the standards in the design documentation, GOSTs, SNiPs and technical specifications. It is used as a primary method for identifying defects and is not able to detect small and hidden intra-suture defects.
- Capillary control. This approach is based on the properties of liquids to penetrate into the smallest cracks, pores, cavities or lack of fusion. Read more about connection defects below in the text. Special penetrating properties are inherent in certain liquids - penetrants. Based on them, compositions are made for application to welds and for magnetic particle testing.
- Ultrasonic testing methods (UT). A universal and universal method for flaw detection of welded joints. Analysis of indicators and detection of cracks is carried out using flaw detectors, which consist of ultrasound emitters and receivers. There are echo-pulse, echo-mirror and mirror-shadow methods of ultrasonic testing.
- TOFD or time-of-flight diffraction testing. More often used for research and detection of defects in circumferential and longitudinal welds using ultrasonic echo. The action is based on the difference in reflected waves from a crack or from a fully welded surface. Both the single-group TOFD method and methods with multi-support of several groups or techniques with a combination of other control methods, for example with pulsed or echo-surface waves, are used.
- Eddy current analysis. It is carried out using certified instruments - vortex flaw detectors. Based on identifying problems in test welds by comparing changes in eddy current and electromagnetic fields. Its operation is similar to ultrasonic testing methods. Like the magnetic particle method, it is used to test depths up to 2 mm.
- Radiation flaw detection of welded joints. In practice, it is also called x-ray testing, because the research is carried out using x-ray gamma radiation. This is the most effective method of control, but it has very limited use due to radiation hazards and the mandatory use of special protective equipment.
- Magnetic particle testing or flaw detection (MPC or MPD). The main character of today's review. Allows you to determine defects in weld metal such as cracks, lack of penetration or lack of fusion, pores and cavities, solid slag inclusions at a depth of no more than 2 mm. In the next section of the article we will talk about regulations and characteristics of weld defects.
Due to the ease of use directly on site, as well as the ability to quickly detect thin and minute cracks, MTD has become widespread. The method does not require expensive and complex equipment or lengthy training of operating personnel. The advantage of this testing option is good visualization of defects. The customer receives clear results without wasting time. Which are visible to representatives of the inspecting and receiving parties. It is important that the results of the study are marked for the welder, who will eliminate the identified deficiencies.
During the verification process, equipment for magnetization and demagnetization corresponding to GOST R 53700-2009 is used. For measurements on non-linear surfaces, such as corners and cylinders, attachments and prisms with different radii are used. They also control the quality of welds on threaded connections, fillets and grooves. And for testing rotating shafts, special prism-cradles are used.
After magnetic particle testing and inspection of the object by flaw detectors, they draw up a test report indicating the object and details of the study. The document reflects the date, location, equipment and control methods. The names of the responsible specialists and their expert opinion are recorded.
Device structure
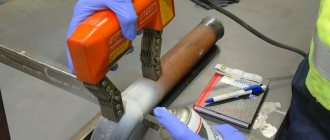
The basis of the segment of magnetic thickness gauges and flaw detectors are hand-held devices equipped with magnetized working parts - usually in the form of pliers. Externally, these are small devices, the filling of which is an electromagnet that regulates the poles of the wave action. The middle class allows you to work with magnetic permeability, the coefficient of which is higher than 40. The body is equipped with an ergonomic handle, thanks to which the device can be used in hard-to-reach places. To supply electric current, the devices are also provided with a cable connected either to a generating station (if work is carried out outdoors) or to a 220 V household power supply. More complex non-destructive testing equipment has a stationary base connected to a computer. Such diagnostic tools are more often used to check the quality of manufactured parts in production. They perform quality control, recording the smallest deviations from standard indicators.
What are weld defects?
In the Russian Federation and CIS countries, definitions of all joint defects during fusion welding of metals are designated and classified in GOST R ISO 6520-1-2012.
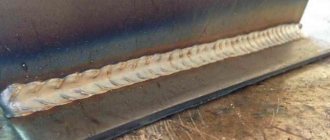
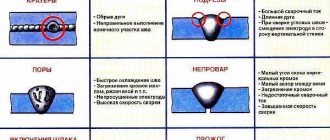
Weld defects are nothing more than surface or sub-surface flaws within the weld. They differ from each other in character, configuration, size and lead to a reduction in the useful life of the metal structure. They affect its user characteristics and lead to emergency situations, and therefore it is better to avoid them. A structure with defects must be urgently taken out of service for troubleshooting and subsequent restoration or disposal of the product.
The magnetic particle method for detecting connection defects helps to quickly identify defects of any type.
Factors causing defects in welded joints:
- Seams may be of poor quality if the welder does not have much experience in the work. During the procedure, the technology of electric arc, argon, and beam welding is violated. There is no preparation or heat treatment of the components, the assembly diagram of the elements is mixed up. An inappropriate mode of operation of the device for laser welding has been selected, etc.
- Poor-quality seams appear due to the use of unprofessionally produced or broken equipment for manual electric arc welding, or low-quality metal or low-cost consumables.
- The reduction in quality is greatly influenced by the melting of slag, multiple splashes of metal, contamination on the surfaces being fused and poor organization of the workplace.
All suture defects have different names and are conventionally divided into three groups, each of which has its own characteristics. There are flaws:
- external;
- internal;
- end-to-end.
The method for correcting the defects of a welded joint is determined by its characteristics. To prevent such problems in the future, the welder corrects errors independently and understands what led to unsatisfactory results. The magnetic particle testing method in this case helps to visually record these errors.
Sometimes, due to overheating, thermal deformations or changes in the strength of the metal occur that do not correspond to the design characteristics of the structure or object. More often this applies to welded joints of hardened and different composition metals. For example, when joining an austenitic stainless steel alloy with carbon steel.
MTD technology
To find it, NDT specialists use certified equipment and use a colored ferromagnetic component, that is, magnetic powder. They apply this marking compound to the weld joint being examined using a dry or wet method.
In the first case, a standard magnetic particle substance is suitable. When choosing wet, a suspension is prepared, including magnetic powder and liquid with penetrating characteristics. To do this, transformer oil is used in combination with kerosene, or water, in combination with substances that prevent corrosion. These liquids are called penetrants, i.e. they penetrate into all pores, cavities and capillaries.
The choice of method depends on the situation. Sometimes they are combined with each other. Regardless of what magnetic substance is used, it helps to identify minimal defects. In the case of using a powder or suspension, the substance “concentrates” around the defect, forming bizarre patterns, with numerous defects. This way you can find out not only the location, but also the size of the flaw.
As a rule, a flaw detector is selected taking into account the scope of its operation. If magnetic particle flaw detection of welded joints is planned on site, then the main parameter is compactness. If research is done permanently in a laboratory, then the size of the device does not matter. In such cases, functionality is a priority and a more technologically advanced model is chosen.
The process of magnetic particle flaw detection of welds
This technology controls the quality of joints produced by welding; its principle is to detect magnetic fields on the surface of the metal above an existing defect in the weld using ferromagnetic components.
If the workpiece has any disadvantage, then a magnetic field will certainly be created above it, which will begin to change. The control section is magnetized and the flow of magnetic lines bypasses defective areas that appear along the way. As a result, the magnetic field is distorted. At the same time, magnetic poles are formed along the edges of the workpiece, forming separate magnetic fields.
All data on the deformation of the magnetic field is recorded with a magnetic particle flaw detector. The more significant the flaw, the greater the degree of dispersion, and, consequently, the possibility of identifying it. If the flow of magnetic lines is at an angle of 90 degrees with respect to the flaw, then the possibility of detecting it increases.
At the site of defects, the lines create a peak that extends beyond the workpiece. If small particles of ferromagnetic substances are observed at the distortion sites, they will change their position in space and will coincide with the direction of the magnetic field lines.
The more significant the inhomogeneity of the field above the defect, the stronger will be the emerging electromagnetic force responsible for the movement of magnetized particles. From them, in the flaw zone, chains are formed.
Methods of applying the indicator
For magnetic powder testing, dry, wet, and paste-like indicators are used. Dry is a mixture of fine metal filings; it is applied to the surface in its natural state, without adding liquids.
The dry flaw detection method is effective for detecting discontinuities, slag inclusions on the surface or subsurface type defects. For the manufacture of magnetic particle indicators, iron scale, babbitt, magnetite, and other highly magnetizable materials are used. The field in the welded workpiece is created by a U-shaped electromagnet connected to a source of direct or alternating current with a power of 300 to 600 amperes. The ferromagnetic mixture is applied from an aerosol package, dispersed by a sieve, and directed by a bulb.
In wet indicators, magnetizable particles are suspended. They are added:
- in water with anti-corrosion substances;
- liquid soap solution;
- kerosene;
- transformer oil;
- special concentrate based on polymers.
For flaw detection, compounds are applied using several methods:
- using a brush;
- immersing in suspension;
- pouring liquid over the surface being examined.
The wet flaw detection method is used to identify surface discontinuities in welds.
Features of the technology
Magnetic particle flaw detection has its own characteristics. The main one is that it is impossible to carry out it if the workpiece is not made of ferromagnetic metals. This must be taken into account if you plan to test elements made of zinc or copper, since they are diamagnetic, so it will not be possible to carry out high-quality control using this method.
If necessary, the IRONCON construction laboratory will select an on-site testing method for non-magnetic metals, as well as for other types of building materials and structures: concrete and brick products, reinforcement, bulk materials and fire escapes.
Sensitivity options
Remember that magnetic particle flaw detection of welds has a certain sensitivity parameter. This is the degree to which the flaw will be detected with accuracy. Sensitivity is influenced by the magnetic properties of metals, magnetic field strength, number of defects, and their area. The size and shape of the workpiece also affects.
Sometimes the sensitivity is affected by the method of applying the ferromagnetic substance (dry or wet, suspension). All this needs to be remembered in order to understand how effective control will be. An important point is that the use of magnetic particle flaw detection is advisable in combination with other inspection methods to obtain an objective picture and accurate figures.
Types of magnetization
Within the framework of the method, 4 magnetization options are used:
- circular;
- longitudinal;
- combined;
- in a magnetic field that rotates.
The most popular are the first 3 types. If we talk about elements that have a simple structure, the formulation of magnetization will be as follows.
- Circular - is a type of magnetization in which the magnetic field becomes closed inside the element, and magnetic poles are not formed at its ends.
- Longitudinal option, during which the magnetic field is directed along the part, while magnetic poles are formed at its ends.
- Combined - when the element is located under the influence of two or more magnetic fields with different directions.
Stages of control
Preparing a workpiece or structure for the procedure.
The preparatory process for magnetic particle testing of welded joints consists of cleaning the surface of the element from corrosion, contaminants, as well as lubricants and oils, if the control is performed using an aqueous suspension or dry powder. If the surface of the element is dark in color and the black magnetic powder on it is not noticeable enough, then the element is covered with a layer of a white coloring composition.
Magnetization of the workpiece.
This is one of the priority measures of the magnetic particle method. The sensitivity and determination of deficiencies depends on how correctly the method, direction and type of magnetization, as well as the type of current, are chosen.
3. Applying a magnetic indicator to the surface of the element.
The best solution for applying a suspension is to immerse the element in a container in which the suspension is thoroughly mixed, and gradually remove it from it. But this method is not always advisable. Typically the suspension is applied by hose, spray or shower.
It is important to maintain a low jet pressure, then the magnetic powder remains in defective areas. If the dry magnetic particle testing method is selected, these requirements relate to the pressure of the air stream through which the magnetic powder is applied to the element.
The period of drainage of a dispersed medium of high viscosity takes longer, so the productivity of the controller is reduced.
Visual inspection of the workpiece.
Deciphering the indicator image and performing sorting. The inspector is obliged to inspect the element after the bulk of the suspension has drained from it, when the powder deposits become uniform.
Parts are checked visually, but in some situations professional optics are used to decipher the type of flaws. Its configuration is carried out according to the official documentation.
Who conducts MTD
The IRONCON-Lab construction laboratory carries out magnetic particle testing and radiographic testing of welded joints at competitive prices. Tests are carried out either in a room equipped with special equipment, or at the construction site of the facility. During the examination, a protocol is drawn up in which flaw detectors will make a conclusion about the compliance or non-compliance of the construction work performed.
Materials for magnetic particle flaw detection produced by ELITES® Russia
Production of flaw detection materials for magnetic particle testing. Magnetic powder, ready-made magnetic suspension and the base for its preparation, primer paint - consumables for magnetic particle flaw detection, produced in Russia under the ELITES® brand, can be purchased from our dealers.
Indicative materials for IVD
Black and luminescent magnetic suspensions, concentrates
Suspension "Elitest ChS2"
Suspension "Elitest LS4"
Con
Means for processing the controlled surface
Primer paint. "Elitest BC5"
Elitest P10 cleaner
