Modern technologies require high precision in the production of various technical products. This parameter is achieved through the use of various measuring instruments.
The article provides a detailed description of the micrometer, its varieties, types, and areas of use. Instructions will also be given on how to use the micrometer and how to set it up correctly, as well as store it.
Purpose
A micrometer is used to measure quantities such as thickness, diameter, width, cross-section, depth of various objects. Depending on the type and purpose of the device, measurements are available from a few centimeters to microns.
Such devices are used for designing, creating, and repairing various technical parts, devices, and technological projects.
Digital type meter
A more modified model of this device for measuring small quantities is an electronic micrometer. This is a modern option that is easier to use. The measurement accuracy of such a device reaches 1 micron and its error is up to 0.1 microns.
Some models have built-in calibration. Externally, you can distinguish an electronic micrometer from a mechanical one by the presence of a digital panel. It provides the ability to select a calculation system, for example, you can make measurements in millimeters or in inches.
The display also displays other important information, such as the battery charge level. The device is equipped with automatic shutdown to save battery power. All technical requirements of the micrometer must comply with GOST.
Advantages of an electronic micrometer:
- the presence of an electronic panel greatly simplifies the measurement of parts and reduces the time for reading information;
- the error of electronic devices manufactured according to GOST has a small error, and the division value is 0.001 mm;
- the ability to carry out relative measurements. Possibility to set the value to zero at any time;
- the ability to enter various tolerances into the memory of the measuring device;
- the ability to display instrument readings on a computer and take photos of readings obtained using a micrometer;
- universal measurement system.
Device
Despite the many varieties of micrometers, the device retains its basic design details. The micrometer consists of the following parts:
- Diametric bracket. This is the base of the micrometer. It is used to place the item being measured.
- Fixed sponge. Placed at the end of the bracket to hold the part motionless.
- Movable sponge. It is she who presses the object for measurement.
- Threaded clamp. Used to fix the movable jaw.
- Calculation scale with markings stamped on it. One side of the scale is divided into centimeters, the other into millimeters. Depending on the type of micrometer, the graduations may be smaller or larger.
- The cylindrical drum is also the moving part of the micrometer. This part is marked in microns.
- Ratchet. Necessary for fixing the sponge without pressure. The ratchet assembly prevents deformation of the surface of the part being measured during strong clamping.
This is a standard micrometer device. Different types of this device may have additional or modified parts. Next, the main types of micrometers and their areas of use will be described.
Micrometer definition
A micrometer is a device for making high-precision measurements; it is used in industry to make the most accurate measurements. This device has a small measurement error, it is about 2-9 microns.
There are many varieties of the device, which allows you to measure parts of various shapes and sizes with a micrometer. The micrometer has found wide application in industry, especially in the automotive industry, as well as in jewelry.
Varieties
Every year the design of various parts becomes more and more complex. Various types of micrometers are used for precise design.
There are 4 main types of device according to the measurement method and the function of issuing the final result:
- Analog micrometer. The simplest and most common device. This micrometer is completely mechanical. The measurement result is controlled using markings on the scale and drum.
- Pointer or lever. Almost similar to its mechanical counterpart. It is distinguished by the presence of a pointer dial. The display is marked in microns and also shows the degree of pressure on the object being measured. These micrometers are highly accurate.
- Electronic. These micrometers are similar in design to mechanical models. A special feature is the presence of a display on which the final measurement result is displayed. Such devices also have a memory function; they can be configured for calculations in the smallest parameters.
- Laser device. It is the most accurate and technologically sophisticated. In addition to the main function, it can calculate the most minor curvatures, deviations, and surface abrasions.
Next, we will look at what types of micrometers there are according to their area of use. The scope of application makes some adjustments to the design of this measuring device.
- Smooth. Using these devices, the diameter and cross-section of an object are measured.
- Pipe. They are used to calculate the difference between diameter and wall thickness. Often used to control the corrosion layer.
- Micrometer "tooth gauge". It is used in gear design. Using a gear gauge, the size, thickness, and depth of gear teeth are measured.
- Sheet micrometers. Necessary for measuring the thickness of thin sheet steel.
- Wire meter. Using it you can measure thin rods, wire, and balls of small diameter. Structurally, it differs from a mechanical device only in the absence of a bracket.
- Universal. It is equipped with special movable attachments, which significantly expands the scope of its intended use.
- Prismatic. The prism-shaped bracket allows you to measure parts with an angular or triangular cross-section.
- Depth gauge. Allows you to control the internal size of the part. Used to measure the depth of holes.
- Thread gauge. Used to measure metric and inch threads on fasteners.
- Double or paired. Necessary for measuring parts with several surface levels.
- Bore gauge. Just like depth gauges, they are used to control the depth of a part. They are distinguished by higher accuracy and the ability to measure the depth of a hole with a small cross-sectional diameter.
All the described varieties are similar in the principle of working with them.
Types of micrometers
Micrometers are divided into mechanical and electronic types. Mechanical ones, in turn, can be divided into the following groups:
- sheet, they are designed for measuring the thickness of flat parts, for example, sheets;
- lever micrometer, its mechanism contains a lever head with teeth, which allows you to measure complex parts with high accuracy;
- smooth, their purpose is to measure smooth surfaces. This is the most common type of micrometer.
- universal;
- pipe, used to measure the walls of various pipes;
- wire, allowing you to measure thin wire.
Setup instructions
Before you learn how to use a micrometer correctly, we suggest that you familiarize yourself with several nuances in preparing the device for use.
Setup and calibration
Before starting to measure a part, you must ensure that the calibration is accurate. This requires:
- Clean the surface of the tool jaws. To do this, place a blank sheet of plain paper between them. The jaws are clamped under slight pressure. Next you need to remove the sheet. The operation must be repeated several times. This removes dirt, grease and moisture. It is prohibited to use hard rags or sandpaper for this purpose.
- To set up the device you need to use a standard. Each similar tool is equipped with such a part. The reference workpiece must be clamped between the jaws, fixed using a ratchet mechanism and checked for alignment of the mark with the size of the standard.
If the indicators differ, the tool will have to be adjusted. To do this you need:
- Loosen the movable jaw and remove the reference sample.
- Combine the jaws again until they stop without applying pressure.
- Check how zero risk is combined.
- If there is no alignment, you need to fix the position of the jaws.
- Loosen the ratchet mechanism.
- Scroll the drum until the zero marks align.
- Secure the ratchet mechanism with the fastening screw.
Thus, all parts of the micrometer are brought into alignment with zero. This calibration will help you measure with a micrometer as accurately as possible.
Types of micrometers
This device is practically not used for home use. But it is actively used for other areas of activity. It is represented by more than 20 types on the measuring equipment market.
Each of which has its own measurement specifics and is used by certain specialists. Among them there are also rare units, special in that they are used in certain activities.
And there are also very popular micrometers such as:
- Sleek device. The most widespread and purchased among its analogues. Used for taking measurements from external parts and workpieces. They are not intended to measure the external size of elements;
- Sheet device. Manufactured with plates on the screw part. Thanks to these parts, the unit fits tightly to the object being measured, showing its exact size. In demand in blacksmithing and workshops specializing in the smelting of metal sheets;
- A device for measuring hot webs. It is used in the production of metal products. The advantage is taking measurements from hot metal. Thanks to this unit, it is possible to stop the smelting of any product in time;
- Device for deep measurement. Equipped with an extended bracket, which can measure parts using the throw method. Ideal for removing thickness from elements that have blind drilling and countersinking;
- Pipe devices. Designed for measuring pipes. This unit does not particularly stand out among others, but displays the exact value when it comes into contact with the walls of the product. The unit is made in the form of a cut-off bracket, which has a cut-off bracket at its end. This detail helps to take measurements even from the thinnest fabric;
- Wire device. It has a compact size. The micrometer has the same parameters as pliers. It is convenient to carry and take with you anywhere. Designed for measuring wire and twigs. The appearance of the tool is quite simple - a metal rod without a bracket. But this is quite enough to take accurate measurements, which are helped by the small range of motion in the device;
- Device with small jaws. It somewhat resembles a smooth micrometer. But it differs in the thin alloy of the heel and screw. This makes it suitable for taking measurements from thin fabric, as well as for measuring machined or drilled surfaces;
- Universal device. Suitable for measuring almost all elements. The micrometer is equipped with removable tips and is produced in two price categories. This is an expensive and cheap model. The first option is characterized by high-quality fastening of the tips, which gives an advantage in accurate measurements. The cheap device is also equipped with tips, which are distinguished by the presence of a gap between them and the measured element. Which affects the error of the device, so you should not expect an exact value from such a unit. But for the home, an inexpensive device is quite useful;
- Grooving device. Designed for measuring workpieces in hard-to-reach places. Equipped with plates, which are also called sponges. You need to work with the unit carefully, since the plates can become deformed under strong compression or become unusable if the device is accidentally dropped. Outwardly, it resembles a wire instrument, differing from it in the absence of a bracket;
Digital device. Has many varieties. From a simple electronic device to an advanced device equipped with built-in memory and functionality. Battery operated.
It does not serve as much as a mechanical unit, and does not differ in measurement accuracy. But it is convenient for work in production when measuring workpieces. Especially if the deadline for submitting the work is reduced to a minimum.
Operating instructions
Measurements with a micrometer should begin by setting the most convenient position for the instrument. It can be held in your hands, or firmly secured in a vice. Next you need:
- Place the part to be tested in the tool bracket.
- Squeeze using a movable sponge until it stops. Do not clamp under high pressure.
- Turn the ratchet mechanism as far as it will go, but without applying excessive pressure.
- Secure the position by moving the clamp to the closed position.
- Look at the combination of marks.
The micrometer readings are read as follows:
- The stem of the instrument has a main and an additional scale. The main one is marked in large quantities and is located below. On the additional one, risks of small value are displayed, its position is above the main scale. The main ones are the risks of the main scale with digital marks.
- The drum has a scale with marks calculated in hundredths of a millimeter.
- First, the integer numeric value of the lower scale is determined. If the line stops near the number “5”, then the whole number is equal to 5 millimeters.
- Then you need to add the number from the top scale to this value. The markings on it have values in fractions. If the risk stops before the mark, its value is not taken into account, and if after, then it must be added to the main result. For example, if the mark has passed by one division, it will be equal to 0.5 mm.
- Next you need to determine hundredths. To do this, you need to remove the values from the drum.
- The drum line is aligned with the central strip between the 2 scales on the stem. For example, the value is 50.
- The final calculation is carried out by adding all the data: 5+0.5+0.5=6 mm.
Working with a micrometer is quite simple if it is accurately calibrated and has a flat surface on both jaws.
A micrometer for internal measurements is used in a different way. Its movable jaw is placed in the hole until it stops. Next, you need to align the tool stem with the surface of the part. After alignment and stop, the stem is fixed with a ratchet, and the resulting data is read. The reading method is completely identical to the description in the instructions.
Types and types of micrometers and how to choose
A micrometer is a universal instrument designed for measuring linear dimensions by the absolute or relative contact method in the area of small sizes with low error, the conversion mechanism of which is a screw-nut micropair.
The micrometer is mainly used to measure external dimensions with high accuracy. In general, it is divided into several main parts and consists of a rigid bracket, on one side of which a fixed heel is mounted, and on the other there is a movable measuring rod. The rod moves by rotating a micrometer screw (hence the name of the instrument). Up to 300 mm are available with a measurement range of 25 mm, more - 100 mm. The high quality of manufacturing of the microscrew allows you to take dimensions with an accuracy of 0.01 mm to 0.001 mm. The most common type is smooth MK micrometers, but in addition, many special types are produced for highly specialized work.
According to GOST 13762-86, storage and transportation of micromeasures is provided at all stages of operation in a special case or case; at the stage of transportation to the place of sale, storage can be carried out in packaging.
To obtain accurate readings, you need to know how to use a micrometer correctly and in what area it will be used - this will help you choose the best option. The fact is that a micrometer is a very precise measuring device, and its incorrect operation will inevitably lead to an increase in measurement error. Firstly, you should only use a micrometer in warm rooms (20±10°C), and if you brought it from the cold, you need to wait some time until the temperature of the instrument is equal to the ambient temperature. Then you need to check the micrometer is set to zero.
In general, GOST 6507-90 stipulates that micrometers can be used at ambient temperatures from 10 to 30 °C and relative air humidity of no more than 80% at a temperature of 25 °C
In models with a measuring range of 0-25 mm, the measuring surfaces are brought together; in other models, you need to use a special setting measure, included in the kit, to set the measuring surfaces to the minimum position (for example, for a range of 25-50 mm, the length of the setting measure will be 25 mm, for 50-75 – 50 mm, etc.). In this position, it is checked whether the micrometer reading device shows zero. If not, calibration needs to be done. To do this, in mechanical models, the included key is used, which allows you to turn the drum and align the zero line; in electronic models everything is simpler - you just need to press the reset button to zero. After setting the micrometer, you can begin measurements.
During work, to bring the heels together with the measured size, you need to use a special mechanism provided in the design that normalizes the clamping force - a ratchet or clutch. This allows you to always take measurements with the same force, avoiding over-tightening, which is certainly important to ensure the same readings. Also, during measurements, you need to hold the micrometer by a special insulating plastic pad located on the bracket so that heat from your hands does not affect the values.
According to the method of taking readings, all manufactured micrometers can be divided into the following groups:
Mechanical micrometers
The most common type, dimensions are taken using the vernier drum used in the design. Allows measurements with an accuracy of 0.01 mm. There are scales on the stem of the micrometer head and the drum, which are used to determine the size. As an example, we can cite smooth micrometers MK, models MK-25, MK-50, MK-75, etc.
Electronic micrometers
A modern model that uses an electronic digital display to take measurements. The advantages are increased accuracy, up to 0.001 mm, and ease of use. In addition, they have the functions of setting to zero at any point, converting millimeters to inches, switching between absolute and relative measurements, and outputting data to a computer. The letter “C” is added to the designation of this type, so for smooth electronic micrometers it will be MKTs, and accordingly the models MKTs-25, MKTs-50, MKTs-75, etc.
Pointer micrometers
determined using the dial indicator present in the design. Among the representatives are sheet micrometers ML (models ML-5, ML-10, ML-25) and lever micrometers MR and MRI (models MR-25, MR-50, MR-75, MR-100, MRI-125, MRI- 150, etc.).
As mentioned, a wide variety of micrometers are available. For many types of work there is its own design, different from others. Features include the use of special shapes of brackets and measuring surfaces, additional mechanisms that facilitate work. Here are the main types of micrometers used today:
Smooth micrometers MK, MKTs
Universal type micrometer. The micrometer rod and anvil have smooth measuring surfaces; the reach of the clamp allows you to measure diameters on round surfaces. Available with mechanical (MK) and electronic (MCC) reference systems. Measurement range - 25 mm for models with an upper limit of up to 300 mm (MK-25, MK-50, etc. to MK-300), more - with a range of 100 mm (MK-400, MK-500, etc. .).
Lever micrometers MR, MRI
The design has a lever for heel retraction and a dial indicator for taking readings. Mainly used in mass production, when it is necessary to check the same outer size on a batch of parts. To do this, the micrometer is initially set to the nominal size, and then during operation, the deviation from it is determined using an indicator for each part. MR models are produced with a reading accuracy of 0.001 and 0.002 mm (MR-25-0.001, MR-50-0.002, etc.); MRI models - with an accuracy of 0.01 mm (MRI-25-0.01, MRI-50-0.01, etc.).
Sheet micrometers ML
Used to determine the thickness of sheet and strip material. It can be steel, plastic, glass, PVC film, etc. This type is characterized by a bracket with a long reach, which allows you to measure dimensions at a distance from the edge of the product. The division value is 0.01 mm. ML micrometers produced by KirovInstrument are produced with a pointer dial to simplify readings; for other manufacturers, the size is determined by the lined vernier on the micrometer screw. Models ML-5, ML-10, ML-25, ML-50 are produced.
Pipe micrometers MT
To determine the wall thickness of pipes and other rounded products. The peculiarity of this type is the shape of the fixed heel - it is made with a spherical surface. This reduces the contact patch with the product being measured and prevents the curvature of the surface from affecting the result. Several modifications of pipe micrometers are produced - this can be the “classic” version with a rectangular bracket and a rounded heel pressed into it; or the fixed part can be made in the form of a rod with a thickening at the end, which allows measurements to be taken deeper from the edge of the product. Available with an accuracy of 0.01 mm, models MT-15, MT-25, MT-50.
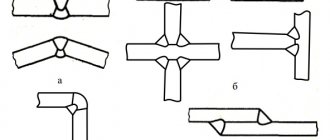
Gear micrometers MZ
Designed to determine the length of the common normal of gears. The measuring surfaces of the heel and movable rod of this model have wide measuring surfaces, at least 24 mm in diameter, which makes it easier to center them along the chord of the tooth. They are used for teeth with a modulus of 1 mm and have an accuracy of 0.01 mm. Models from MZ-25 to MZ-300 are produced.
Micrometers with MVM/MVU inserts
Allows you to measure the average diameter of threads. There are holes in the heel and the movable rod of the micrometer into which the specially shaped inserts included in the kit are inserted. They are standardly equipped with inserts for metric threads; upon additional order, they can be supplied with inserts for inch and pipe threads. Models are produced from MVM-25 to MVM-350.
Prismatic micrometers
Used to determine the outer diameter of a multi-blade tool. Instead of a fixed heel, an angle bracket with carbide plates is used here, forming a supporting prism. The following modifications are available: – MTI type – for a three-edged tool, prism angle 60° (models from MTI-20 to MTI-80); – MPI type – for a five-blade tool, prism angle 108° (models from MPI-25 to MPI-105); – MSI type – for a seven-blade tool, prism angle 128°34′ (models from MSI-25 to MSI-105).
Micrometers with small measuring surfaces MK-MP
The measuring surfaces are in the form of thin rods with a diameter of 2 mm. Used to measure grooves, recesses, and small parts. An electronic model MKTs-MP is also produced. Measuring ranges 0-25, 25-50, 50-75, 75-100 mm.
Spot micrometers MK-TP
They have an even smaller contact area, 0.3 mm. The measuring surfaces are shaped like pointed cones. The electronic model is designated MKTs-TP. Measuring ranges 0-25, 25-50, 50-75, 75-100 mm.
Micrometers with mechanical slider MKTSM
They differ from smooth MK micrometers by the presence of an additional digital slider that takes readings, which makes it easier to take values. Also, reading can be carried out in the usual way using a scale on the stem and drum. Models are available with ranges from 0-25 to 275-300 mm.
Micrometers for internal measurements (another name is micrometric bore gauges with side jaws)
This type does not have a bracket; instead, the body of the micrometer head has movable and fixed jaws that allow you to take internal measurements. Available in ranges from 5-30 mm to 275-300 mm.
Storage
The micrometer is a very fragile instrument. It must be stored following the following rules:
- Be sure to store it in the protective case that comes with the tool.
- Storage in high humidity conditions is prohibited.
- It is necessary to monitor the condition of the jaws and moving parts.
- If necessary, carry out regular cleaning, calibration and lubrication.
- It is prohibited to throw or drop the device.
The following will describe: how to choose the right device; the best models for use in everyday life and industry.
Design and principle of operation of the device
The task that a micrometer solves is to measure the dimensions of an object with an accuracy of hundredths and even thousandths of a millimeter . The simplest area of application for such a device is the production of cutting molds for metal and other hard materials. For the stamp to work effectively, a minimum clearance between its moving parts is required.
The device of a micrometer is quite simple.
- A rigid and durable bracket within which the measurement object is fixed. Different types of micrometers can be designed to work with workpieces of various sizes.
- The heel of the staple is a carefully fixed element made of hardened metal that is not subject to deformation. The alloy is selected to ensure the lowest possible levels of thermal expansion within the permissible range of use of the device.
- Movable measuring jaw. This element is mobile and works as a means of preliminary fixation of the part. It also has a basic size scale, usually in millimeters. The marking is dual-range; not only whole steps of the measured value are marked, but also their half values.
- The position clamp serves as a clamp for the movable jaw to begin precise measurements. Prevents control elements from shifting during measurements.
- Drum with a circular scale with measurement accuracy up to hundredths of a millimeter. Particularly precise instruments allow you to determine sizes down to thousandths.
- Ratchet assembly. It is adjusted to the normalized force of pressing the movable jaw against the part. When a critical value is reached, it begins to scroll.
The described design and exact list of components has the simplest analog, also known as a smooth micrometer. There are also more complex devices. For example, a dial micrometer, which allows you to adjust the pressing force and measure dimensions with an accuracy of thousandths of a millimeter.
Devices
Before choosing a micrometer model, you need to know exactly for what purposes it will be used. The best choice, of course, would be a universal type model. It is suitable for measuring parts of almost any shape. It is also worth considering the type of reading. It is better to choose currently available digital devices. They provide results without the need for calculations from all instrument scales.
Calibron MKTs-50
Model from Chinese manufacturers. It is a type of smooth electronic micrometer. A special feature is a wide range of configuration and calibration functions. There is a screen backlight, a memory function, and an energy saving mode. The tool allows you to measure external diameters and sections.
Advantages:
- High accuracy.
- Measurement within 5cm.
- Memory mode.
- Build quality.
This model can be used as a household tool.
Expert MK-25
Russian model of a smooth mechanical micrometer. It is distinguished by the possibility of absolute measurements up to 2.5 centimeters in increments of 0.1 mm. Can be used to control pipe thickness. A special feature is the build quality, stainless alloy from which the device parts are made.
Advantage:
- Average price.
- Build quality.
- Ease of use.
Such a device can be used for technical work in workshops and industries.
Norgau NMD-165D
High precision smooth type digital micrometer. Available measurement threshold up to 25 mm. A special feature is the ability to independently release pressure when the jaws are tightly coupled. There is a memory function, wide calibration settings.
Advantages:
- Data accuracy.
- Pressure release.
- Clear fixation.
- Average price.
The tool is characterized by a long service life, build quality, and high functionality.
Mechanical type micrometer
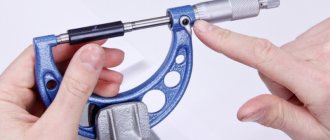
In most cases, mechanical micrometers are used for measurements. Its device consists of a handle and a recess, which houses the part that needs to be measured. It is a semicircle with a stand on which the micrometer screw is directed.
The handle must be adjusted to close the screw. When they close around the part being measured, they begin to rotate the ratchet for adjustment. After this, you can take readings on the scales that are applied to the drum and stem of the micrometer.
Read here: How to use a hydraulic level: the correct choice and features of using the device
To record measured data or compare it with another part, some micrometers are equipped with a locking mechanism.
Preparing for work
How to use a micrometer correctly? First, let's look at setting it up. An important skill is setting the zero mark. This will be needed both at the beginning of work, for example, to check the accuracy of the device, and during operation, for example, if you assume that the settings have gone wrong.
Measuring surfaces must be wiped. They should be free of dirt and dust. Unscrew the drum with the screw - separate it from the micrometer stem. The drum cylinder is not yet secured and is in free rotation. It becomes motionless when it is secured with a ratchet nut. Use the nut to rotate the screw until the jaws close. Using a ratchet, tighten the screw until it clicks to secure the measuring surfaces. The drum is rotated until the zero point on its scale coincides with the reference mark on the stem. This is the zero position.
It is important to know! When setting zero, look at the scale at a right angle, preferably from the drum side. The divisions must match exactly. If you look from above or below, you can visually make a mistake with the risks and get an incorrect zero position. The correct principle is shown in Fig. 2.
Rice. 2. Viewing angle when setting to zero
When the divisions are aligned correctly, you need to fix them. Here it is important to know how to use a micrometer: hold it by the cylinder and carefully tighten the nut. Do not hold onto the bracket under any circumstances, otherwise the setting may be lost.
It is important to know! Some models come with a standard insert, for example, 25 or 75 mm. These are micrometers, the measurement range of which does not start from zero, but from the value corresponding to this insert. In this case, the zero mark is checked against this reference part. An example is shown in Fig. 3.
Rice. 3. Tool with reference insert
Purpose and types of tools
Linear dimensions, internal and external, are measured with a micrometer - a device in the form of a bracket. The procedure is carried out using a contact method, focusing on a micrometer screw. As a result of measurements, maximum accuracy is obtained up to a micrometer, or micron - this is the designation for a unit of length equal to one millionth of a meter.
The readings in different models can be taken using the stem and drum scales, the stem and drum scales with a vernier (the letter N is added to the marking), the stem and drum scales and an electronic digital device (the letter C is included in the marking).
Operating principle of micrometers
For example, let’s take ordinary mechanical smooth micrometers, which are most widely used. This tool allows you to measure in absolute and relative ways. With absolute measurement, the part to be measured is placed between a support post and a movable screw. The resulting size can be determined directly from the scale. With relative measurement, the size of nearby objects is determined and then the desired parameter is calculated.
The measurement itself is carried out in the following sequence:
- Check the accuracy of the device. It is necessary to tighten the screw and check whether the zero mark on the drum scale coincides with the horizontal line on the stem.
- If the measurement limit is more than 25 mm, then reference measures must be used for verification.
- If the marks do not match, it is necessary to adjust the stem with a special key (included in the kit).
- Before starting the measurement, the screw is unscrewed to a size slightly larger than the size of the part.
- The part to be measured is placed between the screw and a fixed stop.
- The screw must be tightened using a ratchet until a characteristic sound is heard - the ratchet begins to rotate, and the screw stops turning after 3 clicks.
- We determine the reading on three scales. The first two are located on the stem and one on the drum. The number of full millimeters is determined by the strokes at the top of the scale. To them we add, if possible, half of the second scale, i.e. another 0.5 mm.
- Finally, we add the value from the drum scale in accordance with the scale division value, for example 0.01 mm.
- The final result is determined by summing all three readings.
- To obtain the most accurate result, it is recommended to take several measurements and calculate the average value.
How to take measurements correctly
To learn how to use a micrometer, take a small metal piece. This could be a nail or a drill. It is better to know in advance the diameter or its value to which it must correspond (it is not a fact that the declared size corresponds to reality). The measurement algorithm can be described in 3 simple steps.
Step 1. Place the part between the measuring surfaces. To do this, by rotating the drum, we move the screw - open the micrometer for measurement.
Step 2. Clamp the part by rotating the ratchet nut. As soon as you hear clicks, you need to stop rotating.
Step 3. Look at the values. The size is calculated as follows: the values on the horizontal scale are added to the values on the vertical scale. We'll tell you more about this later.
It is important to know! Do not clamp the part by rotating the drum, otherwise there is a risk of squeezing it and getting incorrect measurements. This will not happen when fixing with a ratchet, since it regulates the force and gives a signal with clicks.
Let's look at the example in Fig. 4. First, we count the integer values on the horizontal scale - 4 divisions are obtained from zero. Then we look at the hundredths - the mark after four divisions of 0.5 mm clearly coincides with the beginning of the drum. This means that on a horizontal scale it turns out to be 4.5 mm. The remainder of the hundredths is calculated on a vertical scale. In our example, 2 divisions coincided with the reference mark (which is equal to 0.02 mm). This means that the thickness of the part will be 4.52 mm. If the half-millimeter mark on the horizontal scale is not visible, you should immediately look at the values of the vertical scale.
Rice. 4. Example of calculation with a micrometer
Now you know how to use a micrometer. There is one more useful thing you should know about. Using a clamp. When is it needed? For example, to restore a bearing, you need to find 5 of the same size among many metal balls. We take the first one and measure its diameter according to the algorithm described above. We fix the screw in the desired position, remove the ball and then substitute different balls to match the sizes. The process speeds up significantly, since you do not have to unscrew the screw every time you measure a new specimen.
Rules for caring for the device
It is important to remember that the accuracy of the measurements depends on how you handle and care for the device correctly. It is necessary to keep the measuring surfaces clean - clean them after each use, avoid mechanical influences and shocks. After all, if the ends are dirty or damaged, the contact with the surface of the part being measured will be incomplete - hence the error and incorrect measurements. It is recommended to store the micrometer in a box separate from any instruments. So prepare a neat box for it in advance or buy the device already included with it. For more careful storage, you can line it with thin foam rubber, especially if you are planning field work.
Don't have a micrometer yet? Then it's time to buy it! You can do this in our online store. We offer products from leading tool manufacturers: FIT, SCHUT, TOPEX, Zubr, Mastak, etc. Choose your option. And may your measurements be accurate!
Source