Features of manufacturing a cellar elevator
The elevator is a fairly heavy structure; its fixation area is a load-bearing wall.
When planning the manufacture of a home elevator, you need to understand that this is a heavy structure that needs strong, reliable support and foundation.
When making a cellar lift with your own hands, you must follow these rules:
- Follow the manufacturers' instructions for the components that will be used during assembly.
- Build a powerful foundation designed to support the weight of the frame, equipment, people and cargo, plus a reserve of at least 30%.
- The guides can only be attached to concrete or brick walls with a thickness of two stones or more.
- Have sufficient space to accommodate the cabin and platform. These are quite voluminous structures that require a lot of space.
The possibility of a power outage or sudden failure of one of the mechanisms should be considered. For such cases, a portable or stationary ladder and a battery-powered light source should be prepared. Another effective solution is a hand winch. The ascent and descent will be slower, but the elevator will remain operational.
Requirements for a home lift
The main criterion for an elevator is lifting capacity.
To make a cellar lift with your own hands, you need to carefully study the structure of this structure and the requirements that apply to it.
Standard elevators consist of the following parts and mechanisms:
- Lifting device. Operates by manual force or electricity.
- Platform. A base used to accommodate a movable fragment.
- Cabin. Designed to accommodate a person and cargo. Can be open or closed.
- Rails. They are mounted on the wall and serve as guides for the movement of the cabin.
- Controls. These include starters, relays, fuses and other parts that regulate the operation of the structure.
A homemade elevator to the cellar must meet the following criteria:
- safety;
- sufficient load capacity;
- ease of use;
- efficiency;
- availability of an insurance system;
- aesthetics;
- durability;
- Possibility of DIY installation.
When choosing a control method, it is recommended to use a remote control with lifting, lowering and emergency stop buttons.
Types of elevators to the basement
Electric motor lift
The basement lift can be equipped with various types of drives, differing in the operating principle of the applied force.
Electrical structures are equipped with a motor, gearbox and winch. The movement of the cabin is carried out by winding and unwinding the cable from the drum. To ensure smooth movement and reduce the load on the motor, the platform is equipped with a counterweight, the mass of which matches the moving part or slightly exceeds it. The system is reliable, but subject to rapid wear due to the presence of many parts that rub under load. The device produces a loud noise that can be heard in all corners of the building.
Hydraulic elevators operate quietly; the load is lifted by a piston into which a special liquid is pumped through a high-pressure hose. The power plant can be located below, above, even to the side of the shaft. In case of power outages, provision is made for the installation of hand pumps. The downside of this solution is the likelihood of hose ruptures and oil contamination of the entire basement.
Preparation for installation
To make an elevator with your own hands, you will need a welding machine.
The success of all subsequent actions largely depends on the correct implementation of the preparatory stage of work. First you need to choose the type of elevator, decide on its installation location, and draw up a detailed diagram. Then you need to make calculations and purchase the necessary property.
To build an elevator to the basement with your own hands you will need the following tools:
- welding machine;
- Bulgarian;
- perforator;
- screwdriver;
- spanners;
- electric drill;
- roulette;
- square;
- soldering iron;
- screwdrivers;
- level;
- paint brush.
Worm gearbox
- channel;
- rails;
- steel corner;
- drum;
- cable;
- worm gear;
- rollers;
- telpher;
- Electrical engine;
- winch;
- power cable;
- actuator;
- profile pipes;
- anchor bolts;
- mounting boxes;
- acrylic paint;
- anti-corrosion agents.
You need to think through safety issues in advance. Effective ventilation and lighting should be provided, and a respirator, helmet, safety glasses and gloves should be prepared.
Place for arranging an elevator
The corner is the best place to install the lift
The finished lift should provide comfortable conditions for operation. The design should help and not hinder economic activity.
First of all, it is necessary to provide for the issues of ensuring and maintaining the strength of the load-bearing structures of the building. The total weight of the elevator along with its cargo can reach a ton, and this is a large load on the floor and walls of the cellar. The best option is considered to be a monolithic box made of reinforced concrete, where all components have a sufficient margin of safety, and the additional weight is evenly distributed over the slab. The minimum thickness of the slab is 10 cm. If this figure is less, then the base will need to be reinforced.
There are these options:
- Make an external tunnel under the foundation. Place several large stones in it and fill them with cement mortar.
- Drill four holes in the slab and make an extension on top. Fill the wells with reinforcement and fill them with concrete.
- Place an additional screed 5-10 cm thick on top of the existing base.
- Fix and putty the rebar grid on the walls. Another way is to screw two reinforced concrete columns with anchor bolts.
The best place to install an elevator is the corner of the cellar. There the floor is stronger and there are two walls for attaching the guides.
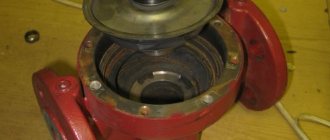
The principle of operation of pulley hoists
The only simpler device for moving heavy objects is a metal scrap. The main element is a wheel with a chamfer in the middle of the outer surface, the axis of which is fixed to the ceiling beam. You can throw a hoist over it, and the lift with a gear ratio of 1 to 1 is ready. To increase the leverage, let's pass the hoist through another loose wheel, the axis of which is connected to the load, and fix the hoist at the top of the structure.
The transfer coefficient will become equal to 2 . Now let's attach another wheel to the ceiling, and pass the end of the hoist through it, securing it to the axis of the lower wheel. The gear ratio will become equal to 3. And so on, by adding one wheel at a time and changing the mounting location of the hoist, you can increase the gear ratio.
The location of the wheels relative to each other may be different.
The most compact designs are those with single-axle wheels. The design of such devices has two wheel holders. Having studied the drawings of the chain hoist, it will not be difficult to assemble it with your own hands. You will need two clips:
- traverse;
- carrying bracket;
- cheek for mounting parts;
- wheel (block);
- emphasis;
- bearing;
- sleeve;
- axis;
- axle holder;
- bearing oiler;
- hoist limiter;
- screw;
- bearing;
- cheek.
The end of the hoist is fixed to one of the clips.
Pulley hoists also have disadvantages. To increase the gear ratio by 1, you need to add one wheel each time, as a result the weight of the mechanism increases. In addition, bending the cable on each wheel requires force, reducing the efficiency of the device. You can reduce these losses by increasing the diameter of the wheels, but at the same time there will be an increase in the weight and dimensions of the pulley. Other types of lifts do not have these disadvantages.
Installing an elevator in a private house yourself
To install the lift, you may need the help of a partner, since you will have to deal with quite heavy objects, and support for attaching them will also be required.
Construction should be carried out in the following sequence:
- In accordance with the project, apply markings to the floor, ceiling and walls. Double-check their accuracy, compare horizontals and verticals.
- Make a frame for the movement of the cargo compartment. A closed loop is made, which is rigidly attached to the supporting structures of the building. Rails are attached to the frame as guides for the rollers.
- Assemble the cabin. A channel is used for the frame and a reinforcement grid for the floor. The structure is equipped with railings and a swing door. If necessary, the walls are covered with steel mesh.
- Install the support beam onto the frame. Then attach the power mechanisms of the engine, gearbox, winch and clutch to it.
- Connect the lifting device and the cabin. Attach the cable and band brake.
- Check the quality and reliability of connections, eliminate curvature and play.
- Clean the metal from scale and rust. Treat it with anti-corrosion agent and paint.
- Supply electricity. Make channels for the cable, secure mounting boxes, remote controls and switches.
- Test the device in different operating modes, with maximum load. Check the operation of the protection when the light goes out and the operation of the emergency braking device.
Upon completion of installation, you need to go upstairs and lower the cabin to the bottom position to remove the load from the supporting structures.
Source
Instructions
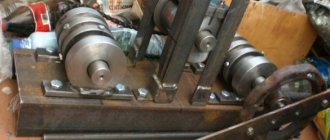
The base of my lift was a frame welded from channel No. 6 (the configuration is visible from the drawing and photo). A bracket with a pulley, a limit switch and an eye bolt for attaching the end of the cable are attached to the frame at the top. Below, a lower limit switch is attached to the same frame.
The frame is attached with two studs to the concrete floor of the basement. A carriage moves inside the frame, also welded from channel No. 6. There are rollers installed on the carriage on the right and left, which move inside the frame channel as if along guides.
A block of two pulleys is attached to the bottom bar of the carriage. The upper pulley on the frame and two pulleys on the carriage form a chain hoist, which allows you to select the required lifting speed of the platform and ensure sufficient load capacity with a small cable diameter.
At the bottom the frame is lowered into a pit.
The pit is needed so that the carriage has somewhere to go down and so that the loading area reaches the floor. The platform is attached to the carriage (in the figure it is conditionally moved away from the carriage).
Features of manufacturing a cellar elevator
Advice: If you want to design an elevator yourself, it is very important to first thoroughly understand the principle of operation of the mechanism for lifting loads and acquire basic skills in performing work with tools.
This is quite enough for installing a simple forklift, but it is unlikely to be distinguished by its convenience, attractiveness and safety.
To make the device more reliable, and therefore more complex, you need to:
- Select the type of elevator lift. He can be:
- electric _ In this case, the winch is driven by an electric motor. To move the elevator, it is equipped with a counterweight;
- hydraulic , used in a cargo lift;
- pneumatic , practically not taken for home use.
- Prepare the installation site for the equipment; you may need to strengthen the wall.
- Correctly calculate the load capacity.
- Purchase the necessary components, which should be:
- welding machine:
- cable of a certain thickness;
- pipes;
- channels;
- lifting mechanism and other elements.
- All work must be done correctly.
Do-it-yourself basement lift includes an electric drive in its design. The price of such a mechanism is usually affordable for everyone.
Taking into account the installation location of the elevator, the electric motor can be installed on top, while it is attached to a supporting metal beam, installed from below in a basement or pit, and the cable is passed onto a roller fixed at the top, as shown in the photo.
Choosing the most suitable design
First you need to decide what type of structure will be created. To do this, it is enough to pay attention to factory-made lifts - they become the main basis when creating a home-made structure.
The most widespread are:
- Lifting mechanisms with two posts. They are found in almost every car workshop. To create force, such a mechanism can have an electromechanical or electrohydraulic drive. A homemade version, as a rule, has an electromechanical drive, since it is easier to manufacture.
- There are versions with several racks. They only differ in that they better distribute the load.
- The scissor type of design is represented by a platform with a lever system. Such a lift can also have an electromechanical and hydraulic drive, through which force will be transmitted.
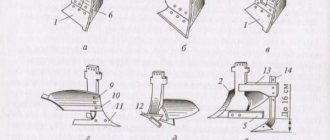
According to the method of lifting the car, the following types of construction are distinguished:
- Fork.
- Scissor.
- Platform.
The force can be transmitted from a screw, chain or hydraulic drive.
A homemade car lift with your own hands should be created taking into account the fact that the structure must be safe and securely fix the vehicle. Do not forget that when performing almost any work, the master is under a vehicle that weighs more than a ton.
For passenger cars
Often single-column models are chosen for working with passenger cars. The advantages of such car lifts include:
- ease of operation;
- compactness, thanks to which the equipment does not take up much space in the garage;
- a modern lubrication system that does not require constant maintenance;
- reliable protection aimed at preventing the car from tipping over during repairs.
Scissor-type equipment is also used to repair passenger cars. With its help, a car mechanic can quickly raise or lower the vehicle to the desired height.
For truck
The main feature of any truck is its size and weight. Due to the non-standard dimensions and large weight, not all lifts can lift such cars.
To repair such vehicles, they use cargo devices with a high carrying capacity. They can be movable, stationary and platform. They are used only in service stations that specialize in repairing tractors or trucks.
How to choose a drive
Drives for lifts are divided into electrical and hydromechanical. Electric models have a small carrying capacity and break down quite often.
Considering the costs of repairing the device, such drives are chosen less often; their cost is not recouped. Hydraulic drives include a cylinder, pump and motor.
This equipment has a large load capacity; such designs are much more reliable than electrical devices.
When choosing a drive, it is important to consider the following nuances:
- what cross-section the metal fasteners and beams will have;
- calculate cylindrical axes;
- depending on the required performance, select the cylinder according to the rod length;
- what power will the hydraulic pump have; organize a device control panel.
By dividing the equipment manufacturing process into several stages, it will be possible to minimize shortcomings and make the mechanism reliable and durable.
Where to get materials
All materials and tools are purchased either in the store, or you choose used technical equipment and consumables.
They are found, for example, at enterprises that own old equipment, or at metal collection points.
Prepare immediately:
- welding machine;
- angle grinder;
- drill;
- file.
The metal used is channels or sheet steel, the thickness of which is 1 centimeter. In addition, thick-walled metal pipes and rollers for the lifting mechanism are purchased.
Work order
After all calculations have been completed, assembly of the lifting device begins. Prepare one or two hydraulic cylinders, bushings of a suitable diameter, a pump and a distributor.
The lift platform, as well as its base, are made of U-shaped channels. Scissors are made from metal squares, I-beams or plates with a thickness of at least 10 mm.
For the lifting device, a station with an electric motor with a power of 2-5 kW is prepared.
Hydraulic cylinders are connected to this station, which will move the arms of the scissor structure; these cylinders will raise the platform.
A safety system must be provided to prevent the equipment from collapsing spontaneously.
So, having the knowledge and skills, you can assemble a scissor lift yourself.
If you have no experience in the field of electrical work, it is better to purchase a used lift.
What are the requirements for a home lift?
Advice: When making a cellar lift yourself, you must comply with the main requirement - safety.
In addition to safety, you need to take care of:
- Energy saving.
- Comfort.
- Aesthetics.
- Reliable grounding of electrical equipment.
- A safety system, which is necessary in case of damage to the main cable.
- It is better to take a control unit in a homemade design with buttons without locking: the elevator will move when the buttons are pressed, and when released, it will stand still.
- There must be an emergency button to turn off the power supply.
There are no special requirements for the finishing of the elevator. It all depends on the tastes of its owner.
How to choose a location for a lift
Before installing the descent into the cellar, you must select a place in the basement where the elevator will be installed.
The following should be taken into account:
- The elevator is a fairly heavy structure, and its fixation area is the wall. The one that is most strengthened should be used. A load-bearing structure is best.
- It is strictly forbidden to install an elevator in the basement on walls built in one layer of brick or foam concrete. This is explained by the fact that the increased load will destroy these materials, which will subsequently lead to the impossibility of operating the elevator.
Tip: If the basement walls are old enough, they should be strengthened with reinforcement mesh. You can build a new brick wall, which also helps strengthen it, but there is a risk of losing space, which is undesirable.
- When installing an elevator in a basement, the installation instructions must be followed, which clearly indicate the sequence of assembly of the device.
- The simplest forklift has several important and interconnected components. These include:
- lifting mechanism;
- platform or base;
- cabin;
- rails are fixed on the wall and serve as guides.
Homemade lift and mini-crane: inexpensive and effective
Building a house alone is possible, but difficult. Especially if you have to lay stone walls, lift bricks to the second floor, or “throw” sand and bags of cement onto the ceiling. So as not to overstrain yourself. To save on ordering a crane and, in general, to simplify your task, many FORUMHOUSE users make mini-cranes and hoists. In this article we will talk about two successful designs.
- Automatic lifting and unloading mechanism for bulk materials
- Homemade crane based on an electric hoist for lifting aerated concrete
How to make a crane for lifting slag, sawdust and sand
I'm building a house. I try to do without helpers. I want to fill the attic floor with insulation - 20 cubic meters of sawdust and 10 cubic meters of slag. The age is no longer the age to run back and forth with buckets. I decided to make a collapsible automatic lift for bulk materials. And this is what I got.
To make a homemade lift you need:
- Electric hoist, power 0.9 kW with a maximum load capacity of 500 kg.
- A trough or body from a garden wheelbarrow, with a load capacity of 250 kg.
- 12th steel I-beam.
- 8 pcs. bearings for rollers.
- Electrical cable.
First make the carriage. How it is arranged can be seen in the photo.
Secure the beam, at the end of which a restrictor plate and a bracket for the carriage movement roller are welded.
The internal stop (support for the carriage in the attic) is detachable. The hoist assembly with the carriage is driven onto an I-beam, after which the limiter is screwed on.
Important!
The beam is installed with a slope of 3 cm per 1 linear meter. Due to this, the carriage with the load moves into the attic itself
.
The carriage is pulled back to the end of the beam with a rope thrown over a roller. The same rope holds the carriage so that the load, after lifting, does not move uncontrollably to the unloading site.
The telpher is placed in a horizontal position. The user adjusted the level using a set of engraving washers.
String holders are welded to the beam, on which the electric cable is fixed.
Important!
The cable is movable.
The lift works like this:
- Load the trough with bulk.
- Lift the load up.
- You drive the trough to the unloading site.
- To unload, lower the trough onto the ceiling. The lift locks are automatically released.
- Unload.
- Pull the carriage with a rope onto the end of the I-beam.
- Lower the trough down.
- Secure the locks.
- Load the trough.
- Repeat the operation.
I used a hoist to load 12 cubic meters of slag into the attic. The device worked great. Not a single breakdown. I disassembled it and put it away for the next construction.
How to assemble and install a basement elevator
One of the design options may be shown in the drawing.
Mini elevator drawing
In order for the elevator assembly to be completed correctly and without unnecessary costs, you should purchase the necessary materials and high-quality tools.
The following is the order of work:
- Manufacturing of the platform.
- A metal elevator is welded onto the pulley.
- Rubberized wheels are attached to the platform.
- Guides for the elevator are made from metal corners.
- A beam is attached to the highest point of the mechanism.
- The pulley can be welded between two walls or mounted in concrete.
- The beam must be parallel to the floor, which is very important.
- A winch or hoist is attached to the beam.
- The cabin and platform are secured.
Alternatively, the elevator can be made as follows:
Cellar elevator
- The frame for moving the lifting cage is assembled from metal steel corners by welding.
- The lifting cage consists of duralumin corners with four shelves measuring 300x300 millimeters. The height of the cage is 1.7 meters. Two pulleys are attached to its lower part, with a cable passed through them.
- The cage is lifted by winding a steel cable onto a drum, which is driven by a single-phase electric motor with a power of 1000 W, with a shaft rotation speed of 1400 rpm.
- The cage lowers under its own weight, due to the reeling of the cable from the drum when the motor rotates in reverse.
- The cage frame is installed on a light foundation and attached to the basement wall.
- The drum is connected to the electric motor through a gearbox with a gear ratio of 1:88 and a finger clutch, which ensures smooth movement of the drum during starting and stopping the engine.
- The band brake provides braking for the lifting device.
- When the electric motor is turned on, voltage is supplied to the electromagnet, which is connected to the brake device by a lever.
- When the engine stops, the electromagnet is de-energized and the cage stops.
What other homemade elevators for basements exist can be seen in the video.
Victor Martovich
He worked as a foreman, head of the construction and installation site. Organization of work and supervision of the quality of construction and installation works of construction sites on the territory of the Balakovo NPP, maintaining and submitting as-built documentation (magazines, acts, documents), purchasing materials, equipment (performing the duties of a supply engineer, quality engineer). Management of construction teams (registration, training in labor protection and industrial safety). Victor completed training courses under the program “Major repairs of buildings and structures. Organization of work and construction control.”, 2015 Balakovo Institute of Professional Retraining and Advanced Training, Occupational Safety and Health Specialist, 2012 Pugachevsky Irrigation College, construction technician, 2000 prof. school, accountant, 1996
Source
How to make a homemade manual scissor lift for a car
The vast majority of homemade lifts can be classified as “scissor type”. This is the most convenient design both from the point of view of operation and from the point of view of maintenance. And, most importantly, it is easiest to make it at home. When assembled, these lifts are quite compact and do not take up much space.
The figure shows a kinematic diagram of a simple scissor lift. On a base welded from a durable profile (pipe, channel or angle), two U-shaped rectangular frames are installed, which can “swing” on the base. One frame is attached to the base with its lower edge through a hinge. Its upper end is also connected through a hinge to the upper end of the other frame.
The lower edge of the second frame moves along the base in special gutters. To do this, a nut is fixedly mounted on the frame, on the cross member. A threaded rod running along the longitudinal axis of the lift is screwed or unscrewed from a stationary nut during rotation. The far end of the rod is articulated with the lower edge of the movable frame.
During its horizontal movement, the rod moves horizontally the lower edge of the movable frame, which, with its lower edge on rollers, rolls along guides fixed on the sidewalls inside the base. At the same time, it rotates around the axis of the lower hinge. The top edge of this frame is raised or lowered.
Along with it, respectively, goes up or down the upper edge of the first frame and a platform installed at the junction of the two frames.
Another version of the scissor lift is shown in the figure. In this design, the base and loading platform are the bottom and top sides of the parallelogram, and the two swing frames are the sides. A jack is installed under the cross member welded to one frame. He changes its inclination, and the entire structure changes its height. The loading platform is raised or lowered.
Homemade scissor lift driven by a jack
Drawing
The principle of operation of the lift is explained by its kinematic diagram. The dimensions of the product as a whole and its parts are determined in specific conditions.
Kinematic diagram of a homemade lift
The illustration below shows a lift in which a drive from a handle or electric drill through separate gearboxes rotates two horizontal threaded rods. A nut moves along each of them, which is welded to the lower end of the movable frame. This design has a more uniform distribution of forces.
Homemade lift with screw drive
Drawings of a homemade lift with a jack
Drawings of any lift design show the principle of its operation. Drawings of all its parts, as well as assembly drawings, are also important for the master.
Since during the manufacture of devices they are guided by the size of their car, the actual availability of components and materials, as well as their skills, it is impossible to make a universal drawing.
We must adapt to realities and ensure that the relevant details fit together.
Drawing of a homemade car lift with a jack
Manufacturing instructions
The technology for performing basic plumbing and welding operations depends little on the design. Basically they are identical.
Sequencing:
- materials and tools are selected;
- parts are cut in accordance with the drawings;
- the upper platforms are welded;
- “scissors” are assembled on cotter pins;
- a jack is installed;
- The operation of the entire product is checked.
Work must begin by creating a drawing of the product. Then the necessary materials and tools are selected. Sometimes the drawing has to be adjusted depending on what materials and components were obtained.
The manufacture of these lifts should begin from the base. It must be welded in the form of a rectangle from profile pipes with a cross-section of approximately 60×80 mm or more. The width of the frame should be slightly larger than the width of the car for which the lift is being made. Then frames are welded from channels or profile pipes.
Their width is determined by the base, and their height is determined by the desired lifting height of the car. The threaded rod must be made from a quality steel bar with a diameter of at least 2 inches. The thread must be trapezoidal or persistent, since it will have to withstand great forces.
The corresponding thread is cut into the fixed nut.
This type of lift is not a “screw” lift. It has no vertical load along the screw axis.
This procedure can be applied to the manufacture of a device of any design option.
8 steps to assemble the lifting device
A homemade lift for a car service workshop is assembled quickly and easily. The workflow consists of 8 steps:
- bent steel corners must be secured to opposite flat walls of the room so that the hood of the car is under them;
- a steel plate must be installed on the corners and secured with M8 bolts;
- install the gearbox on the plate;
- secure the key to the drive shaft gearbox;
- drill a hole in the plate and pass the chain, close it in the shape of a ring;
- secure a smaller key to the output shaft of the gearbox;
- drill two holes in the plate, pass the second chain;
- Fix the first end of the drive chain on a small key, and equip the second with a hook.
Using professional drawings, a DIY scissor lift can be made very easily and quickly. A homemade garage lift has a lever transmission system in the form of scissors. Operating torques are carried out by a hydraulic drive powered by an electric motor.
A self-assembled garage lift must have a reserve load capacity and easily withstand the weight of the car for a long time.
During the manufacture of equipment, a locking mechanism should be installed, with the help of which a self-made car lift holds the load in the event of an emergency. Threaded shafts, load-bearing nuts, hoses and cylinders must be inspected and maintained periodically. Configuring the operating parameters of the device is carried out as follows:
- remove the fasteners securing the frame and engine of the car;
- bring the cable under the motor, throw the loops on the hook;
- moving the chain, tighten the cable, slowly raise the load to the desired height;
- move the engine to the repair table.