- cultural - used for long-cultivated lands, crumbles the soil well, wraps to a medium degree;
semi-screw moldboard bodies are used for cultivating virgin soil, plowing heavily turfed soil, it wraps the soil well, crumbles it moderately (models with an elongated feather wrap the layer completely);
Types of plowshare plow bodies
Tractor disc plow
When planning to make a plow with your own hands, the design of the plow body is chosen based on the type of soil and the goals set. Sometimes the choice depends on the type of plantings being grown. For example, root crops require enhanced loosening, which none of the above plow bodies provides. Then a special one is used - combined. It has a shortened blade and share, as well as a rotor. When plowing, the rotor additionally crushes the soil that comes from the ploughshare.
Blade
The plow blade is one of the working parts of the plow (a component of the body). His job is to cut off a layer of soil from the wall, crumble it and turn it over (turn it around). That is, how well the soil will be prepared largely depends on the quality of the dump. When making your own plow, this is worth remembering.
Shape and drawing of a blade made of 3 mm thick sheet steel
The blade is made from sheet carbon steel or special three-layer steel. It has a complex curved shape, on which the degree of soil grinding and its turnover depend. Structurally, a plow moldboard is distinguished between a chest and a wing (spout).
The blade breast cuts off a layer of soil from the wall of the furrow, crushes it, and begins to wrap the cut layer. The blade wing finishes its revolution. As you can see, the chest does most of the work, and therefore wears out, on average, twice as fast. Therefore, the blade is made of two parts. In this case, if there is severe wear, the blade breast can be replaced. Another nuance: at the factory, to reduce friction between the formation and the surface, it is polished.
There are four main moldboard shapes, each of which imparts specific plowing characteristics:
- Cultural dump. It crumbles the layer well and wraps it quite completely. It is used for plowing large areas of long-developed land.
- Cylindrical. It crushes the soil well, but does not wrap well. As a result, plant residues in this case are evenly mixed with the soil. A similar blade is used on light soils.
- Half-screw and screw. They wrap the layer completely (plant residues are laid upside down), but crumble very poorly. After plowing with a plow with such a moldboard, the field has pronounced “waves”. Before sowing, it must be further processed - leveled (harrows, cutters, etc.).
When choosing materials, keep in mind that both the blade and the plowshare must have almost the same thickness: the permissible “step” size is 1 mm. Also, the gap at the junction of the plowshare and the blade can be very small - no more than 0.5 mm.
ploughshare
To make a plow with your own hands, you need to decide on the shape of the ploughshare. A ploughshare is a part that cuts a layer of soil; along it, the cut layer of soil also rises and ends up on the dump. High-strength hardened steel is used for its manufacture.
Position the ploughshare as follows:
- to the bottom of the furrow at an angle of 22-30°;
- the choice of inclination angle relative to the furrow plane depends on the type of blade: for a cultural dump - 40°;
- cylindrical - 45°;
- screw and half-screw - 35°.
This arrangement provides the least resistance when moving, while the blade cuts roots well and breaks up lumps of earth that slide along its surface.
Ploughshares come in different shapes (pictured above). When making a plow with your own hands, they are chosen depending on the type of soil and the complexity of production:
- Trapezoidal. The easiest to make, the good thing is that when used, the bottom of the furrow is smooth. The disadvantage is rapid wear and difficulty in deepening. Therefore, trapezoidal shares are most often used on long-cultivated lands. To compensate for rapid wear, a certain supply of material is made on the reverse side - a magazine. The next time it is pulled back, part of the reserve goes away.
- Toothed and with retractable chisel. These types of plowshares are used on heavy soils (clay, loams) and where there are a lot of stones.
- Chisel-shaped. It is distinguished by the presence of a sharp, forward protrusion-nose. This protrusion protrudes towards the field by 5 mm and downwards by 10 mm. Such a bend ensures that a plow with such a plowshare penetrates deeper better and faster and goes smoother. To compensate for wear, they also make a “magazine” - a reserve of length. Plows with chisel-shaped shares are used on heavy soils.
Of all these types, chisel-shaped shares are the most common. They are more stable in operation, there are no problems with them when going deep: the plow easily lowers to the desired depth.
Dimensions of a blade made of a thick-walled pipe with a diameter of 50-60 mm (a gas cylinder is suitable)
As they wear, the plowshares pull back and sharpen the cutting edge. This is done regularly, since with a dull blade (width more than 3 mm), the resistance of the plow increases by 50%. Therefore, it is more profitable to inspect and maintain equipment on time.
Blueprints
When planning to make a plow with your own hands, you need to have some kind of role model. If you have an old plow, you can make new ones in its likeness. And if this is not the case, drawings will come in handy. Just take into account the parameters of your equipment on which you will hang it.
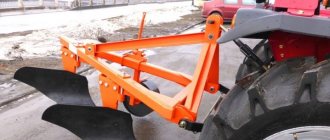
General purpose plow for tractor (single-body)
Detailing of some sizes.
Assembly drawing of a single-body plow
Plow drawing with dimensions
Making plows at home as a business
A reversible 2- or 5-furrow plow can be easily constructed with your own hands if you have all the parts of the device. At the same time, financial investments will be quite affordable. Having mastered the process of manufacturing products, you should begin to implement a business idea for selling plows made by yourself. This business is quite profitable. According to experts, the profitability of such a business is about 70%. Therefore, by choosing this direction, you can secure a profitable home business!
- Download drawings of the double-furrow plow PN-2-20
- Download reverse 5 case for T-150
Advantages
Making your own plow for a walk-behind tractor has certain advantages. The parameters of the plowshare and blade will meet all the requirements for processing a specific type of soil. These parameters include:
- blade angle;
- quality and depth of plowing;
- grip area;
- efficiency.
Taking into account the power of the walk-behind tractor, it is possible to make a plow that will not cause excessive loads on the engine and slipping, but at the same time will have maximum grip. It is necessary to use only high-quality materials, which will significantly increase the service life of the plow. It is also possible to provide for mounting various attachments, which will significantly expand the functionality, making a full range of land cultivation possible.
Types of plowing implements
To increase the efficiency of the work performed, it is extremely important to carefully consider the question: which agricultural implements are best to choose for motor vehicles. There are the following types of implements for plowing the soil:
There are the following types of implements for plowing the soil:
- double-body (2-sided);
- negotiable;
- disk;
- rotary (active);
- turning.
There are also several options for fixing them:
Let's look at some soil cultivation devices in more detail.
Rotary (active)
A rotary plowing tool for motor vehicles is compared to an iron comb, which makes it possible to plow the soil. These types of agricultural implements of various modifications can have a variety of configurations. But these modifications are connected by the fact that their design becomes wider at the top, which makes it possible for these devices to pour soil to the side of the furrow.
An active plow actually has the same field of application as an ordinary implement for plowing the soil, with the only difference being that it functions faster and is more productive. However, there are certain features of its use. Thus, with a rotary device it is much easier to cultivate uncultivated lands that are abundantly overgrown with wild plants. The soil thrown away by the plowshares of this agricultural implement is better crushed and mixed, which becomes a plus when cultivating certain types of soil.
Read also: Motoblocks Khoper 1100
When selecting a tool for plowing the soil, you need to take into account the availability of the option of adjusting the cutting depth and degree of inclination for greater work efficiency.
Reversible (rotary)
A tool for plowing soil of the reversible type is collapsible; this is probably the best option, since sharpening or rotation of the knife is possible.
You should decide what size the plow will be - which directly depends on what modification of motor vehicle you are using.
For more effective use of the implement for plowing the soil, it is necessary to adjust the tool; for this it is advisable to use a coupling device (it is possible without it).
To make adjustments more accurately, it is worth taking into account a number of basic provisions:
- it is necessary that the longitudinal axes of the unit and the regulator are aligned;
- vertical position of the beam.
Such an installation will make it possible to carry out agricultural work more productively. But it is also necessary to use extensions on the axle shafts and iron wheels with weights for all kinds of tasks.
With a drawing and certain skills, you can create a rotary plow yourself from steel with high structural strength. Therefore, it costs nothing for such a homemade device to withstand heavy loads while working on a plot of land.
When using this equipment for motorcycles, you must adhere to several recommendations:
- the device should not have a thin stand, a shortened blade, or a small thickness of the body sheet;
- An instruction manual must be present.
Double-body (2-sided)
Double-sided agricultural implements (hiller, also known as tiller, double-winged plow, tiller) are used to loosen the soil around plants, rolling it to the base of the stems of various crops. Additionally, weeds are eliminated between the rows. With such tools, you can cultivate the ground, cut furrows for planting plants, and then fill them up by turning on the reverse gear of the unit. Such designs are distinguished only by the width of the working grip - variable and constant. The difference between them is solely in the moving wings, which adjust the width of the working grip.
A device that, with a constant working width, operates with light motor vehicles (up to 30 kilograms), with a motor power of up to 3.5 horsepower. Their distinctive feature is 12 mm racks (protect the unit from overloads).
Plow design
There are several types of plows installed on the Neva walk-behind tractor, and each of them has its own design features. Currently, single-body, rotary and reversible structures are used for cultivating land on personal plots.
The single-body type of plow is the most popular design and you can find a large number of drawings of this particular type on the Internet. In addition, it is considered the most optimal option for those who do not have the appropriate skills.
The rotor plow design is considered the most difficult to manufacture. It is more reminiscent of a cultivator, since there is not one, but several shares attached to one axis. In the process of cultivating the soil, the axis rotates, due to which the soil layer turns over. The advantage of the design is that the soil can be cultivated at a depth of up to 30 cm using little effort. In addition, the rotary plow allows you to plow the area along different trajectories.
Video of this plow in action
How to adjust a plow on a walk-behind tractor?
Adjustment is an extremely important point on which the performance of not only a homemade or factory plow, but also a walk-behind tractor depends.
To correctly set up a plow on a walk-behind tractor, you need to pay attention to three key parameters:
Work progress:
- set the width along the edges, for which the edge should not move above or below the soil hook;
- Place the walk-behind tractor stably on stands to set the depth required for plowing. It must be remembered that it varies by season (in winter up to 0.25 m, and in spring about 0.2 m);
- adjust the attachment of the plow to the walk-behind tractor;
- make bolt fastenings so that the rear of the plow is in the same plane with the soil;
- remove the walk-behind tractor from the stand.
The setting is considered complete if the steering wheel is located at the level of the operator’s waist.
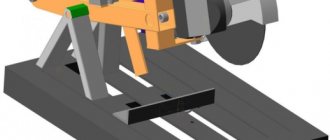
Plow drawing
Nowadays, making a plow for a walk-behind tractor with your own hands is not a problem, especially since you can now find drawings of a wide variety of designs. Very often they come with detailed instructions for creating and assembling the plow.
- pipe handle – 2 pcs.;
- frame;
- fixing the stand with an M10 screw;
- plow;
- mounting fork of the hinge to the frame;
- drawbar;
- wheel;
- nylon bushing for bearing;
- jumper between handles;
- hinged axle made of M10 bolt;
- lock-nut;
- axis;
- spacer washer;
- handle for drawbar;
- tee.
The main thing to follow when creating such a design is to strictly adhere to all instructions and observe all the parameters of the selected drawings. Even a slight inaccuracy, which may at first glance seem insignificant, can greatly affect the characteristics of the plow or subsequently negatively affect the operating parameters during operation.
How to remake a finished plow?
An already finished plow can always be remade as needed. For example, a simple horse version can be easily changed to a walk-behind tractor. Almost all horse plows are distinguished by their impressive weight due to the presence of a heavy blade. If such an element is installed on a walk-behind tractor without prior modification, the earth simply will not be discarded. To convert a horse plow into a walk-behind plow, work is carried out in a certain sequence.
- They are building a dump. A detailed drawing is prepared in advance for it. Based on the diagram, a blade is cut out of a steel blank. It is advisable to prepare a cardboard template for this.
- The steel is given the required shape.
- They remove the horse moldboard and fix a hand-made part in its place.
- Remove the handles that were on a vertically oriented axis.
- Instead, they are fixed with metal fasteners. Through them the plow is attached to the motorized equipment.
If during the “tests” in the field it suddenly turns out that the device does not tilt the ground very well, then you can carefully bend the ploughshare so that it can cut into the soil more strongly.
Turning
The rotating type of plow is rightfully recognized as one of the most functional and practical. This design is an excellent assistant for plowing land on a site, because it can cover a fairly large area. The plow is also good because you don’t have to waste time with it after each approach. You will only need to turn the plow and move in the opposite direction. The productivity of equipment will increase significantly. The main actions are performed in the same way as in the case of a rotary mechanism, but in this case the cutting elements must be below the skid (at least 2 cm).
Rotary
The manufacturing of the structure can be divided into several main stages.
Prepare a good dump in the shape of a cylinder. This must be done exclusively in accordance with the drawing. The part is made of alloy metal
It is important to follow the drawing when making the structure yourself. They put out the ploughshare. The wedges are inserted into the iron sheet (3 mm) at an angle of 45 degrees. Connect the ploughshare to the shield on the side
Be sure to ensure that the blade of the ploughshare is located just below the shield itself (1 cm, no more). Attach the blade to the ploughshare. The working half with the ploughshare is welded to the metal tube, which serves as the base, using a welding machine. On the opposite side - fasteners for motorcycles. When the plow is ready, you can weld an axle with wheels in its lower half.
Disk
It is possible to assemble a disc plow for machinery with your own hands. A similar model is assembled from the following parts:
- disks;
- fist;
- axles;
- bracket;
- scraper;
- drive beam;
- pens;
- screeds.
The disks for the device can be taken from an old “seeder”, if you have one in your arsenal. These elements are installed at an angle to increase work productivity. The hiller is hung on the equipment through the coupling bracket. The T-shaped leash from the plow is screwed to it using bolts and a stopper. At impressive speeds, the hiller may begin to slip, so you will have to work exclusively at low speeds or with twin wheels.
Description of assembly work
First of all, you need to make a frame, for which you can take a metal pipe with a cross-section of 52x40 mm and a wall thickness of about 7 mm. For the fork, it is necessary to cut off the wide walls of the frame located opposite each other. Next, mark the middle on the frame where the transverse beam will be installed, and also the spring racks to which the drawbar is attached will be welded.
There is a hole left in the front part of the frame, at the beginning of the fork, which is welded tightly to prevent dirt from entering.
Plow shank attachment
To secure the plow stand, 31x16 mm holes are drilled or cut out on both sides in the wide part of the pipe that was used to create the frame.
In the narrow walls of the frame there are also 10.2 mm through holes for fastening the handle using M10 bolts. The handles for the plow must be made separately from a pipe approximately half an inch in diameter. You can use an old water pipe, which you need to flatten with a sledgehammer on both sides. Drill holes with a diameter of 10.2 mm in the resulting planes and bolt them to the frame. To give greater rigidity, weld a cross member between the handles.
Dimensions
The dimensions of different types of plows may vary. You can consider the parameters of parts using the example of a rotary specimen. It is taken into account that the rotary type of such a device is assembled from the following bases:
- side vertical part of the runner;
- horizontal plane below the skid;
- front dump part.
The most productive is considered to be a plow in which the cutting edge at the bottom of the fixed share is 20 mm below the bottom of the horizontal skid. Another correctly aligned part of the plow is the matching of the cutting edge on the side of the fixed share with the cutting edge on the side of the moldboard. The share and blade should not protrude more than 10 mm beyond the boundaries of the vertical plane on the side of the skid.
There is one more important nuance - fastening the front plane of the blade share without visible cracks and gaps, and in the same plane. If we look at these parts in more detail, they should be well polished and, like a mirror, reflect any surface. There should be no protruding fasteners under any circumstances. As soon as the plow returns from earthworks, it is advisable to clean it of settled soil and foreign particles. Elements that have been polished should be poured with oil or coated with grease. Next, the mechanisms need to be rubbed using a rag. In this way, it will be possible to protect the structure from aggressive external influences, which can lead to the formation of corrosion on the surface of the plow.
As for the 4th correctly constructed structure, it includes the flat front surface of the ploughshare, which makes an angle of 20 degrees with the flat part of the plow structure. It will be equal to the angle located at the rear of the exposed share. The cutting sidewalls-edges of the plowshare and blade will also have 20-degree angles with their bases on the side of the furrow. Moreover, the edge located on the side of the blade may be slightly rounded.
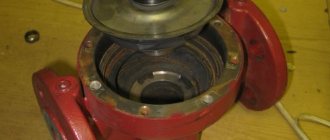
Plow hitch
Motoblock hitch disassembled
The hitch is an important design element that ensures reliable fastening of attachments to the Neva walk-behind tractor. The most popular option is a U-shaped mount made from a channel, which is installed under the steering wheel of a walk-behind tractor.
When creating the hitch, you will need to drill holes for attaching the bracket and mounting pin. The bracket for attaching to the walk-behind tractor is either at the top or bottom, so as not to interfere with hanging.
Manufacturing and fastening of working elements of the plow
The main elements of the single-hull design are the blade and the ploughshare, the creation of which requires durable sheet steel 3-5 mm thick. First of all, a ploughshare is made, for which it is worth using an old disk from a circular saw, since it is made from high-strength steel. To sharpen the cutting edge of the ploughshare, it should be beaten on an anvil.
Next, you need to make a blade from a metal pipe with a diameter of 50-60 cm and a wall thickness of about 5 mm. A template is created from cardboard or thick paper, which is applied to the metal and traced along the entire contour with chalk. Afterwards, along the resulting lines, a workpiece is cut out using gas welding, which is brought to the required dimensions using a grinder or a hammer and emery.
What shape should a plow on a mini tractor have?
This device is made of metal and is a wedge-shaped object with a certain angle, designed to correctly enter the soil.
It is important that all parameters are consistent with the main task of the plow for a mini tractor. Any discrepancy with the technology will lead to difficulties with the robot.
But if everything is done correctly, a homemade plow will not be inferior to a similar factory version.
A drawing of a plow for a mini tractor will help you make a preliminary layout. First you need to make a template. This is a pattern for your product for a mini tractor made of cardboard. The elements are combined into a structure, and if the shape of the tool is correct, then everything is done according to the scheme, but only from metal. This helps to eliminate errors in a homemade tool at the very beginning.
Assembly of the structure
When all the metal parts of the plow for the Neva walk-behind tractor have been created, for final assembly you will need a sheet of metal measuring 50x50 cm and an electric welding machine. To the metal sheet, strictly observing the angles, you need to lightly weld the elements of the future plow - the side shield and the ploughshare, to which to fit the blade. If any inconsistencies are found, the blade should be brought to the required condition with a hammer and welded to the back of the ploughshare.
Inspect the entire structure and, if no problems are noticed, then major welding can be performed. The sheet of metal on which the plow was assembled is disconnected from the structure using a grinder or a hammer and chisel. Next, you need to thoroughly clean the welds and sand the plowshare and blade with sandpaper. After the structure is assembled and almost ready for use, it should be painted, especially the welded joints. This will not only give the plow an aesthetic appearance, but will also protect the metal from corrosion, and, consequently, significantly extend its service life.
Although independently making a high-quality plow for the Neva walk-behind tractor is not an easy task, it is quite doable and can be done by anyone with minimal experience working with plumbing tools. For everything to be successful, you should follow the instructions and drawings, and also carry out proper configuration of the entire structure. Making a plow with your own hands is not only quite interesting, but also economical, since most of the material can be found on the farm by any craftsman.
Assembly
If everything was done correctly in the previous steps, assembly should not cause significant difficulties. To do this, you will need a sheet of steel with an area of at least 25 cm². All parts are welded to it, including the side shield.
Such work requires special care, since parts of the future agricultural implements must fit well and the angles must match. The side shield, which ensures stability and reliability of the assembly, is connected to other elements by spot welding. If a discrepancy in the geometric configuration is noticed, the shape of the blade can be easily corrected with a hammer.
See » The most popular Viking walk-behind tractors and possible attachments
Share attachment
This structural element is attached with its rear surface to the blade and the side plane of the frame. The latter, using a welding machine, is attached to the spacer element and the plate base, to which the thrust steel angles for the ploughshare are attached.
All parts of the structure should protrude a few millimeters beyond the side shield. The steel sheet used for precision assembly of the structure is separated from it with a chisel or a hand-held circular saw with a cutting disc installed. Weld seams should be sanded, and the plowshare and blade should be sanded with fine sandpaper.
How to make a plow for a walk-behind tractor with your own hands
For those who own a small plot of land (20-40 acres) and are actively engaged in farming, for example, growing potatoes or other crops, a walk-behind tractor is a serious assistant in their work. Equipped with a set of attachments, it can be used for plowing and loosening the soil, planting and harvesting potatoes, carrots, etc. Using a walk-behind tractor, you can mow grass, remove snow, and transport small loads. Attachments can be purchased at the store, but a home craftsman with available tools in his arsenal will be able to make some equipment himself, including a plow. If you decide to make a plow for a walk-behind tractor with your own hands, let’s look at their designs, as well as which ones you can make yourself.
Useful tips and tricks
If you decide to build a good plow for a walk-behind tractor with your own hands, then you should listen to useful recommendations from experienced craftsmen.
If you plan to build a double-furrow plow, then you should remember that it must have two shares. This device can be used for plowing various types of soil.
This is the best specimen for working with stagnant soil. When making a rotary plow, it is very important to ensure that the edges of the moldboard and the ploughshare coincide. These elements are connected as tightly and firmly as possible
There should be no gaps or noticeable cracks. After using the plow, it must be cleaned of any dirt and adhering particles. Only if this rule is observed can we talk about the durability of the structure and its wear resistance. And then you won’t have to constantly sharpen the cutting plate. It will be much more convenient to install the plow on the agricultural machinery itself if you place the walk-behind tractor on stands. These can be not only special supports, but also simple bricks or stones/boards. Particular attention is paid to the already constructed plow. If it has only one bolted connection and only one hole, then it will not be adjustable.
It is advisable to assemble a plow with a support wheel on a steel sheet. All surfaces will need to be cleaned and polished. The back surface of the welded share is made as smooth as possible. Popular rotary plow types are in most cases made with disk mechanisms, but there are also drum, shovel and auger types. Such structures are simply irreplaceable when applying fertilizers and controlling weeds. For independent work, it is advisable to use only high-quality plumbing tools. You need to be able to work with them. At least minimal experience is required. Do not forget to process the working edge of the manufactured plow from time to time.
This will make her work more efficient. When making your own plow for a walk-behind tractor, it is important to strictly adhere to the chosen technology and the drawings drawn up. The slightest mistake or omission, which may seem insignificant, can lead to poor quality work of the structure.
Then it will need modification.
To learn how to set up a plow for a walk-behind tractor, see the following video.
https://youtube.com/watch?v=Y2CMyUV2fNc
Types of plows
When completing walk-behind tractors, three types of plows are used, all of which have their own area of application:
- single-hull and double-hull;
- rotary or reversible;
- rotary.
Single-hull models
Single-body units are the simplest in design. They have only one share and are used for plowing light soils in ordinary garden plots, which make up the majority of the land. Such a plow is not suitable for plowing heavy soils and virgin lands; a more powerful design will be required.
A double-furrow plow consists of two fastened frames with plowshares. It is used for cultivating various types of soils and for primary plowing of virgin lands. It can simultaneously perform plowing and harrowing, ensuring the best quality of soil cultivation.
Reversible plows
Reversible plows are distinguished by the shape of the plowshare, which resembles a feather. A plowshare with a curved upper part turns over the soil. Recommended for plowing hard, hard soil. Plows of this type are compatible with walk-behind tractors of medium and heavy classes, for example MTZ. They got their name from a device that rotates the ploughshare when changing the direction of plowing, which is convenient for long areas. The direction of the soil dump is maintained.
Rotary plows
Rotary models differ from other designs: the unit consists of a set of curved shares that loosen the soil, placed on an axis driven by the power take-off shaft of the unit. The depth of plowing the soil with a rotary plow is 25-30 cm, and does not require significant effort from workers.
A rotary plow allows plowing to change directions, which is important for processing areas with complex shapes. This design is popular among summer residents for cultivating soil with a layer of turf or saturated with roots. Rotary plows are compatible with medium and heavy walk-behind tractors.
Dumpboard and non-dumpboard
Based on the presence of a moldboard, plows can be divided into two more types:
- moldboard: the design of such plows allows you to plow the soil, turn over the plowed layer and loosen it;
- non-mouldboard: intended for loosening the soil in regions with dry and windy weather.
Types and classification of plows
There are several plow designs:
- ploughshares;
- disk;
- rotary;
- combined;
- chisel.
The most common are plowshare plows. They were used by our ancestors and to this day they work in most fields. For plowing heavy soils and areas with high or low humidity, disc plows are used. Combined and rotary - more complex in design, suitable for cultivating virgin soil. Chisels are special devices that do not involve formation turnover. They are classified as plows conditionally and are rarely used, especially in private farming.
Based on the type of traction, plows are divided into several categories:
- Tractor. At this time, this is the most common type of plow. They are produced for different types of equipment, including small-sized mini tractors and even walk-behind tractors.
Small tractor plow
- Horse-drawn. This group is rare today. Such plows are used to cultivate those areas where it is difficult or impossible to drive a tractor.
- On a cable car. They are used in places where even a horse cannot go - in wetlands, with a large slope, etc.
And that is not all. There is also a classification according to purpose: general and special. General purpose plows operate on most developed land. Special purpose plows include:
- For rocky soils. They have built-in protective mechanisms (lifting) that prevent large stones from damaging the plow.
- Negotiable. They have two identical plows in a mirror image. Allows you to obtain a flat surface without pronounced humps and furrows (smooth plowing).
Reversible plows - single and multi-body
- Longline. Used to increase soil fertility.
These are not all varieties, but the most popular and used. They differ constructively, and sometimes seriously.
Advantages of homemade plows
Making a homemade plow with your own hands has a number of advantages over using purchased ones. Its design better meets the requirements corresponding to the cultivated soil: the angle of the oval, the depth of the plowed layer, the width of the plowed area in one pass, as well as the loosening effect.
A plow made by yourself, taking into account engine power, will not create additional load on the walk-behind tractor, will eliminate wheel slipping and will provide optimal plowing effect. The use of high-quality material and adherence to technology will significantly increase the service life. When making a plow, it is possible to provide for the possibility of attaching additional equipment for tillage.
Homemade single-furrow plow
The simplest, but at the same time effective plow design is a single-body plow.
This design is suitable for making it yourself at home. Manufacturing will not require special tools and devices, as well as special skills; the tools available in the home craftsmen’s workshop will suffice.
ploughshare
The experience of owners who use walk-behind tractors equipped with plows in their field work shows that the ploughshare must be periodically removed in order to sharpen it before starting work. When choosing materials for the manufacture of a plowshare, we recommend using alloy steel 9ХС, which is used in the manufacture of circular saws.
45 steel can be used, but will need to be hardened to HRC 50-55. It is possible to use ordinary steels, including St.5, which are not subject to hardening, but can be brought to the required quality if the edge is beaten with a hammer and sharpened.
Blade
A plow moldboard can be made using different methods; let’s look at some of them so that we can choose the most convenient and affordable one in terms of materials and cost.
- The blade is made of steel sheet with a thickness of 3.0–4.0 mm. For manufacturing, bending rollers are required to give the blade a curved shape. The workpiece is cut out according to a template, then passed through rollers and hammered to the required shape.
- You can make a dump using a steel pipe with a diameter of 0.55-0.6 m and a wall thickness of 4.0-5.0 mm. We prepare a cardboard template in advance and place it on the pipe so that the angle formed by the bottom edge and the horizontal of the pipe is 20-30°. The outline is outlined, cut out using a gas torch, and then processed with sandpaper or a grinder. If necessary, you can correct the shape with a hammer.
- When making a blade, you can use a steel sheet, but the shape can be given after preheating the workpiece by bending it along a matrix, for example, by taking the blade of a purchased plow.
Plow device
It is possible to make a plow correctly only when you have an idea of the plowing process, as well as the purpose of each of the plow parts.
When plowing, the plow wedge cuts into the ground at a certain angle, depending on the softness and moisture of the soil. The wedge separates the layer, lifts and compresses it, while simultaneously dividing the layer into several parts. The angle of entry determines how many parts the earth layer will be split into: the larger the angle, the larger the split. But if the angle of entry is more than forty-five degrees, then the soil stops sliding along the working surface of the arable device and begins to accumulate in front of it, making further work difficult. A vertical plow, that is, with a sharper leading angle, separates the soil from the edge of the plow furrow and compresses it horizontally. A plow with a horizontal leading angle works differently: it deflects and turns over the soil layer.
A typical working plow consists of:
- The ploughshare that cuts the soil,
- dump,
- Knife,
- Field boards,
- Racks,
- Skimmer.
Additionally, the plow can be equipped with:
- More durable metal frame,
- With wheels,
- A mechanism that corrects the operation of the plow relative to the tractor,
- hydraulic mechanisms,
- Pneumatic hydraulic system.
The blade can have several types of working surface:
- Screw,
- Cylindrical,
- Cylindrical.
The cylindrical grinds the soil perfectly, but does not form a layer well. This is not always convenient. A cylindrical work surface is usually used for working with soft soil. The most convenient and practical to use is a cylindrical surface, which crumbles and turns the soil well, and also copes with both dry and wet soil.
Plow assembly
When starting assembly, it is recommended to first make a layout using thick cardboard, gluing individual parts at certain angles. In the presented drawings, the alpha angle in various areas is 25-30°, the gamma angle is 42-50°. Having assessed the resulting cardboard sample, we begin manufacturing it from metal. The material for the housing is made of sheet steel with a thickness of 3.0 mm.
To complete the assembly, we will use a welding machine. You will need a steel sheet 2-3 mm thick with dimensions of 0.5x0.5 m. Using wedges installed at an angle of 25°, place a ploughshare on the sheet and weld it to the sheet in two places. We vertically join the side shield to the plowshare, overlapping it by 5-8 mm. The shield must be positioned 0.6-1.0 cm above the ploughshare blade (leaf plane) in order to freely cut the soil. We attach the shield with tacks to the ploughshare and the auxiliary sheet. We attach the blade to the plowshare so that we get a solid structure. The angle between the plowshare blade and the edge of the blade must be set to 6-8°.
Share attachment
The plow mounting diagram is shown in the drawing.
If any of the corners or surfaces do not coincide or do not meet the recommended ones, the part will need to be corrected with a hammer. Having adjusted the blade and the ploughshare, we weld them, after which we fasten the blade with tacks to the side shield. We first weld the side shield with the spacer bar, then with the plate located at the base, now we weld the thrust corner of the ploughshare to it. We inspect the entire unit, and now we need to carefully weld the seams, then separate them from the auxiliary sheet. After completing the assembly, the seams must be thoroughly cleaned with a grinder, and the surfaces that will be in contact with the ground must be sanded.
Turning
If you need a reversible plow for a mini tractor, you can make it according to the trailer principle. It is also contained on a single chain for turning. With each pass, there is no need to return to the beginning of the field, since thanks to the turn, the plow turns the furrow in the other direction, which allows you to get equal furrows after passing the mini tractor.
This model has three main parts:
- lower horizontal structural plane of the runner;
- side;
- front dump plane.
The cutting edge must be positioned 2 cm below the runner. The side edges of the blade and the share must match. The ploughshare should lean against the blade tightly, without gaps. If you manage to put together such a model, then you can safely weld the structural elements and enjoy a good result.
Reversible plow
The reversible plow has a difference - the presence of a turning mechanism that turns the ploughshare when passing the adjacent furrow in the opposite direction. By turning the plowshare over, the layers of soil will turn over in the same direction as the previous ones. The rotating mechanism allows plowing to be done faster than with a conventional design.
The reversible design has three specific planes: the horizontal skid plane at the bottom, the vertical side plane and the front dump plane. We remove the plowshare and blade, install them on the floor and lean them against the wall, the lower horizontal plane of the skid should coincide with the horizontal line of the floor, and the wall with the side vertical plane of the skid.
To adjust the plow, it is necessary to lower the bottom edge of the share 1.0–4.0 cm below the plane of the skid. The side cutting edges of the plowshare and blade should lie on the same line and protrude 1 cm from the vertical line of the skid.
The working surface of the share must be aligned with the blade without any gaps, there cannot be any protruding fasteners on them and they must be thoroughly polished.
After finishing plowing, all working parts must be cleaned and lubricated with technical lubricant to prevent corrosion during storage until the next season.
Setting up the plow before plowing
When starting arable work, it is necessary to correctly configure and adjust the position of the plow relative to the ground. This procedure is carried out in several stages: before the start of plowing and during the plowing of the first rut.
Read also: Thermoelectric Peltier cooler what is it
We invite you to watch a video that describes in detail how the plow is configured for the Oka walk-behind tractor:
Algorithm of actions when setting up a plow for an Oka walk-behind tractor:
- Prepare the necessary hand tools (wrenches), walk-behind tractor, hitch and plow.
- Replace pneumatic wheels with lug wheels.
- Attach the hitch to the walk-behind tractor using bolted connections.
- Attach the plow to the hitch by aligning the holes on the plow stand with the holes on the hitch, and secure the position of the plow using cotter pins.
Setting up the plow is not enough; it also needs to be adjusted correctly:
- Set the plowing depth, which for Oka walk-behind tractors is 15-18 cm.
- We move on to adjusting the angle of attack, which directly determines the depth of immersion of the nozzle into the soil. We tighten the bolt on the hitch, which is responsible for the height of the plow heel (the higher the heel, the deeper the depth). The optimal size is 3-5 cm from heel to ground.
- We proceed to test plowing of the soil. During the first pass, parameters such as the depth of the furrow to be cut and the smooth running of the Oka walk-behind tractor with a load are checked.
- If during the first pass we find any shortcomings, we reconfigure the system.