The owner cares about the presentability and beauty of the car no less than problems with the electronics or engine, so polishing the car body is done carefully and regularly. A properly selected polishing attachment for a drill will be able to carry out the work carefully, ultimately obtaining an excellent result.
A properly selected drill attachment can perform the job carefully.
Polishing attachments for drill: types
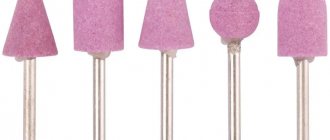
There are several types of polishing attachments for drills:
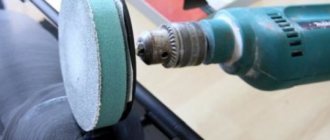
- Felt. This attachment looks like felt circles of different diameters. It is necessary for cleaning and other preparatory work immediately before and after polishing.
- Sheepskin nozzle. Effectively completes the polishing process, giving a final mirror shine.
- Nozzles made of fabric or leather. They are great for cleaning car body or glass before polishing, they are suitable for polishing in inaccessible places and on uneven acrylic and paint surfaces. Leather wheels are softer and are ideal for gentle treatment of the car body.
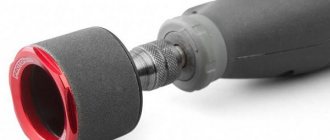
- Foam nozzles. The finer the cells on the foam rubber, the softer and more delicate the polishing will be.
To get started, you will need not only a polishing attachment for the drill, the power tool itself, but also a special product that is applied to the surface to secure a brilliant result.
#Polishing headlights-1 or following the detailing lessons - Nissan Ti logbook >
This story is about.. this story is about how I decided to do things the smart way. Yes, it is not difficult to completely polish the headlights, as they should be.
— without polishing paste — without toothpaste
- no alternative methods or experiments with polishing, if not the only correct one)
The only caveat is that we replace the polisher (which is in the plans) with a screwdriver.
I did this: 1. Wash and degrease the headlight 2. Apply tape 3. Coat the entire surface with water (Radex 1000/2000/3000 mugs) 4. Dry the headlight before polishing 5. Using a screwdriver, polish with a slightly damp circle with Radex abrasive paste (number 23 , medium abrasive) at low speed 6. Polish at high speed
7. Wash away any remaining dough
The left headlight was/is
The right headlight was/is
Now the same thing in good quality
If you don’t look closely, everything is fine, the lighthouse is relatively intact. But close, oh...
Using the example of the left headlight, the texture of scratches in front
Scratch the texture after
Here you can see that the headlight has just started to fade and you need to repeat all the previous polishing steps, starting with a coarser grit (I think 400 or 600). As a result, I just haven’t polished for a long time / there weren’t enough turns / it’s all a joke, I need a polisher.
The hardest part for me with this approach was determining what maximum abrasive size was required. The fact is that theoretically it is possible to polish a large crack with finer sandpaper, but in practice this is very difficult to achieve. So I decided to start with 1000, there is nothing more yet. I can say that this polishing wheel removes marks from 1200 grit, which is much coarser.
Guys, if anyone knows how to select the size of abrasive according to the depth of the cracks, please share, I would be very grateful!
In short, there is almost no result, but there is a negative experience. I'll buy rougher leather and try again.
Ps In short, almost nothing is visible in the photos, only hair cracks and microchips are removed.
Advantages and disadvantages
When choosing a polishing wheel for a drill, you need to understand their advantages and disadvantages.
When choosing a drill attachment, you need to know their advantages and disadvantages.
First, let's look at the main advantages and disadvantages of foam discs:
- foam rubber wheels get very hot on the surface and consume a large amount of polishing paste;
- The advantages include a large selection and low price.
For comparison, we will provide the pros and cons of a sheepskin nozzle:
- effective removal of scratches, low consumption of polishing paste and do not heat the surface;
- not suitable for the finishing process; they leave small scratches and stains on the surface;
- high cost and small range.
Pros and cons of polishing with a drill
This operation will help get rid of minor scratches, ensure better drainage of water and dirt, and protect the metal of the body from the effects of negative environmental factors.
But polishing services are quite expensive. Therefore, many car enthusiasts prefer to perform this procedure independently. The most affordable option is to use a conventional drill. The advantages of this method include:
- A drill is an affordable and versatile tool that almost everyone has in their household. That is, there will be no additional costs for purchasing a special grinding or polishing machine.
- The tool will greatly simplify the manual polishing method.
- Most drills have a rotation speed of about 2800 - 3100 rpm, which is enough for high-quality work.
This method also has disadvantages. These include:
- A drill without a speed control function is not suitable for polishing.
- A drill/driver also cannot be recommended for use due to the fact that the maximum speed often does not exceed 1,900 per minute.
- When working with a drill, it is more difficult to regulate the degree of pressure on the tool.
Preparatory stage
Before starting work, you need to prepare the necessary tools and wash and dry the car. Next, you need to clean insect marks and bitumen stains with a special product.
Polishing the body with a drill should not be carried out outdoors to avoid defects. The work room must be equipped with ventilation and good light, so as not to miss small scratches and roughness.
Foam drill attachment for car polishing
Work algorithm
Prepare the car for the procedure by removing dirt from its body. The surface leveling algorithm is as follows:
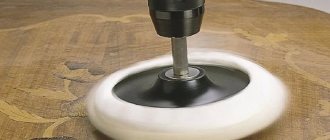
- put a felt product on a drill or polishing machine;
- Apply paste containing abrasives in small portions. It dries quickly. When processing the entire car, start moving from the rear of the car forward;
- Make horizontal and then vertical movements to rub the polish. The main thing is not to put in too much effort;
- After completing abrasive cleaning, remove excess paste with a rag and wash the car.
Car body polishing
The final leveling is carried out using fine abrasive means according to a similar algorithm.
Author: Baranov Vitaly Petrovich
Education: secondary specialized. Specialty: car mechanic. Professional diagnostics, repair, maintenance of passenger cars of foreign production 2000-2015. Extensive experience working with Japanese and German cars.
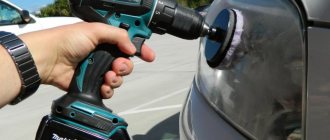
How to polish a car with a drill?
It is not advisable to polish with a drill on a hot day if the work takes place outside. The paintwork can get hot, so you need to park the car so that the sun's rays do not fall on it.
Work process:
- The body must be treated with any means that dissolves fat, and polishing paste must be applied to the surface in small portions. It is best to start work from the trunk and move towards the hood.
- First, a felt circle will do. Place the car polishing attachment on the drill and set the tool to 1300-1700 rpm, moving in horizontal and vertical lines. Do not press the drill too hard, otherwise there is a risk of damaging the paint or acrylic coating.
- Remove any remaining polishing agent with a damp sponge or cloth.
- Next, you can begin soft polishing with a foam pad.
At the end of the polishing process, apply a finishing agent and wipe it with a dry microfiber cloth.
Which is better: buy a professional machine or use a drill?
Of course, having a special polishing machine will make the process of removing scratches from the body more convenient and faster. But, unlike a drill, the scope of alternative uses of a specialized tool is very limited. At the same time, the cost of a more or less high-quality device starts from $100.
In this regard, in order to polish your car from time to time, a good drill that meets the above requirements will be quite enough. If there are several cars in the family, including relatives, that regularly require polishing, then purchasing a grinder will be justified. The savings from 1 car polishing yourself will approximately correspond to the cost of the tool.
Thus, every car owner can maintain the car body in decent condition. At the same time, it must be remembered that polishing reduces the thickness of the car's paintwork. Therefore, after 4 polishings, it is recommended to repaint the car, which costs completely different money.
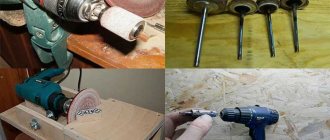
Making your own attachments
At home, you can actually make your own grinding wheel from felt or felt. Old felt boots or felt fabric are suitable for the material. The nozzle requires about 50-250 mm of material.
Sequencing:
- It is important to carefully glue the blanks for the circle. They must be glued together with glue, not reaching the edges, otherwise, during polishing, the dried glue will damage the surfaces.
- Connect the coated parts of the future nozzle and press tightly until the glue dries completely.
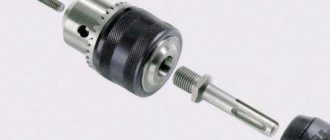
- In the center of the workpiece, make a hole of the required diameter for mounting on a power tool.
- Attach a small rod to the hole to make it easy to put on and take off from the drill.
After polishing, it is advisable to apply a protective film at a car service center, so there will be virtually no scratches or chips on the body.
How to choose a car polishing attachment
We figured out what kind of polishing attachments there are in principle. Now it’s worth summing up and deciding which attachments you should buy for polishing your car at home.
Much depends, of course, on what type of polishing work you plan to carry out. If we are talking about soft polishing, then the nozzles should have a more delicate effect. In the case of deep polishing, it is necessary to use coarser polishing discs. In addition, do not forget that special discs are needed for different types of surfaces. There are no universal discs that are suitable for everything, so it is better to buy several attachments separately that will satisfy all your needs.
Each auto mechanic has his own personal set of discs that he uses in his work. There is no generally accepted set, so everything is determined by trial and error.
However, there are a number of things to consider when purchasing polishing pads.
First of all, you need to pay attention to the rotation speed at which the disks work more efficiently. Manufacturers often indicate this speed directly on the polishing discs. Remember, when working at the wrong speed, the likelihood of damaging the surface of the body increases.
In addition, pay attention to the types of mounting so that the disc will definitely fit your tool and the size of the disc. With a smaller disk size, the convenience of work increases, but the area to be processed decreases, which is why the work time increases. The situation is the opposite when working with a large disk - it is more difficult to process paintwork with it, but the speed of work increases.
And of course you should pay attention to the manufacturer and price. It is better to buy discs from trusted brands. If you choose equipment from little-known or unverified manufacturers, there is a high probability that you will get a defective product that will ruin your paintwork. Don't take risks and buy a nozzle from a reputable manufacturer.
Do-it-yourself headlight polishing – DRIVE2
Polishing headlights with your own hands using the example of my latest car Nissan Skyline V35
Do-it-yourself headlight polishing. Vote for the result!
The plastic headlights of modern cars fog up over time due to the constant aggressive influence of the external environment. The dirt that comes out from under the wheels in front of moving cars acts as an abrasive and gradually dulls the once transparent plastic. But we ourselves speed up this process by wiping dirty headlights with a dry cloth. As a result, the brightness of the headlights inevitably decreases over time, which in itself is unsafe! And in the end, these headlights just look ugly.
In Novosibirsk car washes and service stations, the headlight polishing service costs from 600 rubles. But if you already have a drill, then for a comparable amount you can buy consumables for self-polishing headlights, which will last more than once! In addition, this operation is completely simple and can be completed in 15 minutes! And many of us are simply happy to “tinker” with our favorite car.
So, we will need: - Electric drill. If the drill is an impact drill, set the non-impact mode - Drill attachment adapter for polishing velcro wheels - Abrasive wheels with foam rubber support on velcro, grit 1000, 2000, 3000, 4000 (required for wet sanding). For example, Abralon - abrasive polishing machines 3M 09375 (or 3M Fast Cut Plus n. 417) and non-abrasive 3M 09376 by weight, grams, 50-100 each - foam for abrasive polishing - foam for final polishing. — Scotch tape, wide, 1 pc. — Spray bottle with water 0.5 l. + 2 liters of reserve.
— Clean rags, several pieces.
Foam disc for abrasive polishing
Foam disc for non-abrasive polishing
This set can be purchased at stores that sell body parts. There are ready-made kits for polishing headlights on sale. But we do not recommend buying them because they are too expensive and not optimally equipped.
First, we glue the parts of the body adjacent to the headlights: bumper, hood, radiator grille. This is necessary to avoid damaging the car’s paint during the polishing process. We wash the headlights clean. Insert the wheel polishing adapter into the drill and securely fix it. If you haven't polished your headlights yet, it makes sense to polish one headlight at a time.
1. We put on the adapter “thousandth” circle, the coarsest one, pour water on the circle and headlight from a spray bottle and start polishing at medium speed of the drill. Under no circumstances should you use force or linger for a long time in one area of the lighthouse! We periodically check with our hands whether the plastic has overheated. Regularly water the headlight and rim with a spray bottle. The headlight should become uniformly dim and opaque. The phase lasts about one minute. We wash and wipe the headlight with a clean cloth.
2. Repeat step 1 with circles 2000, 3000, 4000 in sequence. The lighthouse will become more and more transparent.
3. Remove the last “four-thousandth” circle and replace it with a thick foam pad for abrasive polishing. Apply a little abrasive polish to the headlight in a timely manner, five to ten pea-sized points. Gently polish the enamel over the entire headlight area at low speed.
Without allowing the varnish to dry, we polish the plastic until it is completely transparent, gradually increasing the speed of the drill. If the polish is dry, spray water on the wheel or headlight. We wash and wipe the headlight with a clean cloth. It is almost ready, but you need to touch up the result with a non-abrasive polish to seal microcracks in the plastic and prevent the headlights from quickly fogging up.
4. Remove the abrasive wheel and place the grinding wheel for final polishing. We use a non-abrasive polish. The principle is exactly the same as in point 3, except for water. This is not necessary here.
Ready! Now you can enjoy the result of the work done and move on to the second lighthouse!
Text and photo © AutoExpert54.rf
Using a polisher
The rotary machine has a trigger (starter) to start the machine, a trigger lock button (to fix the starter during polishing) and a speed controller for the machine. Most quality machines have a soft start function. This means that when you press the start button, rotation begins gradually and the speed of rotation depends on how hard the starter is pressed. If you press it halfway, the circle will not rotate at full strength, then press it by 75% - the rotation will speed up, press it completely - it will be maximum. How can this be used? Partial pressing of the start button may be necessary in order to evenly distribute the abrasive paste applied to the body. Then you can set the desired speed, lock the starter and start polishing. It must be remembered that the rotary machine heats up the surface if it is held in one place for a long time, so the circle must constantly move.
Polishing wheels
Polishing wheels come in different hardnesses. Most companies make them in different colors to make them easier to differentiate. Abrasive paste with polishing wheels of different hardness will act differently on paintwork.
Wool wheels have a stronger abrasive effect than foam wheels and are more suitable for correcting serious paintwork defects. However, woolen circles leave behind small circular scratches, which foam rubber ones do not. If you polish with a wool wheel with abrasive paste at high speed to remove defects, you will get a “hologram” effect. Therefore, this stage should not be the last. For more information about the choice between woolen and foam rubber circles, read the article “Wool or foam rubber circles.”
Test polishing
It is advisable to do a test polish first to ensure a good result, and then move on to the rest of the car.
Test polishing should be done on a small area (usually horizontal for better visibility).
Apply masking tape to divide the test area. Polish only one side of this tape. Then you need to peel it off, and you will see the difference between the old paintwork and the polished one.
The test allows:
- Understand how paintwork reacts to polishing. Understand hard or soft paint or something in between.
- Select the desired paste and wheel for this paintwork.
- You can immediately see how the paintwork will look after polishing. The result can be shown to the client (if you do detailing professionally). The difference before and after will be clearly visible.