An apartment, and especially a private house, needs regular maintenance and repair work. A home handyman has to be a generalist, capable of performing many different tasks. Therefore, masters want to master as many technologies as possible.
One of the most in-demand skills is the ability to perform welding work. Practice shows that electric welding is best suited for beginners - the technology is simple and accessible to anyone who wants to learn how to use it. Before you start mastering the method, you should familiarize yourself with the theoretical aspects of the issue, don’t you agree?
All the necessary information is described in detail in our article. We described the principle of operation of electric welding and indicated which device is best to choose for working at home. In addition, the article provides a step-by-step technology for welding parts, methods for making seams, and also lists possible defects in joints.
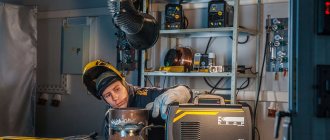
Electric welder at work
Yandex.RTB RA-1479455-2
Types of electric welding
An electric arc can be formed by both direct and alternating current. Welding transformers use alternating current, and inverters use direct current.
Working with a transformer is more complicated: the current is alternating, so the welding arc “jumps”, the device itself is heavy and bulky. The noise that both the arc and the transformer itself makes during operation is also quite annoying. There is one more problem: the transformer greatly “stresses” the network. Moreover, significant voltage surges are observed. The neighbors are not very happy about this fact, and your household appliances may suffer.
Inverters mainly operate from a 220 V network. At the same time, they are small in size and weight (about 3-8 kilograms), operate quietly, and have almost no effect on voltage. The neighbors won't even know you started using the welding machine unless they see you. In addition, since the arc is caused by direct current, it does not jump and is easier to stir and control. So if you decide to learn how to weld metal, start with a welding inverter. Read about choosing an inverter welding machine here.
Yandex.RTB RA-1479455-7
Welding technology
For an electric arc to occur, two conductive elements with opposite charges are required. One is a metal part, and the second is an electrode.
The electrodes used for manual arc welding consist of a metal core coated with a special protective compound. There are also graphite and carbon non-metallic welding electrodes, but they are used for special work and are unlikely to be useful to a novice welder.
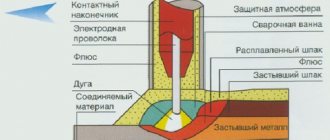
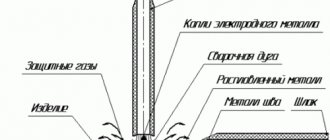
When an electrode and metal of opposite polarity touch, an electric arc occurs. After its appearance, in the place where it is directed, the metal of the part begins to melt. At the same time, the metal of the electrode rod melts, being transferred with the electric arc to the melting zone: the weld pool.
How a weld pool is formed. Without understanding this process, you will not understand how to weld metal correctly
Yandex.RTB RA-1479455-3
During the process, the protective coating also burns, partially melting, partially evaporating and releasing a certain amount of hot gases. Gases surround the weld pool, protecting the metal from interaction with oxygen. Their composition depends on the type of protective coating. The molten slag also coats the metal, also helping to maintain its temperature. To weld properly, you must ensure that the slag covers the weld pool.
The weld is formed by moving the bath. And it moves when the electrode moves. This is the whole secret of welding: you need to move the electrode at a certain speed. It is also important, depending on the required type of connection, to correctly select its angle of inclination and current parameters.
As the metal cools, a slag crust forms on it - the result of the combustion of protective gases. It also protects the metal from contact with oxygen in the air. After cooling, it is beaten with a hammer. In this case, hot fragments fly away, so eye protection is required (wear special glasses).
Yandex.RTB RA-1479455-8
How to learn?
How to learn to cook with electric welding yourself? For training, you will need to properly prepare your workplace. It should be spacious, well lit and equipped with exhaust ventilation. Personal protective equipment for the welder will also be required:
- clothing and footwear made of non-flammable materials;
- split leather gaiters;
- a welder's mask with an adaptive light filter that protects the eyes from arc welding flashes;
- respirator for respiratory protection;
- Safety glasses or a clear face shield for stripping workpieces and seams.
Tools you will need are a wire brush, a hammer, and an angle grinder.
How to connect the electrode?
It is better to start mastering welding technology with electrodes with a diameter of 3 mm. The rod is inserted into the holder with the end cleared of coating and securely fixed with a screw or spring. The cable from the holder is connected to the inverter terminal. The second cable, which has a clamp at the end, is connected to the second terminal. Ferrous metals are welded using the so-called straight polarity - the positive wire is connected to the workpiece with a clamp, and the negative wire is connected to the electrode.
Two types of connection polarity.
Reverse polarity is used for welding stainless steel and other materials.
Beginning: lighting the arc
The arc is ignited using one of two main methods:
- striking with an electrode along the future seam;
- tapping the workpiece.
For beginners, the first method is recommended. If the electrode has already been welded, tapping helps knock off a thin layer of slag from the tip of the rod.
Electrode tilt
The angle of inclination of the rod to the vertical depends on the type of seam
The “backward angle” position is most often used. The working zone follows the tip of the rod, in this case the greatest heating of the metal is obtained. If you tilt the rod in the opposite direction, the heating decreases. This position is used at the end of the seam and when manually welding thin-sheet structures to avoid the appearance of burns and craters.
Movements
The welder must maintain the gap between the electrode tip and the workpiece within 2-3 mm. If it is necessary to ensure a seam width greater than the thickness of the electrode, complex trajectories for its guidance are used.
A novice master needs to master soft and even straight-line driving at a constant speed. After you begin to get even rollers, you can move on to more complex trajectories.
The main task at the training stage is to learn to “feel” and control the state of the weld pool, without overheating or cooling it excessively.
Trajectories of electrode guidance. It is better to learn on workpieces with a thickness of 4-5 mm. After mastering the welding of beads on the plate, you can begin welding two parts.
Step-by-step instructions for welding work
Before starting welding, it is necessary to check the work site for compliance with safety regulations. There should be no unnecessary objects on the site, especially flammable ones, puddles of water, or spilled oil.
The equipment should be checked for serviceability and connected. The stove must be grounded. A clamp with the corresponding current value is attached to the part. The workpiece is prepared for welding if the following steps are completed:
- joints are cleaned;
- the workpiece is installed on an assembly plate or rack and secured;
- the parts are connected to each other by clamps or clamped in a special device.
You should start cooking after fully preparing the place, equipment and tools.
Tools and protective equipment
In addition to the clamp for the electrodes, the welder should always have a thin metal hammer with him to beat off the slag. The seam is checked for lack of penetration, undercuts, and tops. If necessary, the operating mode can be changed.
Welding is one of the harmful and dangerous jobs. Compliance with safety precautions is especially important for novice workers who do not yet have practical skills. When carrying out welding work, you can get various types of damage: electric shock, burns, eye damage, vapor poisoning when flux burns.
Mandatory protective equipment for a welder when working are:
- mask;
- mittens or gloves;
- pants and jacket;
- work boots;
- tarpaulin.
A mask with dark glass protects the eyes from the blinding light that occurs during welding. Gloves and a suit made of non-flammable materials protect the skin from metal splashes and sparks.
When working outside an equipped welding station, a worker may need a tarp. He uses it to cover objects that cannot be removed. For example, a wall and nearby furniture when welding water supply or heating pipes in a house.
Tools and protective equipment
Which electrodes to use
The thickness of the metal and the number of seams applied determine the diameter of the electrode. When welding parts of large thickness, the root seam is laid with a thin electrode of 2–3 mm. In the future, four are used. When the sheet thickness is more than 20, it is possible to use an electrode with a diameter of 6 mm.
For welding structures made of low-alloy steels, coated electrodes of the following grades are used: UONI, OZS, ANO. They are widely used in the creation of building structures, when laying pipelines and welding other parts that have high demands on the strength of joints.
When welding high-alloy and carbon steels, experts recommend using chromium-nickel electrodes grade EA 395.
High-quality welding of non-ferrous metals is carried out using rutile electrodes of the MP 3C series. Tungsten non-consumable grades WC 20 are suitable for joining parts made of non-ferrous metal alloys.
Chromium-nickel and rutile electrodes are recommended for learning the welding process. They light easily and hold the arc well.
Electrodes with rutile and other special coatings are considered universal. They can operate on any current, the seam lies horizontally. Vertical only from bottom to top. Metal spattering is minimal. After them, it’s difficult to switch to UONI and other brands, but only after mastering classic electrodes can you become a welder.
Preparation
Before starting work, you should prepare the metal for welding. The surface of the workpiece must be cleaned of dirt, oils, and rust. Oxide films are removed chemically immediately before welding.
If the seam thickness exceeds 3–5 mm, you should cut the edges on the machine, removing them at an angle of 45⁰.
The parts to be welded are connected using clamps. For mass production, special devices may be used.
Cleaning the joint
Connection
Before work, check the condition of the equipment and grounding. A 0 or a minus is then connected to the part, depending on the type of current being applied. The equipment is connected to the network and modes are configured. After this, the electrode is inserted and the welding machine is turned on.
Welding process
Before cooking, the device is adjusted to the desired operating mode in accordance with the thickness, material of the part and currents recommended for the electrodes. After this, you can proceed directly to welding.
- Light the arc.
- Heat the weld pool.
- Use an electrode to move the molten metal along the seam, ensuring the edges are connected.
During work, you should ensure that the flux does not remain in the seam, but melts and floats up.
How to learn to cook with electric welding lesson 1
To master this method of joining metal well, you need to understand the physical process of welding. Understanding the formation of a seam will help you to cook not “blindly”, but with awareness of what is happening, which will certainly be reflected in the result.
For welding work, various devices are used that convert the current to the required value, capable of melting steel. The simplest are transformers operating from 220 and 380V. Due to the windings of the coils, they lower the voltage (V) and increase the current (A). Most often these are large devices in industrial enterprises or a small homemade device in the garage.
More “advanced” versions are converters that produce constant voltage. Thanks to this, the creation of the weld seam is more delicate and quieter. At home, small versions of these devices are used, called inverters. They operate from a household network and convert alternating current into direct current. Learning to cook with an inverter is easier than starting with a large industrial transformer. The essence of the process is as follows:
- The device produces the required voltage.
- Two cables come from the inverter (+ and -), the first is attached to the product, and the second is equipped with a holder for the electrode. Some people refer to the negative cable as zero. Depending on which wire clings to ground, the polarity of the current is determined.
- At the moment the end of the electrode touches the product, an electric arc is excited.
- Particles of the molten electrode rod and the edges of the metal being welded form a connecting seam.
- The coating on the electrodes, melting, creates a gas cloud that protects the weld pool from environmental influences and ensures a pore-free connection.
- When the metal hardens, a layer of slag forms on its surface, which is removed by light tapping.
An inverter for beginners can be any budget model that supports working with electrodes with a diameter of 3 and 4 mm.
Power supplies
The following power sources are used for RDS welding:
- Transformer. A rarely used power source for manual arc welding with coated electrodes. To work with a transformer, many years of experience are required, since this device is characterized by a significant drawback - inconsistent voltage.
- Rectifiers. It differs from a transformer only in a number of structural parts, thanks to which direct current is generated.
- Inverters. The devices create alternating current with a stable voltage. This type of electric welding equipment is used to join metals manually. Inverters are complemented by protection against sticking of electrodes and an arc stabilization system.
- Semi-automatic devices. This type of equipment is presented in the form of inverters, which are complemented by a wire feeder.
The type of welding equipment is selected taking into account the tasks assigned.
Read more about the types of welding machines in our article.
Features of welding a pipeline with an inverter
The electric arc welding method is suitable for creating a vertical seam, provided that it is located at the end of the pipe. If a horizontal seam is created, the latter should be on its circumference. If you have to make ceiling and bottom seams, then they should be at the top and bottom. Among all those mentioned, it is the last one that creates fewer problems in implementation.
If you have to deal with steel pipes, then the butt welding method is most often used, which involves welding each edge along the height of the walls. To minimize sagging inside the pipe, the electrode should be positioned at an angle of no more than 45 degrees relative to the horizontal. Such a seam should reach a height of 2–3 mm and a width of 6–8 mm. If the products are overlapped, then the seam will have a height of 3 mm and a width of 6–8 mm.
Preparation
Before you begin electric welding of metal products, you need to complete the following preparatory measures:
- It is necessary to remove the top layer from the welded aliment.
- If there are any irregularities at the ends of the pipe, they need to be cut off or straightened.
- Next we begin to process the edges. Here it is necessary to smooth out at least 10 millimeters of the surface adjacent to the edges of the pipe outside and inside until a metallic sheen appears.
Main stages
If the walls are 6–12 mm wide
Particular attention should be paid to creating the first seam, since a lot depends on it. It must be performed in such a way that it melts every edge and dull areas
It is very important to examine it very carefully, as there may be cracks on it. If they are found, they must be melted down or cut down, after which the area is welded again
When creating the remaining layers, you need to slowly turn the pipe. It must be remembered that the beginning and end of each layer should be located with an offset relative to the previous layer at a distance of 15–30 mm.
What is needed to operate an inverter
An inverter-type welding machine or power source necessary to create a welding arc. There are a huge number of different manufacturers and brands of inverters, of course, prices for inverters vary significantly.
However, the operating principle of all inverters is the same; differences exist in the current-voltage characteristics and quality of the equipment.
To get started you need:
- Welding machine;
- Electrodes;
- Mask;
- Welding gaiters;
- Workwear (robes) and safety shoes
- Welder's hammer
- Metal brush
If you decide to try yourself for the first time, choose inexpensive materials and tools. For training, a mid-price welding inverter (which can be rented), 3 mm electrodes and a Chameleon mask are suitable.
Required Tools
For welding work you need a set of tools and special protection.
This is the welding machine itself, electrodes, hammer and brush. The diameter of the electrodes depends on the material to be worked on. Don't forget about protection. To protect your eyes, a welding mask is a must, and you should also wear thick clothing, suede gloves, and durable shoes. Devices that convert alternating current into direct current are also useful - this is a rectifier, inverter or transformer.
Electrode selection
This tool, intended for welding, is a metal rod with a special coating called coating. When welding, the core begins to melt. The coating, when burned, releases gas, which will serve as protection for the seam from the adverse effects of oxygen in the air, which contributes to the creation of oxides.
When choosing an electrode, you should pay attention to the core material, which should be similar to the components of the products being welded. There are electrodes designed for welding the following materials:
- carbon steel;
- alloy steel;
- high alloy steel;
- stainless steel;
- heat-resistant steel;
- aluminum;
- cast iron.
This does not exhaust the complete list of materials. In everyday life, the most common use is not thick structural steel.
The following types of electrode coating exist:
- Basic.
- Rutile.
- Sour.
- Cellulose.
Each of them solves its own problem. Basic and cellulose coatings are used for DC welding. Can be used when working on critical structures. The advantages of rutile coating are ease of ignition and slight splashing of hot metal.
When using electrodes with an acid coating, easy separation of slag occurs. But it is not recommended to use this type in a confined space, as it can harm the health of the welder. The most widely used electrodes are those with basic and rutile coatings. They are suitable for beginner welders.
When choosing a diameter, take into account the thickness of the parts being welded. It is preferable to weld thin metals using semiautomatic machines or inverters. There are also tips for adjusting the current. They comply with the recommendations on how to properly weld using electrode welding. There is a dependence on the diameter of the selected electrode.
The welding current is selected according to the calculation: 20-30 A for each millimeter of electrode diameter. Within this spread, the spatial position of the seam, the thickness of the metals being welded, and the number of layers are also taken into account.
Sufficient information about various electrodes when choosing among them suitable for a specific type of welding can be obtained from the markings of these tools. It won't be difficult to figure it out.
Cooking correctly
Welding metal has many features and difficulties. The main thing when making a seam is not to burn through the metal, but to melt the edges.
Thin metal, the root of the seam of parts with a gap can be welded using the “tear-off” method. The arc is ignited and a weld pool is formed. The electrode rises sharply, the arc goes out, the bath begins to cool and the arc at the end of it lights up again.
Welding of thick metal and surfacing of the weld body is carried out without separation. The arc is ignited and the weld pool is gradually drawn along the seam. If necessary, oscillatory movements are performed.
If the electrode runs out, clean the slag. At the end of the bath, a depression is formed - a crater. A new arc is stirred into the crater of the previous one, and welding continues.
Defecting the seam
After welding, the seam must be cleaned of slag. If the welding is done well, the slag is separated with one blow, easily. A bad seam takes a long time to clean, the slag sticks well to the pores.
What defects you need to pay attention to:
- Edge fusion. Both edges should be evenly fused.
- Undercuts. The edges of parts melt at high current levels, creating depressions. This weakens the metal.
- Shells and slag inclusions.
- Height and width of the roller.
- Scaly roller.
Pipeline welding
Using electric arc welding, you can make a horizontal seam that runs around the circumference of the pipe and a vertical seam that runs from the side, as well as top and bottom seams. The most convenient option is the bottom seam.
Steel pipes must be butt welded, welding all the edges along the height of the walls. During operation, the electrode must be installed at an angle of 45 degrees - this is done in order to reduce sagging inside the products. The seam width should be 2-3 mm, height - 6-8 mm. If welding is overlapped, then the required width is 6-8 mm, and the height is 3 mm.
Immediately before starting work, you need to carry out preparatory procedures:
- The part needs to be cleaned.
- If the edges of the pipe are deformed, then straighten them or cut them off with an angle grinder, or simply with a grinder.
- The edges where the seam will go must be cleaned to a shine.
After preparation, you can start working. It is necessary to weld all joints continuously, completely welding. Pipe joints with a width of up to 6 mm are welded in 2 layers, with a width of 6-12 mm in 3 layers and with a wall width of more than 19 mm in 4 layers. The main feature is the constant cleaning of pipes from slag, i.e. after each completed layer it is necessary to clean it of slag and only then weld a new one. Particular care must be taken when working on the first seam, it is necessary to fuse all blunts and edges. The first layer is carefully checked for the presence of cracks; if they are present, then they must be melted or cut out and welded again.
All subsequent layers are welded while slowly turning the pipe. The last layer is welded with an even transition to the base metal.
Mistakes of novice welders
To learn how to cook with electric welding correctly, you need to consider the main mistakes that beginners make:
- Moving the electrode too quickly, resulting in an uneven seam.
- The seam moves too slowly, resulting in holes and burns in the metal.
- The seam is too uneven and flat. The main mistake here is the angle of the electrode.
- Lack of welding of metal. This happens because the 5 mm gap between the metal and the electrode was not maintained, i.e. the gap was too small.
- Otherwise, when the gap is too large, the metal is not welded.
All of the above mistakes are just the most serious ones. There are many more nuances that can only be understood with experience.
When welding thin-walled metal or profiles, a careful approach to work is required. Thin parts can be welded by applying a cleaned electrode and welding directly on top of it.
Welding on non-ferrous metals is strikingly different, as it requires different electrodes. A special protective environment is also required. Now you can buy universal machines that cook almost any metal.
There are also semi-automatic devices for working with thin-walled metals. Its essence lies in fusing a special wire.
Sequencing
Step-by-step instructions provide for performing several types of work. First you will need to equip a welding inverter. 2 cables are taken from it. One is for connecting the ground wire.
On another, of sufficient length, an industrial or homemade holder is connected. The process of learning electric welding is quite complex and time consuming.
Start of welding: light the arc
When everything is assembled and connected, wearing a mask, you can begin to ignite the electric arc. Use a rough piece of metal for training. The arc is excited by tapping on the surface or striking it, like a match.
The new electrode has a bare tip and ignites fairly quickly. An electrode that has already been used for cooking, if it has had time to cool down, is more difficult to ignite, since a “visor” of coating has formed at its end. You need to hit 3-4 times to fight it off. But do not overdo it, otherwise, without coating, the rod will begin to stick to the product.
Electrode tilt
When the arc strikes, don't panic. Get used to the specific light. Your task is to first learn to keep the gap between the electrode and the product within 3-5 mm. Don't try to weld the joint right away. Just learn to hold the arc so that it does not go out (if you move too far) and the electrode does not stick (if you move too close).
The task is complicated by the fact that the length of the consumable electrode is constantly shortening, so you have to move your hand closer to the product. A “steady hand” comes with time, so you will have to burn more than one electrode before you get used to it.
When you have already mastered holding the electric arc, you can move on to welding. First of all, hold the electrode correctly. Usually they cook it by tilting it towards itself within 30-60º. Some welders choose the optimal tilt position of 45º. Backward angle welding provides good visibility of the weld pool, the metal is heated deeper. Welding at an angle forward (when the seam is pulled away from you) helps reduce heating. This is suitable for joining thin metals 1-2 mm.
You can weld from right to left or from left to right, tilting the electrode on different sides of the weld pool. It all depends on access to the connection point.
Electrode movements
On thin metals 1-2 mm, where the two sides are pressed tightly against each other, no additional movements are required. The arc is excited, the electrode is placed at the beginning of the joint, and is slowly drawn along the connection line. The seam will be narrow and scaly.
On thick metals, provide a gap of 1-2 mm so that the liquid metal penetrates deeper. If the plate thickness is more than 5 mm, cutting the edges at an angle of 45 degrees is necessary. Then the first seam (called the root) is laid without additional movements. And the subsequent ones are needed to fill the width and require transverse oscillatory manipulations. These movements could be:
- crescent;
- in a round, triangular spiral;
- zigzag.
Ideally, place the part at a slight angle so that liquid slag does not flow into the weld pool. If this is not possible, periodically make a sharp movement with the tip of the electrode to the side, throwing away the slag. Otherwise, lack of penetration will occur.
Welding Basics
To learn how to weld correctly, you need to understand the physical foundations of the welding process. Any welding machine creates in a small working area at the junction of two parts being welded a temperature above the melting point of the metal being welded, the so-called weld pool. In it, the part of the metal of both parts that has turned into liquid is mixed with each other and with the metal of the molten electrode. After the temperature decreases, the metal from the weld pool crystallizes, connecting the welded parts into one whole. By slowly moving the weld pool following the arc along the joint, the welder obtains a seam. High temperatures in amateur welding machines are achieved in two ways:
- electric arc;
- gas burner.
Electric welding is safer, since there is no risk of gas explosion, and is easier to learn for those who are just learning how to weld properly.
An electric arc is created by passing a high current through the air gap between the parts being welded and the electrode.
Safety precautions + possible defects
The welding process must not only be correct, but also safe. Losing your eyesight or getting a major burn are some of the many dangers that await a person who decides to take the path of a welder in the Russian Federation.
Precautionary measures:
- inspection of instruments for mechanical damage;
- grounding;
- regularly checking the connection between the workpiece and the contact;
- high-quality cable insulation;
- humidity not more than 75%;
- use of masks, gloves and other personal protective equipment;
- presence of a fire extinguisher near the workplace.
Now about the defects. For a novice welder, punctures during training are par for the course. Knowing the reasons for certain distortions, a person will be able to prevent the occurrence of such situations, therefore, the risk of being in a disadvantageous position is reduced significantly.
An ideal seam is neat in appearance, with the same thickness and height along its entire length. If there are jambs, in 80% of cases they will be visible immediately. Let's take a closer look at the most common defects.
| Defect | Cause |
| Lack of penetration | Occurs when the rod moves at high speed along the seam, or due to incorrect voltage calibration in the circuit. |
| Undercut | Groove along the seam. Occurs due to the electric arc being too long. Correction during the welding process requires adjustment of the amperage. |
| Burn-through | Holes in the welded surface at the seam site. |
| Porosity | When a draft in the room blows away a gas cloud that protects the bath from external influences. |
Sometimes transverse/longitudinal cracks may appear, but here the defect indirectly affects the welder, because the material may simply not withstand the temperature conditions. For each type of metal, it is necessary to select specific operating conditions. Even an experienced welder cannot insure himself against failures in this regard.
Other types of welding
The most important element of any metal structure is the weld. In this regard, the technique of welding vertical seams, as well as other connection options, will be extremely useful for beginners.
There are a large number of methods used to form reliable joints in the case of different locations of parts relative to each other. Special techniques for moving electrodes have also been developed, for example, herringbone, boat, etc.
The simplest types of welding include working in a horizontal position. However, there are more complex types of seams.
Butt
The easiest way to carry out this type of connection is not on a vertical plane, but on a horizontal one.
Drawing of welding seams.
The welding process can be performed in several ways:
- in space;
- on a removable copper lining;
- with a preliminary seam.
In the first case, the most difficult thing is to boil the root throughout the entire product. The use of a copper lining can simplify the task. Due to its high thermal conductivity, it will prevent melting of the surface under the parts as a result of contact with molten material. It can be easily removed after finishing work.
Welded multilayer
This technology involves several passes. Before each pass, the previous layer is cleaned and cooled. In this regard, this connection method differs significantly from others.
The layers are welded using electrodes of different diameters. We weld the bottom one with rods 3-4 millimeters in diameter, and the subsequent ones - 5-6 millimeters. The topmost layer is convex, in addition, it performs heat treatment of the lower layers.
https://www.youtube.com/watch?v=yEz_cweZtyQ
Ring
Used in joining pipes and various parts of shut-off valves. It is a mixed type of arc welding.
First, a vertical seam is made on the side of the pipe using electric welding, then a horizontal seam is formed around the circumference. In the same way, welding of plates located on the ceiling is carried out.
Features of the preparation technique for circumferential welding are as follows:
- the product is thoroughly cleaned;
- deformed areas are trimmed and leveled;
- the edges are cleaned to a shine.
Processing of joints during the welding process is carried out continuously, and turns are welded in several passes. Each subsequent connection is applied only after the previous one has been cleared of slag.
If cracks are found, they are removed and the resulting fragment is welded again.
Ceiling
Characteristics of different types of welded joints.
Every inexperienced welder will be confused when faced with the need to weld a ceiling seam using electric welding. This type of connection can easily be called the most complex welding seam. It should be noted that ceiling welding causes a lot of problems associated with the inconvenient position of the master when working.
Drops of hot metal tend to break off and fall down, which further complicates the work process. The molten metal itself is held in the bath due to the action of surface tension.
Welding a ceiling seam involves positioning the electrode normal to the surface of the product. In this case, the rod performs circular movements. This way it is possible to expand the connection.
The arc should be short to avoid undercuts. It is necessary to weld the ceiling seam according to the following method - the metal should harden at the highest speed. A similar effect can be achieved by using electrodes with a coating that has a high melting point.
In addition to circular movements, you should also make vertical movements. Moving the electrode away from the bath will extinguish the arc. As a result, the metal will begin to cool and the bath will shrink.
Thus, in addition to the standard defects formed during welding, welding of ceiling seams is characterized by another unpleasant feature, which is impossible to get rid of. When making such a connection, you must understand in advance that it will be weakened and less reliable than any other.
In connection with the above, such joints are almost completely absent in industrial production.
What is manual arc welding
As is the case with other welding methods, welding welding involves exerting an impact on the workpiece, which leads to the melting of the metal in a certain zone. This happens due to the formation of an arc, which occurs as a breakdown effect between the electrode and the part.
Manual welding is not much different in characteristics from other methods of producing seams. The main difference is that in this case the entire procedure is carried out by a person. That is, manual electric arc welding involves independent preparation and installation of products, as well as joining parts without the use of automated equipment.
But within the framework of this method, low-, medium- and high-alloy steels, cast iron, as well as alloys of various metals are welded.
Read about how to weld cast iron in our article.
For RDS, special electrodes coated with a protective coating are used. The latter creates an environment that prevents metal oxidation.
Electrodes are selected for each group of materials separately, taking into account the conditions in which the product will operate.
For example, for welding stainless steel 12Х18Н10Т, TsT-15 electrodes are used if the part being welded will operate at temperatures up to 640-650 degrees, and the same steel is welded with EA400 electrodes if the working temperature of the part is not higher than 340-350 degrees.
And for welding black steel, UONI or OK 46 electrodes will be used.
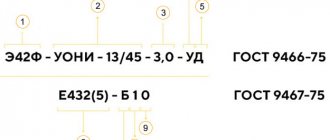
a brief description of
The procedure and basics for performing manual arc welding are determined by the relevant GOST, which establishes:
- types of joints that can be obtained using RDS welding;
- the shape of the prepared edges;
- features of the seam obtained by manual welding;
- cross-section of edges and seam;
- the thickness of parts that can be joined using manual electric welding.
The type of electrodes used for RDS determines the order of work. In this case, the rods are selected taking into account the characteristics of the workpieces. Manual arc welding is used to join metals of different thicknesses and types. The choice of coated electrodes depends on these parameters.
That is, when manual arc welding of ferrous metals, one rod is used, and for heat-resistant steels, different rods are used.
If non-consumable electrodes are used, then filler wire must be introduced into the joint being created (provided that the metal thickness exceeds 1 mm and no work is carried out on cutting the edges C1).
Manual arc welding, like other methods, requires compliance with safety precautions. This is due to the fact that in this case an arc is formed, which heats the metal to a temperature of 5 thousand degrees.
The essence of manual arc welding
Manual arc welding is a method of joining metal using special equipment. This technology does not involve automation of the process. The equipment used in such cases ensures the formation of an arc, which is formed at the point of contact of the electrode (consumable or non-consumable) with the metal product.
During this process, the contact point is heated to high temperatures, causing the material to melt.
The manual type of electric arc welding is also divided into several types:
- one-, two- or multi-electrode (the difference lies in the number of rods used, which determines the speed of work - the more, the faster);
- with direct or alternating current;
- single- or three-phase arc welding.
The choice of arc welding scheme, or method of obtaining a seam, is determined by the tasks set. According to this criterion, the following techniques are distinguished:
- Short seam (length up to 250 mm). The parts are welded “on pass”, that is, continuously along the entire joint.
- Medium length seams (250-1000 mm). With this welding method, the electric arc is applied from the middle of the future seam to the edges. In this case, the specialist moves the electrode in a stepwise manner.
- Long seams. With this electrode welding scheme, the rod is guided from the edges to the middle.
The manual arc welding technique is also influenced by the type of electrodes chosen.
Features of arc welding
In comparison with other methods of obtaining a joint, the features of this type of welding are as follows: in order to create a strong seam, you need a closed circuit through which alternating, direct or high-frequency pulsed current is supplied. An arc in such conditions occurs immediately after the electrode touches the workpiece due to the instantaneous supply of voltage.
With this effect, a liquid melt is formed, in which the metal of the workpieces being joined is mixed. After the welder removes the electrode, the material begins to cool, which leads to crystallization of the latter. This creates a strong seam.
The melt area that forms in the electrode moving zone is called the weld pool. The rod used in this technology includes flux. The latter melts when heated, forming a gas that protects the affected area from oxidation.
These features of manual welding appear when work is carried out on joining non-ferrous metals. When heated, such a material exhibits high chemical activity. Therefore, to avoid oxidation, non-ferrous metals are welded using gases that are supplied to the work area.
Within this technique, several methods of moving the rods are used:
- triangle;
- loop formation;
- zigzag or crescent forward or backward.
To avoid mistakes and to obtain a reliable seam when manual arc welding with coated electrodes, the following rules must be observed:
- Current must be supplied to the rods continuously.
- The surface and electrodes are dried before starting work. If this is not done, the process will be accompanied by the formation of sparks, and the seam will ultimately turn out to be fragile.
- The welding cable must not have cracks. Such defects may cause equipment damage.
For manual arc welding (MAW) with coated electrodes, 220 V inverters are mainly used.
To work, a welder must pass certification and be included in the NAKS register. Read more in our article.
Advantages of manual arc welding
As is the case with other welding methods, RD has advantages and disadvantages due to the characteristics of this technique. Among the advantages of this method are the following:
- the ability to weld metal in any conditions;
- welding is carried out in any position of the workpieces;
- you can combine different alloys and metals;
- the method is easy to learn;
- high mobility.
But these advantages are partially offset by the fact that during manual arc welding with consumable electrodes, many harmful substances are released. This method is also characterized by low productivity. In addition, welding metals less than 2 mm thick requires a lot of experience, since when working with such materials there is a high probability of “burning” and other consequences leading to damage to the workpiece.
Welding process
Electrode welding technology consists of several stages. The electrode is connected to the welding machine to produce alternating current. If you intend to use direct current, you will need a rectifier. When an electrode touches or strikes metal, an electric arc appears. Its ultra-high temperature ensures the melting of the metal and the end of the rod with coating.
One of the circumstances of how to properly weld with an electrode is its proper connection. When connecting the anode to the product, manual welding with straight polarity will occur. If you connect the negative pole, the polarity will be reversed. Whether to connect the electrode in a direct or reverse manner depends on the thickness of the product. For thin metals, reverse inclusion is used, and for thicknesses greater than 0.3 cm, direct inclusion is used.
The electrode welding technique requires choosing the correct current on the welding machine. The device has two cables - one with a clamp, and the second with an electrode holder. Holding the electrode securely in the holder, light the arc by touching or striking.
In the touch method, the electrode is held perpendicular to the surface to be welded. Having touched it, it is taken a short distance. The striking is carried out in a smooth motion, and then the electrode is also moved to the side. If the arc does not ignite, you should try to increase the current.
Before welding with an electrode, you should choose the correct diameter, which is directly dependent on the thickness of the metal parts. Let us assume that it is necessary to weld products whose transverse dimension is 3 mm. The table shows that to decide how to properly cook with a 3 mm electrode, choose electrodes with a diameter of 2 to 3 mm.
The technique of how to properly cook with an electrode suggests that as it gradually burns, it is constantly brought closer to the metal surface. If sticking occurs, you should tear off the conductor by rocking it in different directions.
Manual welding technique - creating an arc
When working with consumable electrode arc welding, the arc is fired after the technician touches the work area with the rod. This process is started in two ways:
- touch and lift - the arc is formed after the rod is slowly withdrawn from the metal surface;
- by striking (like a match) - an arc is formed by quickly striking the end of the rod along the surface.
The second option is considered more preferable. However, when working in hard-to-reach places, the first method is used.
How to cook correctly is written in detail in our article. Come in!
Protection of metal from corrosion after welding
Remember, at the very beginning of the article it was said that in order to weld correctly with electric welding, it is not enough to watch the video, but you also need to prepare theoretically? Agree that the text allows you to better understand the theory. In addition, the videos somehow miss the need to protect the parts later. We will try to eliminate this shortcoming.
Everyone knows that metal quickly begins to rust when exposed to oxygen in the air. Believe me, welds corrode even faster.
In order to protect metal surfaces from corrosion, painting is most often used. To avoid repeating this work every year, do it according to all the rules.
First of all, you need to remove old paint and rust. To do this, it is best to use metal brush attachments for a drill or grinder, but you can also work with a regular metal brush. Do not forget to protect your eyes with glasses or a shield.
After cleaning the surface, treat it with a rust converter and then coat it with a coat of primer. Choose a primer composition specifically designed for working on metal. After this layer has dried, you can begin painting. Acrylic and pentaphthalic enamels intended for outdoor use give good results.
It is best to use a spray bottle rather than a brush or roller for painting purposes. With its help, you can apply a uniform, thin layer of paint that will not crack or peel over time.
Getting ready for welding. Selection of materials and equipment
Before you start welding, you need to understand that this process is accompanied by the formation of sparks and splashes of molten metal, the release of toxic gases and danger to the eyes.
Therefore, in order to safely weld metal, you need to stock up not only with good equipment, but also with the appropriate equipment. To start electric welding you will need:
- welding machine;
- set of coated rod electrodes;
- welder's hammer;
- metal brush;
- welding mask;
- overalls, suede gloves.
Welding machine Set of rod electrodes
Welder's hammer Metal brush Welding mask
You can arc weld without a factory set of overalls. It is important that the protective suit is made of thick fabric with long sleeves, and it is better to tuck the trousers into the boots.
Choosing a welding machine
A good welding machine with the ability to adjust the current from 10 to 200A will help you learn how to weld properly. Of course, you can assemble a simple welding transformer with your own hands, but then you don’t even have to think about how to weld thin metal, because such work requires minimum power values. Factory-made devices are divided into:
- Welding transformers . Designed to reduce the network voltage while simultaneously increasing the current. Being inexpensive and productive devices, they can weld metal quite well, but they have disadvantages such as an unstable arc, a strong “drawdown” of the supply voltage and a large mass.
Welding transformer
Transformer device
- Welding rectifiers . Such devices are the same welding transformers equipped with a diode rectifier, thanks to which the alternating voltage of the network is converted into the direct voltage necessary for the appearance of an electric arc. Welding metal with straighteners is a little easier due to the higher arc stability. Otherwise, this type of welding machine has the same disadvantages as transformers.
Welding rectifier Rectifier device We recommend Sinks above the washing machine in the bathroom. Which sinks are best to buy? Instructions for installing a sink above a washing machine. Video
- Welding inverters . True electronic welding is possible thanks to the modern technological filling of such devices. They provide a lot of opportunities to cook with electrodes with the most optimal parameters. The electronic components of the circuit of modern inverters make it possible to regulate not only the current strength, but also the ignition speed, arc forcing, etc., which ensures excellent weldability of parts. In addition, inverters are compact and lightweight.
Welding inverter Inverter device
The debate among welders continues unabated about which welding method is best. Some people like the simplicity and reliability of the transformer, while others are satisfied with manual welding with a rectifier. However, the best way to learn how to weld is with a welding inverter. The ability to precisely adjust the parameters will allow you to weld metal correctly literally from the very first steps.