How to weld seams in the down position and corner joints
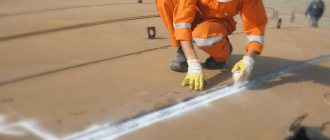
for beginners For beginner welders, it is best to learn to weld seams in the down position. In this case, the molten metal itself, under its own weight, tends to fill the weld pool. In this case, the welded edges of the product hold the molten metal, preventing it from flowing beyond the boundaries.
In addition, when welding in the lower position, the gas tends to rise, pushing the slag along with it, which is very important, since at the very beginning of training you need to learn how to separate metal from slag. All this contributes not only to easy learning, but also makes it possible, at the very beginning of the journey, to obtain a clean and high-quality welding seam.
Based on all of the above, you need to learn how to weld with manual arc welding in the lower position. What nuances should be observed and what should be taken into account?
Welding seams in the lower position
When welding in the lower position, it is recommended to weld the seams towards themselves or from left to right. This approach will make it possible to better control the welding joint, monitor the state of the arc, and correctly move the electrode during welding.
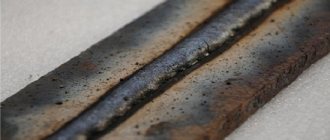
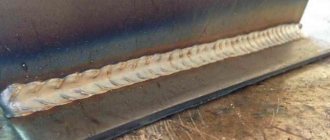
It is necessary to weld the seams in the lower position with a slight overlay of the bead in both directions. In this case, the edges of the metal melt and expand, and the molten metals of the workpieces form a strong and reliable connection. After welding on one side, to strengthen the seam, the workpiece is turned over, cleaned, and welded on the opposite side.
You need to know that metal whose thickness is less than 8 mm can be welded in one pass, that is, in one layer. When the metal thickness is more than 8 mm, welding is carried out in at least two layers. In this case, the height of the first welding seam must be at least 3 mm. The first layer, as a rule, is performed with 3 mm electrodes, and subsequent layers with 4-5 mm electrodes.
Advantages and disadvantages
Advantages
Pipe welding is usually done using a butt joint
For butt connection
- less electrode metal is used,
- it is not difficult to control the process, the designs are reliable,
- The welding technique is simpler than the fillet weld technique,
- butt joints ensure the flatness of the surface of the structure,
- provide connections between parts of different thicknesses,
- It is possible to weld thick metal with a one-sided seam.
Flaws
Butt joint
- does not provide additional rigidity compared to overlap,
- Significant surface deformations may also occur after welding (especially when welding thin metal).
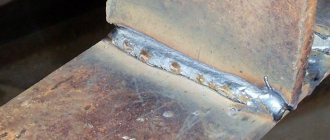
How to weld fillet welds in the lower position
To apply fillet seams, it is recommended to place the product “in a boat”. When this is not possible, special attention should be paid to welding the root seam. To do this, first the surface of the lower edge is welded, and only after that they switch to vertical welding.
It is recommended to weld fillet welds in the lower position using electrodes with a diameter of 3 mm. If a multi-layer weld is applied, the first layer is boiled especially well to prevent the appearance of defects. When applying subsequent layers, it is imperative to clean the connection from slag.
For novice welders, it will probably be interesting to know that it is good to weld thick metal with straight polarity. To do this, the positive terminal of the inverter is connected to the metal. In this case, the metal will heat up well, which will lead to greater penetration.
Thin metal, on the contrary, is cooked with reverse polarity. It is necessary to take into account the fact that this manual arc welding technique is only suitable when working with inverters that produce direct current. When welding with alternating current, forward and reverse polarity does not work.
Share on social networks
content .. 21 22 25 ..Arc welding technique
Methods for making butt welding, T-welding, corner and lap joints
Arc welding techniques include various methods for making butt, T, corner and lap joints.
Butt joints can be welded on only one side or on both sides. To prevent burns, use remaining or removable pads. The material for the former is steel strips with a thickness of 2–4 mm and a width of 30–40
mm, for the second - copper, graphite or ceramics, since they do not melt during welding (they are additionally cooled with water).
Welding on pads allows the welder to work without fear of burns and sagging, makes it possible to increase the welding current by 20–30% and does not require back welding of the root weld.
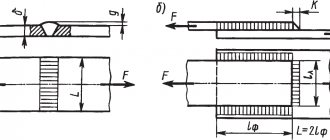
When welding butt joints (Fig. 66, 67), two or more layers are performed, which is determined by factors such as the thickness of the sheets (3-26 mm), the diameter of the electrode, and the presence or absence of edge cutting.
Rice. 66. Technique for welding butt joints without cutting edges at different positions of the electrode: a – vertical; b – backward angle; c – angle forward
Rice. 67. Technique for welding butt joints with grooved edges: 1 – plate; 2 – lining; 3 – electrode located at an angle forward; 4 – electrode located vertically; 5 – electrode located at an angle back; 6 – root seam
The most convenient to perform and
therefore, bottom welds are more preferable, since due to gravity, the molten metal of the electrode flows into the crater and is retained within the weld pool, while gases and slags rise to the surface.
Butt welds without beveled edges are made by fusing a bead along the seam, with a slight widening to ensure sufficient penetration of the edges. Reinforcement of up to 2 mm is provided at the seam. Having welded the seam on one side, turn the product over, remove slag and smudges, and then make a seam on the reverse side.
Butt welds with V-shaped edges are welded in one layer if the metal thickness is less than 8 mm, and when the thickness of the sheets being welded increases, two or more layers are applied. The first layer, 3–5 mm high, is made with an electrode with a diameter of 3–4 mm; for the remaining layers, its diameter is increased to 4–5 mm. Before welding the next layer, the previous one
should be cleaned of slag and frozen drops of metal. This can be easily done with a wire brush.
When the entire groove is filled, the product is turned over, a shallow groove (8-10 mm wide and 3-4 mm deep) is selected (for example, with a pneumatic chisel) in the root seam and carefully welded in one pass, giving the seam a slight reinforcement. If it is not possible to change the position of the product, then it is necessary to perform the root seam especially carefully. Welding butt welds with an X-groove is similar to overlapping
multi-layer seams on both sides of the cut.
Approximate modes of manual arc welding of butt welds with different edge preparations are presented in Table. 19.
Table 19. MODES OF MANUAL ARC WELDING OF BUTT WELDS, SELECTED DEPENDING ON
EDGE CUT
When welding corner, tee and lap joints (Fig. 68), fillet welds are applied.
A
b
Rice. 68. Technique for making catch, tee and lap joints: a - c
symmetrical “boat”; b – in an asymmetrical “boat”; c – inclined electrode; g – with edge melting
Since during fillet welds the molten metal flows into a horizontal plane, it is recommended to make them in the lower position “in a boat”, when choosing the mode of which you can use the table. 20.
Table 20. WELDING MODES FOR
APPLICATION OF A CORNER SUIT “IN THE BOAT”
But it's not always possible
fix the part in the appropriate position. For this reason, welding is carried out
inclined electrode. However, if the lower plane of the fillet weld is horizontal, then lack of penetration of the root of the weld or any of the edges cannot be ruled out. The same defect appears on the lower surface if you excite an arc and start working on a vertical plane. To prevent this, when welding a fillet weld, it is necessary to excite the arc on the lower edge at point A and, having passed the groove, move to the vertical edge, making such movements with the electrode as shown in Fig. 69.
Rice. 69. Electrode movements during welding
fillet weld
Fillet welds can be single-layer if the leg length does not exceed 8 mm, and multi-layer multi-pass if its length is more than 8 mm. In the second case, a narrow thread roll is first made using an electrode with a diameter of 3–4 mm, due to which optimal penetration of the root is achieved.
When determining the number of passes during the welding process, they are guided by the volume of the cross-sectional area of the weld metal filled in one pass. This value should be equal to 30–40 mm2 deposited in one pass.
When choosing a manual arc welding mode for fillet welds, one proceeds from the presence of one- or two-sided bevels or from their absence (Tables 21 and 22).
Table 21. MANUAL ARC MODES
WELDING WHEN APPLYING FILLET WELDS WITH BEvelED EDGES
Table 22. MANUAL ARC MODES
WELDING WHEN APPLYING FILLET WELDS WITHOUT BETWEEN EDGES
Welding vertical seams is
a difficult task, since under the influence of gravity the molten metal tries to leave the weld pool. The amount of current maintained when making such seams should be 1015% less than when welding bottom seams. In addition, the arc must be short. Weld beads can be either narrow or wide. The movements of the electrode are clearly shown in Fig. 70 and 71.
Rice. 70. Trajectory of movement of an inclined electrode when surfacing narrow beads (the numbers indicate the sequence of movements): a – at an acute angle; b – ladder (with the electrode approaching and moving away from the metal surface); c – with reverse-stage movement of the electrode, first 3–4 times its diameter up and along the metal surface, and then back to the weld pool
Rice. 71. Trajectory of electrode movement when surfacing wide beads: a – rectangular; b – curvilinear
Vertical sutures are applied in two ways:
– from bottom to top (ascent) (Fig. 72). In this case, the arc is excited at the lower point of the connection, and when a weld pool is formed, it is moved slightly upward and then to the side.
Rice. 72. Execution technique
vertical seam from bottom to top: a – excitation of the arc; b – the appearance of a weld pool; c – movement of the electrode to rise
The arc should be oriented towards the base metal. Thanks to this technique, the molten metal, when the electrode is withdrawn, has time to harden and form a kind of shelf (platform), which, when the electrode moves upward, will become a support for subsequent drops of molten metal and will not allow them to flow down. The recommended angle at which the electrode should be tilted upward is 20–25°;
– from top to bottom (downhill) (Fig. 73). Unlike the previous method, in this case they excite at the top point of the seam, giving the electrode an initially perpendicular position, and after the formation of a crater - an inclined one. This method is most often used when welding thin sheet metal and for making the first layers in cases where there is a cutting of edges.
Rice. 73. Technique for making a vertical seam from top to bottom: a -
arc excitation; b - the appearance of a weld pool; c - movement of the electrode to the descent
For butt horizontal joints, only the top edge needs to be prepared, which significantly reduces the flow of liquid metal. The welding arc excited on the lower horizontal edge is moved to the beveled edge.
In this case, the electrode is held vertically or at an angle back or forward. The movements are performed in a certain sequence, shown in Fig. 74.
Rice. 74. The order of surfacing layers when
horizontal seam welding
The most difficult are ceiling seams (Fig. 75), in which molten metal tends to flow out of the weld pool. In this regard, its volume should be minimal, the arc should be as short as possible, the electrode coating should be refractory, giving
a small amount of slag, and the welding current should be 15–20% less than the current when making bottom seams.
Rice. 75. Technique for making a ceiling seam (the arrow indicates the diagram of the electrode movement)
content .. 21 22 25 ..
Cutting edges for welding
butt joint without beveled edges
Important! If you weld without beveled edges and the metal thickness is more than 2 mm, you need to set a gap between the parts being welded!
The quality of the seam and the product depends on the choice of bevel of the edges. For each welding method, different edge preparations are selected.
For your information! Without cutting, the process will be much more economical, but cutting the edges is necessary for complete penetration in the cross-section, which makes the quality higher.
with V-shaped edges
with X-shaped bevel edges
with curved edges
The cutting can be done with a chisel, in this case the edges will not be even, an excellent option would be a grinder, a milling machine, the best option would be to use an edge cutter (beveler). also need to control the cleanliness of the bevels in order to get a high-quality seam without defects . For butt joints, all types of edge cutting are used depending on the thickness of the metal and the nature of the seam (one-sided or double-sided seam).
There is a designation for cutting edges: U-V-K-X-shaped. The X-shaped groove of the edges, compared to the V-shaped one, allows you to reduce the volume of deposited metal; the X-shaped groove requires one seam on each side, while the V-shaped one requires a one-sided seam. The shape of the edges depends on the welding method, the material being welded, and the thickness of the elements being welded. [ads-pc-3][ads-mob-3]
Electrode position
The position and movement of the electrode when welding is also very important. Let's give a simple example. You need to weld the bottom seam. In such situations, the quality of the weld largely depends on the amount of slag formed during welding. Slag can either ruin your work or help improve the quality of the welded joint; you just need to control this process. And the correct position of the electrode just helps to monitor the amount of slag, increase or decrease its amount.
There are three types of electrode position during welding: forward, backward, and straight (or 90 degrees). Let's take a closer look at each type.
Forward angle welding
Forward angle welding is rarely used in manual arc welding. This is due to the fact that during welding, slag forms and accumulates in front of the electrode, making welding inconvenient. In addition, the slag will interfere with the stable burning of the arc, and the quality of the weld will deteriorate. But this position is justified if you are welding in a hard-to-reach place.
Backward angle welding
Backward miter welding is used when butt or fillet welds need to be welded. In this position, the slag is forced out of the weld pool, which is generally good. In this case, the welded joint crystallizes very quickly.
At 90 degrees
A very interesting situation. Thanks to it, the welder can quite accurately control the movement of slag, directing it to the welding zone in the required quantity. This is very good for a welded joint. But you need to make sure that the slag does not end up in front of the electrode. If this happens, change the position to "angle back" and change the direction of the slag.
Many beginners ask what is the universal or best angle of inclination of the electrode when welding. There is no answer to this question. Only during work can you accurately determine which position will be optimal. Or it may happen that during the course of your work you will have to change positions from one to another several times.
The provisions described above apply to the formation of a welded joint using manual arc welding. If you plan to work with a semi-automatic or automatic machine, then you will need to take into account the characteristics of the protective gas used.