To make the salt shaker box, I took acacia; this is a very decorative tree of a light green hue, which, when polished well, gives an unusually beautiful mother-of-pearl effect.
To make the box you will need various cutters for a lathe; I have homemade ones from simple files. Their steel is quite suitable for carving.
Wooden box manufacturing technology.
1) We clamp the cylindrical blank for the body of the box into the lathe and first roughly round it, removing the edges. For this purpose we use a semicircular cutter:
2) Round it off more smoothly with a jamb cutter.
3) Using a jamb cutter, we apply indentations that will serve as decorative bands for the box.
4) Then we cut on both sides of these recesses, creating bulges on the box.
5) Round off the resulting edges.
6) Now we need to make the internal cavity of our salt shaker. To do this, we move the support bar to the end of the workpiece and begin to deepen it with a straight narrow cutter from the center to the edge. We do everything smoothly, without sudden pressure. Let's go deeper into the steps:
7) Then, using the tip of a triangular cutter, we smoothly expand the cavity from the center to the edge, reaching the bottom.
8) We level the bottom with a wide straight cutter, use it to form the required thickness and make a groove for the lid.
9) Sand the bottom and side walls of the box with sandpaper.
10) When everything is sanded, cut the workpiece from the machine with a hacksaw. I do this with the machine turned on. But to do this, you need to confidently hold the hacksaw in your hand, you need to constantly watch how much is left until the end of the cut so that the work does not fly out. It is also necessary to remove chips stuck between the swells, otherwise they cause friction:
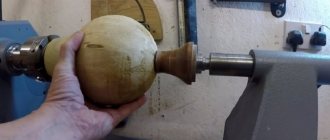
Yes, you need to move the hacksaw away from you towards the part! Before completing the process a little, you need to stop the machine and cut the workpiece. 11) Now you need to make the lid of the box. I have it dome-shaped. We adjust the lid to the size of the inner diameter of the box, for which we try it on:
12) Make the inner part of the lid dome-shaped, forming it with a semicircular cutter:
13) When the inner part of the lid is ready, we begin to form the outer part with the handle:
14) Sand the lid of the box with sandpaper to a light shine. 15) For final finishing, it is better to cover the inside of the salt shaker box with wax (if it will be used for food purposes). Non-toxic varnish can be used outside.
- Related Posts
- How to make a wooden garden swing with your own hands
- Do-it-yourself wooden bath font
- Building a wooden kayak from scratch. Detailed videos
« Previous entry
Benefits of wooden utensils
- Wooden utensils are not only one of the most environmentally friendly, but also useful.
- It is wooden dishes that store beneficial bacteria for the human body.
- The unique properties of wood allow products to be stored and not spoil for a longer time than in any other container.
- The high decorative properties of wooden utensils allow them to be used as decoration on any table.
- Wood does not conduct heat, so food can remain hot for a long time, and it is impossible to get burned on such a bowl.
This is exactly what European wooden utensils manufacturers motivate their customers.
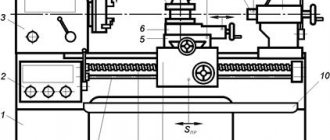
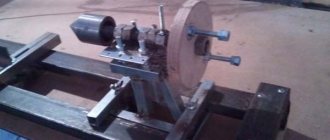
Headstock and tailstock
The workpiece being processed is clamped between two devices called the headstock and tailstock. Rotation from the engine is transmitted to the front one, which is why it is a more complex unit.
Structurally, the headstock of a homemade lathe is a metal U-shaped structure, between the side faces of which a shaft and one or more pulleys are mounted on bearings. The body of this unit can be made of thick steel; bolts of sufficient length are suitable for assembling it into a single whole.
An important part of the headstock, as well as the machine as a whole, is the shaft, a spindle with three or four pins designed to fix the workpiece. This shaft is passed through the bearing of one of the cheeks of the U-shaped housing, then pulleys are mounted on it. To fasten them, a key or a means for fixing cylindrical parts is used, the second cheek is put on last, and the structure is securely tightened with bolts.
The tailstock's job is to support the long workpiece while allowing it to rotate freely. You can buy a ready-made part from a factory machine, or you can use a powerful electric drill chuck mounted on a square of suitable length. A shaft with a pointed end is clamped into the cartridge itself.
The headstock and tailstock are installed on the bed. It is important to understand that the axes of rotation of both shafts must completely coincide. Otherwise, breakage of the workpiece, failure of the machine, and possibly injury to the turner are likely.
Raw materials for the production of wooden tableware
Tree species.
- Birch.
- Rowan.
- Elm.
- Linden.
- Cedar.
- Juniper.
- Aspen.
- Larch.
- Maple.
Requirements for wood for making dishes
- The tree must be recently harvested. It is this tree that has sufficient plasticity.
- Defects such as blue discoloration, rot, cracks, knots, and dead wood are not allowed.
- The wood of the first second cut has an advantage; it is the wood that has the least number of knots.
- Large diameters provide more dishes.
Vase turning
The general principle of turning a vase is the same as turning a goblet. The difference is that the cup is sharpened as a whole, and the vase in parts.
Turning a vase: aa1 - column-leg, b - hollow part
First, the column-leg is carved, then the upper hollow part, and finally the lower part - the base of the vase. Having turned the column on a trident in the usual way, prepare a piece of wood and, according to the drawing, grind out the upper part from it, in the center of which, using a center drill, make a recess for the column and cut it off, then grind out the base using a cup chuck when turning. A recess is also made in the lower part for the lower end of the leg. Having finished turning the individual parts, they are assembled using glue. When the glue dries, the product is finished on a machine.
Wooden utensil production technology
Making wooden utensils is not a very complicated process. All operations for obtaining the finished product can be described one by one as follows:
- Logging. This process should ideally be carried out individually for production in order to obtain a minimum amount of waste. The following tips may help at this stage:
- Thorough inspection of the log for defects.
- Unnecessary defects are removed at the procurement stage.
- The wood is cross-cut only to multiple lengths of the resulting blanks.
- Timber removal.
- Crosscutting into blanks.
- Making dishes on a lathe.
- If desired, apply coating and design.
It should be remembered that it is advisable to produce large utensils from large wood diameters, so the efficiency of raw materials will be much higher. On average, one cube of wood can produce up to 80 cups of different sizes.
Master class: making a segment vase “Greek motif”
The whole process of segmental turning on a lathe has long been known to those who are interested in it, and has been worked out. But nevertheless, I want to talk about it.
Having seen enough on foreign sites how the local craftsmen create all sorts of turning-segmentary miracles, I decided to create something similar. To tell the truth, we have enough of the same craftsmen, but unfortunately, not all of them share their skills. there is not enough time, or desire, or desire, or maybe they are embarrassed. But I (even though I am a shy person by nature) decided to show how I did it.
To manufacture this type of product, and indeed for segmental turning, you need tree species that are contrasting in color. In our northern regions, the choice of such trees is not rich. Birch, bird cherry, aspen, alder, conifers. But I had dry birch suvel, as well as one block of overseas chocolate Che tree, and supplies of veneer of various types of wood. I immediately excluded spruce, pine and larch from the list due to the coarseness of the layers and inexpressive color. Alder, due to its softness too. What remains are bird cherry, birch, souvel, veneer and Che wood. Well, this Che has very hard and heavy wood! But how beautiful! Just like chocolate.
And so, I decided to make a vase with Greek ornaments from all this “wealth”. Having drawn a project for the future vase and using one wonderful program, which on one of the sites, one wonderful Moldavian master Mihai Apostol kindly provided for free use, calculating the sizes of the segments of the future vases, I got down to business.
First, I cut out the round bottom of the future vase and glued it to a piece of round wood left over from previous turning works. This was so that there would be something to clamp the future product into the lathe chuck.
Having run the material to the size, thickness, on a surface planer and setting the desired angle, using a simple device for a circular saw, I sawed the segments
There were 240 of them!
And many hours of painstaking work began to assemble these “puzzles.”
For the ornament I used birch souvel and the same chocolate tree
Then he began assembling larger segments. To do this, it was necessary to polish the edges of each segment. The appearance of the future product depends on the accuracy of the corners. By the way, when assembling the Greek ornament, each glued pair had to be sanded.
Then all the rings were glued together in positions tightened with clamps. Although Titebond is a strong glue, to be on the safe side I left it to dry for a day so that these rings would not fly apart during turning on the machine.
The next stage is sanding again, but this time on planes. Oh, my poor fingers. They got it from the impact of sandpaper (((
Then half of the future “pie” was glued together, clamped in a clamp. And again for a day.
And into the machine, for preliminary processing on the outside, and most importantly on the inside, because then it will be difficult to get to the inside. The narrow neck was supposed to be made for the vase.
The next step was to glue the ring with the ornament, right on the machine, pressing it with the tailstock. And again boring inside, using a homemade lunette. (For those who don’t know, this is a large metal ring, with wheels from rollers inside). A very necessary device for turning internal cavities, protecting the part rotating in the lathe from flying out of the chuck, and your own body from all sorts of unpleasant and accidents.
Having turned the ring with the ornament, we glue the second part of the “pie”, previously glued from the remaining rings, and also grind it first on the outside, and then on the inside.
It’s with internal sampling that the most intense torment begins. You sharpen, after all, almost blindly! It often happened that this final work, sampling the insides of vases, ruined the whole thing. Ruining all the work, materials and time to nothing. But here it comes to the rescue a laser pointer aligned with the incisor. In the photo you can see a red glowing spot on the left side of the neck. This is just from the pointer. Although this does not always save you from failure. My devices are all completely homemade and imperfect
And here it is, this long-awaited miracle!
And the other day, this beauty found its owner, which cannot but make me happy.
There were other works before this, but not with such a large number of details, and they also found their connoisseurs.
Conclusions from all of the above
Psychologists say that each person has his own path. Similarly, we can say that every type of business will develop if you find a way for this business. Let's explain this using today's example: the business for the production of wooden utensils will develop if there is a small but high-quality forest of different species as raw materials for the manufacture of utensils. Specifically, in our conditions, if there is wood that is not particularly in demand as sawmill, in other cases ordinary sawmills can compete with this business.
For sawmills, a large number of different types of wood is not always good, since the consumer prefers to take specific types rather than a “supermarket”. In the production of tableware, this advantage will allow you to diversify the range of products.
Also, to pay for the work of a sawmill, large volumes of wood are needed, even for an ordinary strip you need about 30 cubic meters per shift. When making wooden utensils, you can go once in a GAZ car to the forest and bring raw materials in lumps for a month of work (the raw materials must be “white”).
As we have seen, a business such as tableware production does not require very much investment:
- Removal and harvesting of timber can be carried out either in-house or from suppliers. Requirements for raw materials are discussed in advance.
- Chainsaw.
- Wood lathe for large sizes. A special attachment is installed on this machine.
- Templates for painting and spray guns.
What kind of utensils will be most in demand is sometimes asked by manufacturers; to this question we can say the following: “The most in demand will be the utensils that are most often used in the kitchen, and these are cups, glasses, decorative vases, and even saucepans made of wood.”
DIY wooden chest of drawers
Discussion: 4 comments
- Irina-Yasna:
07/22/2011 at 6:08 pmHello! Thanks for the master class. I decided to add that a salt shaker is not just a storage place for salt. The salt shaker is used in rituals. So, in Rus' it is customary to greet guests with bread and salt. And the salt, of course, is in the salt shaker.
Answer
- AlisherXD:
10/08/2011 at 8:20 am
I work very well on a lathe, but I haven’t seen a salt shaker, but I picked the inside with cutters
Answer
- AlexsTj:
10/14/2011 at 6:38 pm
An interesting method for turning a salt shaker, but it would not have been easier to first grind the lid completely from the inside, the rough outer part, then cut it off, start sharpening the salt shaker itself, grind a chamfer for the lid from the inside, insert the lid so that it sits very tightly, and start processing the outside together with the lid, once you finish sharpening outside and polish, remove covers and do interior work,
This method seems easier and faster, I’m not imposing the owl’s method, these are just my thoughts! I'm a beginner turner, and I want to ask what the main types of chisels should be, if possible with dimensions and drawings!
Answer
admin:
10/14/2011 at 8:31 pm
Your option also deserves to be there. I remember this way I made Easter eggs, and this method fits perfectly there. Well, the issue of speed is the least of my worries now. And for cutting tools for a lathe, look it up on the Internet. I made mine from a file and they satisfy me completely.
Answer
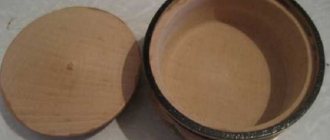
Turning a box
The box is assembled from three parts: the box itself, the lid and the lid button. First, the lid is turned out and a hole for the button is drilled in the center, then the box and the button are sharpened; Moreover, the inner part of the lid is finally turned, and the outer part is only rough.
Turning a box
The lid is cut off and the box itself begins to be turned. A lid is roughly put on the turned box and the top is ground clean. The finished parts are glued together, the product is dried and finished.