How to dig a hole for a post? The first thing that comes to mind is using a shovel. However, there is one caveat - you won’t be able to make a neat hole with a shovel.
Therefore, let's immediately move on to the second option.
To dig a hole for a post, you can use an earth drill. It can be mechanical or electrical.
In principle, both types of tools are good.
But we will look at the manufacturing process of an electric drill, because it is more powerful and productive - it saves effort and time.
We also recommend reading the article: how to make foundation posts from sewer pipes with your own hands.
How to do it yourself?
If you have a hole drill with an electric motor, then there is no longer any need to strain yourself when digging the ground with a shovel.
The tool now does everything itself, with it you can make holes for various purposes, you can bring water to the site, lay the foundation of a house and design a garden by planting trees. Instead of buying, as an option, electric drills are made with your own hands from scrap materials. Designing a high-quality unit is a feasible task for everyone. A homemade drill is not inferior to the one you purchased ready-made.
Moreover, the inventor is given freedom to make his own changes: modifications provide the device with additional functions and make operation easier.
You can create just such a unit that would be ideal for drilling. The type of nozzle and the size of the blades, power, dimensions of the equipment, engine characteristics based on the soil properties are determined independently.
To get a new, reliable electric drill, you need to assemble parts such as the cutting part, the rod, handles and the motor. The blades can be circular disks, and to create an auger yourself, you can look for a suitable model - ready-made drawings are used to create working attachments based on a template. The electric motor is made from a hammer drill, and a powerful motor is also obtained from the starter and gearbox of the drill.
With your own hands, using an electric cultivator, it is easy to create an effective machine for cultivating the land, including plowing it and removing roots from it, which a drill can do well. What do you need to start designing?
Tools and materials
One of the simplest options for a homemade drill is a drill unit. The tool is ideal for using it to develop your own powerful techniques.
So, before you start, you will need the following materials:
- drill;
- worm gearbox, it is easy to install;
- Bulgarian;
- steel disks of the required diameter, depending on the size of the pit.
You can start working.
Manufacturing stages
- On the disks, the number of which corresponds to the number of tiers of the cutting part, make holes in the middle for the rod. The hole should be equal to the diameter of the rod.
- Cut the disks to create circle sectors.
- Weld the disks in a spiral and connect them to the rings.
- The ideal tip option would be a metal drill; it facilitates the drilling process. A sharpened pike is less convenient.
- The tip is placed 5 cm below the auger nozzle.
- We sharpen the tip of the drill and auger.
- Now the attachment is installed on the drill with a gearbox.
The universal electric drill is ready for use.
For a review of an electric drill for winter fishing, see below.
What it is?
An electric drill is a tool that automatically operates on alternating current, which is used to solve such a problem as creating earthen pits of various types and purposes.
The device consists of a rod, handles and a drive. It is equipped with an electric motor, which is its distinctive feature. Special blades on thrust bearings are attached to the rod (the so-called rod part of the frame), which collects and lifts the earth when the unit is buried in the ground during the development of the hole.
How to make an earth drill yourself
With a little effort and strictly following the requirements of the step-by-step instructions from the masters, you can make a bracelet with your own hands in a matter of hours.
Selection of materials
To assemble the blanks for the main elements of the drill, you will need:
- For the rod. Round or square pipe. Size - 20*20 mm, 35*35 mm.
- For blade knives. Sheet steel 4 mm thick or a saw blade from an angle grinder or circular saw (optional). Below we will consider the use of each of them.
- For the pen. Round pipe. The diameter is selected according to the circumference of the palm.
- For the pike. A sharpened large diameter reinforcement rod or steel strip is used. A combination of both materials is allowed.
It is better to work with metal wearing protective gloves and goggles.
Tool preparation
The list is like this:
- welding machine with electrodes, protective mask;
- grinder with disc attachments;
- electric or hand drill;
- hammer;
- sharpener;
- vice;
- mites;
- marker, tape measure;
- compass.
For anti-corrosion protection of metal, a primer and a brush are purchased separately.
Drawing or diagram
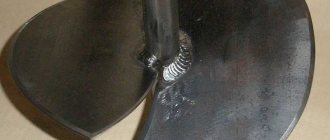
Scheme. 1 – steel rod; 2 – welded half-disk knife; 3 – crossbar-handle; L – depth of the hole to be punched.
Here, each master makes a drill for himself, selects the dimensions, material, type of construction, calculates the material consumption and its cost. The finished product can be improved during use.
Drill assembly
It is necessary to analyze which blades it needs to be equipped with: stationary or removable.
Stationary blades are simply welded to the rod.
To make them removable, you will need:
- Weld shelves made of thickened steel on one side of the shaft.
- Make them so that the knives diverge at an angle of 25-30 degrees.
- Make 2-3 holes in the shelves for fasteners and 2-3 holes in the blades of the same diameter.
- Secure the blades with a bolted connection.
Made from sheet steel
To start, it’s easier to cut out a sketch from white paper. After which a circle of steel of suitable diameter is cut along it. A hole is made in the center in the form of a square or circle, depending on the cross-section of the pipe for the shaft. The hole size is taken slightly larger than the rod for ease of welding.
Blades are made in two types:
- From two halves of a circle.
- From an open circle, where the edges shift, resembling a spiral turn. To increase drilling efficiency, the edges are placed at an angle of 25-30 degrees from each other.
From a saw blade
The best saw blade option is a diamond one. It is highly durable.
Used disks from circular saws will also work. They are made from hardened steel. They have a well-sharpened edge and are reliable, but they cannot be bent, so the disk is sawed in half and the two parts are placed at an angle. To make the drill go easier, the side edges are additionally sharpened on a machine or by hand.
Photo: drill from a circular saw blade
Welding
It is carried out wearing a chameleon-type protective mask (preferably) and gloves. The blades are welded to the rod both from the inside and outside, and the seams are cleaned.
Corrosion protection
The finished product is sanded with sandpaper and treated with an anti-rust primer. An alternative is a phosphating solution.
After priming, the drill can be painted.
Care
It is recommended to periodically disassemble it, clean it of accumulated dust and dirt, and lubricate it with a water-repellent solution. This will avoid jamming of parts, repair or replacement of individual parts and will extend the service life of the product.
Making a drill is not difficult, but it requires skill. In skillful hands, a homemade drill will be an excellent assistant in work on a summer cottage and in the construction of small structures.
Nuances of choice
When the question arises of choosing the appropriate electric drill for the soil, it is important to determine the conditions in which the unit will be used. Based on the type of land that prevails at the work site, it is decided what power of the device is optimal. Serious large-scale work is carried out using a device slightly larger in size than a household electric drill.
The parameters of the device determine its cost and scope of operation. Thus, a low-power electric drill (about 1.5 kW) will be a good option for solving simple tasks such as making single holes for seedlings in a summer cottage. If the product is to be used in a large construction project, which may require pile drilling or other deep holes in the ground, then you will need a drill with a power of at least 2 kW.
The equipment of the unit also plays an equally important role and is worth paying attention to when choosing. For example, for household work, the diameter of the nozzle can be no more than 15 or 20 mm.
The diameter of the nozzles depends on the massiveness of the structures drilling the soil. The attachment that comes with the electric drill can be replaced with new ones as needed.
To take advantage of all the advantages that an electric drill has over other drilling machines, do not purchase a unit if you doubt the integrity of the supplier. Then you will be able to appreciate the bonuses that come from using an electric drill. Namely, efficiency in energy consumption, noiselessness and harmlessness to the environment, because during operation no toxic exhaust gases are released into the atmosphere.
Shock-rope technique
You can drill a hole in the ground for a well or install a pole not only with a rotary type tool. To perform similar work, the shock-rope technique is also used. You can carry out drilling work in this way yourself, and the depth may be suitable for the well. A drilling rig can be purchased or made from scrap materials. It consists of the following parts:
- tripod 2.5-3 m high;
- projectile (bailer);
- cable;
- winch.
The operating principle of this technique involves dropping a tubular projectile onto the well site. Due to its own mass, the bailer enters the soil and grabs it. At the lower end of the working part of the installation there is a valve that holds the soil extracted from the well. After removing the projectile, it is deployed with the technical hole down and the accumulated soil is shaken out with blows from a heavy tool - a hammer or crowbar.
Manufacturing of the installation
To prepare the drilling rig for the percussion-rope technique, you need to place a high tripod at the drilling site. It is made of high strength metal, but it is recommended to make spacers. A cable block is attached to the top point of the tripod; it must be designed for the maximum weight of the projectile filled with wet soil, taking into account a reserve of about 50 kg.
To remove the bailer from the hole in the soil, you need to use a winch with a cable. They are also selected based on mass. It is fashionable to use a manual or automatic winch for drilling, but the fasteners must match. To fix the lifting device, an object that exceeds the mass and loaded with soil, a projectile or a static object, for example a tree, is suitable.
Structure of the bailer
A bailer is a tubular projectile for percussion-rope drilling. The main part contains soil mined during well drilling. To capture, a petal or ball-type valve is made at the bottom of the projectile. The distance from the cutting part is at least 5-7 cm. The diameter of the blank for the bailer must correspond to the expected size of the well.
For reference!
The depth of the well with the percussion-rope drilling method increases by 40-50 cm in one approach. But, you should not focus on this parameter when making a bailer yourself.
The drilling speed depends on the mass of the working part of the tool. To increase this parameter, it is recommended to place a weight at the top of the projectile. For this purpose, use pancakes with holes in the middle or fill the top of the bailer with lead. When pouring along the length of the workpiece, it is necessary to take into account the place with the partition. The algorithm for making a bailer is as follows:
- The cable fastening must be located in the upper part of the pipe along the center line. To do this, weld a transverse strip and drill a hole in it according to the diameter of the cord used.
- The lower end of the pipe needs to be sharpened. Depending on the softness of the soil, you can choose a ring type (for hard soils) or a serrated type (for loose and soft soils). If there is a muffle furnace, the edge is hardened.
- To clean the internal cavity of the projectile, a longitudinal hole 3-4 cm wide is cut in the upper third. During percussion-rope drilling, the soil becomes densely packed into the projectile - it can be loosened with a crowbar and shaken out.
When working with a bailer, you need to pay attention to the condition of the cutting edge - when that part spills, you need to use other drilling methods. This is due to the fact that large stones are easier to remove from the hole with an auger tool
In dense and viscous soil, it is better to attach a bell-shaped collar to the end of the bailer, with the extension downwards.
Budget electric drill.
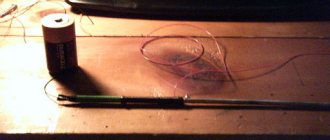
As they say, laziness is the engine of progress. He began experiments on drilling through thick ice back in 2014. And it seems that I found the optimal solution to this, in the form of an attachment - a gearbox for a chainsaw, but something didn’t catch on; of course, it’s convenient for them to drive assholes, but that’s not what we go fishing for. https://www.youtube.com/watch?v=5mIlvYdKwvA And then just last season the original battery on the Dingasik “died” (it’s a winter “goat”, like a snowmobile), I stuck an adult 55 A/h battery in it .
Well, I think, since the stars have aligned, it’s time to switch the drill to electric traction. I bought a Toyota electric power steering at Drome for 2.5 rubles.
, a 22mm aluminum tube in Leroy, a rubberized cable with a cross section of 2.5mm, a 40 Amp car relay, a 30 A fuse, bicycle handles, crocodile clips on the terminals, and other little things.
First of all, I unscrewed all the unnecessary parts from the amplifier that could not be removed in a civilized way - I sawed them off with a grinder, only two wires should be left (thick power ones), the rest “in the furnace”. The button cannot be connected directly, they are usually designed for 2-5 amperes, and the motor “eats” 15-17, in general, sooner or later it will burn out. It is also advisable to install a fuse in the power branch; no one is insured against a short circuit, otherwise at least the battery will remain intact.
The button I have is not quite correct, it is a two-position on-off button, it is better to set it to “single-contact” like on a doorbell, pressed - there is power, released - no power, it’s safer.
Well, of course, it is advisable to solder all contacts. There is a lot of information on the Internet about how to connect a relay; I won’t describe it. I screwed the handle into the standard holes of the amplifier. I put spacers inside the tube on the bolts, without them, when tightening the nut, the handle flattens and it bursts.
The diameter of the output shaft was adjusted to the dimensions of the adapter.
The weight turned out to be 5 kg. Rotation can be provided either left or right, it all depends on how the terminals are connected to the battery. The rotation speed is about 140 rpm, which makes it quite comfortable to make holes in the ice.
I’ll also tell you a case of how NOT to do it. I started assembling the drill at the end of last season, screwed on the handle, installed the auger, threw the wires directly without buttons and relays and ran to the tests. The first hole was good, the second was a total “song”, and on the third the auger got caught on the lower edge of the ice..... In general, while I reached it and threw off the terminals, the handle broke off on the ice. It’s good that the drill itself didn’t drown. So don't repeat other people's mistakes. I wish you all a good bite and big catches in the coming season.
Ways to improve the tool
When drilling holes, the master may encounter a large number of plant rhizomes that lie tightly in the soil. The sharp edges of the blades will make working with the drill much easier. For ease of use, you can cut several teeth on the sloping area of the blade or round off its cutting area.
You can improve the design and make removable cutters for the drill. Thanks to them, it will be possible to drill holes of any diameter. In addition to the manufacture of spare parts, it is necessary to provide for their attachment to the collar. The easiest way is to connect them with two iron plates, which are secured by welding.
In the mounting plates, as well as in the blades, you need to drill two holes for the sides. The cutters are fastened with M6 bolts. To ensure that the bolts do not interfere with work, they must be screwed in with the threads facing up.
There is another way to improve your homemade pole drill. You can increase the efficiency of the lower end of the knob. To do this, you need to cut out a narrow metal plate (10x2 cm) and grind it into a cone shape using a grinder, making a kind of point.
There is no need to make cuts in the collar; turned metal plates are inserted into its end, fixed by welding and flattened. The result should be a peak.
There is another method for making a pike. A metal plate is cut to a length of about 17 cm and a screw is made from it, similar to a corkscrew. Further, the algorithm of actions is the same as in the described first option.
A suitable drill can act as an auger, which can easily handle wood as well as metal. Such a tool will penetrate the ground much easier and will drill a hole to the required depth without any problems.
Builders who work on dense deep layers of soil will need one piece of advice. Between the pick and the cutter you need to weld a small flat cutter. Thanks to this design, it will be possible to loosen the earth and center it when drilling. For such a part you will need 2 metal plates 3x8 cm. This trick will significantly speed up working with the tool.
Milling cutters can also be made from grinder discs, which are designed for working with stone. The circles need to be cut along the radius and the hole in the center should be expanded according to the diameter of the knob. Bending the disk with the sides apart gives the appearance of a corkscrew or auger. All that remains is to weld the part in the manner described above.
The cutter is very easy to make from a circular saw blade. The teeth of this model can easily cope with plant rhizomes and hard soil.
The master can choose how to modernize his drill independently. It is worth saying that making a drill for poles with your own hands is not a complicated process at all and requires minimal physical and financial costs from the master. The entire manufacturing process takes two hours at most.
Finally, there is one important piece of advice: before the drilling process, it is best to loosen the soil with a shovel, then the device will fit into it more easily and the work will go much faster. The recommendations given will certainly help the master make a functional and effective tool that will serve him for decades and become a very good assistant.
Purpose
When using an electric drill, you can perform many types of work without voltage, due to the fact that the device can be used immediately after it has been turned on, and it is also characterized by high productivity.
During operation, there are low mechanical costs, which is a plus: the efficiency is seventy percent.
It is difficult to work manually with highly dense soil, especially if it contains elements that prevent drilling (stones or other rocks, roots), and the use of the unit greatly facilitates soil development.
An electric drill will come in handy in dachas and gardening . They can be used to loosen the soil and make holes of the required depth for planting various crops, be it ornamental shrubs or young trees. Therefore, the use of the unit in the summer is very common, especially among land owners. An earth drill can be attached to a drill or screwdriver and used for any purpose, cultivating the soil.
An electric hole drill is used when installing fences and you need to make holes in the ground for a fence. Similarly, when laying the foundation of any structure, it becomes necessary to drill the soil for piles. Sometimes it becomes necessary to drill through ice, in which again a power tool comes to the rescue. Convenience is due to the fact that you can use different blades.
But in order to successfully use the tool, you need to decide what characteristics it will require for successful operation for its intended purpose. Thus, the diameter and type of blades and the length of the rod differ. For various types of excavation work, units of suitable power are selected accordingly.
Removable blades of drilling machines can be helical, auger or disk.
In the case when it is necessary to obtain a hole with smooth edges that would not crumble, an attachment is used, which is a pipe with a spiral of blades around it - this is an auger. It can be used to drill tunnels in the ground, it is used for water wells, and is also suitable for making holes for pillars.
During serious work, double-spiral augers are the most useful; with their help, it is easier to lift dense soil than single-spiral augers.
The auger must be selected according to the type of soil you will be dealing with. For example, for ground that is frozen and covered with ice, the store always has a separate type of durable attachment.
Auger blades are very popular because they are the most practical and versatile. A garden drill is capable of making depressions in the ground up to a meter, so you can make holes for the base of light structures: swings, benches. This hand-held electric soil drill is suitable for summer residents and can be used even in rocky soil.
The disk type is represented by an attachment in the form of blades attached to a rod, located at an angle to each other. May be useful for the garden.
The length of the rod is selected based on the user’s height and the required depth of the hole. Working at an angle with an electric drill is not always convenient and, moreover, unsafe, so the length of the rod is an important characteristic. For downhole drilling, it would be optimal to choose a rod of 1.5-2 m.
Units with an electric motor operate from the electrical network. A cordless drill is very convenient because it can drill even without being connected to an outlet. If you plan to work for a long time, it is better to use an extension cord, because the battery may be discharged.
Designs and Applications
There are three main designs of earth drills:
- Garden. Usually these are two semicircular blades welded at an angle to one another. A hand drill of this design is used to organize holes for planting plants, which is why it is called “garden”. But the same tool is used to make holes when installing posts for fences, gazebos and other light buildings.
An example of a homemade earthen garden auger
- Auger drill. It differs in that it has a longer cutting part. It is used for the same purposes - to make holes for pillars. Due to its design - a longer cutting part - it needs to be removed less often, so drilling usually goes faster.
The auger drill is distinguished by spirally wound several turns of the spiral
- Drill for TISE piles. This design is similar to a garden auger, but has an additional folding blade to form the expansion at the bottom of the pile characteristic of this type of foundation.
Folding blade - features of the TISE pile drill
Garden earth drills that are easier to make. Depending on the type of soil on which drilling is carried out, their design is slightly modified. This is the beauty of homemade drills - they can be “sharpened” to specific conditions and it’s not just about the size - the blades can be made removable, bolted on, but also about the design features. Yes, ordinary drills in the store are inexpensive, but they are “universal”. They work well on “light” soils.” On loams, clays, marl, etc. they are ineffective.
This is interesting: How to make a hand drill for the earth with your own hands - we explain in detail
Blueprints
A self-made drill is good because its design is “tailored” to its owner. During the manufacturing process, everyone makes their own changes, then many more refine the product. But it can be difficult to do without basic drawings. This engraving contains several drawings with the sizes of various drills. As you understand, the dimensions are arbitrary; they can and should be changed, adjusting them to the size of the required wells.
Shovel drill
There is no point in making a serious structure for planting plants. In this case, you can make a garden drill from a shovel. Choose a high-quality shovel made of good steel, apply markings as shown in the drawing. According to the markings, you will need to cut out two small fragments and saw the lower part in the middle to a depth of 30 cm (pictured).
Next, the edges are bent one forward, the other back, and the petals formed in the lower part are folded towards them. The resulting seams are boiled outside and inside.
Drill for soft soils
If the ground is soft, the conventional design does not work very well. For such cases, there is a special drill with an extended cutting part. It is a kind of glass with slits on the sides. The cuts are equipped with cutting edges. They are best made from well-hardened steel.
Drill for soft soils
This drawing shows an interesting handle design - it can be rearranged as the length of the rod increases.
Basic drawings of auger and garden auger
Both of these units work well, but the garden one has to be taken out often, and the auger one is harder to rotate. Choose according to your own preferences.
Auger and garden auger for soil of different densities
Detailed projection drawing of an auger drill
Garden auger drawing
Types of equipment
In what cases can this type of equipment be used:
- When utility networks are laid.
- For the construction of a well.
- For installing a load-bearing base on piles for light outbuildings or other structures.
- When installing a fence.
Types of structures and their technical characteristics
In the past, vertical shovels were used for such purposes. They have been replaced by new, improved, simple models that will greatly facilitate all types of work.
A few simple kits:
The simplest mechanical device
It is a conventional double-sided equipment with a tubular rod, a handle and a cutter with 2 blades on the other side.
Used for digging shallow holes and shallow wells.
It can be used for all types of work
Auger drilling device
The main differences of the improved manual model are that behind the cutting blades there is a screw auger. Thanks to several cutters and a split design, work is carried out quickly, and due to extension, penetration occurs to the required depth.
Popular brands
Today, electric drills allow you to perform many jobs. Without these tools, the efficiency of solving many problems would be significantly reduced. Thanks to the fact that suppliers now offer equipment that meets consumer needs, labor productivity has increased significantly and less and less human effort is spent.
Drill manufacturers compete for dominance in the market and try to improve new models of equipment. The brands in greatest demand are:
STIHL is the first domestic company to produce a variety of technical equipment at attractive prices. The models presented by this brand receive a lot of positive reviews. Buyers note the decent quality of the products. As for electric drills, STIHL guarantees a long service life of the unit.
There is a large selection of drill models designed for work of various formats.
Equipment for any, even the most specific taste, is sold by the following brand - EFCO , which specializes primarily in garden equipment. It is not surprising that this Italian brand is so famous on the Russian market: official representative offices sell its products in many countries. The drills from this company are very durable and are used for tasks of various sizes, from making an ice hole for fishing to responsible professional work.