Metal marking: technology, equipment, price, consumables
Marking is the application of certain information to an object to identify it for subsequent use.
From the definition it is not difficult to guess that marking metal is also important, because modern industrial production is unthinkable without strict accounting of all units of products. All subsequent control over details is accomplished precisely through a specific sign. Labeling is another way of positive self-promotion for the manufacturer, and for the buyer it is a sure sign of quality. Markings applied to metal have the following functions :
– identifying (allows you to recognize and highlight a specific part);
– informational (carries certain information about the part);
– emotional (works as an element of advertising, used in rare cases).
Marking methods:
– Additional
. Applied to tags, stamps, labels, stickers and other information carriers.
- Straight.
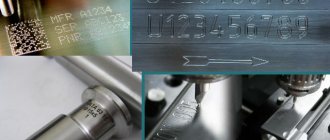
Marking is applied directly to the product in the form of a barcode, letters or numbers, or images. It is carried out by laser engraving and metal marking.
In metallurgy, a direct method of marking is used, since labels and labels can get lost, mixed up, torn, or erased, and laser engraving and metal marking are not influenced by any external factors.
The labeling of metal products is taken extremely seriously and responsibly. The fact is that when constructing and assembling any mechanism, order and accuracy are impossible without special signs that carry specific information. From year to year, the manufacturing technique of a part and its design may change both in terms of quality and design features. Therefore, in such cases, only parts with “old” markings are suitable for repairing old equipment, and for modern ones – with “new” markings. In addition, the marking contains additional information about changes in the design or manufacturing technology, warranty period, and material.
Metal marking technologies:
There are several main types of metal marking technologies:
Each of them has its own specifics in application and use.
How is laser marking carried out?
The technology of metal marking by laser method has its own specifics. The top layer of the part is removed using a non-contact method (without touching the surface of the metal product). This gives a guarantee for the indefinite life of the marking, since it is not susceptible to any possible external damage. If the material is very fragile (glass or plastic), then using this marking method you protect it from deformation. Then, using a laser marker, information is applied to the prepared surface of the metal product: serial number, manufacturer’s logo, bar code and batch number. It is readable, not erasable and contains recommendations for storage and use, as well as sales of parts. Laser marking cannot be removed either physically or chemically, which already indicates its high quality.
The main advantage of laser marking is that almost all materials can be used: wood, glass, plastic, metal products or leather - just determine the correct length of the laser beam.
Regardless of the type of metal or their alloys, laser marking can be carried out at any stage of part manufacturing, without special conditions and requirements.
If consumables for marking metal in different ways are characterized by a high cost, and the marking process itself takes a sufficient amount of time, then laser marking is different in that it does not require large additional costs and is done very quickly.
Advantages of laser metal marking:
– laser marking is carried out using computer modeling;
– products of any parameters and from almost any material can be labeled;
– due to rapid application, laser marking does not affect the level of operation of the enterprise;
– information is applied very clearly, it cannot be changed or erased;
– laser marking requires little energy consumption;
– marking can be done on any uneven surface in the most inaccessible places;
– counterfeiting of the product is excluded;
– laser marking does not stand the test of time.
Why do you need high-quality metal marking?
In addition to keeping records at the enterprise, labeling is also necessary for the buyer. By reading the information on the parts, he can decide what exactly is right for him. Undoubtedly, if the marking was not done very well, or the basic information about the product is impossible to read, the buyer will not want to deal with such details and will refuse to purchase them at his own peril and risk.
This will not happen with laser marking. It is distinguished by its excellent quality, well written letters and numbers. It cannot be faked, it cannot be corrected. This becomes a guarantee that the part was manufactured at the factory. The seller and the buyer can be confident in their choice.
What equipment is used for metal marking?
Industrial metal marking is now widely done using lasers. When producing large batches of products, it is very important to keep records of all elements and not miss anything. For this case, the laser is more suitable than ever. To carry out all the above processes, you need to use metal marking equipment. The equipment may consist of a specific ready-made kit, which consists of:
– computer for process control;
– transmission and control systems;
Alternatively, metal marking equipment may consist of a hand-held marking machine and may also be integrated into a production line. You can use markers on a frame, which are meant as a separate workplace for the marker.
In any case, industrial marking of metal is carried out by serious manufacturers who are ready to take responsibility for their product and provide the buyer with all the information that he may need.
What to do if you need to attach markings to metal?
To attach markings to metal, special tags are used. A metal plate or tape is coated with special ceramic paint, and a row of markings is applied to it using a laser.
If the markings are applied to separate plates, then the markings are attached to the metal using self-tapping screws or self-tapping screws. This method is appropriate only if the introduction into the product does not cause harm to it, does not affect the quality and its size allows such manipulations. Otherwise, the signs can be attached by welding.
If marking according to technology should be carried out only on hot metal, then, naturally, it will not be possible to attach the tag manually. In this case, an automatic fastening unit is used, consisting of the following components:
– installation for making tags;
– manipulator (deliveries the tag to its destination);
– automatic welding machine;
– operator terminal where the control panel is located.
If you use plates for marking, then they can be used on any type of material and regardless of the characteristics of the surface. Such signs are not influenced by external factors. The information is placed in a prominent place and is easy to read.
Using consumables for metal marking
As for consumables, their price and quantity depend on the type of marking you choose. As already mentioned, the least amount of consumables for metal marking is needed for the laser type of marking; you just need to have the appropriate equipment. For other types of marking, a number of consumables are required - you can familiarize yourself with them when purchasing a marking machine or studying the conditions for its use.
Basic consumables:
– carbide needle for marking (the needle is used directly for engraving; when it comes into contact with metal, it is erased and can be changed);
– spring (returns the needle to its place, becomes unusable after using 2-3 needles);
– liquid lubricant (needed to extend the service life of the entire mechanism by regularly lubricating its parts);
– extended marking needles (used if the standard needle length is too short).
Prices for metal marking
When metal marking is carried out to order, prices can vary greatly. It all depends on the financial costs of additional materials. For example, with laser marking you do not need to spend money on anything except electricity - all processes are carried out automatically and without the use of additional equipment.
For attached metal markings, the price will differ, since the price includes plates, screws and paint.
High-quality marking does not mean expensive application. The price depends on the type of marking.
Thus, we can conclude that in any production of metal products, the use of markings is mandatory, since this is the key to quality. It provides the buyer and manufacturer with all the necessary information.
DIY electrochemical marking of metal
Elvert Barnes, flickr.com CC BY
Lettering on metal is a great way to make a unique gift or mark a valuable item. There are not many ways to make a clear and indelible inscription or design. One of them is electrochemical engraving...
There are several ways to apply inscriptions or drawings to metal:
Electrochemical engraving – what will you need?
Electrochemical engraving of metal using a stencil is done using laser-iron technology, which is well known to radio amateurs. You can also make a stencil by hand if your artistic skills allow it.
To engrave metal you will need simple and affordable materials and equipment:
Electrochemical engraving - description of the process
As an example, consider applying a personal mark to a knife blade. In principle, inscriptions and drawings can be applied to any more or less smooth, preferably polished, metal objects. It’s okay if the surface is slightly convex or concave. Objects with an embossed or otherwise textured surface are completely unsuitable for electrochemical stencil engraving.
The inscription or drawing that needs to be applied to the metal is prepared in any graphics or text editor that allows you to print the result. Please note that the final result needs to be mirrored in order to get the correct image later.
The image is printed on a laser printer. An inkjet printer is completely unsuitable for the laser-iron method.
Thin glossy paper (paper from various cosmetics catalogs works well) can simply be inserted into the printer; the typographic designs and text on the sheet do not matter. You can also immediately print on the glossy side of the backing from the self-adhesive film. In the printer settings, you need to cancel the toner saving mode (if it is enabled) and set the maximum brightness (“blackness”) of the image.
Unfortunately, I was only able to get a small piece of the film backing that the printer couldn't grab. Therefore, I had to attach this piece to a regular sheet of office paper with scraps of the same film.
My printer successfully chewed this sandwich and even printed everything successfully, but I don’t recommend repeating the experiment. It felt like a little more and the film would have melted and remained inside the printer.
After printing, the inscription is carefully cut out. In this case, under no circumstances should you touch the drawing with your fingers; it is better to wear cotton gloves.
The metal surface of the object (knife) is thoroughly cleaned of dirt and degreased with alcohol or acetone. After this, the work area should also not be touched with fingers .
The stencil is applied to the desired location. If there is any doubt that you can keep it from moving on a hot knife, prepare tweezers or something similar.
Now the stencil along with the knife is well heated with an iron. The temperature and heating time strongly depend on the properties of the specific toner and the object on which the inscription is applied, so you will have to select it experimentally. You can start with maximum temperature and 1-2 minutes.
If the surface is not completely flat, then after heating with an iron, you can walk with a cotton pad or a cotton-gauze swab, pressing the stencil onto the metal surface over the entire area. During the entire process, do not move the stencil along the knife!
After cooling, the paper can be removed. The backing from the self-adhesive film comes off without any problems, but you just need to soak the glossy paper for a few minutes in warm water.
Now you need to evaluate the quality of the resulting drawing. If some places did not transfer to metal, then the heating temperature or pressure was insufficient. Too high a temperature will cause the fine lines of the toner to blur and become less clear. In case of major defects, the pattern is washed off with acetone and the operation is repeated.
Small flaws can be corrected - the missing parts can be filled in with nail polish, and blurred lines can be corrected with a scalpel or razor. It is also advisable to cover large areas of the design covered with toner with nail polish - pores in the toner that are invisible to the eye can ruin the entire effect. There is no need to rush here; the finished engraving cannot be corrected.
If you have artistic abilities, you can do without toner altogether. To do this, the entire surface of the metal is coated with varnish and an inscription or design is applied, removing the varnish in the right places with a suitable tool.
If everything is in order, then you can start etching . To do this, you should arrange a small side of plasticine around the drawing. To be safe, I covered the adjacent areas of the knife blade with tape so as not to accidentally damage it.
A saline solution is poured into the resulting pool. The positive terminal of the current source is connected to the knife, and the negative terminal is simply lowered into the solution so as not to touch the surface of the knife.
Carefully! If the wire touches a metal surface, a short circuit will occur! If the current source is powerful (battery), strong sparking, splashing of the solution, heating and ignition of the wires are possible.
To prevent a short circuit, it is better to wrap the negative wire with cotton wool, thoroughly soaking it in a saline solution.
The engraving time depends on the power of the current source. If the solution turns black and foams, then everything is in order. After 20-30 seconds, you need to drain the solution and evaluate the result. If necessary, a fresh saline solution is poured into the bath and the process continues. Etching for too long will cause the drawing to lose clarity, and closely spaced lines may merge.
If the result is satisfactory, then the tape and plasticine are removed, and the toner is removed with acetone. The result of the work is visible in the photograph. It all took about an hour.
When applying the stencil, I cheated a little and did not varnish the design, for which I paid - in some places the solution penetrated under the toner and etched areas that should not have been etched.
Source
Concept of labeling
Marking is the application of signs characterizing it to a product.
Methods of applying inscriptions on metal
This may include:
- Name,
- options,
- batch number,
- corporate logo,
- quality mark
The inscription should be clear, concise, and durable. Let's look at some ways of applying inscriptions to metal products.
Lettering methods
Branding methods can be different:
- Mechanical
- Chemical
- Electrical
- Photochemical
- Electrochemical
How to choose a labeling method? Usually the designer makes a choice by comparing some product parameters. Namely: product configuration, size, material, surface hardness, production volume, aesthetic requirements, the nature of the marking applied, its constancy, the degree of mechanization and automation of production.
Electric spark pencil
Today you can find several names: electric pencil, electric spark pen, electric marker.
Electric spark pencil
Using an electric marker, inscriptions are applied to a smooth metal surface.
This method is chosen in cases where the impact-point method is not suitable, stamps are inconvenient, laser application is too expensive or impractical.
The marking pencil is mainly used for metal components and parts where bulging of the surface due to the marking is not allowed.
It is often used as a means of adjusting and correcting markings on a flat or relatively flat metal surface. The type and alloy of the metal may be different.
Features of the Signomat electrochemical marking device:
- Ease of Management
- Plastic case
- Analog power and recording interval controls
- Etching time: 0.5 - 5 sec. in increments of 0.5
- Sound signal about the completion of the process
- Marking voltage: 12V
- Short circuit protection
- Minimum energy consumption
- Connecting the cable from the front of the case
Electrochemical marking (engraving) is chosen if a graphic image or alphanumeric lines need to be applied to a metal surface in cases where the marking must be permanent. The main condition for the use of this type of marking is the conductivity of the material being marked. The EC line is a portable engraving device and can therefore be used to mark large parts or parts of different shapes. It is possible to integrate the devices into a production line using a special clamp, or stand-alone use. The most important advantage of this type of marking is the minimal impact on the structure of the marked material.
The electrochemical marking kit includes:
- 1 pack with marking head for engraving
- 1 pack - control unit for an engraving installation, consisting of a control panel with a three-position switch having the positions “marking dark surfaces” or “marking aluminum”, “deep” and “universal” marking.
- 1 pack with 250 ml of universal electrolyte solution
- 1 pack with 250 ml liquid neutralizer
- 20 pack special marking film
- 1 pack with spare felt pad
- 1 pack with spare screws and stainless steel grille
- 1 pack with anti-polar grounding plate
There are three types of systems for electrochemical marking:
Impact dot marking
The impact-point method is used for engraving on products made of soft metals. For example, such as brass, bronze, fittings. You can also order markings on metal for some piece products.
It is recommended to use for metal assembly units (assemblies) and parts, except thin-walled ones.
Impact dot marking
- With this equipment you can apply markings to any surface.
- This method is often used in the production of pipes and other metal structures.
- The main advantage of this method is the high speed of operation and the absence of consumables.
- The markings are clear. Has high resistance and durability.
Mechanical engraving
One of the simplest, but at the same time labor-intensive and electrically demanding methods of metal engraving is milling.
Milling markings for metal
Using this method, a beautiful profile image, inscription or logo is obtained. By changing the depth of metal cutting, three-dimensional images and logos can be obtained.
Naturally, such a procedure requires a powerful machine with reliable mechanics that will withstand the loads created during the marking process. Of course, it largely depends on the depth of penetration into the metal.
Using high-quality metal engraving machines, you can apply designs and logos of various types. Accuracy and detail depend on the type of engraving tool. Milling cutters with carbide inserts are often used, with which high-quality designs can be applied. As a rule, mechanical engraving on metal is used only on products with thick walls.
Impact dot marking
In addition to milling, other types of mechanical engraving are also used - needle-impact marking, also called dot-impact marking. The technology consists of applying drawings or logos using a special impact marker. It is a machine that has a movable head with a tool installed in it for point impact on the metal surface. With each blow, a dent of a certain size is formed on it, and the aggregate forms a large and three-dimensional image. On the one hand, there is a dent, and on the other, a protrusion.
The dot impact marker is used for engraving on soft metal products. In particular, these include brass and bronze fittings and fittings. You can also order markings on metal for some piece products. Along with stationary models, portable markers are used. Using a mobile marker, you can perform manual marking on large products that cannot be mounted on a machine. For enterprises with medium- and small-scale production. The cost of such equipment is low. For small parts from the conveyor, you can purchase a stationary model for metal stamping.
You can also apply markings manually using a vibrating pencil - this is a smaller model of a portable marking device. It can be used to mark thin metal products. Can be used as a custom metal engraving tool.
Laser marking
This marking method is represented by various devices. The following markers are possible:
- Gas laser
- Solid State
- Fiber optic markers for metal and plastic
- Lasers for delicate marking of electronics
- Ultraviolet for products in instrument making
- Double-headed devices for double efficiency
Many large enterprises in mechanical engineering, aircraft manufacturing, and instrument making give preference to this particular marking method.
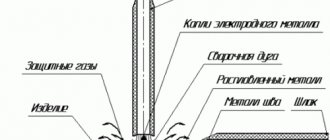
Electrochemical methods of marking on metal
Along with mechanical marking, electrochemical marking is also used - this is a technology for applying images, logos, alphanumeric information using electric current and acid.
Electrochemical marking
The operating principle is as follows. The power supply supplies electric current to the part through the electrode. The current, passing through the material soaked in the electrolyte and a special dielectric stencil for marking, leaves an etched mark in an empty space. It is necessary to ensure that the stencil fits tightly to the surface of the part to be marked.
The electrolyte for electrochemical marking is a saline solution that speeds up the process of transferring charged electrons between potentials.
The effective voltage for the etching reaction to occur is from 3 to 15 V. The peculiarity of this method of marking metal is that the boundaries are somewhat fuzzy. Therefore, the logo and details on it should be large enough.
Electrochemical marking. Installation EKhM-2 for electrochemical marking.
Section: LIBRARY OF TECHNICAL LITERATURE Short path https://bibt.ru<<Previous page Book table of contents Next page>>
The electrochemical marking method allows using cheap and harmless electrolytes to mark products, including thin-walled ones, made from materials of any hardness.
Electrochemical marking involves the dissolution of metal by passing electric current from an electrode (stamp) to the product through a layer of electrolyte directly or through a gasket moistened with electrolyte with a dielectric stencil applied.
When using stencils, it is quite difficult to obtain clear boundaries of the indices, so the stencil-free marking method is more widely used, which is characterized by high productivity, simplicity of equipment and tooling, high quality markings and no wear of the stamps. With such marking, stress concentrators are not created, which makes it possible to mark products (parts) made of thin sheets, openwork parts and parts subject to alternating loads, where geometric and structural changes in the surface are not allowed.
Marking is carried out by applying a stamp pre-moistened with electrolyte to the surface of the part (in a stamp pad) and by passing a direct current of 3-15 V (the positive pole of the current source is connected to the part, and the negative pole is connected to the stamp). Preferably aqueous solutions of neutral salts, single-component and multi-component, are used as electrolytes.
During operation, the stamp becomes contaminated with processing products, so after 30-50 prints it is wiped with a damp cloth. A number of special devices are used for electrochemical marking.
In Fig. 10 shows a device operating from an alternating current mains voltage of 36 V. It is mounted in a housing divided into two parts by a partition. On the left side there are stamps, stamp pads, bottles with electrolyte, power cord, etc., on the right side the electrical part of the device is mounted.
Rice. 10. Device for electrochemical marking:
1 - panel with controls. 2-pull-out plate. 3 - instructions
The panel contains controls: a toggle switch for turning on the network and electrical voltage on the brand, control lamps for the network and operating voltage on the brand, a fuse, a voltage switch (from 3 to 15 V), a machine time switch (from 0.15 to 2 s). At the bottom of the body there is a retractable plate that serves as an anode for marking. The weight of the device is about 4 kg.
Another type of device for screenless electrochemical marking is the EKhM-2 installation (Fig. 11). The electrical circuit of the installation provides semi-automatic control of branding.
Rice. 11. Installation EKhM-2 for electrochemical marking:
1 - hand stamp. 2 - instrumentation
The installation allows you to mark products made of stainless and heat-resistant steels, bronze, brass and other materials.
The unit is equipped with a manual stamp that allows you to mark products of any size. In Fig. Figure 12 shows types of product markings obtained using the ECM-2 installation.
Rice. 12. Samples of products marked on ECM-2
A font made of a typographic alloy (hart), cast on a line-casting machine, is used as an electrode-tool. The resulting stamp is filled with plastic and processed before opening the garth. The tool practically does not wear out and can be used repeatedly.
The electrode is selected based on the requirement to obtain an oxide that is stable and different from the color of the base metal. For marking tool steels, these conditions correspond to an electrolyte that contains sodium nitrate as an oxidizing agent. Potassium nitrate can also be used, but its solubility is poorer. Under the influence of NO3 ions, iron is oxidized to form black iron oxide FeO. This oxide, resistant to alkalis and acids, forms a clear mark. To prevent the possibility of the formation of a brown Fe(OH) precipitate, a small amount (4-10%) of Rochelle salt is introduced into the electrolyte.
The addition of an excessive amount of Rochelle salt, however, leads to a decrease in the color intensity of the stamp.
For the convenience of determining the composition of the electrolyte, a nomogram has been developed (Fig. 13), which also takes into account the number N of markings before cleaning the electrode. For example, with N=500, we determine from the curve K equal to 6%. In this case, it is possible to obtain an optical density of the mark of 1.0 or 1.2 with 20 or 15% KNO3 oxidizer. It is difficult to dissolve more than 25% nitrate. Therefore, to obtain a higher optical density of the stamp, the content of Rochelle salt in the electrolyte should be reduced and the N value should be reduced.
Rice. 13. Nomogram for determining the composition of the electrolyte
In electrochemical marking, the following types of signs are mainly used: typographic font cast on a linotype, signs obtained by pulling through a die, similar to those used in the electric spark method, and combined signs that combine typographic font with a frame of various shapes, made by pulling through a die. It is possible to use metal signs made by extrusion.
For marking, both single and group marks are used, consisting of characters arranged in one or several lines. Single hallmarks contain a mark and a frame (if necessary) attached to a holder made of brass. The holder has a socket for a plug. Its outer part is insulated with a polyvinyl chloride tube or other insulator.
The sign is attached to the thickened part of the holder using a dovetail connection, followed by core punching or soldering with fusible solders (for example, POS-61), or gluing with conductive enamel (for example, type XC-928).
A widely used method of attaching signs with conductive enamel is carried out as follows: the base of the holder and the sign are cleaned of contamination, for example, with sandpaper, then the bonded surfaces are blown with dry air and degreased with gasoline, after which they are dried in air for 10-15 minutes. Next, the first layer of enamel is applied to the bonded surfaces and dried at a temperature of 15-35 ° C for 1 hour. After applying the second layer of enamel to the bonded surfaces, the sign is pressed to the holder, and the brand is air-dried for 72 hours.
The next step is to fill the signs with quick-hardening plastic such as styracrylic or epoxy glue (based on ED-5, ED-6 resins). The marks are poured into special forms, the size and configuration of which depend on the size of the mark. The form consists of a polished steel plate, to which a plexiglass frame is attached with two screws. The internal contour of the frame is made with a slope of 65°, which makes it easier to remove the stamp after hardening. A thin layer of paraffin is hot-applied along the entire inner contour of the frame window and plate, which serves to prevent the plastic from sticking to the walls of the mold.
After the plastic has hardened (styracryl for 6-8 hours, and epoxy glue for 20-24 hours), the stamp is removed from the mold. It is necessary to ensure that after pouring the plastic in an even layer (without any recesses, pores, hairs, etc.) fills all the recesses of the signs around the perimeter with a layer of 2-3 mm. In the event of the formation of these defects, the locality of the marking and the clarity of the print deteriorate, then the insulating stencil is ground until the marks are exposed, and the deviation from flatness should not exceed 0.02 mm.
In case of porosity or chipping of the brand, to restore it, apply several layers of EP-51 varnish, styracryl or liquid epoxy resin to the damaged area and, after drying, clean it without touching the material of the signs.
Since during electrochemical marking the mark is separated from the part by a thin layer of electrolyte, the thickness of which depends on the force of pressing the mark to the part, the possibility of a short circuit cannot be ruled out, so the marking process depends on the skills of the operator. In order to protect against premature destruction of the stamp in the event of a short circuit, local convexities are formed on the insulating stencil along the perimeter of the outer contour of the signs by pricking it with the tip of a needle to a depth of 0.2-0.3 mm. This provides a guaranteed interelectrode gap of 0.01-0.05 mm.
Skip to navigation
Drop jet marking of metal
Using drop jet metal marking , you can apply various images and letters to flat or cylindrical steel.
The peculiarity of this method is that it is possible to apply color markings using pigments of any shade. Equipment with two heads is commercially available, allowing complex visualizations to be performed.
Caleslast marking
This method resembles the operation of an inkjet printer on paper, only it prints on metal.
Products sold in steel bottles and small containers are marked. Marking is done on the bottom or neck of the product. There are portable and stationary inkjet printers for marking.
This equipment is often used in production. Industrial engraving is highly productive. Ideal for use on a conveyor without stopping the process.
As a rule, a barcode and a set of certain digital data are stamped.
Although the quality and clarity of the contours is not high, it is sufficient for reading barcodes.
In this article, we have not considered all methods of metal marking.
Recommended viewing:
Color marking of resistors: definition...- How and with what to charge a li-ion (Li-po) battery?…
Online calculator for color resistor markings- What is the best way to connect copper and aluminum...
Silkscreen printing
In addition to those described above, a method of marking metal products such as silk-screen printing is also used. It is used mainly on flat parts, various device housings and in the manufacture of nameplates. You can print on top of existing paint, because the point is to apply an additional layer. Silk-screen printing, as in the case of paper, can be done in one color or in several shades, resulting in a high-quality multi-color image. The process is performed in several passes.
To perform silk-screen printing, two types of inks are used, which are selected depending on the original type of part. The difference is that for unpainted metal it is necessary to create an adhesive layer. For this, a special paint with two components is used. This consumable material is highly resistant to external factors and fading in the sun, therefore it is widely used for marking products that are used outdoors. The paint is resistant to mechanical stress, so it will remain on the surface of the product for a very long time.
Marking of metal products
Almost no modern production can do without labeling its products. The need for it is explained not only by legal requirements (often quite strict), but also by ease of operation. This applies to metal even more than to many other products, since it is sometimes almost impossible to distinguish one or another grade of steel by eye. In addition, applying information to your own products makes it easier to keep records at the enterprise. In our article today we will tell you how to place the necessary data on metal products. And let’s dwell a little more on the laser technology of their application.
Metal marking functions
1. Informational. This is its main function. Thanks to the data printed on it, the consumer can understand what material the product is made of and what properties it has.
2. Identification. Allows you to recognize a specific product and distinguish it from others.
3. Emotional and motivational. Beautiful labeling can serve as an additional incentive to purchase the product. In turn, carelessly or illegibly printed data can make the buyer wonder whether he should contact this manufacturer.
Technologies and methods of data application
There are 2 application methods - direct and additional. In the case of the latter, the information is placed on a tag, label, sticker or some other item that is attached to the product. This method is not popular in the metallurgical industry because tags and labels can easily come off or get mixed up during transportation.
The main method of application is direct. That is, placement directly on the product. Let's consider several technologies for such marking.
1. Thermal transfer printing. For this method, special thermal transfer tapes are used, the paint layer from which is transferred to the metal under the influence of high temperature. The method is not very popular due to the large amount of consumables and lower marking reliability compared to other technologies.
2. Impact-point. Using a needle-impact printer, a large number of dots are printed on the surface of the product. This method easily applies both alphanumeric information and 2D barcodes, which are later read using a DPM code scanner.
Such marking is very popular among many manufacturers, since it does not require a large amount of consumables (the service life of one tungsten-carbide punch is several million blows) and is very wear-resistant. A paint layer is even applied over the markings without compromising the readability of the information.
3. Electrochemical. Data is applied on a stencil under the influence of an electric current charge. As a result of the reaction, the color or even the surface topography changes, forming the necessary letters and numbers.
4. Stamping (branding). It is carried out using a pre-made stamp on a mechanical press, which makes an impression with the necessary information. The standard set of stamps includes letters and numbers. From a technological point of view, this is the most cost-effective and simplest method.
5. Drop jet. Contactless method of applying data. It is often used in cases where the product is small in size and other data application technologies can deform it. Information is applied with drops of ink.
6. Drawing. It is carried out using a needle pressed tightly to the surface of the metal, which draws grooves on its surface. The technology is used as an alternative to dot-impact marking. The needle deforms the surface to a lesser extent and produces noticeably less noise during operation.
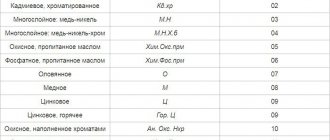
Appendix 1 (recommended). DESIGNATIONS OF CONTENTS AND METHODS OF APPLYING MARKINGS AND STAMPS
DESIGNATIONS OF CONTENTS AND METHODS OF APPLYING MARKINGS AND STAMPS
Table 1
| Designation |
| Trademark, name of the manufacturer |
| Product index |
| Product designation according to the main design document |
| Product serial number* |
| Material grade |
| Heat number, serial number in the heat |
| Technical data |
| Selectivity group |
| Signs of polarity, direction of rotation, direction of fluid flow, etc. data necessary for installation |
| Date of manufacture |
| Product price |
________________ * The product number also refers to the batch or series number.
table 2
| Designation |
| Tests (control): mechanical, hydraulic, pneumatic, electrical, hardness, etc. |
| Final acceptance |
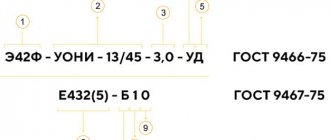
3. Methods of applying markings or brands are indicated by the letter designations given in Table 3.
Table 3
| Method of applying markings or stamps | Designation |
| Shock | |
| Engraving | |
| Etching | |
| paint | |
| By casting or pressure (pressing, stamping, etc.) |
Note. If a marking or stamp can be applied in any way, then the method of application is not indicated.
4. Designations and methods of applying markings and stamps are indicated on the inclined section of the leader line.
AN EXAMPLE OF APPLYING on a drawing the designations of the serial number of a product by impact and the mark of final acceptance with paint, if all the data on marking and stamping are available in the technical specifications for the product, is shown in Drawing 1.
In this case, in the technical requirements of the drawing, an entry is made like: “3. Mark and brand according to TU...”
AN EXAMPLE OF APPLYING on a drawing a designation of a material grade - with paint, a product designation, its serial number and a trademark - using the foundry method, if it is necessary to indicate in the drawing data on the location, method of application and font of the marking that is not in the technical specifications, is shown in Figure 2.
In this case, in the technical requirements of the drawing, an entry is made according to the type:
a) if the markings are made in different fonts, -
"5. Mark according to TU..., Chl - in font... GOST... Nl - in font... GOST...".
"6. Mark according to TU... in font... GOST... ":
b) if the markings are made in the same font, -
"4. Mark according to TU... in font... GOST... ".
APPENDIX 1. (Introduced additionally, Amendment No. 1).
Laser marking of metal. Advantages and disadvantages
Laser technology is the most advanced and reliable method of applying information to metal.
This marking has an indefinite lifespan since it is not subject to any physical or chemical influences. It can be applied to any alloy without any additional conditions. In addition, a clear advantage of laser technology is its high speed of operation, which does not affect the level of operation of the enterprise. It does not require large energy consumption, does not require consumables and allows you to apply the necessary information even in hard-to-reach places that are inaccessible to other marking methods. All that is needed to implement it is a computer with a data transmission and control system and a laser itself. The only disadvantage of laser marking is the heating of the surface during the marking process. Before sending the product to the warehouse after applying the data, you have to wait for some time until it cools down.
Laser engraving
Laser engraving is the most common method of marking metal parts. With the advent of the laser, human capabilities have expanded significantly. With its help, you can apply both thin inscriptions, burning only the film, and volumetric ones, penetrating deep into the metal structure.
Laser engraving technology
The technique of laser marking on metal is well studied and widely used in industry. The technology of applying images and various text information in this way allows us to achieve the highest quality of drawing. This is due to the minimum beam thickness, which can be only a couple of microns. To apply images in this way, a special machine for laser engraving on metal is used.
This technology is used for single products and for applying logos during serial production. By changing the intensity and density of the beam, you can vary the brightness and depth of the engraving. Using this method, you can apply images to any type of metal: aluminum, brass, titanium, stainless steel. The peculiarity of the laser is that when exposed to a specific area of the material, it creates a high temperature that burns the processed fragment.
The laser method is very effective, which is why it is used to apply transport marks, which can then be used to track the location of the product during its delivery. Engraving is carried out with a marking laser.
Advantages and disadvantages of laser engraving on metal
The advantages of laser technology include the following:
Laser technology for marking parts has no analogues: it produces images and text data of high resolution and quality. Disadvantages of laser marking
on metal (especially in comparison with the electrochemical marking method) refers to the fact that:
Marking of metals by etching. Acid markers MARKAL
Existing methods (technologies) for industrial marking of finished products made of metals and alloys can be divided into two groups (hanging tags are not considered):
A. Not affecting the marked product (so-called “non-intrusive”):
- paint marking - hand-held markers based on solid or liquid paint, inkjet printers;
- self-adhesive labels on paper or polymer base.
B. Changing properties of the surface of the marked product (so-called “intrusive”):
- chemical etching;
- electrochemical etching;
- hand branding;
- automated dot-impact marking;
- laser marking.
When choosing a labeling method, you must consider:
- the purpose of marking, the volume and complexity of the information applied, requirements for the quality of symbols;
- number of marked products per day (single, small-scale or large-scale production);
- the need for variable marking and the frequency of entering variable data;
- state of the marked surface: physical and chemical properties (surface roughness, material hardness, thickness of the product at the marking site, chemical composition of the material and coating); geometric properties (marking dimensions, surface curvature in the marking area, location of this surface - recessed or protruding);
- requirements for the durability of the marking, taking into account the conditions in which the product will be used (temperature, humidity, atmospheric composition, immersion in liquids, abrasive and frictional effects, gas flows, etc.);
- negative impact of the marking method: the appearance of stress concentrators, corrosion sources, other changes in the surface layer;
- reliability of access and readability of information;
- requirements for the protection of markings from counterfeiting;
- productivity of the marking process and the ability to integrate into conveyor production;
- economic costs and environmental factors.
In this article we will look at the marking of metals and alloys using chemical etching.
Generalized description of chemical etching: controlled removal of the surface layer of material from a product under the influence of specially selected chemical compounds. Typically, in industry, during chemical etching, scale and rust are removed from the surface of products made of ferrous metals using etching solutions. Etching is carried out in solutions of sulfuric or hydrochloric acids, sometimes with the addition of nitric, hydrofluoric and other acids.
Marking of metals and alloys by chemical etching (hereinafter referred to as etching marking) occurs by obtaining a contrasting image of a rich dark gray color, which is the result of anodic oxidation of the surface of the product at the point of contact of the metal with the acid, with incomplete removal of reaction products. The technical literature uses the term "selective etching" .
If the technology is followed, marking metals by etching is a cheap, effective and safe method of obtaining high-contrast and fairly durable markings on products made from various grades of steel, non-ferrous metals and alloys.
This marking method is very widely used in many industries:
- for applying information to various products, especially small ones, where other methods of marking metals (dot-impact, laser) are not applicable or impractical;
- for identification of metal tools, equipment and mechanisms.
Currently, the most effective industrial tool for marking metals by etching is the Markal® SC.800* acid marker, which is a body made of chemically resistant polymer, into which two types of replaceable cartridges are installed:
- cartridge SC.862 (blue) - for etching marking of structural and tool steel;
- cartridge SC.865 (green) - for etching marking of stainless steel, copper, nickel, lead, bronze and alloys based on non-ferrous metals.
The Markal® SC.800 acid marker leaves clear marks and, unlike crayons and paints, does not flake, does not smear and is resistant to abrasion. It does not require additional power supplies or other means to apply etching markings. Also available is neutralizing fluid SC.871, which allows you to control the etching process.
* Markal® SC.800 acid marker is supplied without cartridges.
PROCEDURE FOR WORKING WITH AN ACID MARKER:
- Clean the surface thoroughly using an abrasive cloth.
- The marking surface must be clean - remove any oxide layer, oil or grease.
- For easy marking, make only one pass with the acid marker.
- To obtain more contrast markings, repeat passes until desired result is achieved.
- Lightly wipe the surface after etching with light oil.
- If the etching agent comes into contact with the skin, wash with soap and water.
Industrial marking of metal products
Metal
Not a single modern enterprise can do without marking equipment. Industrial marking of parts and elements is carried out not only at the last stage of production of finished products, but also during their manufacturing. Parts, assemblies, elements, tools and equipment are marked. The once popular branding method (hand-applied inscriptions using a stamp) is fading into the background in modern production. Automation of all processes requires more effective solutions - for example, the use of point impact and laser equipment.
Both options provide fast, permanent marking and are suitable for installation on high-speed lines.
LASER MARKING OF PARTS
It is actively used for applying technical information and logos to the surface of industrial products. A high-tech method characterized by high marking speed, reliability, and image durability. The non-contact identification method using a laser is used with metals of different strengths: from ultra-strong titanium alloys and hardened steel, to aluminum, gold and other “soft” metals.
Laser marking machines are divided into two types: stationary and integrated devices. Stationary marking devices are designed for applying identification information to medium and small-sized products. Capable of processing non-standard and complex surfaces: rough, curved, painted, and made of fragile materials.
Integrated laser marking machines , as the name suggests, are integrated into production lines that operate 24/7. The devices produce detailed, clear images at speeds of up to 1300 characters per minute. Depending on the specifics of the production process, integrated markers perform marking both as products move along the conveyor and when the line stops.
If it is necessary to mark curved products, an additional axis of rotation is used. Also, depending on production conditions, it is possible to retrofit laser devices with protective covers, mobile carts, a work table with a tripod and other options.
Metalphoto
Metal photo is a technique used to apply images to aluminum nameplates in two-color or multi-color mode. Its essence lies in the appearance of a photosensitive salt on the surface of aluminum. Due to this, the image is literally embedded in the metal structure. The process of marking in this way is carried out as follows:
At the end of the procedure, a monolithic image is obtained, which is embedded in the metal structure. This product acquires high color fastness even under mechanical stress.
IMPACT-POINT INDUSTRIAL MARKING OF PRODUCTS
Using dot-impact devices, identification is applied to metal products with smooth and rough surfaces. The ability to adjust the impact force allows you to apply markings of different depths. Modern software makes it possible to automatically generate inscriptions and apply two-dimensional codes to finished products and their elements for traceability in production and subsequent sales.
Needle impact devices are also divided into stationary and devices integrated into production lines. In addition, there are more compact, portable (mobile) markers.
Integrated needle-impact units are used for industrial marking of products in continuous production enterprises. Allows you to create an effective autonomous identification and traceability system, reducing the human factor. The main components of the equipment are protected from dust and moisture and can be used in difficult technological conditions.
Stationary dot impact markers help create a permanent marking area for identifying medium and small sized products. The devices are characterized by high productivity and speed, which makes it possible to apply even multi-line markings in a matter of seconds.
Portable needle-impact markers solve the problem of applying identification information to large, heavy products and in hard-to-reach places. Mobile devices weigh from 1.5 to 3.5 kg, are easy to carry due to their ergonomic shape and allow you to mark surfaces that are difficult to get to.
CONCLUSION
Direct application of information to the surface is the preferred option for identifying metal products and parts. Neither hanging tags nor stickers provide the required level of reliability and long-term safety of markings in industry. The branding method is associated with the human factor: workers often make mistakes during the marking process, the marking is not clear enough and is difficult to read.
Dot-impact and laser marking of metal parts is free of these disadvantages. The use of advanced technologies guarantees high quality of the resulting images, excellent readability and durability of inscriptions on any metal surfaces. The technologies are suitable for such industries as the automotive industry, rolled metal production, equipment and tool production, aviation and military industries.
EU 300
| The EC 300 control unit allows the user to use a timer when marking, which makes the marking process even more convenient. The timer can be set for a period from 2 to 20 s. After the set time has elapsed, the control unit will automatically turn off. |
Download: Technical description in pdf format (Russian)
The EKO electrochemical marking system is an ideal alternative to laser marking when you need to apply graphics or alphanumeric objects to any metal surface. Some devices in this series allow you to apply contrasting (light or dark) markings to any electrically conductive metal surfaces. They are compact and easy to use. An important advantage of such devices is the unlimited marking area. To apply markings with these devices, stencils are used - short-term or long-term. To create short-term stencils, you can use a special printer with 18, 24 or 36 mm ribbon. They can be used up to 10 times. Long lasting stencil can be used up to 30,000 times.
Depending on the properties of individual systems, you can choose one of the following options: