A circular saw is a tool that no craftsman can do without. Such a unit is especially necessary in a country house or country house. But working with hand tools is not always convenient, and branded machines are quite expensive. A way out of the situation may be to independently manufacture such a device. The basis of such a home machine can be not only a hand-held circular saw, but also a grinder or even a drill.
Making a table for a circular saw with your own hands will cost much less than a ready-made store-bought version.
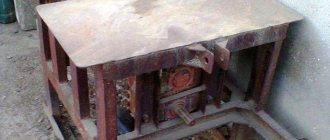
It’s not at all difficult to assemble a frame for a circular saw that is quite simple in design with your own hands. To make it you will need the simplest lumber and very little time.
Saw frame design
Miter box for a circular saw.
Before considering the design of the future machine, it is necessary to calculate the load that will fall on it. Because the main thing in such a frame is stability and reliability. For powerful industrial saws, the base is a reinforced welded steel structure. But such a unit is not needed for a home workshop. If you are just planning to assemble your own woodworking machine, then you should take into account the basic parameters of the tool itself. After all, saws are different, and, accordingly, the design of the table should be different.
First of all, you need to consider the power of the tool. Typically, for a home workshop, a unit is chosen whose parameters do not exceed 800 W. But, for example, when building a house or cottage, a fairly large volume of wood has to be cut. At the same time, the power of the circular saw should be greater. But experts do not recommend purchasing saws whose characteristics are higher than 1200 W. There is no justification for installing such a tool in a private workshop. And working on it will only increase energy costs.
Remember: the higher the productivity of your machine, the more stable the base for it should be. For professional circular saws, a base assembled from a metal profile is usually installed. Sometimes such frames are even built into the floor. Because vibration of the machine can lead to situations dangerous to life and health.
Nuances to consider
Circular saw design.
The second parameter for choosing a saw is the depth of the intended cut. The thickness of the lumber processed on your machine depends on it. This parameter of professional and semi-professional models ranges from 4 to 7 cm. This is enough for sawing boards and even fairly thick plywood. But it will be inconvenient to process logs on such a machine. In addition, it is worth considering that this characteristic of a saw built into the frame with your own hands is reduced. The depth of the cut becomes smaller by about 1 cm. But this can be changed if the design of the table includes the ability to raise or lower the disk.
When choosing a tool, it is necessary to take into account its rotation frequency. If you need a circular saw to prepare building material, then this parameter may be lower. When an even and clean cut is needed, the rotation speed must be quite high. This is necessary, for example, for making furniture. But even this situation has its own nuances. This saw is not suitable for processing plastic materials. Due to too high tool speeds, the disc heats up and the plastic melts. Therefore, it is worth choosing a unit whose rotation speed does not exceed 4000 rpm; in this case, the table for a circular saw can be assembled from wood. The vibration of such a machine is insignificant and additional reinforcement of the frame is not required.
The last thing you need to consider when making your own woodworking machine is the location of the buttons and other controls. When assembling a circular saw with your own hands, remember that access to the controls must be safe. This rule is especially relevant if the tool is installed at the bottom of the tabletop. In this case, it makes more sense to install the panel with switches on the outside of the machine. Or provide a rising tabletop. This design will also help in servicing the unit. After you have taken into account all the little details and nuances, you can proceed directly to making the table.
Features of a manual circular saw
The tool is based on an electric motor with a saw blade mounted on a shaft. Models from different manufacturers have approximately the same design.
The products are equipped with many additional accessories:
- Start button with rotation speed controller;
- Protective casing;
- Retractable parallel stop;
- Regulators for cutting depth and tilt angle;
- Sawdust ejection pipe.
The saw blade rotates towards the base plate, towards itself. The main rule when working with a manual circular saw: first start the engine so that the disk begins to rotate, then carefully bring it closer to the surface to be treated.
The tool is convenient when performing the following work:
- Sawing boards, plywood, particle boards;
- Cutting timber, cutting slats;
- Recesses for groove tenons;
- Edge processing, chamfering;
- Cutting waste lumber for fuel.
The power of the device is selected based on needs. For short-term work in domestic conditions, processing workpieces up to 4.5 cm thick, a power of up to 1.2 kW is sufficient. Semi-professional tools have a power of 1.8 kW and cut workpieces up to 6.5 cm thick.
Professional equipment with a power of 2.2 kW can withstand long-term loads and leaves a cut of up to 8.5 cm. Woodworking enterprises use saws with a power of up to 5.5 kW; their weight reaches 100 kg.
Preparatory stage of work
Figure 1. Machine drawing.
The simplest version of a table for a circular saw is a structure assembled from boards and fairly thick plywood from which the tabletop is made. In this case, the tool itself is fixed at the bottom of a stationary (non-rising) tabletop. There is a special slot in the frame cover for the disk. A drawing of such a machine is shown in Fig. 1.
The dimensions for the bed can be changed so that it is convenient for you to work. The average table height is taken as an example. It is 100-115 cm. But much depends on the height of the person who will work with the tool. In addition, the length of the tabletop can also be changed as desired. If you plan to work with boards whose length exceeds 2.5 m, then the table top should be larger. Then it is necessary to make changes to the structure itself and add an additional pair of supports (legs). Otherwise the bed will vibrate too much.
For the countertop, you can take plywood, whose thickness should be at least 50 mm. But you can also use fiberglass slabs and plexiglass. But experts do not recommend using chipboard, since this material is not strong enough.
The table top can be polished and coated with several layers of varnish. This will ensure sufficient sliding of the sawn materials. But it is much wiser to strengthen a sheet of iron on the tabletop. Then the surface of the bed will be much more reliable, and the machine will last you longer.
Required materials and tools
For a woodworking machine, it is necessary to provide guides. They will help you cut the material accurately. This structure is welded from a metal corner and secured to the tabletop with clamps.
It is not recommended to install stationary guides, because in the future you will not be able to change their position.
Checking the circular saw.
To make a table you will need the following materials:
- sheet of plywood (countertop made of another material);
- sheet of iron;
- board with a section of 5*10 cm;
- timber with a section of 5*5 cm;
- clamps - 2 pcs;
- metal corner for guides;
- hand circular saw.
Read also: How to use an ultrasonic bath
In addition, it is wiser to prepare in advance all the tools that will be needed to make the table:
- jigsaw or hacksaw;
- electric drill, screwdriver;
- milling machine or hand cutter (you can do without this tool);
- measuring instruments (ruler, square, tape measure).
When everything you need is ready, you can proceed directly to assembling the table. Some craftsmen make frames from old kitchen or dining tables. But such a design is unlikely to last long enough. Therefore, it is much more reasonable to make all the parts yourself. At the same time, you can take into account your individual needs.
Advantages of a portable saw
Hand-held circular saw
There are several very important technical characteristics that make this tool recommended for such purposes.
- The saw can be equipped with a blade with an outer diameter of 350 mm, which allows cutting lumber with a thickness of 70–85 mm. On the machine, this depth decreases slightly; boards with a thickness of 60–75 mm can be cut. This is quite enough for most household wood crafts - from complex furniture to simple toys.
- The engine power is at least 2 kW, it can withstand significant loads, and special effective forced ventilation quickly removes heat, which allows the mechanisms to operate for a long period of time under normal thermal conditions.
- The rotation speed of the saw shaft meets the existing requirements for woodworking cutting tools. This allows you to obtain excellent quality cuts and comply with safety regulations.
- The hand saw can be fixed to the table in such a way that, if necessary, it can be quickly removed and used as usual. At the same time, all initial technical characteristics are completely preserved.
Additional attachments to control cutting accuracy make working with the circular saw easier
Bosch PKS 16 Multi hand-held circular saw - lightweight and compact tool
Network circular circular saw Rockwell RK3440K with laser pointer
In connection with such advantages of portable saws, we will not consider dubious options for manufacturing stationary circular saws, but will only dwell on this.
Video - How to choose a circular saw
Assembling the saw table
Figure 2. Belt drive design drawing.
The manufacture of the frame begins with the formation of the tabletop. The plywood sheet is marked so that 2 edges of the cover coincide with the edges of the sheet. The workpiece is cut out using a jigsaw or hacksaw. If desired, the edge of the cut can be processed with a milling cutter. But this operation is not mandatory. Because the main parameter in a table for a circular saw is its reliability, not its beauty. The table top is roughened with sandpaper.
A slot for the disk is marked on the underside of the tabletop. To do this, you first need to measure the dimensions of the unit’s sole. The easiest way to do this is to remove the blade from the tool and simply trace the required part of the saw. These parameters are necessary to form the seat.
Using a hand cutter, wood is selected to a depth of approximately 0.8-1 cm. If you do not have such a tool, then the work can be done using a chisel, but it will take much more time.
After the seat is ready, be sure to try on the saw, adjusting the recess if necessary. Mark the locations for fixing the fasteners and the slots for the disk. If you want the saw blade to lower and rise at your request, then you need to build a pendulum mechanism for the table. In this case, the slot should have the shape of a truncated pyramid. Moreover, the hypothetical top of this figure is directed downwards. An example of a drawing of such a design with a belt drive is shown in Fig. 2. It makes more sense to make the frame itself for the lifting mechanism from metal corners that are welded together.
Assembly of the bed frame
Scheme of the frame of the bed.
It is more reasonable to make markings for attaching longitudinal and transverse slats, which will serve as stiffeners, from the wrong side of the tabletop. The planks themselves are cut from a block. You will need 2 longitudinal ribs, whose length should be equal to the length of the tabletop minus 8-10 cm on each side. And 2 transverse parts, whose length is equal to the width of the table top minus 8-10 cm on each side.
Next, you need to drill out the sockets for the screws. The slats must be fixed on the tabletop so that the table top protrudes beyond the edges of the frame by 8-10 cm. The fastenings must be as strong and reliable as possible. The first fastener must be installed approximately 4-5 cm from the edge of the rail. The distance between the screw heads is 20-22 cm. All parts are drilled through. The self-tapping screw is installed from the side of the tabletop so that its head is completely recessed into the wood.
First, the transverse ribs are attached. To make the tabletop as reliable as possible, the edge of the slats is pre-lubricated with wood glue. The structure is tightened with clamps, and without removing them, screws are fixed. The table cover is left until completely dry. Then the longitudinal slats are installed in a similar way. Next, the frame parts are pulled together, placing 2 fasteners on each side. After this, the clamps can be removed.
Installing the bed legs
The device of a circular saw.
The legs of the circular saw bed are made from a block. The height of the parts is selected individually. It is believed that it is most convenient to work at a table whose tabletop is at the level of a person’s hips. Before installation, each leg must be planed on one side so that it goes to an angle. That is, the area of the base of the leg should be slightly larger than the area of its top.
It makes the most sense to secure the legs using metal corners. They need to be slightly pressed so that the base of the table is located in the spacer. This will give the bed additional stability. For fastening, bolts with washers are used, which are installed with their heads facing outward. Otherwise, you may be injured during work on the protruding parts of the fasteners.
The whole structure will become more reliable if the legs are tightened with additional diagonal slats. They are installed in pairs on the sides of the table.
The surface of the tabletop is polished and varnished. Or they use a metal sheet as a covering, which is “planted” on small self-tapping screws. Lastly, the instrument itself is installed in the place prepared for it. You can additionally apply markings to the tabletop to help you process the material being cut correctly and evenly. All machine controls are located on the outside of the bed. Most often they are fixed on one of the table legs. But to carry out such work you must have certain electrical installation skills.
A stationary circular saw is a machine that should be in the workshop of every craftsman who works with wood. With its help, you can quickly and effortlessly saw a board, cut a workpiece of the required size, or cut firewood.
A home craftsman simply must acquire such a machine. It is not necessary to buy it; a homemade circular saw is guaranteed to cope with the volume of work in a home workshop, and will cost a significantly less amount.
How to make a circular saw at home
The first thing you need to decide on is the dimensions of the future machine.
Dimensions of a stationary circular saw bed
They are selected based on the amount of work to be done. For sawing large workpieces and firewood, a fairly large table is required. To trim wane from an unedged board, a long table is required, etc. In this case, the optimal height of the machine is always approximately the same.
The most universal, suitable for most types of work and workpieces, are the following dimensions: height 650-750 mm, length 700-1000 mm, width depends on the shaft. But, the work table on one side of the saw blade must be at least 250-400 mm wide so that a wide workpiece can be marked so that it does not change when cutting.
Height is important. If the bed is too low, the master will have to bend his back when working, which is inconvenient and tiring. It is difficult to lift heavy workpieces onto a bed that is too high, and it is difficult to work with them. The average height is indicated above (650-750mm), but it can be adjusted depending on the height of the master and the size of the workpieces. For heavy slabs and boards, high beds are inconvenient.
Other options are possible - tabletop machines. They are small in height. For work, they are installed on separate workbenches or frames of suitable height.
Also, for sawing long workpieces, additional separate beds are sometimes used. Most often these are the simplest wooden supports.
You should immediately clearly determine the dimensions of the future machine, based on the above considerations.
Bed material
Then the material from which the frame and work table can be made is selected. There are options.
Metal
For the frame, any available rolled metal is used: angle, square or rectangular profile, pipes for legs, channels, purchased or from scrap metal.
Angles with dimensions from 40x40 with a thickness of at least 2 mm and above have a sufficient margin of safety for all elements of the frame. Thinner corners (25X25) can be used to tie the frame around the perimeter.
More powerful channels have a safety margin that is many times greater than required. They increase the weight of the structure, which is not a disadvantage if the machine does not have to be constantly dragged. A massive machine better dampens vibrations during operation. If you have to buy rolled metal, you should not overpay for clearly excessive power and weight.
For the desktop plane, metal sheets with a thickness of 5-10 mm (ferrous metals) or 10-20 mm (aluminum) are used.
Tree
Wood is prone to drying out and swelling with changes in size, warping and cracking. It has low specific strength compared to metals and requires treatment to prevent rot and mold in damp areas. Poorly suited for these purposes. But due to its availability, ease of processing and assembly, it is sometimes used here too. With conditions:
- straight-grained wood is selected, without knots or interlacing layers;
- the humidity should correspond to the humidity in the room where the machine will be located;
- Desirable aging of blanks for 3-4 years, at least 1 year;
- Hardwoods are used - oak, beech.
Another plus is that wood dampens vibrations well; such machines operate quieter even than on a cast frame made of porous cast iron.
At the same time, the machine is not made only from wood. The shaft must be mounted on a metal frame, which is attached to a wooden base.
Other materials
Plywood with a thickness of 10 mm and above is well suited for work tables. Plywood is a multilayer material made from thin sheets of wood and layers of glue. In this combination, the internal stresses of thin wood are insignificant and are compensated by layers of glue and adjacent sheets. Therefore, thick plywood warps much less than solid wood. It can last a long time on the table. In case of damage, such a table can be easily replaced with a new one.
Legs and framing elements can be made from thick plywood. At the same time, 2-3 blanks with a thickness of 10-20 mm are glued and screwed together with bolts or screws onto one leg.
Chipboard, laminated chipboard, and MDF are not suitable for these purposes , since they are fragile materials that are prone to chipping under loads and impacts. They can be used for temporary machines that are required, for example, only for the duration of one construction project.
Work tables made of this material are mounted flush with the frame of the bed, without overhangs. Protruding edges may break off due to minor loads. Additional transverse joists may be required, since voids under a chipboard table longer than 40 cm may break due to the throw of a heavy workpiece.
Engine
Efficient stationary circular saws have engine power ranging from a minimum limit of 500-700 W and higher, up to industrial options of 5-10 kW.
A low-power homemade circular saw with a motor (500-700 W) is capable of cutting workpieces up to 40-50 mm thick with a disk of small diameter (up to 180 mm) with low productivity. For this reason, motors from washing machines (180-350W) are not suitable, although they can be used on mini-machines for sawing miniature workpieces.
The optimal power for a homemade circular machine is 1.1-2.2 kW at high speeds; a “three-thousander” engine is better - 2800-2900 rpm, running on a 220V household network.
Three-phase asynchronous motors 380V, converted to 220V, were also often used. It must be remembered that after adaptation to 220V, the engine loses up to 2/3 of its power. That is, a three-phase motor with a power of 5.5 kW, after converting it to one phase using capacitors, will be able to operate with a power of about 2 kW.
Therefore, the best option is a factory engine. For example, single-phase AIRE (5AIE) 80s2 2.2 kW/3000 rpm. 220V produced by the plant in Mogilev, Belarus. The cost by mid-2022 is about 8-9 thousand rubles.
Gasoline engines
This option has its advantages and disadvantages.
- well suited for working at remote sites. Indispensable for work in the absence of power supply;
- have great power. Depending on the selected engine model, from 3-6hp. up to 15-20 hp
A number of disadvantages
- big noise;
- difficulties in maintenance, in the device itself, the possibility of breakdowns;
- starting difficulties;
- exhaust gases, inability to work indoors;
- high operating costs due to fuel prices.
In Soviet times, a variety of internal combustion engines were installed on circular cars. From air-cooled tractor launchers (PD-8), internal combustion engines of the UD group, to decommissioned engines from GAZ-51 type trucks.
Today, a good option is an engine from a walk-behind tractor, which is sold separately.
Gasoline engine 6.5 hp.
(4.78 kW). The cost at different sites is from 5 to 7 thousand rubles.
What disk size to choose for homemade products
If the entire shaft is ordered from a turner, or a suitable shaft with carriages and bearings is being finalized, for example, from agricultural machinery, the diameter of the seat for the disks should be taken into account.
Old landing standards: 56 mm and 32 mm. If there are disks with a seat of this size, the seat is bored to fit them. Old Soviet wheels, both carbide and monolithic (backed) can last a very long time.
If we focus on modern discs, for a circular disc of medium power, a 30 mm fit should be provided - the most popular international standard today .
It’s also a good idea to immediately order different seating washers. For example, with a fit for 30, 32 and 56 mm discs. You can order a shaft with a fit of 20 mm (there are such discs) or 30 mm and a set of adapter rings instead of whole washers for 30, 32 and 56 mm. That is, the internal diameter of the adapter washer is strictly along the diameter of the shaft, the outer diameter is according to the mounting diameter of the disk.
The dimensions of the disk are selected in accordance with the engine power. A 600-800 W motor is not able to work effectively with a large disk; it will not have enough power. Maximum – disk 180-200 mm.
The more powerful the engine, the larger the disk can be used.
In this case, you should provide for the size of the slot in the desktop for the disk.
Most often, they use different disks on the same circular saw. For thin workpieces use a small disk, and vice versa.
Circular saw device
Being a truly useful tool, the circular saw has a fairly simple design. Its main components:
- bed – frame on which the main units are mounted;
- tabletop with a slot for a disk;
- engine with rotation transmission system;
- cutting tool, disc with teeth.
Optionally, the device can be supplemented with a pusher, which ensures progressive movement of the workpiece towards the disk, and various lifting mechanisms that regulate the cutting depth.
The principle of operation of a circular saw (circular saw) is that the rotation of the electric motor shaft is transmitted to the cutting tool, a disk with sharply sharpened teeth. The center of the disk is located below the level of the tabletop, only a segment of it is removed from it. The workpiece is brought to the rotating disk, the teeth bite into the wood, creating an even cut.
How to make a shaft for a circular saw with your own hands
In the general design of a circular saw, the shaft is the main element that forms the entire machine. To make it, you will need round steel grade 45. But you can only make this important part yourself if you have your own lathe or have access to it. The diameter of the workpiece must correspond to the size of the saw blades that are intended to be used.
Main standard sizes of disk mounting holes:
- 16 mm;
- 20 mm;
- 22 mm;
- 30 m;
- 32 mm;
- 50 mm.
From the indicators listed above, the size of the shaft for the circular is selected.
To make the shaft you will need steel round timber grade 45.
The most common hole diameter is 32 mm. This is the mounting socket that discs with different outer diameter sizes have. Alternatively, you can make a thinner shaft so that you can do “jewelry” work. Then an adapter will be used to use large disks. It is worth complicating the design of a home circular in this way only in cases where it will be used by a professional.
The saw blades are installed between two flanges and pressed using a nut, which is screwed onto a thread made on the edge of the working surface of the shaft.
Note! The thread must be left-handed. During the inevitable jerk when starting the circular, the nut in this position will tighten, and not vice versa.
Seats for bearings are determined taking into account the dimensions of the latter. The middle part of the shaft has the largest diameter. If the indicator is significant, additional load on the belt will be created during rotation. Drilling will help get rid of the problem, which will lighten the heavy part of the shaft.
The diameter of the workpiece must correspond to the size of the saw blades.
A simple circular saw from a grinder or circular saw
An angle grinder (grinder) is one of the most popular home craftsman tools; with its help it is easy to cut metal and clean welds. In addition, using a wood disc instead of a standard abrasive disc, the grinder can be turned into a hand-held circular saw (it is also called a parquet saw), and by making a frame with a table, it can be turned into a stationary circular saw.
Required accessories
To work you will need:
- multilayer plywood with a thickness of 10 mm or more;
- switch and wire;
- countersunk head bolts;
- screws;
- wooden block 40x40 mm.
Read also: How to disassemble a Vitek 2200w iron video
You also need to prepare a drill or screwdriver, hammer, screwdriver, pliers, ruler and pencil. Using these tools you will have to make a circular saw with your own hands.
Of course, you must not forget the grinder itself or the hand-held circular saw. At the first stage, it will help to cut the material, and then it will take its place as the working body of the circular saw.
Sequencing
The first step is to make the body of the circular. Thick plywood is perfect for this; you can use any pressed wood boards. You will need to cut four rectangular sheets, size 40 x 80 cm. They are used to assemble a box with a square 80 x 80 cm at the base. For ease of assembly and reliability of the structure, four bars are installed in the corners.
The resulting box is closed on top with a table top. It can be made from the same plywood, but it is better to use some sheet material with a laminated coating. This guarantees the durability of the machine and ensures ease of use of the homemade circular saw.
A cut is made in the tabletop to allow the disk to come out, and holes are drilled on the sides for attaching the tool.
The grinder must be securely fixed under the tabletop. The design of the latch can be very diverse, it all depends on the configuration of the machine itself. The main requirement for fastening is that it must securely hold the angle grinder without allowing it to move.
The simplest fastening may look like this: two metal squares, a grinder is fixed between them with a steel clamp.
For additional strength, it is recommended to use the thread of the side handle; a bolt with a suitable thread is screwed into it.
Two holes are drilled in the upper shelves of the angles holding the angle grinder. The structure is secured from below to the tabletop using countersunk bolts. All that remains is to block the power button and connect the angle grinder via an external switch.
In the same way, you can make your own circular saw from a circular saw. In this case, the work is noticeably simplified due to the fact that there is no need to invent a fastening. It is enough to make a cutout for the disk, drill holes along the holes of the plate with a hand-held circular saw.
Design requirements
Experienced craftsmen are ready to create a table for a circular table with their own hands without any techniques or drawings. However, certain conditions still need to be taken into account.
The essential requirements include:
- rigidity (stability) of the system;
- flat, smooth surface of the table;
- securely securing the saw;
- the presence of a guard from the cutting disc;
- free access to the start and pause buttons.
The availability of different functions depends on the working conditions and wishes of the specialist. These include the ability to carry out high-quality longitudinal and transverse cuts.
Standard products, of which there are hundreds in shopping centers, are made of stainless steel. This is an excellent material , but next we consider the production of a table for a saw from wood .
Miniature machine made from a washing machine engine
The circular is distinguished by its extreme simplicity and availability of materials for its manufacture. Perhaps its only expensive part is the electric motor. Stationary machines are equipped with a powerful asynchronous motor, which ensures cutting of thick wood of any species, but in a home workshop you can limit yourself to less power.
Note! To cut boards of medium thickness, it is enough to make your own circular table driven by a washing machine motor.
This design has a number of advantages. An engine from an old washing machine is inexpensive; moreover, a similar unit can probably be found in a home craftsman’s household. Connecting this motor is not particularly difficult; there is no need to look for circuit diagrams or do soldering. With all this, the power of such a unit is quite sufficient for most types of work.
The machine diagram can be simplified as much as possible by eliminating the belt drive. In this embodiment, the cutting tool will be mounted directly on the motor shaft. The base of the desktop mini-machine will be a frame assembled from a block with a cross-section of 40 x 40 mm. If desired, it can be welded from a corner or profile pipe.
Part of the body of an old TV, coated chipboard, is ideal as a stand (tabletop) for a circular table. As practice shows, this part is quite durable, and thanks to the varnish coating, it does not prevent the workpiece from sliding.
Using a jigsaw, two parallel cuts are made in the tabletop perpendicular to the cutout for the disk. A movable square will slide along them, playing the role of a side stop. It will help you make an even cut, if necessary, at a given angle.
Making a crosscut from a circular saw with your own hands
Laying a wooden floor, replacing platbands, covering the facade with plank, clapboard, and creating landscape design elements require a dimensional board. The process of preparing such a board is called trimming. That is, the ends of the material are cut off in order to obtain the desired size of the workpiece and make the cuts aesthetically pleasing.
Do-it-yourself trimming makes work faster and more economical.
To make a crosscut from a manual circular saw with your own hands, you will need available materials and used tools.
The standard characteristics that a future trim should have are:
- maximum cutting length – 350 mm;
- optimal engine speed – 4500 rpm;
- light weight.
The upper part of the power tool is attached to the kingpin using a large bearing - 150 mm (it is not difficult to purchase on the market.) Ears are attached to the outside of the bearing. They are used to fasten the tool to the surface of the frame using M6 screws.
The main devices for making a circular saw with your own hands are car shock absorbers (they are convenient to use as a broach), a soft start button and additional protection that is attached to the power tool and the bed.
The upper part of the crosscut is attached to the kingpin using a bearing.
Note! Before assembling the structure, the shock absorbers must be disassembled, the oil drained and air holes made.
The advantages of a homemade miter saw include the following:
- The design is easy to disassemble, and the power tool can be used for its intended purpose.
- Low cost. Without taking into account the price of the instrument (used), the costs will be no more than 500 rubles.
Among the significant disadvantages, it is worth highlighting the high noise level. It is almost impossible to eliminate this drawback. In addition, it is necessary to make a test cut (selecting and fixing the draft) to ensure good quality of subsequent work.
Stationary machine
Those who plan to get serious about woodworking should think about making a full-fledged stationary circular saw. This should be a separate unit installed on a workbench, equipped with a powerful motor, with the ability to quickly replace the disk. Making such a circular with your own hands will take time, but it will definitely pay for itself.
Despite the apparent simplicity of this device, before starting work it is worth creating a drawing of the machine. This will allow you to clearly see the future unit and choose its optimal configuration.
bed
The basis of any machine is the bed, the frame on which all the main parts are mounted. The frame of the circular saw must be stable and reliable, which is why it is made of metal. It is preferable to use a profile pipe or a thick-walled angle. Welding is used to connect parts. If a collapsible structure is planned, a bolted connection is suitable.
Buying a suitable material will not be difficult; in any specialized metal store you can pick up both pipes and an angle. Those who want to save money can be advised to contact scrap metal buyers. You can buy the same thing from them, only cheaper.
Tabletop
The best material for making the tabletop of a professional circular table is metal. Steel and aluminum-based alloys are excellent. For a budget option, you can limit yourself to thick multi-layer plywood covered with sheet iron. In any case, the surface of the tabletop must be smooth, resistant to friction and not bend under a weight of up to 50 kg.
A groove is made in the tabletop for the disk. It can be done in two ways. You can make a cut in a single sheet, or you can assemble a tabletop from two halves. The second method is preferable for a metal tabletop, which is difficult to cut into at home.
A parallel stop is attached to the tabletop. The best material for this, regardless of the table material, is angle steel. To secure it, grooves are made or powerful clamps are used.
Motor
The engine of the future circular machine is selected depending on the existing disk. If you plan to work with small disks with a diameter of 150-170 mm, you can limit yourself to an electric motor with a power of about 0.5 kW. For disks with a diameter of 350 mm or more, you need to look for a unit of 1 kW or more.
If desired, you can make a sawing machine for work outside the workshop; for this it is enough to provide the possibility of installing a low-power gasoline engine; it can be removable.
Rotation transmission
The optimal drive for a circular saw is a V-belt drive. Two pulleys are used, one on the engine and one on the drive shaft. It's convenient and safe. There is no direct connection between the motor rotor and the disk; if the tool jams, the belt will begin to slip, signaling the need to turn off the power. In addition, using pulleys with several grooves of different diameters, you can adjust the speed of the saw, choosing the optimal mode for different types of wood.
Rotation from the motor rotor is transmitted to the shaft. This is one of the most important parts of the circular. It is unlikely that you will be able to make a shaft yourself; it is better to buy a ready-made one or order it from a turner.
The shaft is mounted on bearings. They must be of a closed type: a circular saw is a sawing place and open ones will not last long.
Read also: Alcohol in a blowtorch
Designs of homemade machines
There are three main elements at the heart of any circular, two of which cannot be made by yourself:
- engine.
- shaft, with jointing knives or the simplest, without them.
Third, the bed (table) is easy to make on your own.
You can make such a stand with your own hands without any problems.
Additional elements are also required:
- starter, switch for the electric motor;
- electrical wire;
- drive belt;
- pulleys on the shaft and motor.
For circular machines with an internal combustion engine (ICE), instead of a wire and a switch, a fuel tank is needed.
Main types of structures:
- The disk is mounted directly on the engine, without a belt or gear drive.
- The disk is mounted on a shaft with a belt drive.
- The shaft is the simplest, only for the disk.
- Shaft with jointing knives.
The first option is the simplest, but with a big drawback. The height of the engine “eats up” most of the working diameter of the disk. If the engine has a diameter of, for example, 200 mm, then a disk with a diameter of 200 mm will protrude above it by only 100 mm. Another part of this distance is reduced due to the motor mounts, connection box, and the thickness of the desktop.
As a result, only the outermost part of the disk diameter, where the greatest “lever” of resistance to engine rotation will actually work, will work. Even with a large blade, the cutting depth remains small, since the blade protrudes little.
If you install the motor with the blade on the side of the table, with the motor elevated relative to the table, the width of the cut will be limited. The wide piece will rest against the engine housing. It is impossible to extend the motor shaft with attachments, since the disk must be located as close as possible to the bearing. In another case, decentration of the shaft, beating and wobbling of the disk are possible.
The second option, the simplest shaft, also inevitably “eats” the working height of the disk, but much less. Only to the height of the bearing carriage from the center of the shaft. Therefore, when choosing a finished shaft, the height of the carriage matters. For powerful shafts this is 80-120 mm (40-60 mm from the center of the shaft). For thin shafts with small bearings 60-80 mm (30-40 mm).
The option with a shaft and belt allows you to select the number of revolutions of the saw blade due to the size of the pulleys on the motor and shaft. The belt can also act as mechanical engine protection. If it is not tightened, when the disk gets stuck in the workpiece, the belt slips along the pulleys, but the engine does not jam.
The option with jointing knives significantly expands the capabilities of the machine. The design can be more complex, with the front of the table being raised to adjust the planing depth.
The simplest option is also possible, without an adjustment platform. In this case, the planing depth is set by the position of the knives in the shaft itself. This option is suitable for rough processing. For example, on jointing knives with a planing depth of 3-5 mm, you can plan one surface lightly. Then, having one flat plane to move along the table, cut the workpiece on the remaining sides with a saw blade.
Machine with pendulum engine suspension
Those who can boast of the ability to work with metal can be advised to make a circular saw with a pendulum engine suspension. The main feature of the device is that the motor, shaft and cutting disc are installed in one common frame. On one side it is hinged to the frame, the second is held in place by a screw with the ability to adjust the height. By changing the length of the screw, you can adjust the height of the disk exiting the tabletop.
This system allows you to adjust the cutting height, as well as use discs of different diameters. If, instead of an adjusting screw, you use a probe placed on the tabletop, you can get a simple copying machine. The feeler gauge will allow you to adjust the cutting depth according to a certain pattern. This fairly simple modification will turn a simple circular saw into a real woodworking machine. With this device you can not only cut the board into the necessary pieces, but also make precise cuts and make various selections.
For greater convenience, the hand-held circular saw can be mounted on a table. This design will help you process and saw wooden parts quickly and without problems.
Working with a circular saw mounted on a special table greatly simplifies the cutting process and is safe when using special tools.
In this article we will tell you how to make a table for a hand-held circular saw with your own hands.
Some manufacturing nuances
Electrical engine
The main parameter that determines the design of a homemade “circular saw” is the thickness of the boards being cut. For household work with your own hands, it is usually not necessary to saw wood thicker than 15.0 ... 20.0 millimeters. To change the depth of the cut, you can use and/or make a special mechanism for lifting the disk, but this will significantly complicate the design of the homemade product.
When choosing a drive motor, the rotation speed of its shaft should be taken into account. Using a belt drive, you can change the speed with your own hands. If you intend to use an electric drill as a drive, then preference should be given to models with variable chuck rotation speed, then using such a hand-made circular saw will be a pleasure.
Circular saw table design
The table base for a circular saw can be wooden or metal.
The tabletop is made of metal or sheet wood materials. A hole is made in it for a circular saw blade.
Supports ride along guides in the tabletop, which move timber and any other sawing material.
First of all, the table should be comfortable, stable (not wobble!), the surface of the tabletop should be flat. These factors will help a person avoid injury during work.
Circular from an angle grinder
If you have your own grinder, that's very good. To create a “circular”, you need to make an axial handle and a sliding stop for the unit. The design of the sliding stop includes a pair of pieces of steel angle placed on the sides of the saw blade. Using nuts and bolts, they are connected by a transverse ligament, and the gap between the working part and the sides of the structure will be ensured by washers.
On the “grinder” you need to pre-tighten the metal band clamp with the screw tie down. Then you need to attach a folded metal strip to the holes for the sliding stop. The stand and clamp can be combined, but in this situation the metal strip will be too thick.
Then you will need to make several holes for the bolts in the gearbox of the future tool. For this purpose, the body is disassembled, and the points where drilling will take place are indicated. Using the holes made, the axial handle is secured, because the “standard” handle will not allow you to make a good cut, even if the master has very strong hands.
The handle is made from a metal tube or rod. The design can be shaped like a horn or a bracket. The ends of the element, with which it will be attached to the gearbox, must be provided with holes for installing fasteners.
you also need to make a bar that will regulate the process. make from one end , rivet it slightly and make a hole for the front thrust bolt.
At the other end of the rod you need to make a thread that will allow you to connect it to the handle. In advance, one strong nut should be screwed onto this thread, and after the structure is assembled, a second one. By lowering and tightening them, you can adjust the cutting depth. By the way, if you use a drill instead of a grinder, you can make a similar tool.
In this way, you can independently make a good circular saw from an ordinary grinder, with which you can cut various materials.
Preparatory stage
The hole in the base is cut for a specific brand of saw
Before you start cutting the material and assembling the circular table, you need to calculate its dimensions and make a drawing.
The hole in the base must correspond to the dimensions of the circular saw platform. For each brand of saw this will be a specific size.
The slab installed on the tabletop should not overhang the table to one side - the base must be resistant to external mechanical loads.
The dimensions of the tabletop must correspond to the sawing flow.
For some, a folding table, a small table with a removable circular saw, is enough. People who have a spacious workshop need a full-fledged table for a circular saw or even a circular saw.
- solid wood;
- Chipboard, chipboard, MDF, OSB, plywood;
- metal (steel or aluminum).
Plastic is not suitable as a material for making a saw table.
Before final assembly, all wooden parts of the table should be treated with antiseptic compounds to protect against moisture and rot.
DIY circular saw table. Drawings, photos, tips.
A circular saw is used to cut wood.
Using a hand saw is not always comfortable; using a table allows you to make the sawing process smoother and more accurate.
The cutting base has a disk-like plane, equipped with an outer edge with teeth. There are models not only of the manual type, but also with the ability to be fixed on the table.
READ Which saw is better: Husqvarna or STIHL
It is difficult to work with large volumes of wood with a regular circular saw, so it is better to place it on a table
There are several ways to acquire the latter for ease of manipulation. You can build a table for a circular saw yourself, strictly following a certain pattern.
Materials and tools
To make a saw table with your own hands, we will need the following materials:
- Laminated chipboard or plywood 21 mm thick;
- timber for the table frame (you can use a 50 x 150 mm edged board 3 meters long - 5 pcs.);
- wooden dowels 10 mm – 12 pcs.;
- wood glue;
- metal fastenings for drawers and legs – 4 pcs.;
- metal corners – 10 pcs.;
- self-tapping screws
Tools required for work:
- pencil, marker, tape measure, meter;
- jigsaw;
- manual frezer;
- Sander;
- medium and fine grit sandpaper;
- plane;
- drill;
- screwdriver
You can make a table for a jigsaw by reading this article.
Additional Important Information
Carpentry work requires special attention. If you want to make a high-quality and highly reliable table for a circular saw with your own hands, then be well prepared for the work.
Do the following:
- Purchase all the necessary materials and equipment without exception.
- After installing the frame, be sure to install it on a flat plane and check that the cover of the structure does not overhang in any direction.
- It is better to install the table for the circular saw in the area where it will be located in the future in order to eliminate possible problems associated with uneven floors.
- If, due to the rough floor, the table vibrates during operation, then it is necessary to adjust the length of the legs using compacted material or rubber.
- The product tabletop can be either single or folding. In order to form a folding table for a saw, it will be necessary to spend a little more time and the material itself and pay attention to increasing the strength of the frame, which is in a disassembled state.
- The dimensions of the material used to create the table are determined experimentally. Ideally, the level of the design should correspond to the height of the master.
- The hole that will be made in the tabletop must correspond to the dimensions of the specific saw available.
- To extend the service life of all materials used, assembled into a common structure, it is necessary to subject them to treatment with special chemicals that can increase the working properties of wood or metal (for example, protect their surface from rust, rotting, mold, etc.).
- It is better to process wood or iron outdoors, rather than indoors, to avoid poisoning from intense fumes.
Using this article as inspiration, you can make a durable table saw stand for your circular saw.
Manufacturing stages
Step 1. First, use a plane to trim all sides of the beam. We assemble the table frame from the timber: in each side of the tabletop we drill two 5 mm holes for dowels for each drawer and one hole for each table leg.
Step 2. You need to make two holes (5 mm) in the drawers, and one hole (5 mm) in the legs.
Step 3. Install the dowels into the tabletop, having previously lubricated them with wood glue. Tsars and legs are installed on top.
If you have clamps with ties, you can secure the table with them. After the glue has completely dried, the drawers are fastened to the legs and to each other with special metal fasteners for tables and tightened with self-tapping screws.
Step 5. You can secure the saw with bolts or bars with self-tapping screws. We will fasten with blocks, so we make a cut in small blocks the width of the saw platform. Using blocks with self-tapping screws on both sides, we fasten the circular saw to the table top.
Step 6. When the saw is installed, take another larger block and screw it to the tabletop with self-tapping screws (directly to the previously marked points along which the saw platform was aligned exactly). This block is necessary so that later, when removing the saw from the table, you can quickly return it to its place without resorting to markings.
Step 7. Place the circular saw blade in place and saw through the table top to create a longitudinal hole. Turn the tabletop over.
Step 8. We make a parallel stop. To do this, we saw off two strips of plywood with a length equal to the width of the table and a width of about 8–10 cm. We round the corners using a protractor and a pencil.
Step 9. Sand both strips and fasten them using self-tapping screws at an angle. We screw a metal corner inside.
Step 10. If you constantly work with a table for a circular saw and need to secure the stop on the table top, attach a guide perpendicular to the disk. The roller or the second part of the guide is attached to the bottom of the fence so that the fence can move up / away from the circular saw blade.
You can learn how to make a workbench for your garage yourself from this article.
Compact tabletop machine
Above we discussed how to assemble a manual circular saw . Now we’ll tell you how to turn this device into a stationary one. This process involves making a U-shaped frame from a pipe, as well as installing a wishbone. The lower ends of the structure must bend horizontally in the direction of the cut. They are attached to the table using bolts. Stability is ensured by additional supports.
READ How to Sharpen a Tipped Circular Saw
The mobility of the lever is ensured by cutting the horizontal segment into two identical parts, which are fixed together with clamps. The cutting disc is attached to the vertical element of the frame with clamps.
Workplace safety
In order to avoid injury during work, it is necessary to carefully monitor the position of the saw table, its stability, and strength.
Before each use of the circular saw, check that it is securely in place.
Holding the cut material with your hands is strictly prohibited! This can lead to injury to your fingers or the wood to bounce into your face when hit by knots or uneven surfaces.
Also, to avoid eye injury, be sure to wear safety glasses while working. Do not neglect these simple rules, take care of your own health.
For more information on how to make a table for a hand-held circular saw with your own hands, see the following video:
Do-it-yourself design production
After preparing a sketch of the structure (with dimensions) and purchasing the required materials, you can begin work. You should start by making a frame for the table top. It can be made from a profile pipe. Having a welding machine and a grinder on the farm, this is not at all difficult to do.
- The required pipe sections are cut.
- The sides are welded.
- Four sections connecting the sidewalls are welded.
- All welding and sawing areas are processed with a grinding wheel.
- Adjustment screws are attached to the ends of the legs, allowing you to install the table on a not very flat surface.
Metal frame under the tabletop
The structure must be painted to give it an aesthetic appearance and protect it from corrosive processes. It remains to make holes in the frame for mounting the tabletop.
The table can also be made from timber or boards with a section of 10 x 5 cm. To assemble the frame you will need metal corners, dowels and screws.
Design example
Important! When using wood blanks, one should not forget about the mandatory treatment of them from exposure to moisture and temperature. For this purpose, special formulations are produced.
You can also use old furniture, such as an office table, as a base for a circular saw. It is only necessary that its base be strong. In most cases, the standard dimensions of such structures are quite suitable for cutting wood. But it is recommended to install a new countertop itself. An alternative is to glue two sheets of plywood 1.2 cm thick. This thickness will be quite enough to install a saw weighing about 5 kg.
You can glue 2 sheets of plywood
After making the base, you can proceed to the most important stage - preparing the surface and installing the saw.
Table. What may be needed to carry out the work.
| Tool, device | Photo |
| Jigsaw | |
| Screwdriver | |
| Drill | |
| Sander | |
| Milling unit | |
| Roulette | |
| Square |
Step 1. You need to drill mounting holes in the platform of the purchased unit (if the holes were not provided for in the design). It should be remembered that after such modification, the manufacturer’s official warranty for the purchased tool will be lost.
MDF (board made from tiny wood chips)
Step 2. The tabletop is cut out according to the required dimensions. It can be made from 1.8 - 2 cm thick plywood, MDF, old furniture or sheet metal, but this option is rarely used. In this case, chipboard is not recommended, since these boards are not very durable. Plastic should also not be used as a countertop.
Important! The thickness of the cut directly depends on the thickness of the table. The larger this size, the shallower the depth the disc can cut through the workpiece, since the working surface of the disc is reduced.
It is advisable to mill the edges of the tabletop (no one has canceled the aesthetic appearance even for working devices), after which you should go over the workpiece with a grinding machine.
Step 3. A slot for the saw blade is made in the tabletop.
Step 4. Markings for hardware are applied. The saw is attached to the bottom of the tabletop. The fastener caps should not protrude beyond its plane.
The saw is fixed to the bottom of the table top
Many people do not drill the platform when installing the saw on the tabletop, but secure it with clamping blocks and self-tapping screws.
Step 5. The tabletop is turned over into the working position and secured to the frame. For fixation, it is recommended to use not only self-tapping screws, but also metal corners, which provide the required structural strength.
Fastening the table top
Many craftsmen do not limit themselves to simply installing factory tools under the table. To gain a few millimeters in the thickness of the cut, they completely remove the saw guard, sole, and saw blade tilt adjustment device (if it is not useful in the future). After this, a homemade platform is produced, on which the saw is attached.
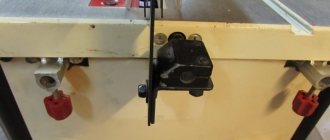
Step 5: The tool's power management is displayed. For this you will need: a plug for the socket, a plug for turning on the saw, a standard light switch, a piece of cable, clamps for clamping the power button on the saw, self-tapping screws and minimal electrical installation skills.
Power management disabled
A socket is attached to the inside of the table; a cable for the switch is output from it, which is installed where it is convenient. The device is powered from the nearest power source in the room. The saw power button is fixed with clamps in a recessed position. The integrated saw start control allows you to quickly and easily control the operation of the tool.
Step 6. To work on the table, you need to make stops and a carriage.
Circular table guide carriage
A carriage for sawing small workpieces or cross-cutting lumber can be made from a plywood base and two wooden walls. It will move along two guides, which are made of sections of metal pipe with a cross-section of 2 x 1 cm and installed in grooves made using a router. The parts placed inside the carriage are very convenient and safe to saw.
Finished carriage
Guides for working with workpieces can be made of boards, plywood or metal.
Metal guides
They must be able to adjust their position depending on the width of the workpieces being cut. The stops can be not only longitudinal, but also transverse, and also help to make cuts at an angle.
Example of a stop
If you don’t want to make the guides yourself, you can install a ready-made device.
You can supply a ready-made device.
To cut workpieces, you cannot do without a marking ruler. To mount it in the tabletop, a shallow groove is selected using a router. It can be done with a chisel and a knife, but using a milling machine it is much faster, more accurate and easier. All areas where work was carried out are carefully sanded to eliminate the risk of splinters. Installation holes are drilled. The ruler is secured with self-tapping screws.
The ruler is attached with self-tapping screws
You can provide various devices to facilitate the operation of the tool: a bag under the table top to collect chips, a dust extractor for sawdust flying over the table, a mechanism for lifting the table top for servicing the tool. In small spaces, a folding tabletop is convenient.
Operating a circular saw is a traumatic operation, so you should push the workpiece toward the disk not with your hands, but with a pusher specially made from a block. The most common injuries that an operator can receive when working with a circular saw are injuries to the fingers and eyes when knots or chips bounce off. When working, be sure to wear safety glasses.
Sawing table made from a hand-held circular saw
A well-made frame, a securely fastened saw and prepared work equipment allow you to cut material quickly and safely.