A grinder is a grinding machine used for processing and sharpening metal, wood and plastic products. It all depends on the rigidity of the tape. The stiffer the tape, the more durable the material can be processed. In addition to final sanding of products, the grinder can also remove rust from the surface. A necessary tool for the household. The price of finished products varies from 20 to 170 thousand rubles. But the product can be made at home. It is only important to understand the details and power of the device.
Homemade grinder. Important points.
There are many designs of homemade grinders. Some make them using an engine from an old washing machine, others make them from an old grinder or drill, but all these models share the same technical details. Let's look at them in more detail.
Dimensions and design
There are no specific sizes that are the same for all grinders; they can be purely individual in each specific case. When choosing the overall dimensions and design of a belt grinding machine, you need to be guided by the free space in your workshop and the rule that the longer the belt, the more resistant to abrasion it will be and, accordingly, the less often it will have to be changed. If you are going to purchase ready-made, already glued tapes for the grinder, then the machine needs to be designed taking into account the size of these tapes. If you are going to glue the tapes yourself, then the dimensions of the machine can be arbitrary, but it is best to stick to the standard sizes of the tapes.
Abrasive belts for grinders are available in two widths: 50 and 100 m. The length of such tapes can be 610, 915, 1230, 1600, 1800, 2000 millimeters.
It is best if you have an abrasive belt of the required length, then it will be easier to adjust the size of the grinder to it.
The main components of the grinder are a machine frame with a work table and a tape clamp, an electric motor with a drive roller, a tension roller, a barrel-shaped roller and, if necessary, additional driven rollers. The barrel roller can also be a tension roller.
The most compact grinder can be made with just two rollers, one driven on the electric motor shaft, and the second barrel-shaped tension roller.
If the grinder will work with long abrasive belts, then it will not be possible to do without additional driven rollers.
Why do you need a barrel shaped roller? When assembling the machine, it is almost impossible to maintain perfect parallelism of the axes of all rollers. For this reason, the tape tends to come off the rollers. To eliminate this drawback, a barrel-shaped roller is used. By adjusting the tilt of its axis, you can “force” the abrasive belt to remain in place.
To adjust the axis of the barrel roller, you can use the principle of a regular door hinge. The roller axis is welded to the movable part of the hinge, and adjustment is made using a bolt. Which rests on the movable part of the loop.
The mechanism for tensioning the abrasive belt can be made in several ways. The most common is using a spring, the second is using a furniture gas shock absorber and the third is using regular rubber, for example from a bicycle inner tube. If you use a furniture gas shock absorber, you need to know that it does not work well at low temperatures.
It is recommended to make the tape support two-layer. Make the base of the stop from a metal sheet and glue smooth porcelain tiles onto it. Thus, the emphasis will practically not heat up during intensive work on the grinder. Also, porcelain tiles wear out much slower than metal. It can be conveniently replaced as it wears out; you just need to heat the connection with a hair dryer, and it will come off. You can glue it to a regular silicone sealant for marble, for example Silirub MA from Soudal.
The stop must be adjustable relative to the tape. It must be moved to the tape tangentially to it or with a slight overhang of up to 0.5 mm. This overhang does not cause excessive wear of the belt, but it allows you to grind long strips longitudinally without touching the convex parts of the rollers.
How to calculate the diameter of the drive roller.
To calculate the diameter of the drive roller, you need to know the belt speed at which the grinder will operate and the number of engine revolutions.
Belt speed should be selected according to the belt manufacturer's recommendations. For example, for a 3M Cubitron tape on steel it should be 22-25 m/s; from the same manufacturer, a speed of 30-35 m/s is recommended for tapes with aluminum zirconate. Belt speed is highly dependent not only on the type of abrasive, but also on the grain size. And so on average it is recommended for carbon steel 32 - 38 m/sec, alloy and stainless steel 18-30 m/sec, Titanium -15 m/sec, non-ferrous metals 35-45 m/sec, plastics 10-30 m/sec, malleable cast iron 38-34 m/sec, gray cast iron 35-45. As for wood, it is recommended not to exceed 20 m/sec, and you also need to know that different wood will burn at different speeds.
Formula for calculating belt speed:
V tape (m/s) = (3.14* D * N) / 60000,
where D is the diameter of the drive wheel in mm, N is the engine revolutions per minute.
Formula for calculating drive roller diameter:
where V is the belt speed in m/s, N is the engine revolutions per minute.
Calculation example. It is necessary to calculate the diameter of the drive roller for processing steel (22-25 m/s). Electric motor 2800 rpm.
The speed of rotation of the belt for different materials can be adjusted by changing the diameter of the drive roller or adjusting the engine speed. It should also be understood that as the diameter of the drive roller increases, the load on the engine increases and if it is of low power, for example, from a washing machine, then it will often stop even from a slight load.
Which engine to choose for a grinder.
On the Internet you can find information about machines made using electric motors from old washing machines. Such electric motors are low-power and low-revving. Most often it is 180 watts and 1400 rpm. Such grinders, as a rule, do not have enough belt speed and engine power, so they can be used to perform light work, for example, sharpening knives or processing small pieces of wood. They are not designed for anything more serious.
Below is the formula for calculating engine power for a grinder.
Formula for calculating engine power:
where D is the diameter of the drive wheel in mm, N is the engine revolutions per minute.
If a three-phase motor is used, but connected to a single-phase 220V network, then its calculated power when connected in a delta with a working capacitor is approximately 1.5...1.6 times lower than the nominal value. This must be taken into account. For example, according to calculations, an electric motor with a power of 800 watts is required, and the motor will be used three-phase, but on a 220V network. Then the required power of such an engine will be equal to: 800 * 1.6 = 1280 watts.
The optimal choice is a single-phase motor with a speed of at least 2800-3000 and a power of at least 800 watts. With such an electric motor, it will be possible to process hardened steel on a grinder, and not just sharpen “pencils.”
If an open-type motor is used in the manufacture of a belt grinding machine, as in washing machines, then you should think about protecting it from abrasive and metal dust. Such protection can be made from a 5-liter plastic bottle or any other plastic container.
How to make rollers for a belt sander
If you know a turner, then you should not have a similar question. Well, if there are no such acquaintances, then this information will be useful to you.
There are several ways to make videos.
It is convenient to make the drive roller from a sheet of plywood. First, circles of the required diameter are marked, then they are cut out using a jigsaw. After this, the plywood circles are glued together.
After gluing, the central hole of the roller is drilled to match the diameter of the electric motor shaft. Now you need to make a keyway in the hole. It is easy to do with a file.
Then we put the roller on the electric motor and grind it using a chisel, a large file or an angle grinder (grinder) with a grinding wheel.
To make the drive roller slip less, it can be treated with liquid rosin.
The easiest way to make driven rollers is to simply assemble them from bearings of a suitable diameter on a shaft. Partially threaded bolts can be used as a shaft. Bearings need to be sealed, otherwise they will quickly become clogged with dust and fail.
You can use timing belt rollers from your car as rollers, but don’t buy new ones, ask them at any service station. It is only desirable that the rollers be flat without shoulders. These beads can cut the edges of the tape.
Another way is to cut the rollers with a crown made from a sheet of plywood and glue the resulting washers together. You can additionally secure them with self-tapping screws. Afterwards, inside the roller you need to drill two holes on both sides of the roller for the bearings. The depth of such holes should be equal to the width of the bearings. It is convenient to drill such holes using a wood drill bit. When the holes are ready, we drill a through hole in the center of the roller for the roller axis. The diameter of this hole should be slightly larger than the diameter of the inner race of the bearing, otherwise the bearing will jam inside the roller.
After this, the roller is almost ready, all that remains is to sand it on the outside and give it the desired shape, if it is a barrel-shaped roller.
The rollers can be made from round caprolon or another name for this material is polyamide-6. The process of making a video is no different from the previous ones. We cut the workpiece to the required length, drill holes with a feather drill for the bearings and grind it on the outside using a grinder.
Another way to make driven rollers is to use couplings from a polypropylene pipe. Barrel couplings are available for sale. For example, a Czech-made coupling d 32 Wavin Ekoplastik.
Bearing No. 201 fits well under this coupling. The bearing can be pressed into the coupling using a vice.
If you need to make a straight driven roller or you couldn’t find a barrel-shaped coupling, then you can make a roller from two straight couplings. If necessary, this roller can be ground to a barrel-shaped state.
For one roller you will need two plastic couplings with an internal diameter of 32 mm, three bearings No. 201 and washers for the M12 bolt. First, the plastic couplings are cut, on one side, so that the distance from the edge of the coupling to the inner rib is 5 mm. We need the bearing to be able to enter the coupling only half its width, that is, 5mm. The bearing should rest against the internal rib of the coupling.
After cutting the couplings, use a vice to press the bearing between the two couplings. It will be inside exactly in the middle of the future video.
Now we put washers and press two bearings along the edges of the roller.
All that remains is to sand the outside of the roller.
I recommend watching a video on this topic.
Source
What is a grinder and what is it intended for?
As mentioned above, a grinder is a variation of a grinding machine. However, unlike traditional emery, the device is more versatile. It can act as a finishing tool, for example, sanding wooden products, and for preparatory work - removing rust from the surface. Important! Mechanisms for tensioning the belt and a rotating working platform allow you to change the sharpening angle to the required one.
Mini hand grinder for wood processing
A professional grinder is not cheap. The simplest option will cost 25,000 rubles. Semi-professional models cost several times more. Some machines can reach prices of 170,000 rubles. In this sense, the easiest way for a home craftsman to choose the path of making a grinder with his own hands.
What is sandpaper used for?
An emery machine is useful for the following work:
- Restoring the cutting qualities of the drill. To avoid buying new drills, you need to know how to sharpen old ones. When working with a drill, the drill gets very hot, which is why it constantly becomes dull. Once you sharpen it on a machine, you can use it many more times.
- Sharpening knives, scissors, shovels and other tools. Thanks to a homemade machine made from a washing engine, your knives will always be sharp and your scissors will cut perfectly. You don't need to use any special effort for this.
- If you replace the emery wheel with a polishing wheel, you can easily process products and parts.
Using the motor from the washing machine, you can make a sharpening machine with your own hands. To do this, you will have to buy just one part - an emery wheel. All other components are located in the motor.
Console left
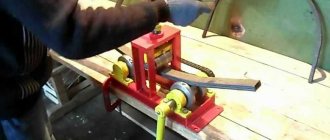
The console is easy to assemble. The parts are welded according to the drawing. First, one pipe must be bent using a manual pipe bender or simply clamped securely in a vice.
After welding, clean the seams and blacken them to prevent corrosion. Or you can paint it with enamel.
This is what you should end up with.
Homemade grinder assembled without tape
If you need to change the maximum grinding speeds, then, as an option, you can change the diameters of the rollers.
The diameter of the drive pulley is calculated using this formula: D=V x 1000 x 60 / π x N
Or use a frequency regulator to change the speed. There are many options for implementation, the main thing is the desire to do everything with your own hands and not be afraid of difficulties.
What is a grinder and what is it used for?
A grinder is a grinding and sharpening machine that is equipped with a belt abrasive. This design is indispensable in home workshops, and there is a worthy use for it in any garage. A homemade grinder is superior in functionality to grinding machines. The main feature is the possibility of processing the ends of products and the high convenience of working with small parts.
A grinder is necessary for finishing the surfaces of parts when it is necessary to remove various types of roughness and minor defects. This preparation is carried out before painting or varnishing the part.
The design and functional features of this homemade machine make it easy to process surfaces of various shapes. This kind of work cannot be done with hand tools.
Grinder from a grinding machine
In this case we will need a grinding machine.
We assemble the base for mounting the machine.
It is necessary to make a hole in the design for wiring. And now the grinding machine is ready.
Design Features
Before you begin selecting materials and components, it is important to understand the operating principle of the device.
Important! Some grinder parts will have to be purchased ready-made. Perhaps turn to the services of a turner.
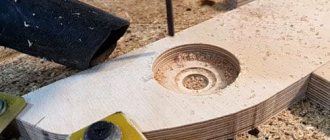
There is nothing complicated in the design of the grinder from the mechanical side. It is important to determine the power of the unit and find components. In fact, the main element of the design is the motor and drive, which supplies torque to the rollers that rotate the belt. All elements can be made from metal, plywood, or even plastic. The photo shows a drawing of the grinder with dimensions.
Grinder device in the drawing
Let's look at the principle of operation of the grinder. With the help of a motor, a group of rollers is driven, one of which is the main one, or leading, the others are secondary. After turning on the device, the sanding belt begins to move. Using the regulators, you can shift the position of the rollers, which allows you to adjust the depth of tension and grinding and also its angle.
So, the main elements of the grinder are:
In addition, the design includes a rotating clamping mechanism.
Main components of the grinder
The unit, as we have already said, can be either manual or stationary. The design of a stationary device includes elements such as a rotary table with clamps, which is usually mounted on a workbench or stationary frame. The table can change the angle of inclination, rotate along its axis, and in some models – perpendicularly.
The motor is driven either by a foot drive or by a drive motor that is attached directly to the tool on the frame. An old drill, grinder, or washing machine engine can serve as the “heart” of the grinder. The main thing is to ensure the necessary speed, which will allow you to process exactly those surfaces that you need.
Interesting fact! The power of the machine depends on the design of the belt mechanism and the volume of workpieces that you plan to process. The longer the sanding belt, the stronger the motor needs to be installed.
It is clear that over time the tension force of the tape may weaken; for this, options are provided for adjusting the tension system. This may be a spring clamp, and in some cases a regular bolt will help to adjust the height and angle of the rollers relative to each other.
Important! The rollers in the grinder must be installed strictly vertically relative to each other. Any change in the position of the rollers may cause the belt to break.
When thinking through the design, determine in advance how the work area will be cleaned of dust and eye protection. Typically, a folding acrylic glass or a stationary vacuum cleaner is used. You can see the design of this piece of equipment in industrial grinders.
Advice! Before deciding on the size of the belt and the width of the rollers, figure out for yourself what surfaces you plan to process, their dimensions and volume of work.
An example of the correct placement of rollers on a grinder
As we have already noted above, the issue of choosing a belt for a grinder is one of the most important. The speed and quality of surface treatment will depend on this. It is well known that sanding belts for grinders vary in length, width and degree of hardness (grain). Most often, the following tape sizes are used in machines of this type: 610, 915, 1230, 1600, 1830 mm in length, in width there are only two options -50 and 100 mm, however, experienced craftsmen can cut a tape of any width.
Important rules for choosing a belt for a grinder:
- The bottom fabric must be elastic in its structure. The fabric base better withstands surface tension.
- must withstand maximum angular speeds - at least 1500 rpm;
- the abrasive coating must be of high quality. Selected according to the material;
- the tensile strength must be at least 15%;
- the tape must be resistant to possible heating, which often occurs during long-term operation.
To make a homemade grinder, the master will use the soleplate of an old belt sander. This is convenient because you can buy ready-made sanding belts instead of gluing them yourself.
The transmission mechanism will be the belts and rollers of the vehicle's auxiliary drive system. Please note that the timing belt is toothed, but in this case the technician will use the smooth side of the belt rather than the toothed one.
First of all, the author makes the drive pulley. And for this he uses 20 mm thick plywood. We make markings and cut out a circle of the required diameter with a jigsaw. Then you need to drill a hole in it.
READ MORE: Asiatic lily: varieties, planting and care
The pulley will need to be mounted on the electric motor shaft; the author uses glue to fix it. Then you will need to connect the speed controller.
The diameter of the plywood pulley turned out to be a little large, and therefore the author grinds off the excess using a carpenter's cutter. As a result, the diameter was reduced to 70 mm, and runout was reduced to a minimum.
A homemade grinder is characterized by a special design in which the soleplate from an old belt sander will be used. This solution makes further operation of the machine convenient and low-cost. This is explained by the possibility of using ready-made sanding belts and the absence of the need to apply them yourself.
The desktop is used as a basis. Its design can be changed at the request of the user, who will focus on the goals and the desired result. Grinders can be screwed to the floor, which makes the machine more stable, although it deprives it of such an important quality as mobility. But in this case, the grinder will not move or vibrate during operation. You can also add wheels to the table, making it easy to move around the workshop.
The beauty of a homemade grinder is the ability to change the design at your own discretion, add structural elements or remove what is not useful in further work. In any case, before starting work on creating a grinder, it is necessary to think through the drawings of the future machine. It will be much easier to make adjustments on paper than during the process of creating the installation.
Collecting videos
The drive roller for the engine is made of plywood. Cut out 10 circles with a diameter of 85 mm. Mark the center and drill a hole with an 8 mm drill. We coat each disc with PVA glue. We collect it in a bag on an M8 stud and compress it from both ends through washers with nuts.
We compress the drive roller on both sides with clamps.
Let it dry overnight for further finishing. Next, drill a hole 24 mm deep. If you don't have a finger cutter, you can use any drill. In our case, the cone from the drill is not a hindrance.
Driving Roller Hole Dimensions
Your motor shaft may be different from the drawing, but this is not a problem. The principle of fastening remains the same, only the dimensions will change, which can be measured with a special tool. Read how to use a caliper here.
Another option for a washing machine motor
After preparing the roller and shaft, you can begin finishing the drive pulley. Attach the motor to the platform, put on the drive pulley, turn on the motor and carefully sand the roller with a flap abrasive wheel.
Finishing drive pulley
After cleaning, the edges need to be beveled a little to get a barrel look.
Types of engines
The type of electric motor chosen for homemade products depends on the age and model of the washing machine. For example, if it was an old washing machine dating back to Soviet times, then it most likely had a reliable asynchronous electric motor installed. This washing machine motor has a power of 180 W, has excellent torque and is the most convenient motor for homemade products. Also in the hands of the master may be a two-speed electric motor, a commutator motor or an engine from a modern SM of any model and class.
Asynchronous motor
Asynchronous electric motors used for washing units can be of two or three phases. But since about 2000, the production of two-phase motors has practically ceased, and they have been replaced by more modern three-phase motors with frequency-controlled rotation speed.
Grinder “from Chapai” - a brief overview
Andrey Chapai developed his own version of the grinder. The model was so loved by the craftsmen that it soon became a household name. Hundreds and thousands of samples of grinding machines “from Chapay” have found their place of honor in workshops in different parts of Russia and the CIS countries. The main advantage of the development is its versatility.
Grinder “from Chapaya” is a universal machine for processing complex-shaped products made of metal, plastic and wood
You can buy a product, as they say, “turnkey”, or you can choose a modest set of tools and equipment: choose a specific motor, a set of related parts, or order your own development.
For your information! The most common models of grinders: “GCh-10”, “GCh-12”, “GCh-16” (professional series), as well as new mobile versions of the grinder 610 series “GCh610-63” and “GCh610-71” - are made with zinc coating.
General points characteristic of all machines:
- it is important that all surfaces of the grinder are polished, which simplifies the work with the tool and protects the processed parts from scratches, providing additional smoothness;
- precise, calibrated location of the rollers helps to eliminate distortions during the running of the belt;
- There are a variety of models that can come without painting or protective coating;
- surfaces work effectively on sliding;
- do not forget that in order to prevent corrosion of the product, it is enough to periodically wipe it with a special oil or silicone spray;
- versatility of work is achieved due to the special design of the pressure pad.
The peculiarity of the pressure pad is that it can be rotated strictly vertically and strictly horizontally, while providing different pressure. Additional elements included in the package: a disk for installation instead of the drive roller. It is recommended to be used when working on metal, if it is necessary to remove large amounts of paint and varnish material or rust deposits.
One of the most popular grinder models is No. 16. It is made on a reinforced rotary base, the frame is equipped with two racks. The base for the frame is 2 metal sheets, 12 mm thick. Metal provides the necessary rigidity of the structure. Special fasteners allow you to quickly and effortlessly deploy the grinder into both vertical and horizontal positions.
The design uses an enlarged sanding belt – 1600-1800×50 mm and a fairly powerful motor – 2.2 kW. The machine has higher productivity and is ideal for continuous work in large industrial production. The price of such a product currently varies from 55,000 to 60,000 rubles.
We glue the tape for the grinder with our own hands
We will need the following materials:
- PVA glue, regular super glue will also work.
- Clamps.
- Sandpaper.
Determine the required width of the tape. Cut off the required amount of paper. We remove the abrasive layer from the edges of the tape. We glue a piece of fabric onto the empty spaces and use clamps. We wait for it to harden, then tear off a piece of fabric. This is what you should get:
Then use finer grit sandpaper. And glue it flush to the abrasive part.
We made a reliable and durable grinder belt ourselves.
To choose the right belt for the machine, you need to correctly calculate the size of the pulley, focusing on the engine speed and the rotation speed of the belt. If the belt moves slowly, it may damage the surface being processed during processing. And if the tape is fast, the abrasive part will be erased without treating anything.
The process of manufacturing parts and assembling the grinder
The body is made from five parts cut from chipboard and fastened with furniture screws. Its dimensions are determined by the specific engine, and we will not give them.
We create the unit on the basis of a commutator motor from an automatic washing machine with 14 thousand rpm. / min. We connect it to the network through a voltage regulator to control rotation.
We fasten it with two screws on the blocks. It has a 220 V input and two outputs to the motor, which has terminals for connecting many wires: to the stator, armature brushes, Hall sensor, tachogenerator, etc.
For proper connection, we find two wires each from the stator and rotor brushes. We connect together one wire from the stator and armature brushes. We connect the other pair of wires to the voltage regulator. We install a switch before the regulator. This completes the electrical connection.
The support for the sanding tape is made from a mounting angle, the edges of which are rounded to prevent the tape lock from catching.
We cut out the rectangular surface of the tool rest from sheet metal and glue it to the chipboard. The diameter of the mounting holes is slightly larger than needed for the bolts. This is necessary to adjust the angle between the stop and the rest.
The drive roller is made from two propylene pipes with a diameter of 20 and 32 mm.
We select a large pipe with an internal diameter also equal to 20 mm. There are two ways to connect pipes: gluing or fusion.
Let's use the second method. To do this, it is enough to press a wooden block against its end while rotating the roller.
As a result of the heat generated, the pipes are tightly fused.
Additionally, we insert a tube bent from tin into the inner hole of the double pipe.
We stuff this entire structure onto the splined shaft of the engine. The connection turned out to be reliable with minimal runout.
For the driven roller, we select two bearings and, depending on the outer diameter, a polypropylene pipe with exactly the same internal size.
If it turns out to be smaller, then it can be drilled out with a drill with a feather drill of the required diameter.
We expand the bearings with a steel tube to relieve the lateral load. On the inner end of the roller we place a ring cut from a coupling of the same size, which will serve as a stop.
READ MORE: Descor stretch ceilings in the interior || Stretch ceilings Descor seamless German ceilings reviews of ceiling coverings from Germany
We assemble the resulting assembly on a hairpin and screw it to the base using washers and nuts.
We make the diameters of the holes in the body larger than what is needed for the stud. This solution will allow you to adjust and tension the sanding tape.
You shouldn’t rush to start working on creating a grinder - it will always be done in time, and haste will be a bad help. First you need to think about the list of necessary tools and parts. We will provide a general list, which may change at the discretion of each master:
- the main element of the future design is the engine from an automatic washing machine;
- starting capacitor from the motor;
- trim and two pairs of legs from a typewriter;
- plywood with moisture-resistant characteristics;
- a tube with thick walls with a length of about 5 cm and an internal diameter of about 14 mm;
- a pair of bearings with the same diameter;
- sealant;
- sheet of thick metal with a cross-section within 8 mm;
- corner with dimensions 63x63 mm;
- two profile pipes (40x40 and 30x30 mm);
- long nut;
- steel strip with a cross-section of about 10 mm;
- gas shock absorber used in furniture assembly;
- button to turn on/off;
- plugs, bolts, nuts, screwdrivers and other small items.
When all the parts and tools are at hand, you can proceed to creating a grinder with your own hands from a high-speed motor from a washing machine.
Tensioner and driven rollers
Made from propylene couplings, they are sold at any hardware store. Assembly drawing and step by step guide below.
Assembly drawing of the coupling
We assemble a package of couplings and D20 tubes onto the M12 stud; they serve as spacers between the bearings and install the bearings themselves. The photo below shows the entire assembly.
Step 1. Assembling the roller
Step 2. Tighten the nuts with a wrench
We pull together the assembled package into one whole. We process it with a grinder and a petal wheel on all sides, achieving a barrel-shaped shape.
In the same way we assemble the next two driven rollers. But we give the barrel shape only to the tension roller.
If you want to purchase a ready-made machine, we suggest you study the prices of the most popular ones.
Grinder "Lefty"
Characteristics: motor – 1.5 kW, belt length – 1250 mm (up to 1600 mm); The model is interesting for its additional equipment (wheel, contour), which is included in the kit.
Appearance of the “Lefty” grinder
How to set up an emery machine and make a protection
How to secure the sanding machine and put protection on it? You can screw it to a workbench.
To do this, use the bracket that is in the washing machine. To reduce vibration during operation, rubber gaskets are placed on the corner, which can be made from a piece of hose.
If the device is installed on a wooden workbench, cover it with a sheet of metal on top to prevent fire.
For your own protection while using the machine, install a metal arc over the disk. You can also enhance the protection by attaching 5 mm thick plexiglass to the pendants. The glass can be raised and lowered using hangers.
Making a sharpening machine yourself is not difficult. The main thing is to secure it and connect it correctly. Also follow safety rules when working, use safety glasses and special clothing.
In some situations, it is cheaper to purchase a new product than to restore broken household appliances. However, a prudent person will receive additional benefits by using functional components for their intended purpose. This publication presents homemade products made from a washing machine engine. And video clips will help you more accurately reproduce the homemade products of craftsmen and get useful products quickly and at no extra cost.