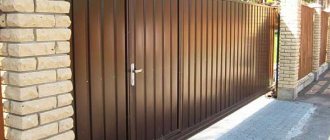
The appearance of the fence plays an important role in the aesthetic perception of a private house and the entire surrounding area. Particularly noteworthy are the gates and gates, which are the calling card of the owner of the site. If the owner approaches the design of the external appearance of his property with all responsibility, then he will try to make the structure of the fence, gate and gate not only durable, but also beautiful.
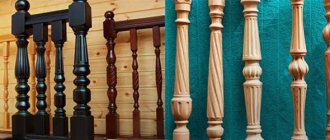
Wooden fence with gate
Despite the wide choice of modern materials for fences and gates, fences made of boards remain popular. They are distinguished by their special rustic charm, creating the impression of friendliness and cordiality of the owner, the material for their manufacture is inexpensive and accessible. And most importantly, the design options are endless. For every home craftsman, such a task as making a wooden gate with your own hands is an opportunity to realize creative potential and get a lot of pleasure from the process of work and its result.
Wooden gate - pros and cons
Before you make a wooden gate with your own hands, you need to understand what advantages this material will provide and what its disadvantages are.
Advantages:
- Strength and durability - provided the correct breed is chosen.
- Attractive appearance - you can create a structure of any shape and choose a suitable decorative design.
- Affordable price. The bars required for assembly can be purchased very inexpensively, and if you use the remaining material after the main construction, then installing the gate will cost practically nothing at all.
- Quick and easy to assemble - such structures are easy to make with your own hands, even in the absence of professional construction skills.
- No need to use complex equipment and tools.
- Environmentally friendly materials.
Important! The design possibilities when installing a wooden gate with your own hands are endless. You can paint the product in any color you like or paint it with paints. And carved wooden gates are also very popular today - you will learn how to make them below, as well as interesting “antique” options.
Flaws:
- Low degree of protection against burglary.
- Limited service life - depending on the chosen model, you will have to periodically restore and correct the position of such a gate.
- Fire hazard.
Important! Such disadvantages necessitate additional treatment - antiseptics, fire-resistant compounds. Due to this, the time required to create a wooden gate increases.
Preparation of tools, materials and workplace
The wooden gate is assembled on a flat surface. For a private yard, the best option would be to install two long beams on the trestles, and a sheet of chipboard on top of them.
To make a gate with your own hands you will need the following carpentry tools:
- Hand drill with adjustable speed, feather and regular drills;
- Jigsaw, passing hacksaw (with small teeth);
- Screwdriver;
- Hand router with shaped and quarter cutters;
- Planer (you will need both a regular and an electric one);
- Hand tools: set of chisels, hammer, clamps, square, pencil, tape measure;
- Hip (for assembling frame sashes) or strong rope;
carpenter's tool
For painting work you will need a brush, fine and medium-grained sandpaper (sander). Depending on the type of coating, paint, impregnation, and varnish are purchased.
Loop with long wing
To hang the sash, buy hinges. There is a large selection in stores, it’s only worth noting that “antique” forged fittings look especially harmonious, and hinges with a long overlay wing, when installed on a lattice sash, will add rigidity to the structure and prevent the sash from sagging.
Locking hardware
For locking, you can also give preference not to ordinary latches and latches, but to choose something extravagant.
Primary requirements
The gate itself is not capable of performing its functions; it needs a support, the role of which is most often played by a pole on which the gate is hung using hinges. It could also be the wall of a house, garage or other outbuilding.
Any gate requires reliable support
The support pillars must withstand the weight of the gate taking into account the wind load, so the choice of material for them is approached responsibly:
- the most reliable option is a metal pole.
This can be a round or profile pipe with a cross-section of 60 mm or more, which after concreting can be lined with bricks or blocks; The metal pole can withstand heavy loads - wooden posts can also be used, choosing dense wood that is not afraid of moisture.
For example, oak or larch. The lower part of the pillar, buried in the ground, is pre-impregnated with protective compounds. Wooden poles require protective treatment
The posts for the gate must be concreted, buried below the freezing point of the soil. And if the post carries an increased load (for example, it is common to the gate and gate leaf), the concrete layer must be at least 60 cm greater than the standard freezing depth.
Note. When installed in heaving soils, the holes for the pillars are made to taper upward, but in no case expand. Otherwise, frost heaving will push the pillar out of the ground or change its position relative to the vertical axis. There are other ways to securely fix them in a given position.
Video - Correct filling of gate posts
The gate itself is hung so that it swings open into the yard and not into the street. This is done for two reasons:
- for convenience, so that you don’t have to retreat when entering the site, backing away from the opening door onto the street;
- for security, so that the hinge hinges are located on the yard side and cannot be hacked from the outside.
The gate should swing into the yard
There are also special requirements for the size of this structure.
- The width is no more than one meter, otherwise, with a gust of wind, the unlocked gate may swing open sharply and the hinges will be turned out. Ventilated picket gates can be wider. But it’s not worth making it narrower than 75-80 cm, especially if there are no wide gates nearby. A narrow passage is inconvenient if you need to carry large loads to the site, or simply when going out in winter clothes.
- The height of the gate should not be more than 2 meters. This is enough to close yourself from prying eyes. Greater height increases the area, and therefore the wind load.
- When calculating the linear dimensions of the canvas, it is necessary to leave gaps around the perimeter between it and the framing elements. The distance to the ground should be at least 8 cm so that in winter snow drifts do not interfere with the opening of the gate. On the side of the hinges the gap should be about 6 mm, on the side of the rebate (side and top, if any) - 2 mm. It is necessary in case of freezing and snow jams.
Average wicket parameters
The process of creating a wicker fence
- A wicker fence is made from thin long branches. Most often, willow, birch, aspen, hornbeam or hazel are used for this. To create a small decorative fence, young branches of currants, apple trees and other flexible branches are suitable. The vine for the future fence needs to be prepared in the fall. The straightest, most flexible and longest shoots are selected, cut with an oblique cut and dried until spring. They are thoroughly steamed before use. But you can also weave a fence from freshly cut vines.
Wicker fence with decorative elements
- For support, use stakes 5–6 cm in diameter. To prevent them from rotting, it is necessary to treat them with an antiseptic, and, if possible, install a drainage trench at the location of the weaving, which will increase the service life of the fence and prevent premature rotting of the support posts. If metal posts are chosen as support, this can make the fence and gate structure stronger and more durable.
Wicker fence with concrete base
- The supports are placed at a distance of 30–50 cm from each other. During weaving, the fence may bend slightly. To prevent such deformation, a long pole is attached to the top of the supports. Upon completion of work it is removed.
Fence weaving process
- The fence is woven in two ways: vertical and horizontal:
- Horizontal weaving
Horizontal weaving of a vine fence
The branches are drawn around the support pillars in a figure-of-eight pattern. The rods are placed in such a way that the next one is a continuation of the previous one. For greater strength, the fence is periodically compacted by tapping the top with a mallet. The ends of the rods are brought to the inside of the fence, and then cut off obliquely with a knife.
Wicker fence with horizontal weaving method
- Vertical weaving
Scheme of vertical weaving fence
For this type of weaving, the stakes are installed at a greater distance from each other. Then, thicker rods are tied horizontally, at a distance of 20–30 cm, to serve as the basis for the future fence. The thick end of the vine is fixed in the ground, and the upper part is braided with support rods. For greater strength, the rods on top are braided or braided around a pole. If the rods are thick enough, then they do not need additional fixation from above.
Wicker fence with vertical weaving method
To study this topic, you can watch a video clip
Guide to making a lumber gate
In order to get a beautiful wooden gate, you will need not only carpentry tools, but also an understanding of the process of assembling and installing the structure. Discover a simple manufacturing and installation method that requires no welding to secure hinges or canopies.
Scheme for constructing a wooden gate
Carpenter's kit
Most of these tools are found in the household. But even if you don’t have them, purchasing them in a store won’t be superfluous - they will always come in handy in a country house or dacha:
- a construction square, a ruler (a plumber's ruler will do), a metric tape measure and a pencil;
- hacksaw for wood. If you want to cut out any shaped elements, you will need a regular or electric jigsaw;
- a shaped screwdriver, but a cordless drill (screwdriver) will significantly speed up the assembly process;
- a rasp for processing cuts - this will make the edges more attractive and protect against splinters;
- manual or electric plane for unplaned material;
- a shovel, a garden drill, a crowbar and a plumb line (long level) for installing posts.
Pine timber 100×100 mm - the most affordable material
To figure out how to properly make a wooden gate, you need to decide on the materials. In this case, wood will be used, which may already be in the household:
- Supports for the gate are very important, and the most practical wood profile here is timber or logs. But if we consider the decorative part of the issue, then the rounded log looks more attractive, but the 100x100 mm beam is stronger;
- a 40×40 mm or 30×40 mm block is well suited for the frame;
- The frame is sheathed with lumber 20-25 mm thick. This could be a picket fence, a slatted fence or an edged (tongue-and-groove) board;
- To fix a wooden gate in the closed position, you will need a valve that opens on one or both sides. You will also need two loops (preferably decorative) and ears for a padlock, if necessary.
Valves of various shapes and designs
There are at least four ways to fix supports in the ground, these are:
- Driving a pointed support into the ground.
- Combined installation.
- Butting.
- Full concreting.
4 ways to install wooden poles
A wooden gate will hold up with any of these installation methods - the whole question is how long the pillars, the butt of which is immersed in the ground, will last. With the first option, even with bitumen treatment, the structure will begin to tilt within 2-3 years. The second position, shown in the schematic image, will increase this period to 5-7 years.
A more stable third option - there will be no distortion, but moisture will still penetrate through the rubble, and the butt will gradually begin to rot, and after 5-7 years the support will simply break. And only the fourth installation method with full concreting of the butt will allow the pillars to stand without distortion until they rot in the above-ground part! With proper care, this will last for 10 years or more.
Complete concreting of the butt of the timber
The installation depth of the supports mainly depends on the soil and ranges from 50 cm to 1 m. If the soil on the site is stable (non-heaving), for example, rocky or sandy, then 50 cm is enough, but on loam (heaving) it is better to go deeper to a meter. It is most convenient to make a hole with a garden drill with a diameter of at least 200 mm, so that there is room for concreting.
Before lowering the timber into the hole, it should be completely treated with an antiseptic, and the butt should also be tarred or tightly wrapped with polyethylene so that it does not absorb moisture when the concrete hardens. The solution around the perimeter can be compacted with the handle of a shovel so that there are no voids left, and during pouring the support must be constantly monitored with a plumb line. The distance between the supporting and the front pillar (passage) is usually left 100-120 cm.
Since you can only make a gate out of wood using a frame, you should start with making this base. First of all, you need to assemble a frame that is narrower than the passage by at least 10 mm (on the street, even painted lumber swells and this will have to be taken into account). If there is a need for the sash to close without gaps, then shutter strips are sewn onto the supports on one or both sides.
Stages of assembling a wooden frame
The height of the frame can correspond to the sheathing or be smaller, but such a base should not be less than 2/3 of the total length of the structure. In addition, the finished gate can be at the same level as the supporting pillars, as well as higher or lower. This is not of fundamental importance - it all depends on the architectural design.
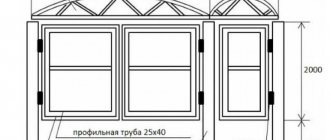
First you need to cut two bars with a cross section of 40x40 mm, a length 10 mm shorter than the width of the passage, for example, if the passage is 1 m, then the bars will be 900 mm each. The length of the verticals depends on the height of the fence minus 4-5 cm from the bottom and minus the thickness of the crossbars. Let's say they turned out to be 1600 mm each, then the perimeter of the frame will be 1680x900 mm. This is a fairly high frame and it wouldn’t hurt to add another cross member with a length of 900-40*2=820 mm in the middle.
The assembled structure will be movable, but it can be easily reinforced with a triangle. To do this, you can install one rail, as if intersecting the crossbar, or one profile diagonally for each sector. Before taking measurements, the frame must be placed on a flat surface and the diagonals must be adjusted - they must be the same.
Wooden gate with a semicircular top
Above in the photo is a beautiful wooden gate, which is easy to make yourself when a rigid wooden frame is assembled. If you need the same blind sash, then for this purpose the frame is sewn up with a planed edged or tongue-and-groove board in the form of a regular shield. The semicircle is made after it is assembled. After this, the edges need to be processed with a rasp to avoid splinters.
To make the correct semicircle, measure the required height of the gate along the edges of the shield and find the center between them - drive a small nail there or tighten a self-tapping screw. Screw a pencil to a soft wire on one side, and on the other make a loop and put it on a nail - you get something like a compass. The pencil should reach exactly to the edges of the shield - now draw an arc and get a semicircle.
If you want to make a quarter circle or even less, you just need to move the nail lower vertically, but the tied pencil should still reach the marked height along the edges. That is, the length of the wire will have to be increased (you can use thread or cord, but they should not stretch). The lower the center is lowered, the smaller the bulge will be.
In exactly the same way, you can make a wooden gate with your own hands from a picket fence or slats, as in the photo above. Only the slats here are not nailed (screwed) tightly, but installed with a gap - usually this is the width of the profile used.
Manufacturing procedure
The first step is to install the pillars (depending on the size of the sash, timber 60x60, 100x100 is taken), and the sash is made according to the size of the resulting gate opening. Standard sash dimensions are 1.1x2m.
Dig two holes 70 cm deep the width of a bayonet shovel. It is convenient to use a garden auger for these purposes. The screenings are poured into a 5 cm layer at the bottom of the hole. Then you need to prepare a wooden beam. Its lower buried part is burned with a blowtorch and treated with bitumen. Then it is placed in the hole on spacers and filled with concrete.
To limit the travel of the gate, slats are placed on the posts to imitate a quarter.
Scheme for installing columns in a bundle
Important! To achieve an ideal mutually parallel position of wooden poles, it is recommended to first knock them down crosswise with slats, thus assembling a rigid box. After this, they are installed in the pits in the form of such a structure and concreted. After the concrete has hardened, the slats are removed.
Assembling the gate on the frame
For assembly, prepare two identical horizontal beams along the width of the gate, onto which vertical slats will be placed. They are placed on a prepared table parallel to each other. It is advisable to make markings on the table and screw in the stubborn punks.
To maintain a constant gap between the vertical slats, prepare a thin rail, which is laid in front of each subsequent sheathing strip to be filled. The figured top edge of the picket fence is cut out with your own hands using a jigsaw after all the slats are nailed (or screwed). Therefore, it is not necessary to ensure that the top of the sheathing is level. The ends of the sheathing strips can be cut with a cone, and the edge of the slats can be processed with a figured cutter.
What does the assembled sash look like?
To attach the pickets, it is better to use stainless steel screw cutters. After the vertical strips are filled, the structure is turned over, the strut is measured and inserted.
Frame sash assembly
Making a wooden gate with your own hands is more difficult if you choose a frame structure. The complexity of the work depends on the design of the sash and whether it has curved lines. As a rule, the lower jumper of the frame and two side straight ones, and the upper jumper can be either straight or curved. The sash can be divided into 2 segments, with the lower part being solid and the upper part being transparent.
For the frame, a 30mm thick timber is taken, and the filler is made of 10mm thick lath and plywood. The essence of the design is that using a hand router, a groove is made with a 10 mm cutter on the inside of the jumpers. Slats or plywood will be inserted into it. If it is necessary to make a ledge less than 10 mm, then take a thicker lath (12 mm, 14 mm, etc.) and make the groove with a corresponding cutter.
Schematic diagram of the frame structure assembly
The vertical bars do not have to be cut to length; the excess ends can be trimmed off after assembly. And the transverse ones must be cut to length, since 3 cm spikes will be cut on them. If the width of the side post is 70 mm, then the length of the transverse will be 80 mm less than the width of the gate (140-60mm). The thorn is cut with a hacksaw, the cheeks are chopped off with a chisel. The eye in the rack is drilled out using a drill and finished with a chisel.
The infill lath (or plywood) is cut to exact size based on the depth of the groove.
Frame assembly process
The frame is assembled with glue, the tenons are reinforced with blind dowels. First, the lower jumper is connected to the stand, the filler is inserted, then the upper jumper is put on and the second stand is inserted. For tightening, use a hip or rope twists.
The simplest DIY design:
How to make a wooden gate correctly?
The process of creating a gate itself is not difficult if you do everything step by step, following this algorithm:
- Correctly determine the location of the gate.
- Determine the convenient opening direction.
- Draw up a drawing, indicating all the necessary dimensions.
- Select materials for work and collect a complete set of necessary tools.
- Assemble the structure.
Wooden gate design options
The home craftsman has two options for how to design a new gate:
- Study all the slats and bars available to him and, on this basis, come up with a design.
- Create your own drawing and go to the store for the material or do your own sawing and jointing of workpieces.
The design of the gate always contains the following elements:
- Support pillars;
- Sash;
- Canopies and locking mechanisms.
Basic design of a frame-and-rack gate
To install a wooden gate, you can use existing metal or brick posts, but it looks better with wooden posts. Depending on the quality of the soil and the size of the gate, wooden posts can be driven into the ground, backfilled or concreted. Concreting is the most reliable method in which the supports will be the most stable and last a long time.
Fundamentally, according to the method of assembly (and complexity of execution), gate leaves are of two types:
- Frame and rack.
- Frame.
Slatted door with figured top
Frame-and-slat is the simplest and most common type of garden gate, which can be assembled without complex carpentry procedures. Fundamentally, they consist of two horizontal bars, onto which sheathing slats are placed vertically. Such a sash in the form of a lattice will not be rigid, so usually a strut is installed in this design - a diagonal bar connecting the opposite ends of the horizontal bars. This design of a gate with a strut on a Z-shaped frame can have a different design due to the different lengths of the vertical battens of the sheathing and the density of their padding:
- A transparent sash is created when there is a gap between the vertical boards.
- If the packing is dense and there is no gap, the sash will be blank.
- If all the vertical slats are the same length, the sash will have a straight top. By cutting the slats to different sizes, you get a gate with a figured top.
Straight transparent sash
Important! The wicket casing of this design is made from a calibrated lath (passed through a surface planer).
Classic frame structures require milling operations, since the sash structure consists of a frame and internal filling. The frame is assembled using a tongue-and-groove connection, and to insert internal elements (slats, plywood) a groove must be made along the inner perimeter of the frame. Framed doors are stronger, more massive, reminiscent of real doors, so they look solid and have an unlimited number of design options. All starting materials must be calibrated.
Types of structures
Designers divide entrance gates according to the way they design the passage:
- Gates with an arch.
- Gates with pergola (with portal).
These are complex projects in which the design of the entire passage is developed as a whole (design of the gate, support pillars, framing style, selection of appropriate fittings).
Gate with pergola canopy
Advantages and disadvantages of a wooden gate
A wooden gate goes well with stone structures
The material is inexpensive and easy to purchase when it comes to common types of wood. Expensive species are rarely used; coniferous varieties are mainly used.
Advantages of a wooden fence gate:
- low weight of the structure, reliability and strength;
- fast production, ease of assembly and processing;
- environmental safety for human health;
- lack of complex equipment during production.
The disadvantages include the fragility of wood compared to other materials, since it intensively absorbs water. As a result, the structure rots and microorganisms multiply on the surface and inside. Bugs violate the integrity of the fibers and weaken the strength.
Without protective impregnation, the product will last 5 – 7 years. Wood ignites quickly and does not stop burning on its own, so it needs to be treated with preparations to increase fire resistance.
How to choose lumber
Larch contains a lot of resin, so the wood is resistant to rot and moisture
Different breeds differ in terms of strength, moisture resistance, and durability. When cut, each variety has its own unique pattern. Land owners choose materials based on their properties and characteristics, taking into account their material capabilities.
Briefly about the breeds:
- Oak hardly swells or shrinks when humidity changes. A decent, high-density material that is difficult to machine is expensive.
- Larch steadfastly resists moisture and the appearance of rot. It is characterized by a beautiful fiber pattern and is easy to saw.
- Pine is characterized by its low cost and low strength. Contains resinous components and absorbs little water.
- Spruce is classified as a soft species and begins to rot upon contact with the soil. The wood is durable and inexpensive, so it is used after preliminary impregnation.
In addition to the species, the quality of the wood is taken into account. The boards should not have any curvatures, rotten or falling knots, or cracks along the length and across the lumber.
Material selection
Many types of hardwood and softwood are suitable for gates:
- pine;
- cedar;
- larch;
- birch;
- aspen;
- poplar;
- oak.
The choice depends on the desire to spend a minimum of money, quickly get the job done, make a strong barrier, create fabulous beauty, as well as many other factors.
Breed selection is largely based on the owner's budget.
Oak is known for its hardness and durability. It is able to resist fire for a certain time. The disadvantage of oak is its cost and inflexibility.
A do-it-yourself gate made from an oak board looks beautiful against the background of a wrought-iron fence around a site with a permanent house within the city or a residential village. Forged elements against the background of oak look harmonious, the gate will be strong and impregnable.
Without experience working with hard wood, it will be difficult to make selections for hinges and tighten screws. Decorating a canvas with carvings will take a lot of time and effort. The oak board material makes the structure heavier and gives it a more impressive appearance. If oak slats are available, it is better to make a frame from them and cover it with lighter boards.
If you want to perform cutting, you should choose the optimal wood for this purpose.
Aspen is easy to process, it is also resistant to moisture and temperature changes and does not form cracks when dried in the sun. A large number of knots reduces the strength of wooden parts and the uniformity of the continuous sewn fabric.
When making a durable gate, cedar is chosen. Its dense wood resists the formation of fungi and mold. Cedar does not rot or crack. In the photo it is difficult to distinguish it from light oak. Cedar is used by those who like to make complex options with figured inserts, carvings, and arches.
A pine structure is suitable for a summer cottage. Resinous wood is resistant to moisture, has a golden color and a beautiful pattern. Pine boards and slats can be purchased freely at a budget price.
Coniferous trees are less susceptible to moisture due to the presence of resin
Cheap wood species include poplar and birch. The wood is easy to work with a chisel and is soft. You should choose well-dried boards and immediately after cutting they must be primed, covering the ends and filling the holes. After assembly, the entire structure should be coated again with a primer and 2-3 layers of varnish or paint. Surfaces swell and collapse when moisture enters through small unprotected areas, and also fade in the sun.
Larch is an ideal option for those who want to make a beautiful, durable gate and decorate it with carvings, as in the photo. The wood has a dense structure, is easy to cut with hand tools, and does not warp from rain. Externally, larch looks like bleached pine with a weakly expressed pattern.
When choosing boards, you should pay attention to the absence of sapwood and fragments of ingrown bark.
An example of the presence of bark beetle cuts and resin pockets
Accessories for gates
Types of locks for wooden gates
A wooden fence gate functions with the help of canopies, handles, locks, and latches. To work in outdoor conditions, purchase fittings with a galvanized coating, stainless steel, or thick aluminum.
Recommended items:
- Canopies can be classic, decorative or hidden.
- Locks are used for overhead locks, mortise locks, or padlocks. Electronic and electric locks are rarely used for wooden structures, but sometimes they are used.
- The handles are made of iron or wood; forged ones look good. The staples are installed as a separate element or combined with a locking mechanism.
- The latches are located on the inner surface of the canvas so that you can close the gate without a key while at home.
For a gate in the fence of a vegetable garden or garden area, they install simple, no-frills fittings. The entrance to the site is equipped with more stylish elements, which are selected according to the type of details of the gate and fence.
Some tips
To prevent resin from appearing on the wood, it is wiped with alcohol or solvent
Resin appears on the surface of coniferous wood, which ultimately spoils the quality of painting. Before finishing, the surface of the boards and bars is wiped with solvents (acetone, gasoline, soda ash solution, alcohol).
After applying the first layer of varnish, small fibers and lint rise on the surface of fresh wood, so additional sanding of the blade is required. This does not happen after the second varnishing.
The paint is applied in 2 - 3 layers to protect the material from destruction and to obtain an even layer. Before processing, you can putty and repair cracks, chips, and knot holes.
Wooden gate for a summer residence
Fences at dachas rarely represent an impregnable barrier. Usually these are not too high wooden fences. For such a fence it makes sense to make a gate made of wood. There is a very simple one, no fuss. Only dry boards will be needed (provided that there are already pillars).
If you don’t have woodworking machines (thicknesser, router), it’s easier to buy an edged board with the required parameters. The width/thickness of the boards is arbitrary, as are the distances between the planks. Most often they use a pine board 6-10 cm wide and about 2 cm thick, the distance between the planks is 2-6 cm. More or less is possible - it depends on the desired degree of “transparency”.
One of the most common options
It is advisable to have dry boards. It’s unlikely that anyone will use a drying chamber, but aged for a couple of years or at least six months or a year (humidity about 25%) is already excellent. To prevent wood from deteriorating longer, it must be treated with protective impregnations. Now there are compounds that protect even wood that lies on the ground (protective impregnations for wood in direct contact with the ground). But some of them give the wood an extraneous tint (most often greenish, olive). If you are going to paint the gate, it's not a big deal. If you are planning to use a light varnish, pay attention to this point.
Simple garden gate
This is the simplest gate that an ordinary person, not a carpenter, can make. If you know how to saw, hold a hammer, and hammer nails, everything will work out. You don't have to do anything more complicated.
Take two planks or two beams (parameters depend on the weight of the gate). They are equal in length to the width of the future gate. These bars are laid across. The distance between them is slightly less than the height of the gate. It makes sense to place them at the same distance as the bowstrings on the adjacent fence (as in the photo above). Then the gate will look like part of the ensemble.
Wooden gate device
Treated and dried picket boards are laid out at a given distance on the crossbars. To make it easier to maintain distances, you can use scraps of the same length, laying them between the boards (you can also use a matchbox if you are satisfied with its size). We take nails (two per plank at the top and two at the bottom) and attach the boards to each cross member.
After all the planks are nailed, we turn the gate canvas over, try on the jib, and draw the lines along which the jib should be cut. We saw off the excess with a hacksaw, put it in place, fasten it - two or three nails on both sides. Now we attach each board to the slope. This gives the wicket additional rigidity.
How to make a simple wooden gate for a summer house
We choose metal hinges, or barn hinges. They are small in size, just for country gates. If desired, they are attached to the front part of the gate - they add some zest. You can just as easily secure them from the back.
Do-it-yourself wooden gates. Drawings of gates, hinges. Step by step assembly.
Posted by Nils · September 20, 2016
Wood always looks natural and never goes out of style. There is no feeling that you are in some kind of warehouse, as if behind gates and a fence made of corrugated sheets, which is so popular that it protects almost every yard. In addition, the tree makes it possible to make any of your fantasies come true. It is possible to make the design very simple or complex, depending on your skills. Let's see how to make wooden gates with your own hands.
Wooden gate drawings
To begin with, let's schematically depict wooden gates on paper with dimensions indicated, which will further facilitate their production, as well as the calculation of the required material.
Drawing of the outside of the gate
Drawing of the inside of the gate
Drawings of hinges for wooden gates
Since we have a wooden fence and wooden gates, we won’t deviate from the concept and the given style and make wooden hinges.
Their length takes up half the width of the gate - 1 meter, the second part of the loop, which is attached to the post - 18 cm.
Counting and preparing material
We will need
- Board: 1.2 x 0.1 x 0.02 m - 42 pcs., 1.8 x 0.1 x 0.02 m - 4 pcs., 2.0 x 0.1 x 0.02 m - 8 pcs., 1.2 x 0.15 x 0.05 m. - 4 pcs.,
- wood screws,
- threaded rod - 6.00 mm.,
- nut with locking ring - 8 pcs.
Tool:
- Jigsaw or hacksaw,
- drill,
- drill 4.0 and 6.0 mm,
I indicated the quantity based on the length that we need, since there are different cuts on sale - 2, 3 or 6 meters. For example, if you buy a three-meter board, then the required number of square meters is 33 pieces, 6 meters - 13 pieces, and two-meter boards - 54 pieces. The same goes for loops - 4 two-meter loops or 1 six-meter loop.
Purchasing lumber
I will give advice that will help you save money when buying lumber, which I try to buy not in stores, but at woodworking factories for the reason that they often sell illiquid goods at a reduced price. At the same time, by illiquid, I mean a board of “unusable” size, but in terms of quality it is the most ordinary, no worse and no better.
Taking with me a list of what I needed, I went to one of the local woodworking shops. There they offered me an edged board (10 cm - width, 2 cm - thickness, from 1.25 m to 1.65 m - length) for 10 rubles apiece. Just what you need, fits perfectly, no big scraps left. I also got lumber for the remaining parts of the gate there at a reasonable price.
Assembling wooden gates
Naturally, we start assembling the gate from the frame. We will screw the screws on the inside of the gate. It may not be very convenient, but in the end it will look neat.
Then I went through it with a grinder, the disc grain was P60.
Let's move on to the top of the wooden gate. We assemble according to the drawing.
We screw in self-tapping screws from each edge of the board, as shown in the picture below.
Be sure to thoroughly treat the gate with protective impregnation. Firstly, in just two days the mold and mildew that formed due to improper storage will disappear from the tree. Secondly, the tree will retain its beautiful natural color for a long time. You can see the difference in the very first photo, what an even and soft shade the gate acquired after treatment with impregnation. And in about a week and a half they will become the same color as the fence.
How to make wooden hinges for gates
We made the wooden gates with our own hands, now let's start making the hinges. First of all, according to the drawing, according to the given dimensions, we draw a contour, starting with most of it.
We trace the cut out part of the loop with a pen or felt-tip pen on the side where the grooves are, this will allow you to correctly make the second part. Thus, it is almost impossible to make a mistake, the two components will look like a single whole, it won’t work out at random.
We put crosses in the place where we need to cut.
Finish drawing and cutting out.
Now let's sand and round the edges a little.
Using a four-piece drill, we will make three holes for subsequent fastening on the gate.
Now the most nerve-wracking job, using a six-piece drill, you need to drill a hole for the stud through all the grooves. We put the parts together, put a mark on the side in the center, and draw a line along the grooves that we will adhere to. To fix the parts without allowing them to move during the drilling process, we clamp them with a vice.
Of course, if you have special machines and tools, it’s easier to do this, but I don’t have those. You need to be careful and precise, not to “mow” and not ruin all the work.
It is possible to highlight the hinges against the background of the gate with a contrasting color; options to achieve the result: paint, impregnation, for example, walnut, gas burner. I chose the third.
After firing, treat with a brush.
We make handles for gates using the same principle: we cut them out, burn them and brush them.
Photo of wooden gates
Do-it-yourself wooden gates and all additional elements for them are ready and can be hung.
Do-it-yourself wooden gates, like the fence, caused a lot of discussions among the neighbors, which lasted for a very long time, so to speak, the first news in the village. As I already said, among the metal profiles my work stands out significantly and catches the eye. There are those who like it and those who don't like it. But this doesn’t matter, because I did it for myself, and not for my neighbors. Well, let's see how the gate behaves after a while.
Painting the finished gate
To ensure that a home-made gate does not lose its attractiveness over time and does not turn black under the influence of rain and sun, it must be covered with a protective layer.
To do this, you can use special paint for exterior use or varnish. First of all, before painting, you need to sand the surface of the gate well, getting rid of any unevenness and roughness. Wood can sometimes be damaged by insects or fungus. Therefore, it must be thoroughly treated with an antiseptic and, after complete drying, covered with a primer, which must match the technical parameters of the paint. The final stage of this work will be one or two layers of paint.
Wooden gate painting options
Wickets coated with varnish look very beautiful. In this way, the structure of the wood is preserved. Yacht varnish is considered the most durable, but its cost is several times higher than the price of a regular transparent coating.
When varnishing the surface of the gate, moisten it with water and wait until it dries completely. After this, the wood is treated with a special primer and the dried surface is covered with several layers of varnish. You should not rush when performing painting work, because the life of the wooden gate depends on this.
Whatever model of wooden gate you choose, the result will still bring joy and satisfaction. Wood is an excellent material for these purposes; it is easy to process and not too expensive. Of course, if we are not talking about using bog oak or Karelian birch. You can make a wooden gate, like a gate, with your own hands, spending very little free time on it, but saving the family budget.
Templates for a carved fence and its installation
“My home is my castle,” many owners of private houses believe; supporters of this opinion, as a rule, enclose their territory with a continuous high fence. But such a fence does not look very aesthetically pleasing, despite the fact that a wide range of modern materials leaves the owner with a wide choice. A blank fence creates a feeling of enclosed space, the closedness of the owners of the site. For those for whom it is important not to isolate themselves from the world, a wooden fence made using the wood carving technique would be an excellent solution for marking their personal territory.
Carved fence
You can make a wooden fence with your own hands using samples - it will give your home individuality and will not leave your neighbors and guests indifferent. The house behind the original openwork fence will look especially hospitable, shaping your image as the owner. Nowadays, forged fences are in great fashion - but a carved fence is in no way inferior to them in beauty. If you want the fencing of your site to not only create the illusion of protection from the outside world, but also to be an excellent decorative decoration, choose a carved fence.
The advantages of such a fence:
- A carved fence will suit any type of house and any design of a personal plot;
- A wooden fence is easy to keep clean;
- If you wish, you can do all the work yourself; wood carving is an interesting creative process.
- A carved fence is easy to install; you can also do this work yourself;
- Carved fences are inexpensive and will suit anyone;
- The environmental friendliness of the material used does not cause any harm to the environment;
- You can independently experiment with varnishes and paints of different colors and textures to give your fence individuality.
Which wood to choose?
The cheapest material is wood-laminated board, or plywood. To work with it, you only need two tools: a hacksaw and a file with fine teeth.
If you want your fence to seem expensive and look stylish, choose valuable wood as the source material:
- Trees such as poplar, maple and ash give beautiful designs when cut;
- Beech and oak form small specks;
- Walnut, ash and elm form curved lines similar to sinusoids.
Coniferous trees are well suited for creating lace carvings. Coniferous plywood is cheaper than solid wood, but the result will be almost indistinguishable.
If you choose a contour carving or a geometric pattern, choose hardwood.
Styles
Interesting carving
If you have absolutely no experience in woodworking, but you are determined to make the fence yourself, stop at simple patterns. There are techniques that require expensive equipment, but you need carving options that do not require special knowledge and experience. The following techniques are suitable:
- Geometric carving. The ornament consists of simple geometric shapes. Such work will require quite a lot of time, but even a beginner can do it with some perseverance. In this case, you can even do without a special tool - an ordinary sharpened knife will do.
- Contour carving. For this type of work you will need a chisel. The point of carving is not to cut through the wooden base, but to cut small recesses in it. As a result, you get a 3D drawing - to enhance this effect, we recommend painting the raised areas with light paint. The contour technique can also be used in combination with a solid solid fence - then a pre-prepared canvas with threads is fixed to the fence canvas, which is a decorative design element.
- Lace carving. Using this technique, you can make a unique artistic fence with a pattern reminiscent of lace. You can use a power tool or a jigsaw. First, one hole is drilled, a file is inserted into it - and then the entire pattern can be sawed entirely along the pre-drawn contour.
The final stage of work
Coating the gate with impregnation.
Wood impregnation PROPITEX.
Wood soil.
Capitex.
In order for swing wooden gates to serve for a long time, they must be treated with an antiseptic, which is recommended to be applied in at least two layers. After the antiseptic has completely dried, the surface can be covered with stain and varnish or any wood paint. Considering that wood is prone to fire, it is recommended to treat the openings with a special fire-fighting compound every 3-4 years.
A bolt can be installed on the inside of the doors, which will serve as reliable protection against burglary. Many swing wooden gates are equipped with an electric drive, with the help of which the doors open and close by pressing the remote control button.
During operation, it is recommended to constantly tint the wooden structure and lubricate the hinges with oil, and then the gate will last for many years.
How to properly install wooden posts
The pillars are installed in this way:
- Using a drill, we dig a hole a meter deep;
- the distance between the planes of the pillars placed “facing” each other should be slightly greater than the width of the gate, this is within the range of about 120 cm;
- pour 5 cm of sand into the bottom of the hole and spill a lot of water for shrinkage;
- add 5 cm of crushed stone;
- we burn the underground part of the pillars with a gas torch or blowtorch, or you can treat the entire pillar with an antiseptic to protect it from rotting;
- Place a pole along a plumb line, fill the hole with crushed stone and compact it;
- the base must be filled with liquid cement mortar and sand. The stronger the solution, the faster you can start installing the gate.