Types of organizers
Often, storage for tools is an old cabinet, chest of drawers, or table with drawers. Stationary option. Has many disadvantages. The main problem is that it is difficult to maintain order, items get lost, and you have to look for them in the general pile. Regular sorting is required. The exit is a special organizer for frequently used items. The simplest structures are easy to build with your own hands.
Do you store tools in your workshop in organizers?
Not really
Main types of organizers:
- boxes, boxes. Traditional option. Initially, people used ordinary boxes with handles. They were replaced by designs with compartments, pull-out shelves, and holders;
- stands. Desktop options. They have holes for screwdrivers, hooks for pliers, pliers, and other tools;
- wall organizers. Panel with holders, hooks. Allows you to use vertical surfaces and save space.
They usually make their own tool organizers from wood, plywood, and less often use other materials. We offer a master class on making a mobile box.
Stages of work
Sequence of operations for making a simple box for plumbing tools from plywood with your own hands. The bottom, walls and other parts are cut out using a pre-prepared template, the contours of which are transferred to a plywood sheet with a marker or a special pencil.
To remove burrs, the edges of the holes are ground with abrasive paper. Then the tray parts are glued together and fixed using tenon joints. This will give the structure strength.
The manufactured tray is glued to the bottom between the parts that have holes for the handle, and is additionally secured with small nails.
Using glue, the bottom and sides are assembled in the shape of rectangles; the strength must be further increased with nails. Then you should insert the handle and secure it with nails or any other way.
A metal rod with threads at the ends is secured with nuts and washers. It should be taken into account that the hardening time of the glue directly depends on its brand and the temperature at which gluing occurs.
Internal connections are strengthened by gluing bars of rectangular or triangular cross-section at the joints between the walls, sides and bottom. The bars are additionally secured with screws or nails.
Design
By type, organizers come in the form of drawers or open shelves. The second option is easier to do with your own hands - we select a suitable panel. Even a sheet of plywood will do. We attach it to the wall, fix all kinds of holders - nails, hooks, clothespins, magnets, hanging trays.
The boxes are characterized by mobility. It’s easy to move it to another place, take it with you, or put the organizer in the trunk of your car. The wall panel and the rack are inferior to this. You'll have to choose the right tools and put them into something. A portable organizer is perfect for this. It is advisable to do both types.
Characteristics of wall structure:
- capacity;
- ease of search;
- order;
- easy to make with your own hands.
Characteristics of the portable organizer:
- mobility;
- compactness;
- limited size.
Tool cabinet
Service cabinets take up more space than wall panels. Externally, they are not much different from ordinary furniture: cabinets or drawers. The opening principle, the organization of the internal space, as well as the materials used may differ radically between different models. They can be stationary, mobile (on wheels) or hanging.
This is interesting: The best Russian detectives 2019
Such organizers are safer than wall-mounted ones, since all sharp and heavy objects are kept behind closed doors. In service cabinets you can store anything: small parts to heavy electrical equipment, as well as completely foreign things (dishes, clothes, medicines). The internal space allows for additional containers, retractable elements, and magnetic fastenings.
What you need to make a tool organizer
We suggest building a portable organizer with your own hands. You can choose absolutely any size. We just take into account the weight. A drawer filled with tools can be lifted without difficulty. It's important not to overdo it. Otherwise we will get stationary storage.
Preparing all necessary materials
The easiest way is to build a wooden structure with your own hands. Therefore, planks will be required. We suggest replacing the back wall with plywood. She weighs less. Take a piece, at least 0.5 cm thick.
What else is needed for work:
- drill;
- drills of different diameters;
- nails, hammer or screws;
- hacksaw;
- sandpaper.
For measurements we take a construction ruler. A tape measure will do. Additionally, you will need a pencil and a sheet of paper.
Options for homemade tool storage boxes
Organizer for bolts, screws, nuts and nails from plastic bottles
In the garage it is often difficult to find the right screw, bolt, nut, screw or self-tapping screw because they are lying around out of nowhere; you often need to rummage through a drawer for a long time looking for the right bolt or nut. In order to somehow organize your work space and save yourself time and nerves, I suggest making a super cheap organizer for bolts, screws, nuts, nails and other small things from plastic PET bottles, which we often simply throw away.
We will mount our organizer on this wall.
Organizer for bolts, screws, nuts and nails from plastic bottles
For the organizer we will use 30 plastic 2-liter bottles.
Organizer for bolts, screws, nuts and nails from plastic bottles
First, let’s get rid of the stickers so that the bottles become completely transparent and in the end it is clearly visible what’s inside them, and nothing interferes with us when working with them in the process of creating storage for small items.
Now we drill holes in the center in all 30 bottle caps with a drill with a diameter of 4 mm.
Organizer for bolts, screws, nuts and nails from plastic bottles
Next, we will need plastic ties from which we will make fasteners; they are easy to use, inexpensive and quite durable.
Organizer for bolts, screws, nuts and nails from plastic bottles
We pass the sharp angle of the tie from the bottom of the lid into the previously drilled hole, pull through almost the entire tie except the locking mechanism, then with the sharp part we thread it back into the hole, leaving a loop on top of the lid, and insert the tip into the tie lock a couple of centimeters.
Organizer for bolts, screws, nuts and nails from plastic bottles
It took me literally 10 minutes to make 30 lids with loops.
Organizer for bolts, screws, nuts and nails from plastic bottles
Using a stationery knife, we make windows in the top of the bottles, such that your hand can pass through them and it is convenient to take something small even at the bottom of the bottle.
Organizer for bolts, screws, nuts and nails from plastic bottles
We attach a wooden block to the wall, mark its center line, and you will also need to mark the distance between the bottles, I marked it at 10 cm.
Organizer for bolts, screws, nuts and nails from plastic bottles
Now, in the place where the bottles are attached, we screw in the screws or self-tapping screws, but not completely, but leaving about 1.5 cm for putting the loops with the bottle on them.
Organizer for bolts, screws, nuts and nails from plastic bottles
Organizer for bolts, screws, nuts and nails from plastic bottles
The first shelf has been created, now we’ll make another one on top, for this we took a board 10 cm wide and also made fasteners in it using screws for 10 bottles. In order to attach the shelf to the wall, I initially drilled holes 5 cm deep into the board, and then I fastened it with 100 mm screws to the wall and we get an excellent organizer for 30 bottles from 3 levels. We place the remaining 10 cell bottles on this shelf.
Organizer for bolts, screws, nuts and nails from plastic bottles
Organizer for bolts, screws, nuts and nails from plastic bottles
Organizer for bolts, screws, nuts and nails from plastic bottles
Well, this is what we actually get, as you can see, our homemade bottle organizer made with our own hands copes with the required task, everything is visible and everything is at hand, and it also saves us space in the workshop or garage. In addition, any bottle can be easily removed, replaced, or swapped, which is very convenient.
Organizer for bolts, screws, nuts and nails from plastic bottles
Organizer for bolts, screws, nuts and nails from plastic bottles
Take home:000
Similar homemade products:
- Broom made from plastic bottles
- Bag made from rings from plastic bottles and zip ties
- A collapsible stool made from plastic bottles, rolling pins and…
- Crafts from plastic bottles
- Convenient organizer for small parts made of plastic...
- Workshop organizer made from plastic containers…
- Pencils made from shampoo bottles in the shape of funny monsters
- Bottle opener with magnetic holder…
- Glass bottle lampshade
Tags:bottle, organizer, plastic bottle
We take the necessary measurements for the organizer
We will make our own tool organizer in the form of a box. An easy way to determine dimensions is to measure the length and width of your largest tools. Usually they make a box 50x15 cm. This is enough to accommodate basic things. The height of the handle is approximately equal to the length of the drawer.
You will need:
- 2 planks 50 cm;
- 2 planks 15 cm;
- plywood sheet 40-50 cm;
- 2 slats 50, 20 cm.
You can choose other dimensions, for example, increase the width, make the sides higher, shorten the back wall of the box, which acts as a screwdriver holder.
Characteristics of plastic trays
Modern trays offered by the industry are made to strict standards from polypropylene with increased wear resistance. Polypropylene is a durable but elastic material that absorbs possible shocks and vibrations. Plastic containers are also preferable because they do not dry out like wood and do not rust like metal. In addition, it is easier to maintain and weighs much less. Trays made of polypropylene are not afraid of exposure to most chemicals.
Containers can be molded from plastic in a variety of shapes and sizes. The boxes are available with or without lids, have comfortable handles and the ability to install internal dividers, as well as reinforced ribs for stacking. The color scheme can be very diverse: someone will choose a bright palette, another will decide to decorate the workshop in strict “masculine” colors. There are trays with windows for labels: in a rack with labeled drawers it is much easier to find the necessary fasteners.
The necessary characteristics of a high-quality polypropylene tray are:
- frame rigidity;
- strength and wear resistance of plastic;
- a light weight;
- resistance to different temperature conditions;
- ergonomic design that allows trays to be installed on top of each other or on special racks;
- Beautiful design.
Making an organizer with your own hands
The process consists of two stages - preparation of parts and assembly. The first part is the most important - you need to make precise cutting. Then the constructor will fit perfectly.
Creation of components
We cut out the main components according to the established dimensions. We sand each board with sandpaper. We apply to each other. The length and width must match. We immediately make the back wall. Cut off the corners of the plywood. We cut out the handle. Next, take a short block, make a notch, and fix it over the hole. For strength, we drive in nails, sometimes we use special glue.
We recommend immediately drilling holes in the rack for screwdrivers. We use a drill and drill bits. We select the diameter according to the size of the available tools. Let's try it on. We nail the finished strip to the back wall.
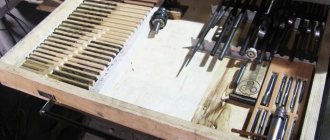
Homemade storage systems
People of mature age still remember the times when domestic industry, even if it produced some kind of boxes for tools and fasteners, was not even talking about their variety, and foreign goods were in limited quantities. Craftsmen got out of the situation using scraps of canisters, old parcel boxes, tin cans, tea tins and more.
It’s great that the problem of shortages is a thing of the past, and the only difficulty is to choose what you need from the huge variety of options offered.
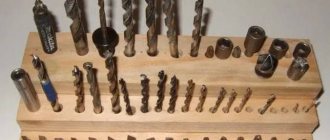
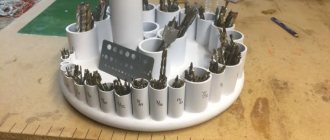
Although the tireless Samodelkins even today manage to adapt yogurt cups, coffee cans and the ubiquitous water bottles for small fasteners. A big advantage of such handmade devices is the very idea of reusing used containers, and this is important for solving the problem of environmental pollution. Carpentry masters go further and independently construct entire storage systems from wood, for example, stands for drills and cutters.
An ergonomic and even beautiful organizer can be easily built from narrow wooden shelves and the required number of identical plastic jars with lids. The board or plywood for the shelf should be quite thick (at least 20 mm), capable of withstanding the load of filled cans. It is safer to choose plastic rather than glass, then such a design will be much lighter.
You can either buy such jars specially or give a “second life” to chocolate-nut butter containers. The covers are drilled and secured to the bottom of the shelves with self-tapping screws.
All that remains is to fill the jars with metal fastening “small things” - dowels, screws, screws, washers, nails - and screw them onto the lids. This system is attractive due to its simplicity, clarity and tightness.
Preparing the shelf space
It’s easy to make a tool shelf with your own hands. First, it is worth determining the location of its future placement so that access to it is free. The size of the shelf also matters and depends on the volume of tools planned to be stored on it.
Designate a space on the wall for a shelf. Make the necessary sketch or drawing on paper, then take the necessary measurements with a tape measure and mark the mounting locations for the hanging shelf on the wall.
It is desirable that the wall surface is free of defects and distortions. If there are still irregularities, then the wall needs to be plastered. In addition, this will protect the room from condensation and increase the thermal insulation properties.
When arranging a shelf with your own hands, you should remember that it must be quite reliable in terms of strength, because it will store tools made mainly of metal.
If the shelf is fixed in only two places at the edges, then the maximum weight it can support is no more than 15 kg. Therefore, for greater stability and strength, it is better to use brackets.
How to make wall shelves for tools
To make shelf parts you will need a drawing with the required dimensions, which can be selected on the relevant websites. Or you can use your talents exclusively. The height of the shelf should not be higher than the height of the owners. At best, the shelf should be perfectly visible.
The materials you will need are high-quality wooden boards without damage or defects, no more than 3 cm thick and about 20 cm wide, which need to be sanded to make the surface smooth.
Make eyelets along the edges of the board to fix the shelf on the surface of the wall, in which 2 holes of a certain diameter are pre-drilled with a hammer drill and plastic dowels are inserted.
To ensure that the eyelet is securely fixed and the hanging tool shelf is sufficiently stable, a fastening washer is used. The product is ready.
Wall clamp holder
Carpenter's clamps are often piled up or placed in a corner of the home workshop. Build a shelf holder for them from waste wood and a piece of sheet material.
Our homemade device can accommodate up to six rack clamps. You can increase the dimensions of the hanger to store more tools by approximately 30mm for each tool. Please note that if the holder expands significantly, you will need to strengthen the bar or place additional support in the middle.
Dimensions of blanks for wall clamp holder.
Cut the workpieces according to size and sand the visible surfaces. Align the parts and drill the countersunk holes.
Screw the bar to the supports with 4.5x40 mm screws.
Turn the pieces over and secure the back panel.
Hang the holder on the wall through the drilled mounting holes.
Directly below this device there is a place to store C-shaped clamps.
Ready-made wall holder for carpentry clamps.
The holders for them are very simple and are made separately for each set of clamps. The dimensions of the suspension are selected based on the fact that the width of the protruding shelf should be slightly less than the distance between the jaws.
Holder for storing C-clamps.
Instructions for making a shelf-rack
In order to make a tool rack with your own hands, you will need to follow simple instructions:
- First you need to prepare grooves on all parts of the main part of the structure to accommodate the perforated panel. Also on the doors for attaching perforated panels, on the vertical elements of the lower compartment (on which dividing partitions are installed). The grooves should be approximately 6 mm deep. After you place the blade of the tool, you need to check the correct settings on a small piece of wood.
- In order to reduce the chance of damage to the plywood while cutting grooves, you need to apply tape to the cut area.
- Use screws and wood glue to assemble the frame of the structure. In order to avoid destruction of wood and plywood, you need to use a special device - before connecting, you need to make pocket holes for the screws.
- Now you need to install the bottom shelf using glue and screws.
- After this, through the upper part you need to insert the perforated sheet into the grooves, previously lubricated with wood glue.
- Use the pocket holes to attach the top cover.
- Lubricate the ends of the partitions of the lower compartment with glue, then one by one you need to install everything in its place.
- Assemble three of the four door frame pieces.
- Place the perforated plates in the grooves, lubricate the joints with wood glue.
- Attach the last element in each of the doors.
- Check that the length of the hinges for attaching the doors to the frame is the same. Make the adjustment so that the hinges are approximately 2-4 cm shorter than the length of the door.
- Step back 1-2 cm from the edge, install the hinges on the screws. Attach the hinges to the shelving body.
Now the simplest thing remains - put the plastic containers in the compartments and hang the rack on the wall. And then you can fill it at your discretion.
Manufacturers
The highest quality solutions for storing metal products are offered by the following range of manufacturers.
- Blocker is a Russian company operating since 2008 that has proven itself well in the DIY (do it yourself) market.
- Topaz is a Russian plant with a wide range of plastic containers.
- Stels is a Russian brand of tools and accessories.
- Tayg (Spain) is a very well-known global manufacturer of fastener storage systems, guaranteeing high quality.
- Schoeller Allibert is a company from Germany with a 50-year history.
Buying plastic trays for hardware will help you place your home tools as comfortably as possible for use. And the affordable price will be another reason to purchase them. Leave homegrown storage techniques behind and organize your storage space in a modern and practical way.
The video below will look at an alternative method of storing hardware.
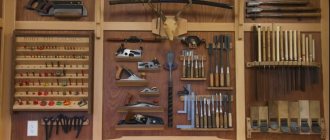
Often, when visiting a workshop, you can witness the following landscape: drills with brushes and files protrude from a dying plastic cup, nails mixed with screws and screws are scattered across a couple of tin cans, and screwdrivers with clamps and wrenches rest in the depths a disposable bag dangling somewhere near the ceiling. However, there comes a time when the owner of the establishment realizes that it is still worth paying attention to the storage of tools and various pieces of hardware.
You can read about how to organize the storage of garden tools here.
If this moment has come to you, carefully read our article, where we want to talk about several simple techniques that will allow you to maintain order in the place where you usually perform sacred functions.
Making a shelf rack
If you regularly use tools, it will be convenient to use an open hanging rack. When working, you don’t need to look for the right wrench or nuts; you just need to stretch out your hand to get to the right tool. You can find various models - both simple and complex.
If the tool rack (photo shown in the article) is used away from the workshop, then you can install doors on it. The result is an aesthetically pleasing design that will serve you for many years. But now let's look at how to make a shelf-rack.