How to make a miter saw from a circular saw with your own hands?
A miter saw is a device that every builder needs to adopt. However, it is no secret that high-quality professional tools presented on the construction market are quite expensive. That is why those who want to save money and also show off their skills should try making a miter saw with their own hands. The starting material for this will be a circular saw.
Types of miter saws
There are several types of miter saws (popularly called “miter saws”). Let's get acquainted with these varieties.
Pendulum
The basic part of such a saw is the bed. A table is attached to the frame, which must have a rotating mechanism equipped with a ruler. It is this mechanism that allows the cutting process to be carried out at a certain angle, adjusting it to the specific individual needs of each user. Moreover, this angle can be changed by moving the work table directly in relation to the bed.
Combined
When using a combination saw, the cutting angle can be changed in 2 directions. The device, like the previous version, contains an additional hinge. In order to change the cutting angle, it must be adjusted and moved to the side opposite to the place where the drive is mounted.
With broach
This device is considered the most universal, since the saw can be moved not only around its axis, but also along the cut in a straight line.
How to make a crosscut from a circular saw?
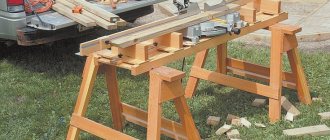
So, in order to make a trim with your own hands at home, you need to make a box that will serve as a base. Chipboard (chipboard) can be used as a raw material for making the box.
In the process of knocking and assembling the box, experts recommend using confirmats consisting of 1 element - they are essentially ordinary ties for connecting wooden parts. The final box for the base for trimming should be shaped like the letter “P”.
On both sides, small pieces of chipboard need to be secured using self-tapping screws. Thanks to this manipulation, you will adjust the position of the tool sole. The next step in transforming the circular is fixing it. Moreover, this should be done using the same clamps, and you can also use wing clamps.
Next you should proceed to installing the so-called table. It should be fixed near the base of the table. However, keep in mind that in the process of carrying out this activity you reduce the depth of the cut by 1.5 centimeters, so try to place the profile as close as possible in relation to the saw element.
After carrying out the above described manipulations, you can start making a test cut - you should get a cutting line based on the stop. If this happens, then you did everything right.
As you can see, it is quite possible to make a miter tool from a circular hand saw. The main thing is to strictly follow the instructions and recommendations, as well as put in a little effort and be patient.
Advantages and disadvantages of a homemade device
Pros.
The first and most important advantage of a homemade miter saw is significant financial savings. So, buying a ready-made instrument will cost you quite a lot (the average cost of a device is 10,000 rubles), but making an instrument with your own hands is, from a financial point of view, accessible to almost everyone.
Minuses.
Often, available household items are used as starting materials for making a miter saw with your own hands. It is worth noting that such materials are not always of high quality. That is why the life and quality of service of a home-made device can be very short and low.
For more information on how to make a miter saw from a circular saw, watch the video below.
This is interesting: Foiled penofol - technical characteristics, what it is, application in thermal insulation
Possible malfunctions and repairs
Frequently encountered malfunctions of do-it-yourself trimming from an angle grinder.
Miter saw repair
Discrepancy of surfaces in the side stop
Negatively affects cutting accuracy. If during work there is a noticeable difference in sawing on the right and left, in this case it is necessary:
- Remove the stop.
- Prepare a thin fragment of getinax.
- Make a pattern for the leveling surface.
- Place it on the countertop.
- Glue the getinax to the side surfaces using epoxy resin.
- Trim off any bumps.
Sawing accuracy is impaired
The reason may be a crooked disk. To correct this result:
- Disconnect the machine from the network.
- Raise the protection cover.
- Place a marker on the surface of the toothed disc.
- Turn it a full turn.
- Loosen the saw and turn it 180 degrees.
- Tighten the disc.
- Apply a marker of a different color and repeat the rotation.
- Compare the two drawn rings.
- In case of discrepancy, replace the disk.
Engine and gearbox repair
If there is a burning smell, sparking in the engine, the motor hums, but the disk does not spin, you need to perform the following steps:
- Remove the disc.
- Get the gearbox.
- Inspect the brushes.
- Check the lubrication.
- Call a technician or replace it with a new motor or gearbox.
Hand saw trimming is not often used in home construction. However, it will not be superfluous to have it at home. The main thing is that the saw performs its functions efficiently and cuts parts at a certain angle in different directions. Do-it-yourself wood trimming is an indispensable assistant in the construction of individual buildings and structures.
Assembling a complex machine
There is an option with a more complex and heavier design. She can definitely handle cutting pipes. In this case, a homemade installation will not require the use of a circular saw as a component of the machine. But for certain stages of work it is better to have a circular saw on hand.
Depending on the selected components, you can get a machine with increased power. To assemble the machine yourself
by hand you will need:
- Electric motor with a power of about 900 W. If you have to regularly cut pipes, you can choose a more powerful electric motor;
- Metal sheet;
- Metal corners;
- Channel;
- Hinge groups;
- Bulgarian;
- Welding device;
- File;
- Spring of impressive power.
When everything you need has been collected at the workplace, you can begin assembling the cross-cutting machine with your own
hands.
- A homemade bed can be made with your own hands by using adjustable supports, metal corners and bed posts.
- A sheet of durable metal acts as a working surface. You need to make holes in this sheet table and process them using a file.
- To weld a pendulum stand for a future machine, use channels and a welding machine. The structure is installed on a metal sheet. The approximate height of the stand is 80 centimeters.
- The stand for the electric motor is made of a metal sheet in the form of a fixed plate. Be sure to install the stand on its hinges.
- The stabilizer of the electric motor of a cross-cutting machine is a powerful spring. If you manage to find one, you can completely abandon the belts and pendulum.
- Using the eyebolt, you can tension and adjust the belts. The pendulum can be made of metal to make the structure reliable and durable.
- Use the actuating tool to select a disk of the required diameter. For household purposes, a saw blade with a diameter of 400-420 millimeters is usually sufficient.
- Be sure to provide protective covers, since assembling such a machine is accompanied by a certain degree of danger.
When choosing the option of assembling a machine with your own hands, rather than purchasing a factory-made cross-cutting machine, you need to understand that there will be quite a serious difference between them in the quality, accuracy and error of processing wood, pipes, metal and other products.
Which wheels to take?
The saw blade is the most important part of the circular saw, the working part for which it is made. The entire design of the machine is also tied to it, so we need to decide in advance which disks we will use in our work, and how to choose the right one in absentia (online) according to the designations on it or in the description..
Types and designation systems of saw blades
The most common 2 notation systems. According to the first (item A, position 1 in the figure), the following are sequentially designated:
- diameter of the disk at the tops of the teeth, mm;
- cutting width, mm;
- diameter of the installation (landing) hole, mm. Typical (default) tolerance +0.05 mm is not specified;
- atypical landing tolerance (possibly);
- number of teeth;
- the letter T or pictogram - the presence of carbide tipped on the teeth;
- rotation speed - operating (nominal) simply in numbers, the maximum permissible with the prefix max.
According to the second system, it is mandatory to indicate the standard size of the disk in numbers separated by hyphens: diameter at the bases of the teeth, their number, landing diameter (the default tolerance is the same). For example, 190-36-30 in item B, pos. 2 means a disk with a diameter of 190 mm (at the tops of the teeth there will be 200) with 36 teeth for a 30 mm fit. The rotation speed is indicated separately, but here it is the maximum by default; labor is 10% less. The remaining parameters are indicated either by symbols (item B, item 2) or textually. The minimum rotation speed, at which proper cutting quality is still ensured, for certified disks with stabilizing slots (items 1, 2, 4, 5) is 50% lower than the working one, and for solid disks it is 25% less.
There are quite high-quality “non-system” disks on sale (items 3-5). But in all cases, simply “for wood” (items 2-4) means commercial wood, plywood, chipboard, laminate and other fairly high-quality wood materials corresponding to the specifications. It is dangerous to saw unseasoned raw wood with such a blade - it can jam and fly apart. For sawing wild wood, special discs are produced with the designations Forest (forest, item 5), Wildwood (wild tree), Timber (wood), Log (log), etc. Discs with such designations are used in stationary pendulum saws, circular sawmills and other equipment for sawing raw wood.
Note : if you are going to saw metal with a circular saw, be careful - discs for steel and aluminum are not interchangeable. Universal discs for sawing any materials are also sold, but they work roughly. It is impossible to saw laminate, chipboard and other laminated materials with “station wagons” - the coating will peel off.
Finally, many saw blades go on sale without any markings or pos. 6 in Fig. In general, they cut, but you need to be careful with them: it is better not to give the linear speed of rotation of such a disk more than 40 m/s. To obtain the rotation speed from it (to calculate the gear), we measure the diameter of the disk at the bases of the teeth D (in mm), and calculate its operating rotation speed as 60(40,000/(3.1415xD)). For example, the operating speed of rotation of a “cloudy” disk of 200 mm will be 3815 rpm; It's better to take 3500.
Milling
Discs
Such nozzles are available in various designs. The main difference between the devices is the size of the abrasive grains.
Trimming from various scrap metals
The cutting frame is made of metal
This is a fairly heavy crosscut on a stationary metal table. It will take some effort to control it. But in the end, the saw mechanism moves smoothly, without jerking, and trimming with your own hands is easy.
Specifications:
- electric motor power - 2.2 kW;
- disk revolutions - 2800;
- cutting depth 80 mm.
Materials and tools required for assembly:
- 900 W electric motor;
- a metal sheet;
- metal corner;
- channel;
- hinge group;
- powerful spring;
- Bulgarian;
- welding machine;
- file.
The bed is made from adjustable supports, a metal corner and posts from an old bed. The working surface is a metal sheet like a table surface, in which we cut a hole, and process the edges with our own hands using a file.
- The pendulum stand for the saw is welded from a channel mounted on a sheet of metal; its height is about 80 cm.
- The stand for the electric motor is made in the form of a movable metal plate mounted on hinges. When installing an electric motor, a spring is used as a stabilizer. Then you can do without a pendulum and belts.
- The tension belts are adjusted with a conventional hinged bolt, and the pendulum for the mechanism is also made of metal.
- As an operating tool, a disk with a diameter of 420 mm is installed on the trimmer.
What will be needed for production?
The working body of a factory trimmer (motor, body, cutting disk) is similar to a conventional manual circular saw. Therefore, the hand saw can easily be adapted for miter cutting. The first thing you need is the handsaw itself. All that remains is to add a frame for attaching the electric saw and placing workpieces.
A variety of design options are possible, from the simplest platforms for straight sawing to complex devices: sawing at angles, with broaching for large-sized workpieces. Therefore, different materials and parts can be used.
For the frame, plywood with a thickness of 10-20 mm is best suited. Its advantages over other materials:
- Not brittle like chipboard, doesn't bend like fiberboard.
- Doesn't warp like wood.
- It is easy to process and attach in any home workshop, unlike metal.
- Under the roof, without moisture, it lasts quite a long time.
In addition to plywood, you will need:
- Fasteners for connecting frame parts (screws, studs, bolts, nuts).
- Wooden blocks or metal corners for joints and hinges.
- Hinge axis (pin, long bolt, washers, nuts).
The following tools are required and may be required:
- Sawing tool (hacksaw, jigsaw, circular saw).
- Drill or screwdriver (we also recommend reading how to make a circular saw from a drill).
- Drills of the required diameter.
The dimensions of the blanks for the bed will depend on what design the master chooses and on the dimensions of the circular saw itself, on the basis of which the trimming is done. For example, to trim a fence picket, you will need a bed length along the workpiece (1.2-2 m). For small parts, a more compact bed is suitable.
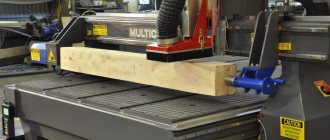
The photo shows an example of the so-called monkey - a cutting circular saw with an abrasive disc for metal, but it serves as an example of what a small frame can be used in such a design.
The cost of materials and parts cannot be calculated, since they will be different in each individual case. Someone may simply already have everything they need to make it, and the parts won't cost anything. If purchased, the cost will depend on what design the master chooses.
Sanding wood
If you decipher the abbreviation angle grinder, it is clear that finishing is the main purpose of the “grinder”.
Cord brushes
They are used primarily for primary (rough) sanding of wood, when it is necessary to smooth out the unevenness of the sample.
End discs
The name speaks for itself. These attachments are used to process the end parts of wooden blanks (cuts). They are especially effective if you have to deal with corner (oblique) cuts.
Rough stripping of wood
Disc plane
This attachment actually replaces this hand tool one hundred percent.
An irreplaceable thing if, for example, it is necessary to pre-process a log - during the construction of a log house, preparing fencing supports, etc.
- In this case, the protective cover can be removed. This nozzle is solid and does not collapse. But protection from flying wood chips (glasses, thick clothing, gloves) is required.
- It is allowed to work only with a grinder, in which a second handle is provided (or installed). The angle grinder must be held with two hands when pre-processing wood.
About choosing a saw model
Typically, recommendations regarding choosing a power tool model come down to comparing power, functionality and similar characteristics
We will not repeat these generally correct tips, but we will draw the attention of our readers to the main thing
Therefore, we strongly advise you to first determine more precisely for what purpose and for what work the tool is being purchased, and only then choose a specific model.
A circular saw is mainly used in “manual mode”, that is, the master holds it in his hands and moves his hands along the part being cut. For comfortable and fatigue-free work, the saw should weigh as little as possible and fit comfortably in the hand.
For a miter saw that is intended to be used in a carpentry shop, the recommendation is exactly the opposite: choose a saw that is as large as possible. It is preferable to buy a saw with a broaching mechanism, which allows you to cut workpieces of significant width and diameter.
Advantages
When a tool (and especially a machine) is made without the help of others, its design usually takes into account the needs and tasks that are meant to be solved with its help:
- so that the molded parts do not have burrs and creases when cutting, it is necessary that the circular saw has an adjustable speed of movement relative to the plane being cut (so that the burrs are removed by the cutting edges of the saw teeth);
- Let's imagine that it is necessary to create not the usual transverse trimming of molded products, but at a certain angle. With all this, it is necessary that the workpiece be fixed to avoid free movement during cutting;
It is very difficult to find a cross-cutting machine on sale that has the function of not only rotating the desktop, but also the option of pressing the workpiece. And if you manage to find such a tool, it will not be inexpensive.
and, of course, the cost. A cross-cutting machine can be assembled practically from scrap materials, moreover, from parts that cannot be used anywhere else. Cost-effectiveness – why isn’t it a decisive advantage?
All these features are inherent in specifically homemade designs of cross-cutting machines, which makes their creation on their own justified and profitable.
Setting limiters
When the shelf for the circular saw is formed, you should position this same saw on it and mark it so that the teeth of the disk fall into the cutout under them, and at the same time do not touch anything. It is necessary to emphasize the dimensions of the body on the shelves - it is precisely according to these marks that in the future it will be necessary to set limiters for the movement of the circular saw.
These limiters should be made from scraps of chipboard or thick plywood. They should be more than 5 cm wide. Their main feature is a very even edge along which the circular saw will move. The limiters should be set so that the circular saw walks along them tightly and evenly, without any free movement.
To do this, it is recommended to first expose them to the glue, and until it sets, test the movement of the facing device. If everything is set correctly, then the stops (or guides) should be fixed with screws, screwing them to the shelves. Because the guides are 5 cm wide, it is recommended to take the width of the shelves more than 10 cm.
READ How to sharpen a band saw on a machine
What is the purpose of this tool and how does it work?
A device designed for cross-cutting wood pieces at different angles is called a miter saw. Often such a tool is also called an electric miter box, by analogy with a carpentry device in the form of a tray for cutting boards at a certain angle. The design of such a saw allows you to make cuts by changing both the vertical and horizontal angle of the saw blade.
You can cut a long workpiece by changing the vertical and horizontal angles
The functionality of the miter saw allows it to be used in woodworking, where precise joining of the ends of two elements of a product or structure is required. It is to ensure cutting accuracy that a frame is required, which can have legs or be mounted on a table. Such work is often necessary for the following purposes:
- production of decorative frames;
- cashing door traps;
- baseboard devices;
- construction of wooden building structures during the construction of houses and auxiliary buildings;
- finishing work with clapboard or plastic panels, as well as laying wooden, parquet or laminate flooring.
When installing a certain type of disk on such equipment, it is possible to cut light metal or plastic profiles and pipes. If necessary, you can even select the thickness of the wood with a miter saw, arranging grooves, which are often used to make window or door frames and beams.
Such work is often performed in the manufacture of window frames.
Despite their solid appearance, and the fact that such saws are often called machines, their weight is small (about 18 kg) and they can be an excellent tool for a home or country workshop.
Mechanism parts
All miter saws have a simple design that is basically similar for different types of this tool. Their main elements are:
Basic design elements of a miter saw
- bed with a round rotary table (some models have a table extender extending in both directions on integrated supports);
- a rotary lever attached to the frame by a special hinge with a return spring, on which a saw blade and a handle with buttons for starting and braking the disk are attached, such a lever is called a pendulum, which is why the entire tool is called a pendulum saw;
- an electric motor located on the pendulum to the right of the saw blade (in some models, in order to get a better overview, it is installed at the back of the pendulum;
- unit for adjusting the angle of the disk, allowing you to turn the cutting head of the tool to the left of the operator at any angle up to
45o; turning to the right is impossible due to the engine located on this side; - sawdust discharge pipe, to which you can attach a vacuum cleaner hose or a bag for collecting chips;
- stops for convenient placement of the workpiece and clamps in the form of clamps for its reliable fastening.
On the tool table, at the cutting site, there is a special insert in the form of a tray-type recess that allows the saw blade to completely cut through the workpiece, making a neat cut. There is a scale on the frame for rotating the table in both directions at a certain angle. The table is secured in the desired position with a screw clamp. The saw blade of the tool is protected by a special transparent casing, which allows the master to clearly see the place of the cut. For convenience, many models of miter saws are equipped with a laser pointer showing where the cut will be made and table illumination.
You can understand in more detail the design of a miter saw, the purpose of its main components, and also see how they are used in work, in the following video.
Homemade wood trimming with broaching - Metals, equipment, instructions
One of the most important tools that is used in construction and for some repair work is a miter saw, which is capable of cutting workpieces and material at any angle and any inclination.
This possibility is provided by the existing rotating platform, the movable working part of the device and, accordingly, the disk itself above the frame.
Using it, you can cut wood, plastic, hardboard, OSB, laminate and other materials of low strength.
To select the right tool, you should consult with a specialist who understands not only the order and path of work, but also broached miter saws.
Features of design solutions
In principle, the design of the saw is simple and consists of a motor on a gearbox, a saw blade, a platform and a handle with a conveniently located start button. The motor is a commutator motor, which has a higher number of revolutions, but requires periodic brush changes. And asynchronous, which is quieter in operation, but at the same time more durable to use.
The transmission of torque for the disk is provided by a gear or belt transmission through a gearbox. To avoid slipping of the product, use first gear.
When switching to second gear, vibration is reduced and disk rotation is stabilized, which is more suitable for long service life.
The most reliable is direct transmission , which is used in some copies, but they are disadvantageous due to their low speeds.
To turn a regular saw into a miter saw, a broaching mechanism is built into it. With this option, the module itself is located in the structure on parallel rails. This design approach allows for cutting large-sized products.
Magnesium or aluminum is used for the frame, and the base itself is a rounded part, set at the desired angle and stop. The kit also includes a cover to protect body parts from injury.
Miter saw table
The basis and very important element of the design is the table. With the right tools and some knowledge, you can set up a DIY miter saw table. It consists of two sides that are attached to the stand. The bar is installed exclusively on saws with broaching.
To measure the position when rotating the table, angular scales are located on the base. The rotation angle can be allowed from 0 to 45 degrees. A special groove on the latches securely fixes the rotating part and ensures the most accurate fixation.
There are some samples with a tilting stand. But such a design requires more complexity and a larger number of components, which will lead to a greater likelihood of failure. And the need for tilting is not so great and arises only when cutting certain types of baseboards and moldings.
Built-in clamps provide reliable fixation of workpieces on the table. And when using sufficiently long workpieces, retractable stands and stops are used, which are installed in the frame and expand the dimensions.
Trimming settings
To block the mechanism for replacing the disk and, accordingly, stop the engine, the device is equipped with a soft start. For safety purposes, the models are equipped with protection against electrical breakdown through the body.
To adjust the cutting of metal products, electronic components are built in, which allow you to adjust the process depending on the properties of the material.
Electronic components are also installed as a precautionary measure to ensure safety and prevent damage from overheating, jamming, and braking when the shear load is exceeded.
It also allows you to cut the workpiece more accurately. Although usually saw models come without the listed components.
In order to be able to calculate the number of parts produced over a certain period of time in exact quantities, newer models are produced that have the option of setting the exact number of revolutions.
Another useful, but expensive feature in the device is a laser guidance system for cutting accuracy. This system can operate both from the mains and from batteries.
Its essence is simple and very suitable for beginners, since they see the line of the future cut indicated by a laser beam. And beginners, if they have the drawings, will be able to make a miter saw with a broach with their own hands.
During this production process, a large mass of sawdust and small parts from the workpieces remain. Some models have a built-in vacuum cleaner, which saves time on cleaning later and always keeps the workplace in a relatively clean condition.
Selection of saw blades
The quality of the cut is influenced by the blade that will be used to make it. distinguish saw blades by the following criteria:
- configuration and geometry of teeth;
- outer diameter;
- landing hole.
The internal diameter in conventional configurations is 3 cm, and the external diameter can be from 21 to 30 cm. This information is indicated on the side of the disk without fail.
A large value of the outer diameter indicates that the load on each of the teeth during operation will be less. And this will lead to longer operation of the disk.
The disk also indicates its marking, the permissible maximum rotation speed and how compatible it is and with which tool.
Disc teeth and their configuration
The quality of the cut depends on the quality of the sharpened teeth, their size, the material from which they are made, and the shape configuration.
For a high-quality cut, which is used when working with laminate or treated wood coated with varnish, it is imperative to use disks with fine teeth. The working time with smaller teeth differs in duration, but is better in quality.
And for working with soft wood and plywood, a disc with large teeth, even located at a greater distance from each other, is sufficient.
The following types of teeth for circular discs exist:
- trapezoidal;
- with carbide tipped;
- with ATV soldering.
by brands of global manufacturers
When choosing a tool, it is very important to pay attention to the brand of the model. It is important to consider what environment you will be working in, with what materials, for how long.
Although tools from different brands have typical characteristics by category, they can still differ significantly from each other. Each manufacturer uses its own approaches, materials, and concepts for solving problems.
Before considering the rating of these units, you need to pay attention to the manufacturers of the most used and reliable brands and be able to choose the best miter saw with broaching, and this is:
- Makita.
- BOSH.
- Devalt.
- Hyundai.
- Metabo.
Saws from these brands do not raise any questions about quality among the user. The only comment people who used the devices had was about the disc play when the guide came out. But this phenomenon is typical and acceptable.
Makita Miter Saws
In the ranking of the safest saws to use and those with high-quality assembly, the Makita brand can be noted. In them, the traction allows you to choose the width of the cut. Makes it possible to make combined cuts, inclined and oblique. Among the professional versions of this brand, one can highlight Makita LS-1216.
Thanks to its double guides, it is the best choice for working on plastic and wood, makes the most precise cuts and is as wide as possible, up to 107 mm and 363 mm wide. These dimensions are the maximum for instruments of this class. The cost of the unit is around 45 thousand rubles.
The weight and dimensions of this tool can be considered both a plus and a minus, since they are large. That is, it is difficult to use as a portable one; it is better and of better quality when used as a stationary one.
BOSH
This company has long secured its place in the world market as a manufacturer of high-quality and reliable things.
Moreover, the gradation of the target potential client can start from a simple amateur and reach professional companies that work with tools of this brand every day with full and maximum load.
Their saws are equipped with a specialized circle and a self-adjusting bed angle. For durability, the design of this brand uses aluminum and magnesium alloys.
The best budget option for a novice craftsman or just an amateur is the Bosh PCM 7. This model can be easily fixed to the frame. It is equipped with a laser for precise cutting, a small disk diameter, and a 1.1 kW motor. And you can buy it for 11 thousand rubles.
Professionals can opt for the Bosh GCM 8 SJL Professional saw.
Its design has a very large number of settings, which allows you to complete work of any complexity without damaging the surface or deforming the end of the cut. But it does not have the ability to regulate the number of revolutions.
But there is a dust collection system, which will benefit professionals. And the cost of such a unit will already be 32 thousand rubles.
Saws from Metabo
A unique feature of Metabo miter saws is the ability to tilt and rotate the blade using a special regulator. The accuracy of the cut is ensured by the projection system, which casts a shadow on the workpiece from the disc.
The most used model is the Metabo KGS 305. The kit already includes a 2 kW motor and fairly convenient control of the adjustment levers.