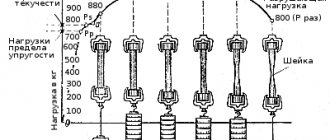
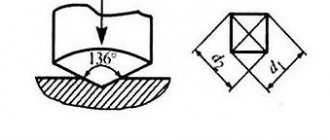
Historically, with the development of metal processing technologies, methods for quality control of metal products appeared and improved. There are many ways to determine the hardness of metals and alloys:
- Indentation of the indenter under the influence of a static load (the load is applied smoothly) - according to the Brinell, Rockwell, Super-Rockwell, Vickers, M.S. Drozd, Hertz, Ludvik method, Shore monotron;
- Dynamic indentation of the indenter (the load is applied by impact) - according to the Martel, Poldi method, Nikolaev's vertical impact driver, Schopper and Bauman's spring device, Walzel's pendulum impactor, Herbert's pendulum, Kuznetsov's pendulum sclerometer;
- Microhardness measurement by static indentation - according to the method of Lips, Egorov, Khrushchev, Skvortsov, Alekhine, Ternovsky, Shorshorov, Berkovich, Knoop, Peters, Emerson, Zeiss-Hahnemann microhardness tester;
- Method of elastic rebound of the striker - Shore scleroscope;
- Hardness measurement by scratching - Mohs, Barba file, Martens, Hankins device, Bierbaum microcharacterizer, O'Neill sclerometer, Grigorovich, Berkovich).
In general, by the nature of the impact of the indenter on the surface of the object under study, one can determine the specific properties of the material: indentation determines the ability to resist plastic deformation, rebound shows elastic properties, scratching characterizes resistance to destruction.
Many techniques are now rarely used or are completely a thing of the past. At the moment, the main and most common methods for controlling the hardness of metals are conventionally divided into two groups: direct and indirect.
Direct methods for measuring hardness are based on the ability of a material to resist the penetration of another, harder body - an indenter. Indenters are made in the shape of a cone or pyramid from diamond, in the shape of a ball - from hardened steel or tungsten carbide.
Direct methods are mainly implemented by stationary hardness testers on the Brinell (HB), Rockwell (HRA, HRB, HRC), Super-Rockwell (HRN and HRT), Vickers (HV) scales.
The essence of the tests is that after the introduction of the indenter, when a given static load is applied, plastic deformation of the material under study occurs. An imprint remains on the surface of the sample.
Calculation of the hardness value is based on the dependence of the applied force and certain geometric parameters of the print. Each direct method has its own dependency (see table below). For example, when taking Rockwell measurements, the depth of the imprint is recorded: the smaller it is, the higher the hardness of the object.
Pros: stationary hardness testers are used to test any metals and alloys; produce results with minimal error; do not require additional calibration.
Disadvantages: they work in one place, usually in a specially equipped laboratory; it is necessary to prepare samples in advance, or the product must have specific dimensions; operator qualification required; low speed of research.
Indirect methods of hardness measurement are divided into ultrasonic and dynamic - they do not directly measure hardness, but only estimate the hardness value of the metal depending on other physical properties.
Indirect methods are implemented by portable hardness testers - ultrasonic and dynamic. The result can be obtained both in the most common hardness units, such as Rockwell C (HRC), Brinell (HB), Vickers (HV), and in the less commonly used units of Rockwell A and B (HRA, HRB), Shore D (HSD) and others.
The ultrasonic method (ultrasonic contact impedance) is based on fixing the degree of attenuation of the resonant vibration frequency of a metal rod with a diamond tip (indenter) when it is introduced into the surface of a metal product.
When the indenter penetrates deeply into a soft metal, there will be a large area of contact between the diamond and the material, which means there will be a higher degree of attenuation of the oscillation frequency.
Applicable to products of almost any size and weight; leaves an invisible imprint; suitable for measuring the hardness of surface-hardened layers; convenient for samples with complex configurations (gears, bearings, hardware). Application on products with a coarse-grained structure is limited (cast iron, bronze).
The dynamic method (Lieba) is based on determining the ratio of the speed of the striker when rebounding from the surface of the sample being measured to the speed of the striker upon impact with the surface of the sample. A carbide ball (tungsten carbide WC-Co) is used as a striker.
The lower the hardness of the metal, the more impact energy is spent on forming an imprint and the lower the rebound speed of the striker.
Suitable for massive products; samples with a highly rough surface; objects with a significant thickness of the hardened or hardened layer.
Pros: portable hardness testers are autonomous, easy to operate, work in hard-to-reach areas, and have a high measurement speed.
Disadvantages: the error of measurement results is higher than that of stationary instruments; Sometimes additional calibration of the scales is required.
How is hardness measured and how is it designated?
For most hardness measurement methods, the basic unit of measurement is kgf/mm2
However, you should understand that there are methods with their own unit.
The designation of hardness also depends on the method.
The letter “H” always denotes “hardness” (from the English Hardness), and then the letters indicating the determination method are indicated. The most popular designations:
- HB – Brinell method (pressing a steel ball)
- HRA - Rockwell method, A scale (diamond or steel cone indentation)
- HRB – Rockwell method, B scale
- HRC - Rockwell method, C scale
- HV – Vickers method (diamond pyramid indentation)
- HSD – Shore hardness, etc. (rebound method)
Mohs scale
The Mohs hardness scale is relative and is used exclusively for minerals. Ten minerals were selected as reference minerals, which were arranged in increasing order of their hardness (in the photo diagram below). Accordingly, the scale has 10 points (from 1 to 10).
The mineralogical hardness scale was proposed by the German scientist Friedrich Mohs back in 1811. Nevertheless, it is still used in geology.
How to determine the hardness of a particular mineral on the Mohs scale? This can be done by carefully examining the scratch left by the sample. It is convenient to use a fingernail, a copper coin, a piece of glass or a steel knife.
So, if the tested mineral writes on paper without scratching it, then its hardness is equal to one. If a stone is easily scratched by a fingernail, its hardness is 2. Minerals that are easily scratched by a knife have three points. If you need to make some effort to leave a mark on the stone, then its hardness is 4 or 5. Minerals with a hardness of 6 or higher themselves leave scratches on the knife blade.
What are the requirements for the product to be measured?
Hardness is directly proportional to the load to determine it. High hardness – high load.
The more accurate the method, the higher the requirements for preparing the surface of the product. The surface of the product on which hardness is determined must meet a number of requirements:
- The thickness of the sample must be at least 10 times the depth of penetration of the tip after removing the main force.
- At the inspection site, it must be cleaned to a shine, be smooth and flat, and must be free of scale, rust, oil, fat and paint contamination, potholes and scratches. Roughness Ra is not more than 2.5 µm according to GOST 2789, unless there are other requirements of regulatory and technical documentation.
- The surface on which the sample “lays” on the object stage of the device must also be clean and level. Both surfaces must be parallel to each other.
- The product must be securely fastened, excluding the possibility of displacement of the sample relative to the axis of load application.
see also
Related Properties
Other amplification mechanisms
| Hardness scales, tools and tests
|
What methods exist for determining hardness?
Conventionally, all methods can be divided into 3 groups:
- Indentation (implementation) methods
- Scratching Methods
- Elastic rebound methods
Indentation (implementation) methods. The meaning of the methods is to press a so-called indenter - a solid object of a certain shape (usually a steel ball or a diamond pyramid) into the test metal with a certain force. After indentation, the diameter (for a ball) or depth (for a pyramid) of the resulting imprint is measured.
In this case, hardness is defined as the ratio of the load to the area of the indentation after indentation.
The most common are the Brinell (HB) and Rockwell (HRA, HRB, HRC) methods.
Indentation thickness measurement methods:
- Brinell device
- Rockwell device
- Vickers device
- Ludwick method
- Hertz method
- Drozd method
- Shor's Monotron
- Berkovich method
- Egorov's method
- Khrushchev's method
- Leeds method
- Zeiss-Hahnemann microhardness tester
- PMT-2, PMT3 (Khrushchov, Berkovich)
- Emerson, Knoop, Peters method
Scratching methods. Simple methods. If the tip used to make the scratch leaves a mark on the metal being tested, then the hardness of the metal is less than the hardness of the tip. In this case, the hardness of the tip is initially known (corundum, diamond, gypsum and other tips are used). The most popular is the Mohs method.
Scratching methods:
- Mohs test
- Martens device
- Bierbaum microcharacterizer
- File test, Barba
- Hankins device
- PMT-3 (Berkovich)
- PMT-3 (Grigorovich)
- O'Neill sclerometer
Elastic rebound methods. Rarely used. The firing pin falls freely onto the test surface from a fixed height. Under the action of elastic recoil of the material, the firing pin rebounds to a certain height. The hardness of the material is proportional to the height of the rebound. The most popular is Shor's method.
Elastic rebound methods:
- Shore Scleroscope
- Martel method
- Nikolaev vertical pile driver
- Shopper spring device
- Bauman spring device
- Poldi device
- Walzel pendulum pile driver
- Herbert pendulum
- Kuznetsov pendulum sclerometer
Why is it important to measure the indicator?
The hardness of metals is an indicator that means the resistance of steel to the mechanical stress of other harder materials. Indicators are assessed in units of hardness, on the basis of which a conclusion is made about the condition of the material.
The hardness of metals is important to consider in most types of work with them. For example, when manufacturing large, heavy structures using several types of metals, it is important to know that they will interact optimally and successfully withstand heavy loads.
It is especially important to take into account the hardness of the metal in the following areas:
- Shipbuilding;
- Car manufacturing;
- Aircraft assembly;
- Production of metal-based building materials and consumables.
In any of these areas, resistance to mechanical stress determines human safety, the ability to complete a given task, and service life.
To determine hardness, an indenter is pressed into the metal - a body made of a hard alloy or diamond, which has the best resistance to mechanical stress. The greater the pressing force a metal can withstand, the greater its hardness.
Hardness of electroplated coatings
In the case of electroplated coatings, it should be noted that due to their small thickness, many methods (especially indentation methods) may not be suitable. The most common methods are Mohs and Vickers.
To measure hardness, a coating with a minimum thickness of 2 µm is required. If a smaller thickness is required, use GOST 9013-59, GOST 9012-59, GOST 22761-77
The measurement principle is the same. After applying the coating and drying it, the quality control department takes measurements and makes a decision - to ship the product or send it for recoating.
An important role here is played by both the electrolyte in which the coating is applied and the coating application mode (temperature, current density). For example, in one chrome plating electrolyte it is possible to obtain a chrome coating with a hardness from 500 to 1100 kgf/mm2.
If we talk about the electrolyte, the most important role is played by the quantity and quality of the brightening agents in it. A matte zinc coating will be much softer than a shiny one. Therefore, if you want a super-shiny coating, keep in mind that it will be hard, and there is a possibility of it cracking or peeling off at the slightest bending of the product.
Physics
Diagram of a stress-strain curve, showing the relationship between stress (force applied per unit area) and stress or strain in a ductile metal.
In solid mechanics, solids typically have three responses to force, depending on the force and the type of material:
- They exhibit elasticity - the ability to temporarily change shape, but return to the original shape when pressure is removed. "Hardness" in the elastic range—a small temporary change in shape under a given force—is known as stiffness in the case of a given object, or high modulus of elasticity in the case of a material.
- They exhibit plasticity - the ability to constantly change shape in response to force, but remain integral. The yield point is the point at which elastic deformation gives way to plastic deformation. Deformation in the plastic range is nonlinear and is described by a stress-strain curve. This response gives the observable scratch and indentation hardness properties as described and measured in materials science. Some materials exhibit both elasticity and viscosity during plastic deformation; this is called viscoelasticity.
- They fracture - split into two or more parts.
Strength is a measure of the range of elasticity of a material, or the range of elasticity and ductility combined. This is quantified as compressive strength, shear strength, tensile strength depending on the direction of the forces involved. Incredible force is an engineering measure of the maximum load that a piece of a certain material and a certain geometry can withstand.
Brittleness in technical use is the tendency of a material to fracture with very little or no predetectable plastic deformation. Thus, from a technical point of view, a material can be either brittle or strong. In everyday use, the term "brittleness" usually refers to the tendency to break under the influence of small forces, which manifests itself in both brittleness and lack of strength (in the technical sense). For perfectly brittle materials, the yield strength and ultimate strength are the same because they do not experience noticeable plastic deformation. The opposite of brittleness is ductility.
The durability of a material is the maximum amount of energy it can absorb before breaking, which is different from the amount of force that can be applied. The toughness of brittle materials is usually low because elastic and plastic deformations allow the materials to absorb large amounts of energy.
Hardness increases with decreasing particle size. This is known as the Hall-Petch relationship. However, below the critical grain size, the hardness decreases with decreasing grain size. This is known as the inverse Hall-Petch effect.
The hardness of a material to deformation depends on its microstrength or small scale. shear modulus in any direction, not in any stiffness or stiffness properties such as bulk modulus or junior modulus. Stiffness is often confused with hardness.[5][6] Some materials are harder than diamond (such as osmium), but not harder and are prone to chipping and flaking in a scaly or needle-like form.
Mechanisms and theory
An image of a crystal lattice showing the planes of the atoms.
The key to understanding the mechanism of hardness is understanding the metal's microstructure, or the structure and arrangement of atoms at the atomic level. In fact, the most important metallic properties important for the production of modern products are determined by the microstructure of the material.[7] At the atomic level, the atoms in a metal are organized into an ordered three-dimensional array called a crystal lattice. In reality, however, a given metal sample will probably never contain a consistent single crystal lattice. A given sample of metal will contain many grains, with each grain having a fairly consistent array pattern. On an even smaller scale, each grain contains irregularities.
There are two types of irregularities at the grain level of the microstructure that are responsible for the hardness of the material. These irregularities are point and linear defects. A point defect is an irregularity located at a single lattice point within the overall three-dimensional lattice of the grain. There are three main disadvantages. If there is no atom in the array, a vacancy deficiency is formed. If there is another type of atom at a lattice site that would normally be occupied by a metal atom, a substitutional defect is formed. If an atom exists in a node that normally should not exist, an interstitial defect has formed. This is possible because there is space between the atoms in the crystal lattice. While point defects are irregularities in a single site of a crystal lattice, line defects are irregularities in the plane of atoms. Dislocations are a type of linear defect associated with the misalignment of these planes. In the case of an edge dislocation, a half-plane of atoms is wedged between two planes of atoms. In the case of a screw dislocation, two planes of atoms are displaced, and a spiral array passes between them.[8]
In glasses, hardness appears to depend linearly on the number of topological constraints acting between the atoms of the network.[9] Consequently, the theory of hardness made it possible to predict hardness values by composition.
Atomic planes split by an edge dislocation.
Dislocations provide a mechanism for sliding atomic planes and therefore a method of plastic or permanent deformation.[7] The planes of atoms can flip from one side of a dislocation to the other, allowing the dislocation to pass through the material and become permanently deformed. The movement allowed by these dislocations results in a decrease in the hardness of the material.
A way to suppress the motion of atomic planes and thus make them more complex involves the interaction of dislocations with each other and with interstitial atoms. When a dislocation intersects with a second dislocation, it can no longer pass through the crystal lattice. The intersection of dislocations creates a tether point and prevents the atomic planes from continuing to slide past each other.[10] A dislocation can also be pinned through interaction with interstitial atoms. If a dislocation comes into contact with two or more interstitial atoms, the sliding of the planes will again be disrupted. Interstitial atoms create anchor points or pinning points in the same way as intersecting dislocations.
By varying the presence of interstitial atoms and dislocation density, the hardness of a particular metal can be controlled. Although it may seem counterintuitive, as dislocation density increases, more intersections are created and therefore more attachment points. Likewise, the more interstitial atoms are added, the more pinning points that impede the movement of dislocations are formed. As a result, the more support points added, the harder the material will become.
further reading
- Chinn, R. L. (2009). "Hardness, Bearings and Rockwells". Modern materials and processes
.
167
(10):29–31. - Davis, J. R. (ed.). (2002). Surface hardening of steels: basics.
Materials Park, Ohio: ASM International. - Dieter, George E. (1989). Mechanical metallurgy.
SI Metric adaptation. Maidenhead, UK: McGraw-Hill Education. ISBN 0-07-100406-8 - Malzbender, J (2003). “Comment on the definitions of hardness.” Journal of the European Ceramic Society
.
23
(9): 9. Doi:10.1016/S0955-2219(02)00354-0. - Revankar, G. (2003). "Introduction to Hardness Testing". Mechanical Testing and Evaluation
, ASM Online Vol. 8.
Recommendations
- Vredenberg, Fredrik; P.L. Larsson (2009). "Scratches on metals and polymers: experiments and numbers." Wear
.
266
(1–2): 76. doi:10.1016/j.wear.2008.05.014. - Hoffman Scratch Hardness Tester Archived 2014-03-23 on the Wayback Machine. byk.com
- Allen, Robert (December 10, 2006). "Guide to Rebound Hardness and Scleroscopy Test". Archived from the original on 2012-07-18. Retrieved 2008-09-08.
- "Novotest".
- Jandron, Michel (25 August 2005). "Diamonds are not forever." World of Physics
. In the archive from the original dated 02/15/2009. - San Miguel, A.; Blase, P.; Blase, X.; Melinon, P.; Perez, A.; Itie, J.; Polian, A.; Reny, E.; and others. (1999-05-19). "High-pressure behavior of silicon clathrates: a new class of low-compressibility materials." Physical Review
.
83
(25): 5290. Bibcode:1999ПхРвЛ..83.5290С. Doi:10.1103/PhysRevLett.83.5290. - ^ a b
Haasen, P. (1978). Metallurgy of metals. Cambridge [English]; New York: Cambridge University Press. - Samuel, J. (2009). Introduction to Materials Science Handbook
. Madison, WI: University of Wisconsin-Madison. - Smedskjaer, Morten M.; John C. Mauro; Yuanzheng Yue (2010). "Prediction of glass hardness using temperature-dependent constraint theory." Phys.
Rev. Lett .
105
(11): 2010. Bibcode:2010PhRvL.105k5503S. Doi:10.1103/PhysRevLett.105.115503. PMID 20867584. - Leslie, W. C. (1981). Metallurgy of steels. Washington: Hempisphere Pub. Corp., New York: McGraw-Hill, ISBN 0070377804.
