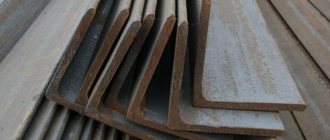
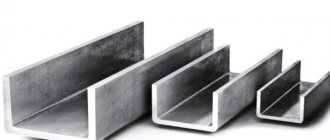
In the manufacture of various metal structures, rolled steel angles (angles) are among the most commonly used materials. In addition to welding corner pieces together, it often becomes necessary to weld a corner to a pipe or to a flat surface. Such compounds are used in construction and installation work, in the manufacture of furniture and crafts.
How to weld a corner at 90 degrees
In the manufacture of various metal structures, rolled steel angles (angles) are among the most commonly used materials. In addition to welding corner pieces together, it often becomes necessary to weld a corner to a pipe or to a flat surface. Such compounds are used in construction and installation work, in the manufacture of furniture and crafts.
Types of connection
Welding steel products using angle iron comes down to several main types of connections:
- butt welding of billets from angle bars;
- welding corner blanks at an angle of 90 °;
- welding of angle steel with other products.
When creating a structure, a good welder solves at least two problems. The first is to weld a strong product that can successfully withstand certain loads. The second task is to ensure that the completed work looks aesthetically pleasing. After all, the work of a true master is always pleasing to the eye.
Let's look at typical examples showing how to weld iron corners to each other, as well as to other surfaces.
Butt joint
You can butt weld pieces of corner profiles. This type of welding is often required to lengthen an existing piece of steel. The technology for making such a connection is simple and basically does not differ from the butt connection of sheet blanks. But there are still some features.
First, you should make even trimming of the areas to be joined. This procedure must be preceded by careful marking of the material. In general, this should be the rule when working with metal if the goal is to do the job well. The sharp edges of the cuts must be processed with a file, removing burrs and scraps of metal from them.
In order to weld metal parts evenly, it is best to first combine them and clamp them in a special clamp. After carefully checking and, if necessary, adjusting the position of the workpieces using a level, you can make the first tacks.
You should not start welding by applying a finishing weld along one of the angle bars. With intense heating during the welding process, the metal is deformed, as a result of which the joint along the second flange of the corner workpiece may separate. It is more correct to first weld the metal with tacks along the edges of the shelves and in the middle of the corner, and only after that finally weld the workpieces to each other.
Welding profiles at an angle of 90°
When questions arise such as how to weld a frame from a corner, you need to be able to correctly connect the parts at an angle of 90 °. There are three versions.
The first method is that the outer part of one of the shelves of one corner is superimposed on the inner part of the shelf of the second. This method is the simplest, but when it is performed, one corner is higher than the other by the thickness of the shelf.
The second method consists of preliminary cutting the shelf of one of the corners to the height of the shelf. After this, the second corner can be attached flush to the cutout and welded with the first.
The third welding method also allows you to weld workpieces at the same level. To do this, each of the blanks is pre-cut at an angle of 45 °C, after which they are connected at the corners, ultimately forming a right angle.
To weld the frame, you need to take four blanks from angle bars, prepared for welding at right angles using one of the above methods. For preliminary fastening, it is better to use a clamp.
Having combined all the blanks, it is necessary to control the geometric dimensions of the future product. Then, having made tacks at the four corners, again take measurements of the diagonals of the frame, if necessary, adjusting them with light blows of a hammer along the larger diagonal. After this, you can weld the joints.
Welding to pipes and planes
It is most convenient to weld a corner with a profile pipe, since its flat surfaces fit tightly to the flanges of the corner and, when welded, form a reliable connection.
For example, if you need to weld a workbench, a table for a workshop or a stand, then the base of the future tabletop can be a frame from a corner, and the legs can be sections of pipes.
In this case, the frame can be oriented with the plane up, and steel pipes - legs - can be welded to its inner corners. When performing this work, it is also useful to use clamps of the desired shape and round pipes.
If the strength of the intended connection is insufficient, you can weld reinforcing elements in the form of triangular gussets made of sheet metal or sections of corners.
Connecting the corner to a flat surface does not cause any difficulties. If you need to weld a corner with the shelf adjacent to the plane, the seams along the shelf securely fasten the corner.
If the corner workpiece needs to be welded at the end, welding is performed as with a classic T-joint, which is described in detail by GOST.
Nuances of welding corner joints
- Date: 07/26/2015
- 480
- : 51
Today, welding corner joints is becoming an integral part of the work. This involves the use of a wide variety of equipment and methods.
Quality directly depends on the diameter of the pipe, its position in space, as well as on power. In any case, the work should be done with an electrode with a diameter of 3 mm and a maximum current of 90-110 A.
The methods can be varied, but they must be applied in each specific case in their own form.
When working with a welding machine, wear a protective helmet and gloves.
Welding a plate to a vertical pipe: features
In this case, the corner welding technology involves an angle connection from the rear. In this case, the first roller should be normal in completeness, with maximum penetration and minimum cross-section.
The second roller should be made with an electrode whose diameter is 4 mm. In this case, the operating current is selected as average or maximum. It all depends on the diameter of the parts being connected.
The locks of the two rollers must not be connected to each other.
Depending on which leg was chosen, the technology for welding corner joints may vary. The magnitude of the arc and the speed of movement of the electrode directly depend on this.
The third roller is made on the base.
Before welding, the material must be cleaned.
In this case, it is imperative to first clean the material. All toxins are removed from its surface. The third is, accordingly, superimposed on the fourth.
This is done until the required seam parameter is formed on the outer surface. The technology for applying the third, fourth and fifth rollers is no different from each other.
Here, welding is done first on the surface, and then trimming must be done.
The final roller is made without undercuts directly to the vertical wall. To do this, you need to fulfill some conditions. There must be a minimum gap at the site of the last roller.
The fifth layer is applied with electrodes whose diameter is 3 or 4 mm. It all depends on the thickness of the materials being welded.
So, the technology for welding corner joints in this case involves the use of several layers, each of which is superimposed on the previous one.
How to weld a plate to a horizontal pipe: recommendations
The technology for welding corner joints in this case will be slightly different from that described above. The pipe must be divided by a vertical axis into 2 sections, and those, in turn, into 3 positions or zones. They are called ceiling, vertical and bottom.
Welding corner joints (T-type).
Each individual section is welded relative to the ceiling position. The first root roller should be placed at a distance of 15-20 mm from the next section. Welding is carried out using electrodes having a diameter of 3 mm. It is better to work at maximum currents. This will make the process more efficient.
First, after crossing the axial line, work is done at an angle backwards. After this, the position of the electrode is gradually aligned at an angle of 90 degrees. After this, the transition to welding back is smoothly made. The roller ends on the vertical axial.
The root roll of the second section is made using the same technology.
It is worth noting some nuances of the work. The root bead throughout the entire area must be performed using the same welding current. In this case, the diameter of the electrode should also be the same. You can use both models with a diameter of 3 mm and models with a diameter of 4 mm. Here everything depends directly on the thickness of the metal.
If we talk about the ceiling position, then it is performed with narrow rollers. Over the entire width of the vertical position, work is carried out at the same current as in the ceiling position. In this case, manipulation is necessary. It is necessary so that there is a correct liquid bath, which contributes to the formation of the seam of the correct shape.
Welding a corner joint: 1 - symmetrical boat welding, 2 - asymmetrical boat welding.
Welding in one pass is carried out until problems arise with the formation of the seam and bead from the vertical plane to the lowest position. If such a situation begins to arise, then it is worth moving on to the formation of a double layer. In this case, the same electrodes are used as before.
The next roller is formed just below this position, that is, just below the place where the transition from one layer to two was made. This distance is most often determined to be 5-6 mm. In this case, you cannot do without manipulating the electrode. It is very important at this stage to create a stable molten pool. This is the only way to achieve a uniform seam.
Welding products from metal corners – Welding Profi
Today, corner profiles are quite often used in the construction of various buildings and structures.
It is also used when carrying out less global work, for example, for assembling enclosing structures for land plots.
The question “how to weld a corner correctly?” is of interest to many, since the strength of the structure and the durability of its operation depend on the correct choice of welding technology.
How to weld iron angles at right angles?
Welding a corner at 90 degrees is not as easy as it might seem. There are quite a few options for such welding. The subtleties are to most accurately position the two corners in relation to each other. There are several main types of connections:
- The corners are arranged with vertical shelves outward (one corner is nested inside the other). This method will provide the smoothest shape of the welded frame and that is why it is used most often.
- The edges of the corner profile are cut at an angle of 45° and then joined.
- Knitting a corner into a tenon - cutouts are made in the corner flanges (the most difficult method).
Let's look at the first, easiest way to weld a corner into a frame. It is first necessary to make blanks from the angle profile, cutting them to size and cleaning the area where the weld is applied.
Then, having placed the corners in the frame, you need to measure the diagonals to make sure the dimensions of the future product are correct.
Next, at the end of each corner (from the outside), you need to make tacks using an electrode. This is necessary to fix the position of the corners in the frame. Then tacks are made inside the frame (in each corner).
After applying the tacks, it is necessary to completely weld the joints of the metal corners. Depending on how large the load on the frame will be during operation, it depends on how many seams will have to be applied - that is, is it enough to perform only internal welding or also welding of all the ends from the outside.
The final stage of welding metal corners into a frame will be cleaning the seams from slag. This operation must be performed carefully so as not to damage the weld.
How to butt weld two corners?
It is somewhat easier to butt weld corners, as well as other profiles, than to weld at an angle.
You can skip preliminary cutting of the edges and immediately join the ends of two corner profiles. The main thing is that the edges are cleaned, otherwise pores may form in the weld.
The number of passes may vary and depends on the thickness of the walls of the corner being welded.
You can weld a metal corner by making oscillatory or circular movements with the electrode (in a spiral). Before you start welding, you need to ignite the arc, for example, by striking the electrode on a metal surface.
The angle of inclination of the electrode should be 45°. This will allow the welder to freely observe the weld pool and form an even seam.
After welding is completed, it is necessary to carefully remove the resulting slag and splashes.
To ensure that the weld seam when welding an angle profile is as strong and reliable as possible, it is necessary to use high-quality consumables. To purchase them, contact Welding Materials.
We sell electrodes, welding wire, welding accessories and personal protective equipment from the best manufacturers.
The lowest prices and convenient ordering conditions apply to you!
DIY metal door from a simple corner
Branded metal doors are certainly a beautiful thing, but this product, firstly, is expensive, and secondly, it is not always of high quality, so self-confident people make them themselves. Next, we will talk about how to assemble a metal door with your own hands from a corner. We will talk about welding the structure, hanging hinges and installing a lock.
Installation of branded iron doors.
Why exactly the corner?
It cannot be said that metal corners are better or worse than the same profiled pipe. Moreover, structures made from profiled pipes are approximately 20% lighter. But for a novice craftsman, making a metal door with your own hands from a corner is easier and more convenient.
Without experience, making a metal door with your own hands from a corner is easier because the metal there is many times thicker, and thick metal is easier to weld, it definitely won’t burn out. If a profiled pipe 40x20 mm has a wall thickness of 1.5 mm at best, then the wing of a 50x50 mm angle has a cross-section of 5 mm.
Metal corner 50x50 mm.
If your material is cut incorrectly and, for example, you need to weld one long post from two short parts for an iron door, then there will be no problems with the corner. While a profiled pipe needs to be precisely joined and welded around the entire perimeter, without “managing” to burn through the thin metal.
And finally, when transporting with a corner, you have nothing to fear: even if a car runs over it, it will survive, but the profiled pipe will be crushed, and all that remains is to sell it for scrap.
Assortment of metal corners for iron doors.
How to make a door from a corner
A do-it-yourself iron door from a corner is made something like this:
- preparing the instrument;
- we purchase material;
- draw up drawings;
- measure and cut the material;
- We weld the steel outer frame;
- We weld the frame under the door leaf;
- We weld the outer metal sheet to the door leaf;
- we hang the hinges;
- we cut the lock.
Actually, making the doors with your own hands is finished, finishing work will continue. That is, you need to paint the entrance doors, as well as insulate and sheathe them (at least from the inside) with some kind of facing material.
Tool and material
Welding metal doors with an inverter machine is a good solution for a home craftsman.
- welding machine;
- grinder, you can get by with a small one;
- electric drill, or better yet, a hammer drill;
- a metal cord brush or a special attachment for an angle grinder;
- emery;
- core;
- hammer;
- roulette;
- plumb line;
- hydraulic level and bubble level 1.5 - 2 m long;
- clamps;
- pencil.
Naturally, the power tool will need components: drills, discs for the grinder, mounting anchors for installation, etc., without which it is impossible to make a metal door.
As for the material, it goes like this:
- For the supporting outer frame, a corner of 50x50 mm - 7 m is usually taken.
- For the frame under the door leaf, it is advisable to use a 40x40 mm corner, although if you are not going to insulate the structure, you can take 25x25 mm, a total of 8 - 10 m.
- To fasten an iron door with your own hands, you need a strip 30–40 mm wide, with a cross-section of 2–4 mm, 1.5–2 m is enough.
- It is believed that for external cladding you can use a sheet with a thickness of 1 mm, but if you are afraid of burning it during welding, then take 2.5–3 mm, it is more reliable.
Guillotine for cutting metal sheets.
Drawing or sketch
Searching for diagrams and professionally made drawings is a thankless task, because cases when a metal entrance door assembled according to GOST 31173-2003 clearly fits into the doorway are extremely rare.
Since you have decided to make metal doors with your own hands, it would be much wiser to draw a sketch by hand. It may not be so “beautiful”, but in it you will definitely take into account all the important details and tolerances that are not found in professional drawings.
Naturally, you will have your own dimensions, but before you make a sketch, think about the tolerances (we are talking about a frame made from a 50x50 mm corner):
- The outer frame should fit into the contour of the doorway with a small gap, ideally 10 mm around the perimeter. From the front side the gap is not visible, since it will be covered by the wing of the corner. But from the inside you will have space to pour polyurethane foam.
- Consider the thickness of the corner itself. That is, if your gap is 10 mm, plus the angle wing is 5 mm, then the internal perimeter of the frame needs to be narrower by 15 mm (the most common mistake).
- Entrance doors in multi-storey buildings often have thresholds 10–20 mm high. There is no point in knocking down this threshold; you can simply cut off the lower wing of the corner up to 30 mm wide. The idea is that the upper wing of the corner touches the threshold, but does not lie on it.
- A gap of 5 mm is left between the inner and outer frames of iron doors, and do not forget to take into account the thickness of the wing in the corners.
- The overlap of the front metal sheet on the outer frame must be at least 10 mm, plus 5 mm for the gap between the frames. Total - 15 mm from the frame to the edge of the sheet.
We weld the outer frame
Working on the floor, even if it is absolutely flat, is very inconvenient, because you will have to turn the welded frame over several times, plus on the floor you will not be able to get to the part from below. Therefore, it would be wise to prepare a metal workbench. The design can be anything, but the main thing is that the upper plane is level.
Homemade workbench for welding doors.
First we need to cut all the frame parts to size. You can join the frame in the corners either directly, that is, at 90º, or with cutting at 45º. Both methods are reliable, but visually oblique pruning looks much better.
Cutting a corner at 45º is not difficult. So, if the wing size is 50 mm, then we measure 50 mm from the edge and get a square. Next we draw a diagonal inside this square, which will be a guide for cutting.
Now you need to cut out the excess parts and lay the corner on a flat workbench. During work, it is advisable to fix the corner on the workbench with clamps.
Laying out a corner on the table.
To ensure that all corners of the outer frame are strictly 90º, you need to orient yourself along the diagonals. That is, the diagonals must be the same. A square is a good thing, but in this case it does not provide absolute accuracy.
Checking the frame using a square.
Next, the corners are boiled. There are also nuances here: you can’t apply a full seam right away; overheating will cause the metal to move and the frame will warp.
Therefore, you first need to grab the joint at two or three points on all four corners, and then gradually weld the seams in small strips, moving from corner to corner.
When the metal has cooled, the seams made on all sides are cleaned with a grinder.
Cleaning corners with a grinder.
We weld the inner frame
A gap is left between the inner and outer frame. To accurately set this gap, you need to cut more plates from a corner, strip or any hard material in advance.
Standard plates for maintaining the gap.
Next, you put the cut corners inside the frame, place the plates between them and firmly fix it all on the outer frame with clamps.
The corners of the inner frame are welded in the same way as the corners of the outer frame, but do not rush to immediately remove the clamps and separate the structures. If you are planning to install stiffeners, then they need to be welded right now, so you will eliminate even the slightest distortion or deformation during welding.
Welding the inner frame according to the template.
We weld the sheet
As you remember, the sheet should “look out” beyond the internal frame by at least 15 mm, but many craftsmen advise making a tolerance of 20 mm. An equally wide seal can be glued to such a wide area, thereby protecting against drafts.
Control of sheet protrusion around the perimeter.
There is a very important point here. The fact is that the corner should be welded to the sheet not flat, but with the upper part of the wing, as shown in the photo below. With this approach, you will not have problems with attaching the internal lining, plus it is easier to install insulation in such a niche.
Technique for welding a corner to a sheet.
The corner is welded to the sheet not with a continuous seam, but pointwise, in increments of 10 cm. Again, do not try to weld in a row, fix the sheet in a checkerboard pattern, that is, at different points, this way you will eliminate the possibility of temperature deformations of the metal.
In single doors with an opening width of up to 900 mm, an outer frame from one corner with a cross-section of 50–70 mm is sufficient, but if the door is double-leaf or one-and-a-half (standard leaf plus a small folding section), then it is advisable to weld a reinforced frame. A diagram of such a design is presented below.
Diagram of a reinforced angle frame for a wide iron door.
How to properly weld hinges on an iron door
Naturally, the main detail here is the hinges themselves. There are many varieties of these mechanisms, but an amateur would be better off sticking with the simplest male-male hinges. An example of such a mechanism is shown below.
The only thing you should pay attention to is the availability of lubricant, otherwise after a year the hinges will begin to creak, and it is very inconvenient to remove and lubricate a heavy iron door alone. As a rule, the lubrication hole is made either from the top (in the “female” section) or from the side. Plus, it’s better to insert a ball from the bearing inside, so the mechanism will work longer and smoother.
How to weld a corner at 90 degrees - Machine tools, welding, metalworking
Welding is a process that requires considerable skill and skill. In addition, knowledge of physics and construction is also very important. Truss welding is especially difficult. This is caused by the combined influence of a large number of different factors.
Starting from the fact that for the production of trusses it is most often necessary to use thick metal, which requires significant pre-treatment, and ending with the fact that it is very difficult to simply weld at a specific angle required in a particular case.
But first things first.
The farm is the basis of many buildings
For the construction of large and small industrial premises and buildings, as well as bridges, towers and masts, metal (usually steel) welded trusses are widely used. This is not surprising.
After all, the use of high-quality material in combination with the right approach to design allows trusses to be one of the most durable structures, despite the low metal consumption.
The truss is manufactured by welding disparate steel structures (channels, angles, gussets) into a single whole. This connection occurs according to a pre-approved drawing. Prepared elements are collected on racks and stocks. They are then fastened together with welds to form a truss.
To fix individual products on the rack, additional devices are used: magnetic clamps, clamps, clamps, etc.
With their help, the truss structure acquires the required geometric shape. After assembly and fixation, it is removed from the rack along with magnetic latches and clamps.
The final welding of the seams is carried out outside the rack, which is already used to assemble the next truss.
It is necessary to pay close attention to the process technology. Welding of the truss must be carried out in strict accordance with the approved procedure and according to the drawings. This will avoid unwanted warping, and, consequently, damage to the entire structure and a significant reduction in its overall strength.
Any process consists of several main stages. Welding is no exception.
It can be divided into three main parts, which are necessary for execution: preparation of the material and welding machine, welding itself and, finally, quality testing.
Each stage has its own tasks, the high-quality implementation of which guarantees the reliability of the entire final product.
Preparation of material and apparatus
The process of preparing a product for welding includes several separate moments. These include: cleaning the edges that will be welded from dirt and rust; setting the necessary gaps between the edges; mandatory tack welding of parts being welded, taking into account the geometric dimensions of the product.
The first point must be carried out with maximum diligence if you do not want to end up with a lot of defects in the welds. The result may be a significant loss of reliability and strength of the entire structure. You will also provide yourself with additional work in the form of the need to clean the welding seams from carbon deposits and other things.
Cutting metal edges is a process that is absolutely necessary when welding metal of large thicknesses. It is mandatory for several main reasons. But the main thing that cutting gives is complete penetration of the entire edge along the length of the seam.
This allows you to significantly strengthen the entire structure. Cutting is especially important when welding trusses that will form the basis of load-bearing metal structures.
After all, the main property of trusses is their amazing strength, which allows them to be used in almost all construction processes.
Setting gaps between the edges of the parts to be welded is no less important than cutting them. Correctly adjusted distance between parts of the corner will help make the entire structure of the farm stronger and more reliable.
Welding corners requires joining parts whose thickness is over two millimeters, and sometimes thicker. The use of such metals requires the installation of gaps from half to two millimeters.
Naturally, its size depends not only on the thickness, but also on the overall design of the truss, which should be obtained by connecting all the parts, including the corners.
The next process is probably the most important in the preparatory stage of work. The quality of the product after welding directly depends on it.
So, after you have prepared, cleaned, and set everything up, you can start placing the entire product on tacks.
Correctly performed planting will guarantee that the entire truss will withstand all the loads that will be applied to it, as it will be assembled in accordance with all technical requirements and drawings.
Tack assembly allows you to take into account all the nuances that may arise when connecting parts. After all, this process allows you to clearly identify a possible change in the planned geometric structure and correct it in time.
Further, after the tacks have cooled, you get a structure that is resistant to minor physical impacts. This will allow you to calmly move on to the main stage of welding corners for assembling trusses.
Remember that deformations cannot be avoided, but they can be minimized.
The welding machine is prepared according to the instructions that come with it. Before you start reading it, decide on the material you will use.
It is also worth making sure that the required voltage is available in your electrical network.
Otherwise, welding the corners will end in failure, and the farm will end its existence without taking on its final form.
Connecting corners
To ensure the connection of the two parts that will make up the corner, you need to follow a few simple rules. Most often, the corner is made at an angle of ninety degrees. But anyone who has been involved in creating trusses knows very well that making a perfect angle, and then welding it, is truly not an easy art. Let's try to simplify this task for ourselves.
https://www.youtube.com/watch?v=7C1m6ahAMSk
The first step is to fit a tack on each side of the part, which becomes perpendicular to the part that acts as the base. Otherwise, an elementary blockage will occur in one of the directions, and all the work will go down the drain, and your farm will remain just a good idea. To properly place the potholders, you must do the following:
- Place tacks on the side where the main seam will go;
- We measure the angle and, if necessary, correct it;
- We put the potholders on the other side and proceed to the main process.
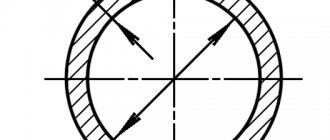
A more complex process is connecting steel pipes at a ninety-degree angle.
After all, they are characterized by increased instability due to their shape, as well as high density due to their composition. In this case, the process logic is completely preserved.
The only difference is in the number and placement of tacks. As a rule, their number is four. They are placed opposite each other.
Their final arrangement should be such that if you draw imaginary straight lines between adjacent tacks around the circumference, you should get a square.
Placement order: put it first, check the corner; put the second one diametrically opposite to the first one, check the angle; We place the third one, moving along the circle in any direction by ninety degrees, and check the angle again; We place the fourth diametrically opposite to the third. That's all.
This is how almost all the corners are assembled, which subsequently become the basis for assembling the trusses. Naturally, if the pipe is pulled to the side, it will not be able to perform the tasks assigned to it. The result will be absolute unreliability of the entire structure of the farm. Therefore, carefully monitor the angle that the structure forms.
Magnetic holders - help in work
The modern building materials market provides a wide selection of different devices that can significantly simplify the welder’s work process. One such device is a magnetic holder.
As discussed above, the process of alignment at a certain angle, as well as fixation to ensure high-quality, and most importantly correct welding, can be very labor-intensive. At the same time, it is not always possible to fit everything at once and you have to start over each time.
A magnetic holder will help avoid these inconveniences. With its help, you can significantly increase your productivity and greatly improve the accuracy of your work.
The average time spent on the production of metal structures is reduced by approximately four times.
Corner clamps help to perform preliminary fastening of elements of various metal structures. They will help you accurately set the required angle for welding trusses or corners. In addition, it does not matter at all what parts you fix: flat or round. In any case, success awaits you.
Magnetic angles occupy a special niche. They help, with the help of a large magnetic force, to securely fix parts, both for assembly and for welding work.
Once welding is complete, they are easily detached and can be used for other purposes.
There is also no need to attract more than one worker per design, which significantly reduces labor costs for production. These magnetic devices can be safely used in the process of cutting, cutting, and stripping parts. Magnetic holders significantly reduce the likelihood of falling parts of the structure, and, consequently, there are much fewer injuries at work.
They are of greatest practical value when it is necessary to accurately fix irregularly shaped parts. The stability of the shape they fix makes it possible to safely perform high-quality welding.
Design verification
After the welding seams have cooled, it is necessary to knock off carbon deposits from them and check for cracks, chips, and air bubbles. After all, any deformation of the seam can ultimately lead to disastrous consequences.
https://www.youtube.com/watch?v=W3NxaiwFnHY
It is worth trying to apply some force to break the structure. It should be stable enough so as not to react in any way to your influence: not to bend, not to crunch, not to crumble.
If nothing like this happened, then you have received a truly reliable design that will perform all the tasks assigned to it.
If you need to weld a corner, then you must be well prepared and learn all the techniques.
It is also worth taking a responsible approach to the choice of equipment for welding, as well as the material from which the structure will be made.
Welding a corner is not an easy task at all. Take this task seriously.
If you follow all the rules and welding techniques, you will end up with an excellent quality structure.
How to bend a metal corner 90 degrees
If you have already started a major renovation with your own hands, regardless of where it is carried out: at home or in an apartment, then you need to be prepared for many tests.
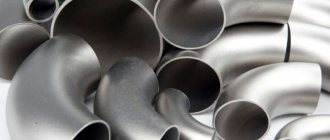
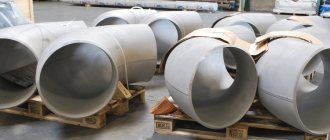
Manufacturing and application of steel bends
Seamless bends are made by pulling cut and heated pipe blanks through a horn core. Seam bends are made in a similar way, but from welded water and gas pipes in accordance with GOST 3262-75 (this standard applies specifically to pipes). The presence of a seam weakens the structure; the service limits of seam bends are lower.
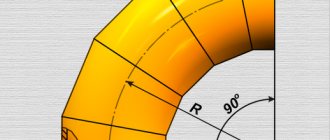
Both types of bends are used to rotate the route at a certain angle. Most often it is 90º (two perpendicular steel pipes).
Technical characteristics and markings
The determining factor for the performance characteristics of bends is the type of pipe from which they are made. Seam fittings are suitable for pipelines with pressures up to 16 bar in a temperature range from -5 to +150º Celsius. More durable seamless bends can be used in the range from -70 to +450º, system pressure up to 40 bar.
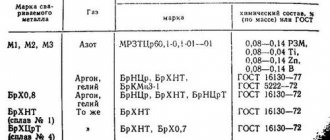
Marking of bends in accordance with GOST 17375-2001 includes the type of fitting, angle of rotation, diameter, wall thickness, steel grade and applied standard.
Advantages of steel bends
- High mechanical strength, can withstand large internal pressures or external loads;
- Suitable for systems with high fluid temperatures;
- Galvanizing can significantly increase corrosion resistance and service life.
Joining metal corners
April 9, 2012
Butt joining of wood parts is a process of firmly fixing elements at right angles, regardless of the longitudinal or transverse fibers of the wood.
Please note that in this case the parts will not be connected as usual, overlapping or using grooves.
The butt joint of boards, which we will consider, is based on the use of nails, screws and other fasteners to securely fix the structural parts.
Making butt joints
To make a butt joint you will have to use the following materials and tools: wood, portable workbench, hammer, nails, hammer, wood putty, screwdriver, screws, pencil, metal angles, wood glue, T-shaped metal plates, triangular metal plates, L-shaped metal plates.
The process of butt joining parts will consist of the following steps: 1.
One of the wooden parts needs to be fixed on the workbench. Place another board on top of it, with the necessary elements end-to-end. 2. Drive in nails.
If the parts are not wide, then you will need only 2 nails, and if they are wide, then it is better to use several nails at once, hammered at a distance of 25 mm from each other.
You need to drive the nails so that the head is barely visible on the surface of the wood. 3. Disguise the nails.
To do this, use the tip of a hammer to drive in the heads of the nails so that they are just below the surface of the wooden parts. If desired, it is better to disguise the nails with a special wood putty. 4. Metal corners.
Their use makes corner joints more durable. Steel corner strips connect the corners of the parts with screws. To do this, you need to connect the parts, install the bracket and drill holes for the screws.
If you neglect to drill holes for the screws, the wood near the screws may splinter. After this, screw in the screws.
Strengthening the butt joint
Strengthening the butt joint of parts can be done in the following three ways: 1. Using T-shaped fasteners. It is used to connect parts in the shape of the letter T and consists of flat fastening plates. They need to be placed in the center of the parts intended to be connected, guide holes drilled and screws screwed in.
The disadvantage of T-bar fasteners is that they are very visible, but they are valued for their ability to securely hold T-pieces together. 2. Application of corners. If your goal is to make fastening parts invisible, then it is better to use metal corners.
To create a rectangular frame, they need to be attached one in each corner and, if we are talking about a T-shaped connection, one fastener on each side. Please note that metal corners must be attached to both sides of the parts being fastened. If you are going to hang the resulting structure on the wall, then you can immediately attach it to the wall through the hole in the corner.
Many experts believe that steel angles provide more reliable connections than plates or staples. 3. Use of metal triangular plates. These plates allow you to achieve truly strong butt joints.
Additional advice from professionals
To ensure the best possible performance of butt joints, you need to take the advice of professionals in this field. When driving nails, to avoid splitting the wood, the nails must be held at an angle and worked very carefully.
When nailing the edge of a part, it is better to use oval nails instead of round ones. This will also prevent the material from splitting. It is also advisable to hit the hammer in the direction opposite to the angle of the nail.
When sawing straight edges, the cut line on the wood should be drawn as follows: check its position with a square, make a mark with a knife and cut slightly above the marked line. To make the butt joint of the parts stronger, apply a special glue, let it soak well into the structure of the material, and then apply one layer of the compound and connect the parts.
https://www..com/watch?v=W3NxaiwFnHY
If you want the connected parts to be invisible, then you need to make a recess with a chisel. Place the selected plate on top of the required joint, outline it with a pencil and use a chisel to make an indentation of approximately 1 mm. Secure the angle or L-shaped plate and cover the piece with wood putty.
We wish you successful work!
Welding corners is the basis for creating trusses
Welding is a process that requires considerable skill and skill. In addition, knowledge of physics and construction is also very important. Truss welding is especially difficult. This is caused by the combined influence of a large number of different factors.
Starting from the fact that for the production of trusses it is most often necessary to use thick metal, which requires significant pre-treatment, and ending with the fact that it is very difficult to simply weld at a specific angle required in a particular case.
But first things first.
How to weld a 90 degree corner - Metalworker's Guide
the diameter is the same (something about 70 mm). That is, the task is to connect the end of one pipe to the surface of another. My meager imagination suggests that it is possible, for example, to give a “concavity” to the end. How? Bulgarian? Or cut the surface of the second pipe so that the end of the second one goes a little deeper into it. Give me some advice, please?
Thank you!
Discussion closed by moderator
if the diameter is the same and the angle is 90, then the end of the pipe is simply cut in the form of /, and the pipe into which you are welding is cut in the form of /. the angle between the lines is 90 degrees. if the angle between the pipes is not 90, then tricky curves begin
in. I'll try that. Thank you!
It depends on what you're cooking. In shipbuilding, when railings are boiled, the horizontal pipes are simply flattened a little at the ends with a sledgehammer.
There is software, you enter your parameters - any connection at any angle, with a shift from the axis, etc., the program prints a template on a 1:1 scale, you cut it with scissors, wrap the pipe and mark the cutting line with chalk. The program is called Plate “n” Sheet Development. There are corrected ones on the internet.
grandiose! Sorry I can’t download from my work. Damn bastard admins!
buy a welded tee. it will be faster and more beautiful. )
in! Or maybe it’s really possible to find out where the mufflers are sculpted and buy a 90 degree “turn” of the required diameter from them and weld it in? culturally it will work out very well.
a little bit different. I would not like the footrest pipe to have thickenings
Well, why - maybe the diameters will match perfectly? Just put something inside for rigidity and file down the seam. eh - as they say, if I had the money, I would run into the “tuning studio” and do it.
if the tee is the same diameter as the pipe, and clean the joints.
such things are done beautifully and correctly at any angle, with a core drill for metal. but they are expensive.
Sincerely.
to catch up - link to the calculator https://snip.awardspace.com/
By the way, what is “it” called? I've never seen it for sale. I guess I really wasn't looking in the right place.
Re: comrades! and how to weld two pipes at 90 degrees > the diameter is the same (something about 70 mm). That is, the task is to connect the end of one pipe to the surface of another. My meager imagination suggests that it is possible, for example, to give a “concavity” to the end. How? Bulgarian? +
++ Depending on what you have - even a file;)
Or cut the surface of the second pipe so that the end of the second one goes a little deeper into it. +
++ This is possible. It depends on the connection requirements.
the running boards on the mega-vnidarozhneg i.e. I’m not going to carry them with a crane from the swamp, but I want to stand on them with all my heart. and you can even jump, or what a rotten basin if you catch it with the barrel, the darning did not reach the threshold and the door with its rot
Well then, just use a grinder to adjust the end of the pipe without much ado, scald it and clean it.
How to weld a gate
Buba wrote. I’m a beginner welder, and soon I’ll have some pretty important work ahead; I’ll need to weld a gate. This is my first big project.
In general, the progress of the work is clear, but I would like to clarify something. The gate consists of a frame made from an angle, the leaf is corrugated sheeting, and the corrugated board is fastened to the frame with rivets. Pillars - pipe 90 -100 mm.
maybe square. The width of the doors is 120-140 cm.
(we'll figure it out on the spot). I plan to weld the frame on a horizontal wooden board, then attach it to the pillars and the pillars are poured in place. Questions have arisen: which corner is better to choose? (planned for 30). What is the best way to join overlapped corners at 90 degrees. or right next to 45 degrees.
Do I need to weld the diagonal or is it enough to reinforce the corners with triangular overlays? How to properly weld a frame so that it doesn’t move?
Greetings! If you haven't cooked it yet, I'll add it. It is best to cook on two sawhorses, such as construction ones.
align them, lay down the two long sides, set the required distance between them, then step aside and check the parallelism.
This is done simply, sitting down at the level of the corner, look over it at the second corner, both should be parallel, in which case you make a “pad” under one of the corners.
Grab the top and bottom jumpers, check the diagonals, they should naturally be equal; if they deviate, lightly hit them with a hammer in the horizontal plane and straighten them out.
Make the fastening tacks a little further than those on which you assembled, check the diagonal again, just in case. You start cooking, I also cook diagonally, i.e.
Having cooked one side, I go to the diagonally opposite corner and cook it. Then.
diagonals from twisting will not help, that’s for sure, but the longitudinal rigidity should be enough, how much is the height? It’s better to take a corner 40, or an edge 35, or a professional pipe 20*40.
The advantage of a professional pipe is its rigidity, but the wall thickness is not great for a beginner. When calculating the sides, you need to take into account the thickness of the material, i.e.
The width is the same size, and the height is -2 times the thickness of the material (well, this is with strict parameters). If you cook from a corner, you can simply cut one shelf to the width of the corner.
And when installing, you can also cheat, grab both halves previously laid out on a horizontal surface with the required gap, it will look like one sash, and after hanging, cut the potholders, but in general you should look here
https://www.mastercity.ru/showthread.php?t=32409
Vladimir_Vas wrote. Cook at 45 degrees.
you'll be exhausted trying to catch the corners, you won't be able to cut everything straight
How to weld pipes at right angles
When installing metal structures, from the frame of a children's swing to a heating system, you almost always have to deal with welding. This process is much more complicated than it seems at first glance, and much more responsible: the reliability and durability of the product literally depends on the quality of the seam.
Welding: varieties and features
In its most general form, it means joining two pieces of the same or different materials by forming a permanent connection. There are quite a few methods for such connection. There are two main groups:
- under pressure - for example, ultrasonic, cold, press;
- fusion welding is a thermal method that involves heating the joined fragments.
Fusion joining is divided into two types:
- electric arc - manual, submerged arc, argon and so on. The edges of pipeline sections are melted under the influence of an arc charge;
- gas - the familiar acetylene one. In this case, the edges of the connected pipes are heated with an oxygen gas flame, joined, and the gap is filled with the material of the molten rod.
The quality of such a seam is lower than that produced by the electric arc method. But the latter is not applicable to pipelines with thin walls - up to 3.5 mm.
The method provides a reliable, strong connection, but one-piece. If we are talking about metal products, then this is an advantage.
Types of connections
Depending on the purpose of the pipeline, thickness and diameter, different joining methods are used. In general, three main groups are distinguished.
- Butt joint is considered the most durable. A transverse joint is used to weld the pipeline around the circumference, and a longitudinal joint is used to connect parts. Butt welding allows you to connect sections along an axis. Different seams are used: single for pipes with a diameter of up to 500 mm, and double for pipelines with a nominal diameter of more than 600 mm. The photo shows a butt joint.
- Angle welding - used to connect pipes at different angles: 90 degrees, 45 degrees, 20 degrees. The reliability of such a seam is somewhat lower.
- Lap joint - joining is used only to combine the pipeline with additional elements.
Right angle welding
Installing pipes at an angle of 90 degrees is not such a rarity, especially for a heating system. To get it when walking around rooms, for example, a special part is used - a 90-degree angle. In this case, the butt method is used for connection.
However, when installing metal frames and small-diameter pipes, other problems may arise.
Preparatory stage
- If installation of two elements is required, which together form a right angle, then preparation will consist of correctly cutting the pipeline at 45 degrees.
This is easy to do: a regular rubber band is put on the pipe, fixed, its second edge is pulled along the pipe by 325 mm, and the resulting contour is outlined with chalk. The cut is obtained at exactly the right angle.
In all other cases, you will need to draw up a drawing and calculate the curve, along which you will then need to make a cut.
- The second common option: the pipe is connected by inserting into the second one at a right angle. In this case, two cuts are made at 90 degrees in the section with a grinder and the resulting wedge is cut out. Then, gradually cutting off, a round hole is formed. At the end of the perpendicular fragment, a section is removed at the same angle. Gaps are inevitable, so further welding will be carried out in several stages.
Welding corner joints: recommendations and features, methods
/ Welding technique
Back
Reading time: 3 min
0
1285
It is difficult today to imagine construction or installation work where it would be possible to do without welding seams at an angle.
High strength of metal products welded in this way is ensured. True, without sufficient experience, it is better for a welder to gain some experience first.
The process takes a lot of time and is quite labor-intensive; you need to know a number of subtleties inherent in fillet welds. In our article we will characterize welding of this type and find out how accessible it is in everyday life.
- Characteristic
- Possible problems
- Process specifics
- How to weld
- Results and conclusions
Introduction
MMA welding, or manual electric arc welding, is widely used in many industries. But today the trends are such that in the modern world preference is given to higher-speed welding methods, such as automatic and MIG/MAG. Their share has only grown over the years.
However, in spite of everything, MMA welding remains indispensable in conditions of limited access zones, when working outdoors and at home, since the cost of welding machines and consumables is more or less affordable.
Most companies that produce expensive welding equipment also do not ignore MMA welding; year after year they improve the devices, adding modes to them that simplify the work of the welder.
To come in
Already registered? Sign in here.
There are currently 0 users on the page
There are no users viewing this page.
Today, welding corner joints is becoming an integral part of the work. This involves the use of a wide variety of equipment and methods.
Quality directly depends on the diameter of the pipe, its position in space, as well as on power. In any case, the work should be done with an electrode with a diameter of 3 mm and a maximum current of 90-110 A.
The methods can be varied, but they must be applied in each specific case in their own form.
When working with a welding machine, wear a protective helmet and gloves.
Closer to specifics...
When talking about welds, beginners need to decide what the criteria are for a good and a bad weld. Therefore, first master a little theory.
When welding household greenhouses from small cross-section corners, installing fence sections, staircase handrails, cornices, awnings and other similar things, the quality of welding does not play any leading role, since the loads on such products are insignificant.
And completely different requirements for weld strength are imposed when welding highly loaded structures: supports, floors, load-bearing units of cars, trailers, main liquid, gas and oil pipelines under pressure, bridges.
The seams of such structures are already checked using non-destructive testing methods (NDM).
However, the very first method by which the quality of a weld is assessed is visual inspection. If the welder himself can evaluate his seams, then his skill will begin to grow quickly, he will see his mistakes and will not allow them to be repeated in the future.
How to learn welding? It would be a good idea to start by studying the paper part...
Go to menu