What is a welding inverter and how does it work
This device was called an inverter because it converts alternating current of a 220 V network with a frequency of 50 Hz into high-frequency oscillations, and then into direct current. At the same time, the device has a high efficiency: about 85-90%, and even under fairly heavy loads the counter “winds” a little. In any case, you won’t have to pay crazy bills. The consumption will be slightly higher than without welding, but not by much.
This small box is an inverter welding machine
Most inverter welding machines operate from a 220 V household network (there are also devices from 380 V). And this is one of their advantages. Moreover, they have practically no effect on it, i.e. do not reduce tension. Rest assured about your neighbors: they won’t even know that you are welding. The second important advantage is that they can work more or less normally at reduced voltage. Of course, you need to look at the specifications, but at 170 V, most of them still allow you to work with a 3 mm electrode. This is very important especially for rural areas, where low voltage is the norm rather than the exception.
What’s also good for beginners is that it’s easier to get and hold an arc when using inverter welding. And in general, according to many, it cooks “softer” and has a “lighter” arc. So if you want to learn how to cook, try inverter welding first.
Resistance spot welding
Resistance welding has been the dominant joining method in automotive manufacturing and repair since the 1930s. Spot welding is carried out by pressing the electrodes of the machine firmly against the metal of the body and a combination of intense heat created by a very high current in a short period of time. The metal of the body panels is melted at one point and welding occurs.
The advantage of spot welding is the speed of action, the accuracy of the resulting weld points and the strength of the connection.
Modern passenger cars have from 3,000 to 4,000 weld points that connect individual body parts into one structure.
There are spot welding machines used in body repair, the electrodes of which do not need to compress the welding area. The force is applied to only one sheet of metal, and the second sheet touches the first sheet and is connected to the ground. Such a device is convenient to use when access to the reverse side of the metal to which another metal panel is welded is impossible.
Resistance welding points are often not protected from corrosion because the areas between the joined panels are susceptible to attracting moisture. This problem is aggravated by the fact that when exposed to spot welding, all metal processing elements, such as galvanized coating, evaporate at the hot spots. This problem is reduced by using a special welding primer between the panels being welded. This soil contains a high percentage of zinc. It is capable of conducting current. After exposure to spot welding, zinc ions protect the weld site.
Inverter Welding Basics
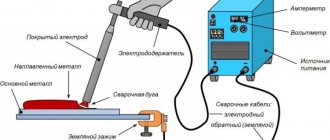
First, let's look at the design of the welding inverter. We won’t look at the “stuffing”; we’ll look at what’s on top and what we’ll have to use.
What does an inverter welding machine consist of? (To enlarge the picture size, right-click on it)
This device is a small metal box, which, depending on the power, weighs from 3 kg to 6-7 kg. The case is usually metal; some manufacturers make ventilation holes in it for better cooling of the “filling” (mostly the transformer). There is a belt for carrying, and sometimes there is also a handle: the belt is put on the shoulder if the work requires movement.
One of the panels has a power button or toggle switch. The front part contains power and overheat indicators. There are also knobs for setting voltage and welding current. Also on the front panel there are two outputs - “+” and “-” to which working cables are connected. One cable ends with a clothespin clip, which is attached to the part, the second - with an electrode holder. The power cable connector is usually located at the back. That's all, actually.
When purchasing an inverter, make sure that the cables are long enough and flexible: this makes it easier to work with. It is the insufficiently long and rigid working cables that have the most complaints from users of the popular brand of inverter welding machines “Resanta”.
The general principles of working with an inverter welding machine are described in this video.
Welding with an inverter for beginners
As with any electric welding, the melting of the metal occurs due to the heat of the electric arc. It occurs between the welding electrode and the metal being welded. To create an arc, they are connected to opposite poles: “+” is applied to one, “-” to the second.
When connecting the electrode to the “minus” and the part to the “plus”, the connection is called “direct”. If “plus” is applied to the electrode, the connection is reversed. Both options are used when welding, but only for metals of different thicknesses: reverse - for welding thin metals; straight - for welding thick metals (more than 3 mm thick). But this is not an immutable rule; sometimes they do the opposite.
Direct and reverse polarity of connection on the welding inverter
What causes this division in practice? Physics of the process. When an arc occurs, the electrodes move from minus to plus. And at the same time they transfer their energy to the positively charged surface, increasing its temperature. Therefore, the element that is connected to the positive output heats up more. When welding metals of sufficient thickness, they need to be heated well so that they melt and the weld is of high quality. That’s why they are given a “+”. Thin metal, on the contrary, can burn out due to overheating and a “minus” is attached to it, warming up the electrode more, from which more molten metal flows into the seam.
You can weld metal correctly with an inverter only if you have good control over the electrode. To do this, you need to take the holder correctly. How to do this, watch the video.
How a seam is formed during welding
To make the basics of welding with an inverter clearer, let’s look at what happens when a seam is formed. To begin with, let us clarify that a welding electrode for welding metals consists of a metal core and a coating - a special coating that protects the welding area from contact with oxygen contained in the air. Read more about electrodes for inverters here.
Now about the welding process itself. An electric arc is formed when the electrode core and metal come into contact (read how to ignite an arc below). At the same time, the coating begins to burn. It partially melts, turning into a liquid state, and partially turns into gases. These gases surround the welding zone - the weld pool. They prevent oxygen from the air from “breaking through” to the molten metal. The part of the coating that has become liquid covers the molten metal, creating a second layer of protection. After cooling, it turns into slag, which crusts over the seam. And at this stage, the slag protects the still hot metal from oxygen.
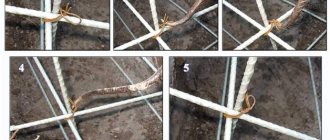
How does inverter welding work?
But slag and protection are far from the only process that occurs and that needs to be controlled. When welding, it is necessary to ensure that the junction of two pieces of metal is heated evenly and sufficiently. Both parts should melt to the same distance from the edge. To ensure uniform heating, you need to maintain the same distance from the tip of the electrode to the part. This is not very easy to do: the electrode melts during welding, and particles of its molten metal are transferred into the seam by the arc. Therefore, you have to gradually move the electrode holder closer to the part. But this is not the end of the electrode welding technique. You also need to “write out” some shapes with its tip - zigzags, circles, Christmas trees, etc. They allow you to make the seam wider and fuse two parts together. The most common electrode movements are shown in the photo below.
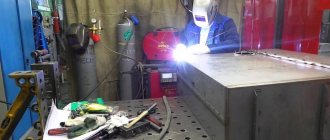
Carbon dioxide semi-automatic
It is considered the most affordable and versatile welding tool. With this equipment you can weld metal with a thickness of 0.8 to 6 mm. The carbon dioxide semi-automatic machine is suitable for performing the following work:
- overcooking sills and side members;
- patching holes;
- straightening dents.
This tool is most often used to weld car bodies with low durability, for example, VAZ models.
The principle of operation of a carbon dioxide semi-automatic machine is to supply carbon dioxide under pressure into the welding zone. In this case, the air mixture is displaced, so the welding process is carried out in a carbon dioxide environment, which protects the metal from oxidation. During the welding process, the metal melts, firmly holding the parts together.
One of the advantages of a carbon dioxide semi-automatic machine is that with this tool you can weld all types of metals, in particular non-ferrous ones, such as stainless steel and aluminum, only for this you will need to replace carbon dioxide with argon.
To ensure the strength of the seams of the body, it is necessary to weld correctly, applying stitches 2 cm long at intervals of 5 cm. The disadvantage of the tool in question is considered stationary, due to its large mass and size, but this is not so important for body repairs, which are usually carried out in a car service center or garage.
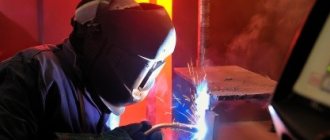
How to learn to weld metal with an inverter
Begin training by igniting the arc. To do this, in addition to the apparatus, metal (5-6 mm thick) and an electrode, you will also need a welder’s mask and leggings (thick leather gloves), as well as thick clothing and boots made of thick leather to protect against sparks and scale.
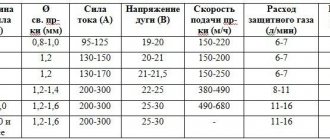
Start work by connecting the welding cables. Then the selected electrode is inserted into the holder (to start, take MP 3 with a diameter of 3 mm - they light easily and cook well). After turning on the power, set the welding current (see table). For an electrode with a diameter of 3 mm, the current is set to 90-120 A. The current can be adjusted during the welding process. If you see that the result is not a roller, but just some disjointed stripes, increase it. If, on the contrary, the metal is very liquid and it is difficult to move the weld pool, reduce it. The settings greatly depend on the device and the selected electrode. So try it, change it. Having set the current, put on a welder’s mask (it will be easier for beginners to work in a chameleon mask), and you can work.
General recommendations for choosing the diameter of the electrode depending on the thickness of the metal
Welding with an inverter for beginners begins with learning how to ignite an arc. There are two methods: tap the tip of the electrode on the part several times or strike it like a match. Both methods work. Whichever is more convenient for you, use it. But for the future, keep in mind that you need to scratch along the seam line so that there are no marks left on the product. To consistently strike an arc, you will have to practice for a while and burn several electrodes.
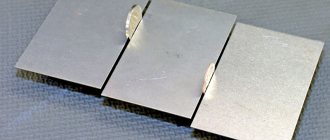
When the arc lights up without any problems, you can move on and master the movements. This is done by laying rollers on thick metal. On a metal plate, draw a line with chalk that will replace your seam. Then you strike the arc. In the place where it rests, the metal melts and becomes covered with a film of liquid slag. This place is called the weld pool. So you will have to move it along the drawn line. Do this with one of the movements shown in the figure above.
In order for the bath to move, the electrode must be tilted slightly, approximately at an angle of 50-45°. Some have a larger angle, some have less. In general, by tilting the electrode, you change the size (width) of the weld pool. You can experiment: there are a lot of different techniques in welding and the only important thing is that the seam is of high quality, and how you achieve this is your business, especially since you will be working for yourself and for yourself.
There are two main working positions of the electrode: forward and backward. When welding at an angle forward, we get less heat and the seam will be wider. This technique is used when welding thin metals . Thick ones are usually welded at an angle backwards.
Electrode positions for welding and their use
But the angle of inclination is not all the parameters that will have to be maintained. There is also the length of the arc. This is the distance from the tip of the electrode to the surface of the part. The average arc is 2-3 mm, the short one is 1 mm or even right next to each other, the long one is 5 mm or more until it comes off. Practice begins with working on the average length of the arc. Maintain 2-3 mm to metal. Then the seam will be smoother and of better quality: if the gap is too large, the arc begins to jump, the heating of the metal is insufficient, the seam turns out to be smeared, and the connection is unreliable. With a short arc, another problem arises - the seam is too convex due to the fact that the heating zone is too small. This is also not good, since undercuts remain - grooves along the seam on the part - reducing the strength of the connection.
The length of the welding arc and its effect on the quality of the seam
After practicing for some time laying beads using different movements, and when the beads are the same width and the surfacing flakes are approximately the same size, you can try welding the seams. You can read about the types of seams and joints, as well as their preparation, here, or you can watch another lesson, “Welding for Dummies.”
All the basics of welding with an inverter for beginners. All you have left is practice: you need to use more than one electrode for training. Even, maybe, more than one kilogram. When your hand makes all the movements itself, everything will seem completely uncomplicated to you.
To consolidate the acquired knowledge, first try to train your hand a little without an electrode, practicing movements while holding a pencil in your hand. This is also a good option, maybe it will seem more acceptable to you. This video tutorial on welding with an inverter for beginners explains everything very clearly, simply and easily. If there are any uncertainties, please review. You will understand how to cook using inverter welding. Lots of useful information for beginner welders.
And finally, about some features of the operation of welding inverters. They are very afraid of dust, especially metal dust. Therefore, it is advisable not to use an angle grinder near them and carry out regular cleaning with a vacuum cleaner inside (after the warranty period has expired). It is not recommended to use them in the rain or in damp areas. This is especially true for inexpensive household models. Although they have protection against electric shock, it is still better to be safe.
When choosing electrodes, pay attention to the area of their use: they must be suitable for direct current operation. When welding at the highest current or voltage, the operating mode is intermittent. It is indicated for each device in the passport.
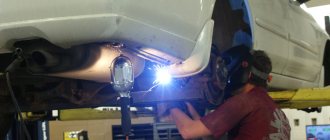
How to treat the outside of the bottom after welding
If the bottom is not covered with a protective layer, it will rot over the next couple of years. Confirmation is the service life of the muffler can - it is not treated and lasts for a maximum of 3 years. And we also have an intermittent seam, where moisture will get in. I suggest this procedure and how to treat the bottom of the car after welding from the outside:
- Cover the metal with body primer.
- Let it dry.
- Treat with bituminous compounds “Bitumen Anticorrosive”, “Epoxy Autoanticorrosive”, “Bitumen Mastic”.
These are elastic products that adhere well to a vibrating surface. Pay special attention to the joints to fill the gaps. Inside the cabin, I recommend, if you have access to the joint, to apply sealant or blow it with wax.
Welding a car body with an inverter
Both the owner of a new car and the owner of a vintage car may need body repairs. With the help of welding work, a body damaged during an accident, corrosion, rotting or under the influence of time is restored. Doing the repairs yourself will save you money on auto mechanics. Timely elimination of corrosion damage and replacement of rotten parts will extend the life of the car.
An inverter is a modern welding device, characterized by its small size and compactness. The current supplied from the network enters the rectifier and is converted by the device into high-frequency alternating current. Afterwards, the voltage decreases and the current increases to 200 A, necessary for welding work.
How to choose an installation
When choosing a welding machine, it is important to pay attention to several factors.
- Surge protection, this function protects the device from voltage surges. Choose a model with a protection factor of 20-30%.
- Operating temperature range. The optimal range for Russian latitudes is from -40°C to +40°C. This parameter will allow you to carry out welding work both in winter and summer. But using the device at the extreme points of the range is undesirable.
- Power. The device must be suitable for working with electrode No. 2, No. 4, then it will be possible to weld both thin body steel and metals with greater thickness.
- Device safety class.
- Protection against short circuits, overheating. The device should automatically turn off when an emergency or overheating occurs.
- Protection from moisture and dust. For use in a garage, it is better to choose an installation with automatic dust removal.
Tips for repairing a car body using DIY welding
It is quite difficult to connect parts made of very thin metal. To do this, it is better to use the services of a professional, since you will most likely simply deteriorate the quality of the metal yourself.
First, you need to conduct a detailed inspection of the car body to understand which areas need repair. Also, with the help of a careful inspection, you will be able to understand whether you need a major overhaul or can get by with a small local one.
A major overhaul involves performing full-scale repair work, which most often involves replacing a body part completely. If you have all the necessary equipment and experience behind you, you can easily carry out both local and major repairs to the body of your car
Advantages of inverter welding machines
To connect metal structures, you need experience and the welding machine itself. The best option is to use inverter equipment, which is great for working at home. This device is inexpensive and small in size and weight. Small sizes do not affect the quality of welding work. All connections are neat and reliable. craftsman can handle this type of welding .
The design of the inverter welding machine consists of the following elements:
- Power supply with filter and special rectifier unit.
- The inverter unit is responsible for converting DC voltage into alternating high-frequency current.
- A transformer is used to reduce the high-frequency current. It is he who is responsible for safety and prevents equipment overheating.
- The power rectifier serves as a means of supplying direct current to the output of the device.
- The device is controlled by an electronic unit.
Inverter welding uses various innovative technologies that have helped to significantly reduce the size and weight of the installation. Due to its small size, it is easy to store at home or install in any convenient place while working. The weight of such equipment ranges from 5-15 kg. That is, moving the welding machine will not be difficult.
This device helps to weld any metal structures if you work correctly on an inverter welding machine. Included with the equipment is an instruction manual, which contains a lot of different useful information indicating how to properly weld using inverter welding, choose electrodes depending on the type of metal , etc. Such a brochure will be useful even for experienced specialists.
When purchasing, it is important to pay attention to the presence of instructions in Russian, because using blind welding is difficult, not to mention dangerous. There are cases when equipment is bought second-hand, but the old owners have lost the instructions. Then it is best to find a specialist who will clearly show the main points of welding control. You can’t start testing it on your own without even banal instructions.
DIY welding
It is possible to weld the body yourself if you have basic skills, especially using an inverter, which will reduce the cost of paying for skilled labor. However, you will have to get the appropriate equipment somewhere.
The best repair option for body damage is to replace it. But this is expensive, so welding is used to restore inexpensive cars that have low corrosion resistance, therefore, the prevalence of the repair method in question is high. Next, we consider semi-automatic carbon dioxide welding.
Preliminary actions
Before starting work, it is necessary to prepare the areas of the car body to be welded. Preparation consists of completely cleaning the metal from paint, rust and dirt.
Then they move on to preparing the welding equipment for work.
- First of all, they check the network for load capacity.
- Next, the welding machine is charged with wire. To do this, you need to remove the gas nozzle of the welding torch, unscrew its copper tip with a wrench, remove the pressure roller with the wire and set the polarity. This parameter is determined by the type of wire used. When using flux-cored wire, set a plus on the clamp, a minus on the torch, and vice versa for regular wire.
- After this, the end of the wire is inserted 10 - 20 cm into the feed channel and a pressure roller is inserted to keep it from falling off. In this case, the wire should fall into the groove of the drive roller.
Upon completion of the described operations, the device is connected to the network and the key on its handle is pressed, after which gas is supplied, then welding wire and current. In this case, you need to put on the wire and tighten the required copper tip and install the gas nozzle.
Welding Recommendations
During body work, all parts are usually welded except the front part, since during operation it bears minimal loads. For cars that do not comply with this rule, it is necessary to over-weld, first of all, the places where the front “legs” are attached to the cross beam. In any case, it is necessary to weld the seams of the pallet, pillars and rear part of the car body. The fenders and hood are usually not treated. It should be noted that the body has some weak points that are especially susceptible to destruction by corrosion, so these areas are most often welded.
The bottom can be boiled on both sides, but during work it is necessary to observe the temperature regime. This will preserve the structure of the seams and neutralize the harmful effects of the welding machine on the material.
It is necessary to cut the material in compliance with optimal conditions in order to avoid deterioration of its properties. It is better not to cook the bottom alone, since the sheet of metal needs to be positioned evenly, which is difficult to do alone. Upon completion of the work, the edges of the welded sheet of metal are ground and treated with primer or epoxy resin to ensure tightness. After overwelding is completed, it is necessary to treat the seams with a primer
In this case, special attention is paid to the seams of the pillars, pallet and rear part of the body.
A carbon dioxide semi-automatic machine can weld not only the body, but also the engine and muffler of the car. When working with the engine, it is necessary to use argon. This allows you to weld metals such as cast iron, stainless steel, ordinary steel, and aluminum, which make up most engine parts. Over-welding the muffler is carried out similarly to welding the bottom, that is, by applying a metal patch.
Very often, when purchasing a used car, buyers are faced with various problems with the condition of the body.
Before a transaction, it is necessary to pay great attention to even the most insignificant nuances, because they almost always have a strong impact in the future
When buying a used car, most people only pay due attention to the technical specifications, appearance, horsepower, etc. But strangely enough, the car body is practically not checked, but only briefly examined from the outside
It is worth saying that the inside of the body is not always in the same condition as the outside.
Most experts tell us that almost all models of domestic automobile production regularly maintain the original condition of the body during ten years of operation. Foreign cars outperform our cars in this regard; their bodywork can “maintain” its factory condition for fifteen years.
Stages of preparation for welding
Finding out how to learn to cook with electric welding is not difficult, but using the acquired skills in practice is more difficult. First of all, it is important to understand that all work is divided into several stages, which include:
- selection of inverter and electrodes;
- preparation of equipment;
- welding work.
Selection of inverter and electrodes
The choice of electrodes has a direct impact on the quality of the result in the welding process. They differ in steel grade, coating, thickness, purpose and mechanical properties. Most often, the instructions describe which electrodes are recommended to be used during the work process, but there may not be such a clause. In this case, it is important to know the basics of their choice.
Features of welding work
The first thing a novice welder needs to do is to understand the very principle of connecting a structure, and then it’s just a matter of accurately following all the instructions.
First, you need to light an electric arc between the tip of the electrode and the surface of the part. To do this, the welder applies dotted or scratching movements with the electrode on the part. After several touches, a flash occurs, which indicates that the arc has ignited. In the zone of such action, the metal instantly begins to melt, so it is important to practice the movement and do everything as quickly as possible.
When performing electric arc welding, many specialists are faced with the fact that the electrode simply begins to stick to the surface of the metal. This problem occurs if the technician uses excessive force to press the electrode. All work should proceed easily and smoothly. To weld parts together, minimal contact of the electrode with their surface is required.
During the process, it is important to ensure that the length of the arc matches the diameter of the electrode. That is, hold and melt metal products as smoothly as possible, forming a high-quality weld, but this is not the only requirement. The quality of the seam is also influenced by the correct choice of polarity when connecting the ground cable and inverter. It is possible to choose the correct polarity only if you accurately determine the steel grade of the workpieces being joined. If there is no such data, then it is better to use straight polarity, which is suitable for most grades of steel. Reverse polarity connects only rare alloys, thick-plate structures and low-carbon products.
The design of welding equipment includes a wide range of innovative technologies that smoothly and efficiently regulate the current during operation. This greatly simplifies the work and makes it comfortable for novice welders, but why is it sometimes still not possible to achieve an even and high-quality seam? This is due to the movement of the electrodes or incorrect manual adjustment of the current.
When using low current, the seams are narrow and convex, which prevents good joining of parts. Setting a high current splashes the metal on the surface and thereby creates burns that spoil the appearance of the product. A thin and slightly flattened seam is an indicator of rapid advance of the electrode. A thick and blurry seam is evidence of a long advance of the electrode. The correct seam is obtained with the correct choice of current, normal and stable operating speed.
Any person, using general tips and rules, can understand how to weld correctly. There is nothing complicated about this if you follow the technology and properly prepare the equipment, site and special clothing before starting to join metal products. The main thing is to constantly observe safety precautions, and experience will come with practice.
Equipment selection
Professionals believe that a carbon dioxide semiautomatic machine that performs wire welding is best suited for welding a car body. An inverter can also be used for the work under consideration.
It is not recommended to use a welding machine on an electrode. It is explainable:
- this tool is not capable of creating a high-quality seam when working with automotive metal;
- due to the large size of the equipment, it will be difficult to reach some hard-to-reach places during work;
- there is a high probability of burning through the body metal when using an AC welding machine.
Therefore, electrode welding tools are not suitable for body repairs. You can use them only for simple work, for example, it is possible to weld a broken frame with such a tool.
As for the inverter and carbon dioxide semi-automatic machine, each of these options is characterized by specific features when used for welding a car body. However, in any case, in order to properly weld a body, you must have the appropriate skills and follow safety precautions. In addition, it is important to properly organize the workplace, purchasing and arranging in advance all the equipment necessary for work and organizing sufficient lighting. It should be borne in mind that it is difficult to weld a car body alone, so it is better to find an assistant.